When you click on links to various merchants on this site and make a purchase, this can result in this site earning a commission. Affiliate programs and affiliations include, but are not limited to, the eBay Partner Network.
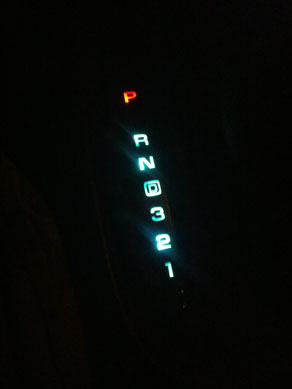
As many have reported on the OEM A4 shift indicator bulb creates a LOT of heat in an area that is already HOT. This contributes to failures in the bulb as well as the plastic bulb socket and surrounding plastics. Several members have reported having the red shift indicator break due to the heat and these parts are not available individually.
So since I had my console out in an ongoing SNAFU trying to get my HVAC module repaired I decided to convert my OEM A4 shift indicator bulb to an LED.
Sorry, no pics on this one
Again, based on several previous member posts below I ordered an LED from Autoillumination.com. What I selected was a
T10 Wedge (type 194)
Item# Super Wide , Color: Super White , Lens: 194 $5.99 USD (plus shipping)
The install took all of 10 minutes and I did not need to have the console parts removed at all to do this.
1. I used a small flat tip screwdriver and pried lightly at the 6 o'clock position and the black cover popped right off.
2. Next I carefully removed the white/clear "waveguide" by again lifting from the 6 o'clock position just enough to pull it directly back to clear the red plastic shift indicator. Be VERY CAREFUL here to not lift the white/clear "waveguide" straight us as the 12 o"clock portion is under the red shift indicator and you could easily break the red plastic piece.
3. Now I could easily see my OEM bulb and socket as well as several burned pieces of plastic that had chipped off the socket over time. I first tried to pull the OEM 194 bulb out with needle nose pliers, no such luck. So I used the same small flat tip screwdriver and pried lightly at the base of the bulb until it popped loose. As expected so did some more of the socket plastics
4. After cleaning up the breakage and dust I used my needle nosed pliers to seat the new LED in place and test it's operation. It was a success but my original bulb socket was now loose in the bottom of the shift assembly but thankfully it remained in the same location after the bulb swap. (if I was doing this over I would squeeze some silicone seal in around the bulb base socket to help hold the base in place now that most of the bulb base plastics that held it have overheated and broken off)
5. I tried to carefully reinstall the white/clear "waveguide" above the bulb by CAREFULLY slipping the top tip under the red plastic shift indicator but it didn't seem to want to seat correctly. So I removed it and used my dremel with a sanding drum to widen the bulb space in the white/clear "waveguide" a bit. On the next try it slipped into place.
6. I then replaced the black PRND21 cover and snapped it into place and all was done.
Works great so far ! The color is a bit bluish like most LEDs but the level seems fine and it won't get HOT.
Thanks to all members that helped with advice, especially tstar, $$$frumnuttin', egrand333, and tbrowne.
I have done this to 3 C5's so far and it looks great. Nice even lighting. I did try the 194 type LED's. These just burned out quickly.
Also the original 194 socket on most of these cars is probably shot from heat. The socket has to deal with the lamp being on all the time and the tunnel heat, hence it can get brittle. Mine was shot when I changed it to the LED strip. The other 2 that I did were in the same bad shape.
My bulb housing had desintegrated from the heat of the bulb, so I carefully snipped and stripped the wires and went to town. I carefully removed the plastic wedge the light goes against, sanded up to almost flush with the top arch, and epoxied a LED strip to that. Each light is behind each of the gears. Unfortunately I don't have photos of the in-progress project as it was very hands-on, and I can tell you that with how fragile the little red indicator bar is the project is not for the faint of heart, but I can definitely say the results were worth the effort.
As many have reported on the OEM A4 shift indicator bulb creates a LOT of heat in an area that is already HOT. This contributes to failures in the bulb as well as the plastic bulb socket and surrounding plastics. Several members have reported having the red shift indicator break due to the heat and these parts are not available individually.
So since I had my console out in an ongoing SNAFU trying to get my HVAC module repaired I decided to convert my OEM A4 shift indicator bulb to an LED.
Sorry, no pics on this one
Again, based on several previous member posts below I ordered an LED from Autoillumination.com. What I selected was a
T10 Wedge (type 194)
Item# Super Wide , Color: Super White , Lens: 194 $5.99 USD (plus shipping)
The install took all of 10 minutes and I did not need to have the console parts removed at all to do this.
1. I used a small flat tip screwdriver and pried lightly at the 6 o'clock position and the black cover popped right off.
2. Next I carefully removed the white/clear "waveguide" by again lifting from the 6 o'clock position just enough to pull it directly back to clear the red plastic shift indicator. Be VERY CAREFUL here to not lift the white/clear "waveguide" straight us as the 12 o"clock portion is under the red shift indicator and you could easily break the red plastic piece.
3. Now I could easily see my OEM bulb and socket as well as several burned pieces of plastic that had chipped off the socket over time. I first tried to pull the OEM 194 bulb out with needle nose pliers, no such luck. So I used the same small flat tip screwdriver and pried lightly at the base of the bulb until it popped loose. As expected so did some more of the socket plastics
4. After cleaning up the breakage and dust I used my needle nosed pliers to seat the new LED in place and test it's operation. It was a success but my original bulb socket was now loose in the bottom of the shift assembly but thankfully it remained in the same location after the bulb swap. (if I was doing this over I would squeeze some silicone seal in around the bulb base socket to help hold the base in place now that most of the bulb base plastics that held it have overheated and broken off)
5. I tried to carefully reinstall the white/clear "waveguide" above the bulb by CAREFULLY slipping the top tip under the red plastic shift indicator but it didn't seem to want to seat correctly. So I removed it and used my dremel with a sanding drum to widen the bulb space in the white/clear "waveguide" a bit. On the next try it slipped into place.
6. I then replaced the black PRND21 cover and snapped it into place and all was done.
Works great so far ! The color is a bit bluish like most LEDs but the level seems fine and it won't get HOT.
Thanks to all members that helped with advice, especially tstar, $$$frumnuttin', egrand333, and tbrowne.
Thought I'd thank the folks on here that posted this for the help.
Also, to remove the bulb, just wrap a piece of duct tape on it and pull. No prying, no broken plastic, no difficulties.
THANKS! Worked Like a Charm and Didn't Break the Little Red Thingie
Thanks to all. This site is the best! I had a tough time getting the bulb out. Duct tape didn't work. Neither did that 3M trim strip tape. I ended up breaking it, but then grabbed one of the wires with a pair of needle nosed pliers, pulled out the base, and vacuumed out the debris.
The big point was the caveat about avoiding breaking the red thingie. It was really no big thing-with a little care and knowledge, for which this site is known, it was an easy job.
Thanks again to all!
Frank
Originally Posted by jrprich
As many have reported on the OEM A4 shift indicator bulb creates a LOT of heat in an area that is already HOT. This contributes to failures in the bulb as well as the plastic bulb socket and surrounding plastics. Several members have reported having the red shift indicator break due to the heat and these parts are not available individually.
So since I had my console out in an ongoing SNAFU trying to get my HVAC module repaired I decided to convert my OEM A4 shift indicator bulb to an LED.
Sorry, no pics on this one
Again, based on several previous member posts below I ordered an LED from Autoillumination.com. What I selected was a
T10 Wedge (type 194)
Item# Super Wide , Color: Super White , Lens: 194 $5.99 USD (plus shipping)
The install took all of 10 minutes and I did not need to have the console parts removed at all to do this.
1. I used a small flat tip screwdriver and pried lightly at the 6 o'clock position and the black cover popped right off.
2. Next I carefully removed the white/clear "waveguide" by again lifting from the 6 o'clock position just enough to pull it directly back to clear the red plastic shift indicator. Be VERY CAREFUL here to not lift the white/clear "waveguide" straight us as the 12 o"clock portion is under the red shift indicator and you could easily break the red plastic piece.
3. Now I could easily see my OEM bulb and socket as well as several burned pieces of plastic that had chipped off the socket over time. I first tried to pull the OEM 194 bulb out with needle nose pliers, no such luck. So I used the same small flat tip screwdriver and pried lightly at the base of the bulb until it popped loose. As expected so did some more of the socket plastics
4. After cleaning up the breakage and dust I used my needle nosed pliers to seat the new LED in place and test it's operation. It was a success but my original bulb socket was now loose in the bottom of the shift assembly but thankfully it remained in the same location after the bulb swap. (if I was doing this over I would squeeze some silicone seal in around the bulb base socket to help hold the base in place now that most of the bulb base plastics that held it have overheated and broken off)
5. I tried to carefully reinstall the white/clear "waveguide" above the bulb by CAREFULLY slipping the top tip under the red plastic shift indicator but it didn't seem to want to seat correctly. So I removed it and used my dremel with a sanding drum to widen the bulb space in the white/clear "waveguide" a bit. On the next try it slipped into place.
6. I then replaced the black PRND21 cover and snapped it into place and all was done.
Works great so far ! The color is a bit bluish like most LEDs but the level seems fine and it won't get HOT.
Thanks to all members that helped with advice, especially tstar, $$$frumnuttin', egrand333, and tbrowne.
Everything was good with mine except the socket. It disintegrated when I touched it. So I bought the wire harness and socket and just replaced the whole thing along with the LED bulb so it won't happen again. I don't remember off hand where I bought it though.
My indicator 2002 is visible but it doesn't move. Piece broken? Slipped? Easy repair? PITA for its value? To me its a esthetic thing, not needed.
thank you. (Yes i see its an old post but ive had great results from old post. Seasoned i guess lol)
My indicator 2002 is visible but it doesn't move. Piece broken? Slipped? Easy repair? PITA for its value? To me its a esthetic thing, not needed.
thank you. (Yes i see its an old post but ive had great results from old post. Seasoned i guess lol)
This can happen if the housing is put together improperly. It isn't necessarily damaged. I had this issue when I replaced my bulb, and had to get back in there. Sorry, no pics. It isn't difficult to figure out once you get in there, but the console and shifter housing have to be removed. Then just make sure "tab A goes into slot B" as you put it back together.
This can happen if the housing is put together improperly. It isn't necessarily damaged. I had this issue when I replaced my bulb, and had to get back in there. Sorry, no pics. It isn't difficult to figure out once you get in there, but the console and shifter housing have to be removed. Then just make sure "tab A goes into slot B" as you put it back together.
Ty. I found a complete video. Way too much for a little orange plactic piece thst either broke or got stuck, lol. I never even look at if. Maybe a project for a boring but motivated day after holidays.


 but my original bulb socket was now loose in the bottom of the shift assembly but thankfully it remained in the same location after the bulb swap. (if I was doing this over I would squeeze some silicone seal in around the bulb base socket to help hold the base in place now that most of the bulb base plastics that held it have overheated and broken off)
 The color is a bit bluish like most LEDs but the level seems fine and it won't get HOT.