
Added Stripes To Vette - PlastiDip Process

Thread Starter
Safety Car


Joined: Nov 2000
Posts: 4,549
Likes: 30
From: Shenandoah Valley Virginia
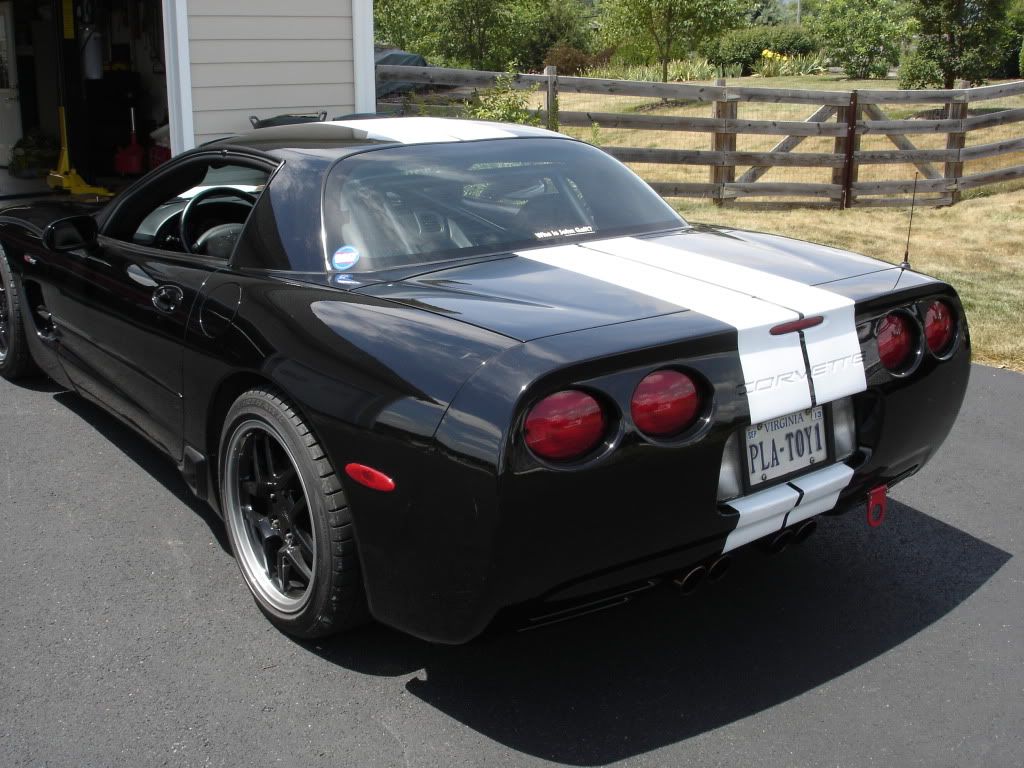
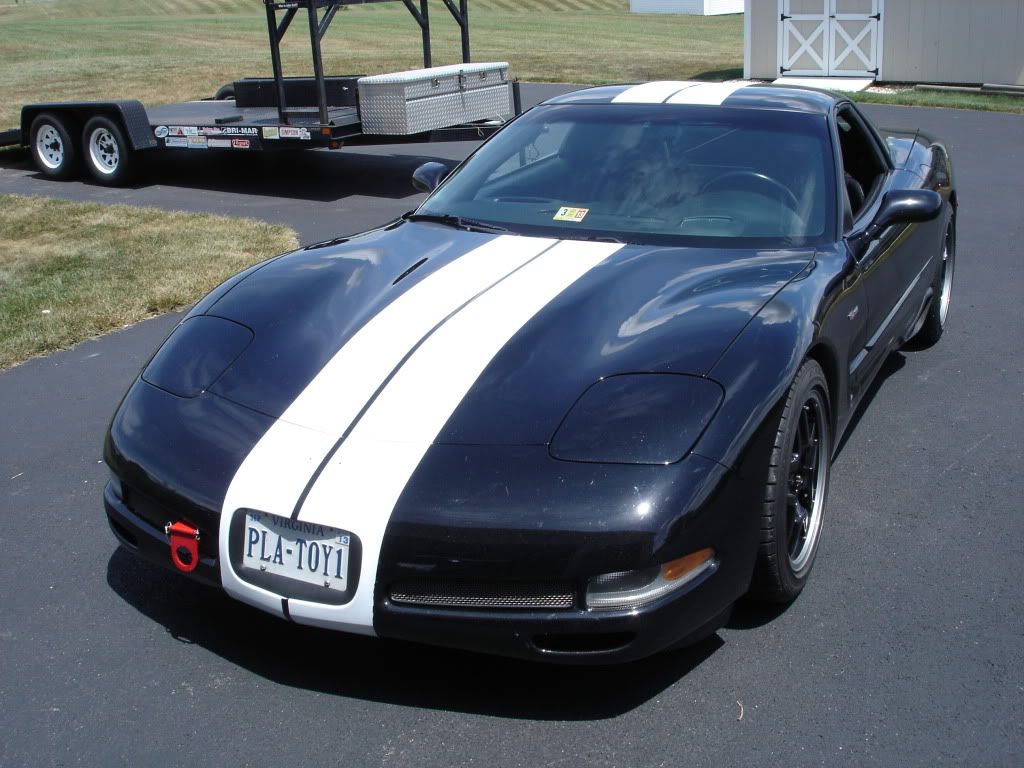
I decided to change the look of the Vette by adding a set of racing stripes. Investigated paint - too expensive. The commercially available vinyl applique stripes didn't cover the roof or complete fascias so they were out. After reading several threads about PlastiDip, I decided to give it a try. If it didn't work, I could always peel it off.
First step was to wash the car and then clean areas to be sprayed with denatured alcohol. The DA removed all the wax, track turds, and residual junk on the paint.
Next step was to mask the areas outlining the desired design. Used 3/4" tape for the reveal between stripes and 2" on the outsides. 3M blue painters tape works great, is sticky and peals off easily.
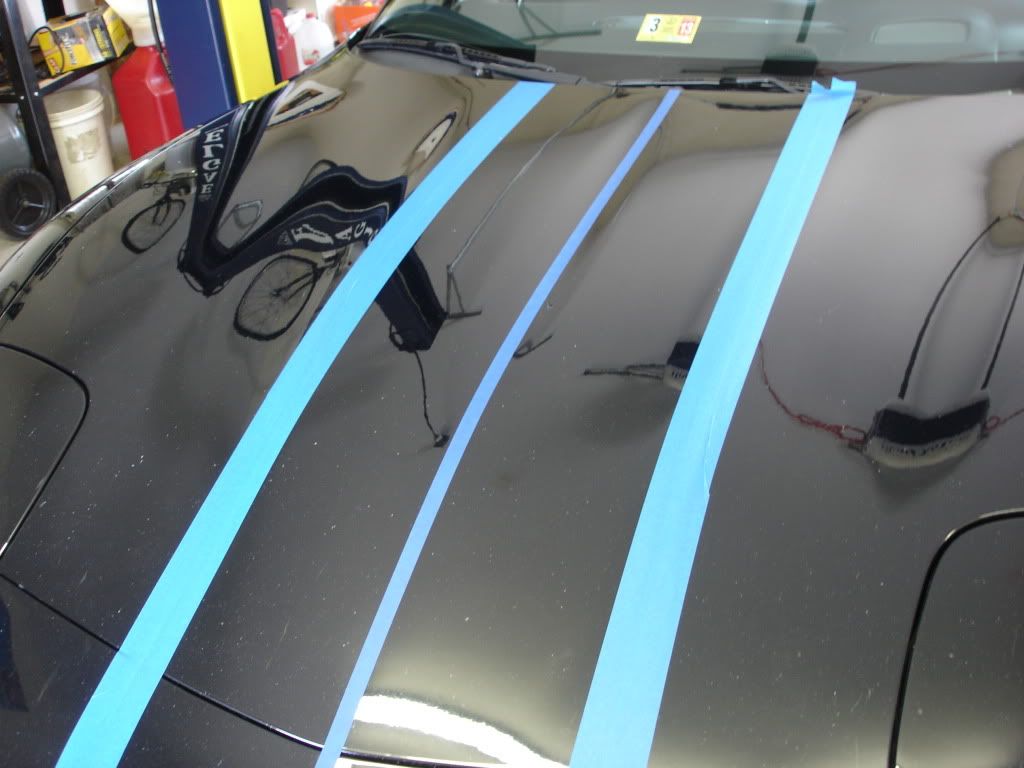
Next came the paper masking. Like any paint type application, there is a lot of overspray. White PlastiDip overspray on a black car = big mess so cover a lot of area with your newspaper.

Next came the spraying. I used 3 1/2 cans to get coverage for the entire set of stripes. Probably took more because of the black car. Even application in several directions with 4-5 coats is necessary. Do the bulk body the stripe but keep the edges next to the tape till last. The PlastiDip needs to be still wet when peeling the tape masking. If you let it dry, you will have rips and tears and it will look like s--t. Peel tape at a sharp angle to get the best separation and a clean edge. dipyourcar.com has excellent video tutorials on the process and I recommend that you watch before attempting your own spray. Be careful that you do not rub against a freshly sprayed surface PlastiDip takes about 10 minutes to dry and is easy to smear when wet.
Finished product looks great and cost less than $50 and 4 hours of my time start to finish. We will see how well it holds up over the long term.
First step was to wash the car and then clean areas to be sprayed with denatured alcohol. The DA removed all the wax, track turds, and residual junk on the paint.
Next step was to mask the areas outlining the desired design. Used 3/4" tape for the reveal between stripes and 2" on the outsides. 3M blue painters tape works great, is sticky and peals off easily.
Next came the paper masking. Like any paint type application, there is a lot of overspray. White PlastiDip overspray on a black car = big mess so cover a lot of area with your newspaper.
Next came the spraying. I used 3 1/2 cans to get coverage for the entire set of stripes. Probably took more because of the black car. Even application in several directions with 4-5 coats is necessary. Do the bulk body the stripe but keep the edges next to the tape till last. The PlastiDip needs to be still wet when peeling the tape masking. If you let it dry, you will have rips and tears and it will look like s--t. Peel tape at a sharp angle to get the best separation and a clean edge. dipyourcar.com has excellent video tutorials on the process and I recommend that you watch before attempting your own spray. Be careful that you do not rub against a freshly sprayed surface PlastiDip takes about 10 minutes to dry and is easy to smear when wet.
Finished product looks great and cost less than $50 and 4 hours of my time start to finish. We will see how well it holds up over the long term.
Drifting

Joined: Mar 2011
Posts: 1,412
Likes: 15
From: Richardson TX
Nice!
I did something very similar recently.
How well are your lines? Would you mind taking a close-up shot?
I used vinyl pin-striping from autozone to hide imperfections and make the edges more smooth. Maybe some red pinstriping on yours would add some cool colors?
All in all great job!
I did something very similar recently.
How well are your lines? Would you mind taking a close-up shot?
I used vinyl pin-striping from autozone to hide imperfections and make the edges more smooth. Maybe some red pinstriping on yours would add some cool colors?
All in all great job!
Thread Starter
Safety Car
Joined: Nov 2000
Posts: 4,549
Likes: 30
From: Shenandoah Valley Virginia
The key to getting a crisp edge is pulling the tape when the PlastiDip is still wet. Concentrate coating on the bulk areas of the stripe and do the final 2-3 coats on the edges last. You have about 7-10 minutes to pull the tape after last application. Divide the car up into several sections - hood, roof and rear deck and work on one at a time. Pull tape at sharp angle for best separation. Here is as good a pic as I can get this evening of the edges. 98% of my edges are acceptably crisp. The other I messed up by rubbing before fully dry. The car is mostly a track car so ultimate quality was not the primary concern. PlastiDip is available in several colors so accented stripes can be done. They also have a gloss over coat so you can make the PlastiDip look like it is clearcoated.

Last edited by CHJ In Virginia; Jul 14, 2012 at 09:50 PM.


Administrator


Joined: Mar 2001
Posts: 368,522
Likes: 24,823
From: In a parallel universe. Currently own 2014 Stingray Coupe.
C7 of the Year - Modified Finalist 2021
MO Events Coordinator
St. Jude Co-Organizer
St. Jude Donor '03 thru '26
NCM Sinkhole Donor
CI 5, 8 & 11 Veteran
Nice job with the PD. Will be interesting to see just how long it lasts.
Will be interesting to see just how long it lasts.


