






Brake duct screen install

Thread Starter
Drifting

Joined: Nov 2011
Posts: 1,401
Likes: 141
From: Summerville South Carolina
 Brake duct screen install
went a bit wrong. Anyone had experience with them? One went in just fine and looks great. The other was so tight that an end wire in the weave came out while I was attempting to pull it into position. I have since determined that one was cut larger than the other.
I taped off the ducts to prevent any paint damage and proceded carefully, as they have no edging, but still encountered the fit issue. Anyone have any hints on this? I am thinking of making a cardboard template before I try the new one they are sending.
I want to add that Corvette Mods was outstanding in their response and service, and notified me the same day I called them that a replacement screen was on the way. I have always had great experiences with them and with their products.
The front fog light Z06 screens and the rear ones fit perfectly.
I taped off the ducts to prevent any paint damage and proceded carefully, as they have no edging, but still encountered the fit issue. Anyone have any hints on this? I am thinking of making a cardboard template before I try the new one they are sending.
I want to add that Corvette Mods was outstanding in their response and service, and notified me the same day I called them that a replacement screen was on the way. I have always had great experiences with them and with their products.
The front fog light Z06 screens and the rear ones fit perfectly.

Race Director


Joined: Jul 2008
Posts: 17,755
Likes: 3,688
From: The Sunshine State
2022 C5 of the Year Finalist - Modified
2021 C5 of the Year Finalist - Modified
C7 of the Year - Modified Finalist 2021
Finalist 2020 C7 of the Year -- Modified
2020 C5 of the Year Finalist - Modified
C5 of Year Finalist (appearance mods) 2019
2018 C5 of Year Finalist
Where are you installing the screens? Some installations have them pressure fitted between the brake duct and the front fascia but I installed my RaceMesh front brake screens into the the first groove inside the brake duct per the instructions on their website.
I taped off the edges of the fascia just to be safe and then after placing it inside the brake duct, I pulled it back into position with a pre-installed zip tie and needle nose pliers. I then cut off the zip tie once it was in place.


I taped off the edges of the fascia just to be safe and then after placing it inside the brake duct, I pulled it back into position with a pre-installed zip tie and needle nose pliers. I then cut off the zip tie once it was in place.
Last edited by MSG C5; Feb 22, 2013 at 11:15 AM.

Racer


Joined: Nov 2006
Posts: 434
Likes: 103
From: Churubusco IN
I found using a couple of zip ties to really help the installation of the screens. I can't remember if I even zipped them closed or just threaded them through the screen allowing you to pull the screen toward you once it is in the brake duct.

Drifting

Joined: Oct 2003
Posts: 1,932
Likes: 4
From: Warrenville Il
How are you trying to install them? If you go from under the car and remove the closeout panel you can pull the duct back and easily set the screen in it and then let the duct push back against the painted fascia. Trying to install them trough the painted opening is risky since you can easily scratch the paint even with it masked off, and you are also trying to fit the larger diameter screen through the smaller opening. This also keeps the screens close to the front for a clean look. Just another suggestion if you still have trouble. Good luck.
I got my screens from West Coast Corvette, fyi.
[IMG]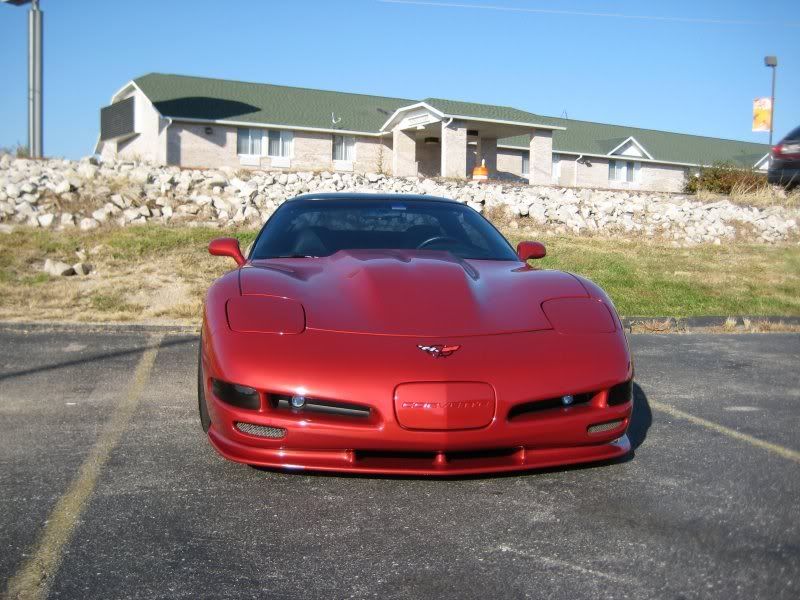 [/IMG]
[IMG]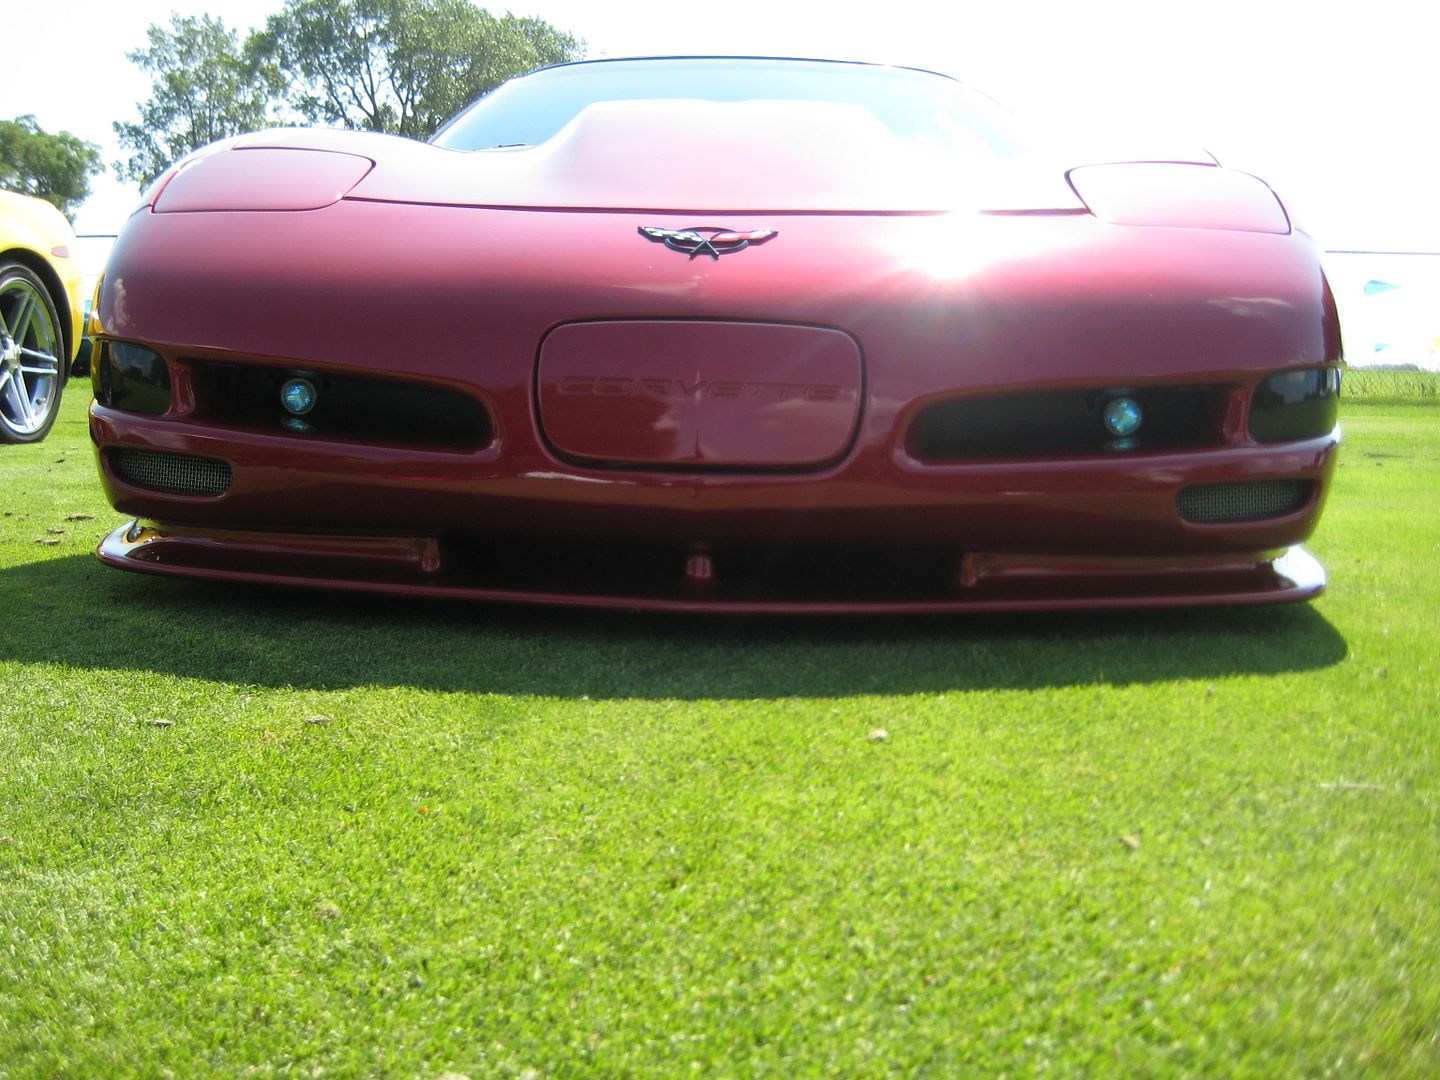 [/IMG]
I got my screens from West Coast Corvette, fyi.
[IMG]
[/IMG][IMG]
[/IMG]
Thread Starter
Drifting
Joined: Nov 2011
Posts: 1,401
Likes: 141
From: Summerville South Carolina
Ok, some seem to have them in the first groove
Where are you installing the screens? Some installations have them pressure fitted between the brake duct and the front fascia but I installed my RaceMesh front brake screens into the the first groove inside the brake duct per the instructions on their website.
I taped off the edges of the fascia just to be safe and then after placing it inside the brake duct, I pulled it back into position with a pre-installed zip tie and needle nose pliers. I then cut off the zip tie once it was in place.
I taped off the edges of the fascia just to be safe and then after placing it inside the brake duct, I pulled it back into position with a pre-installed zip tie and needle nose pliers. I then cut off the zip tie once it was in place.
 but would prefer them up against the fascia.
Also the instructions I got say, after inserting through the opening after taping[B],"simply pull the screen forward to between the duct and front fascia"[/B] This implies that they do not sit in the first groove. Further, my instructions did not say to remove the inner fender liner, but rather tape and insert through the opening. To me removing the liner is the way to go and what I intend to do.
Racemesh says they are marked left and right ...............mine were not, but not hard to figure out.
As an aside, Mine were shipped to me from Ken Pettit, Vetteshop, LLC in Port Orange,FL. So, may not be Race Mesh.
I really appreciate the input, as I want the best looking result.
Drifting
Joined: Oct 2003
Posts: 1,932
Likes: 4
From: Warrenville Il
I don't recall what the instructions might have said for mine when I did the installation but, if you can raise the front of the car you will see a plastic cover panel directly underneath the area of the brake duct. It's kind of pie shaped and about 12" across, forgive me I'm just going on memory but I'm sure someone can post a pick of the underneath front portion of the car. this panel is held on with a few hexhead screws. You do not need to pull the wheel well fender liners. These panels are there for the specific reason to gain access to the turn siganl lights and fog lights. Once this cover is off you can see the brake duct. The duct is simply held in place against the fascia with pressure from the corrugated ribs it has. Simply pull it back a bit and place the screen in there and allow it to press back against the fascia. This should provide you with the screen right up against the painted fascia. I'll try to find a picture of the panel that needs to be removed.
You can check this link for the panel details:
http://forums.corvetteforum.com/c5-g...b-2000-c5.html
You can check this link for the panel details:
http://forums.corvetteforum.com/c5-g...b-2000-c5.html
Last edited by MG RED 99; Feb 22, 2013 at 03:06 PM.
Corvette Stories
The Best of Corvette for Corvette Enthusiasts

Top 10 Most Explosive Corvettes Ever Made: Power-to-Weight Ratio Ranked!
Joe Kucinski
150 hp to 1,250 hp: Every Corvette Generation Compared by the Specs That Matter
Joe Kucinski
8 Coolest Corvette Pace Cars (and Replicas) of All Time
Verdad Gallardo
Top 10 Corvette Engines RANKED by Peak Torque (70+ Years of Muscle!)
Joe Kucinski
Corvette ZR1X Will Be Pacing the Indy 500, And Could Probably Race, Too!
Verdad Gallardo
Top 10 Corvettes Coming to Mecum Indy 2026!
Brett Foote
Top 10 C9 Corvette MUST-HAVES to Fix These C8 Generation Flaws!
Michael S. Palmer
10 Revolutionary 'Corvette Firsts' Most People Don't Know
Joe Kucinski
5 Reasons to Upgrade to an LS6-Powered Corvette; 5 Reasons to Stay LT2
Michael S. Palmer
Race Director
Joined: Jul 2008
Posts: 17,755
Likes: 3,688
From: The Sunshine State
2022 C5 of the Year Finalist - Modified
2021 C5 of the Year Finalist - Modified
C7 of the Year - Modified Finalist 2021
Finalist 2020 C7 of the Year -- Modified
2020 C5 of the Year Finalist - Modified
C5 of Year Finalist (appearance mods) 2019
2018 C5 of Year Finalist
and others seem to have been able to get them right up against the front fascia opening. (How did you do that?) Racemesh shows them in the first groove at least 1/4 inch back from the fascia edge. I don't mean to appear denser than I am, but would prefer them up against the fascia.
Also the instructions I got say, after inserting through the opening after taping[B],"simply pull the screen forward to between the duct and front fascia"[/B] This implies that they do not sit in the first groove. Further, my instructions did not say to remove the inner fender liner, but rather tape and insert through the opening. To me removing the liner is the way to go and what I intend to do.
Racemesh says they are marked left and right ...............mine were not, but not hard to figure out.
As an aside, Mine were shipped to me from Ken Pettit, Vetteshop, LLC in Port Orange,FL. So, may not be Race Mesh.
I really appreciate the input, as I want the best looking result.
but would prefer them up against the fascia.Also the instructions I got say, after inserting through the opening after taping[B],"simply pull the screen forward to between the duct and front fascia"[/B] This implies that they do not sit in the first groove. Further, my instructions did not say to remove the inner fender liner, but rather tape and insert through the opening. To me removing the liner is the way to go and what I intend to do.
Racemesh says they are marked left and right ...............mine were not, but not hard to figure out.
As an aside, Mine were shipped to me from Ken Pettit, Vetteshop, LLC in Port Orange,FL. So, may not be Race Mesh.
I really appreciate the input, as I want the best looking result.
I followed the same instructions you outlined above. What worked for me was to move the brake duct as much as possible leaving me the room to work the screen into place against the backside of the front fascia. Once the screens were where I wanted them, I simply moved them over a little and then repositioned the brake duct. Once in place, you can then adjust the screen by pressing on it to make sure it's centered. As mentioned, make sure you apply some layers of painters tape around the inside of the fascia openings to make sure the sharp edges of the screens don't scratch. I never had a problem with it because you insert the screens sideways and then adjust them after they are inside the fascia.
I never liked the idea that the screens were only held on by the pressure of the brake duct, so when I replaced the original screens with the RaceMesh, I followed their directions and installed them into the 1st groove of the brake duct. I like the look of them sitting back a little further, plus I know they are locked in pretty tight. Below is a link to the Racemesh instructions (for reference). What's weird is that their pictures showing them installed are different than those they use for installation.
Another tip is that I drove up on ramps to get the front end up a little higher. It was much easier to perform the work that way vs. crouching down on the floor.
http://www.racemeshgrilles.com/installation.htm#C5
Last edited by MSG C5; Feb 22, 2013 at 01:17 PM.
Thread Starter
Drifting
Joined: Nov 2011
Posts: 1,401
Likes: 141
From: Summerville South Carolina
Great input
I guess it would depend on the actual size of the screen, although regardless of the manufacturer, they should all be pretty close to the same size. I had originally bought a set of wire brake duct screens from WCC a few years ago. They looked like regular mesh and the instructions were to pressure fit them between the plastic brake ducts and the front fascia.
I followed the same instructions you outlined above. What worked for me was to move the brake duct as much as possible leaving me the room to work the screen into place against the backside of the front fascia. Once the screens were where I wanted them, I simply moved them over a little and then repositioned the brake duct. Once in place, you can then adjust the screen by pressing on it to make sure it's centered. As mentioned, make sure you apply some layers of painters tape around the inside of the fascia openings to make sure the sharp edges of the screens don't scratch. I never had a problem with it because you insert the screens sideways and then adjust them after they are inside the fascia.
I never liked the idea that the screens were only held on by the pressure of the brake duct, so when I replaced the original screens with the RaceMesh, I followed their directions and installed them into the 1st groove of the brake duct. I like the look of them sitting back a little further, plus I know they are locked in pretty tight. Below is a link to the Racemesh instructions (for reference). What's weird is that their pictures showing them installed are different than those they use for installation.
Another tip is that I drove up on ramps to get the front end up a little higher. It was much easier to perform the work that way vs. crouching down on the floor.
http://www.racemeshgrilles.com/installation.htm#C5
I followed the same instructions you outlined above. What worked for me was to move the brake duct as much as possible leaving me the room to work the screen into place against the backside of the front fascia. Once the screens were where I wanted them, I simply moved them over a little and then repositioned the brake duct. Once in place, you can then adjust the screen by pressing on it to make sure it's centered. As mentioned, make sure you apply some layers of painters tape around the inside of the fascia openings to make sure the sharp edges of the screens don't scratch. I never had a problem with it because you insert the screens sideways and then adjust them after they are inside the fascia.
I never liked the idea that the screens were only held on by the pressure of the brake duct, so when I replaced the original screens with the RaceMesh, I followed their directions and installed them into the 1st groove of the brake duct. I like the look of them sitting back a little further, plus I know they are locked in pretty tight. Below is a link to the Racemesh instructions (for reference). What's weird is that their pictures showing them installed are different than those they use for installation.
Another tip is that I drove up on ramps to get the front end up a little higher. It was much easier to perform the work that way vs. crouching down on the floor.
http://www.racemeshgrilles.com/installation.htm#C5
Thread Starter
Drifting
Joined: Nov 2011
Posts: 1,401
Likes: 141
From: Summerville South Carolina
Thanks to all I now have all the input
I don't recall what the instructions might have said for mine when I did the installation but, if you can raise the front of the car you will see a plastic cover panel directly underneath the area of the brake duct. It's kind of pie shaped and about 12" across, forgive me I'm just going on memory but I'm sure someone can post a pick of the underneath front portion of the car. this panel is held on with a few hexhead screws. You do not need to pull the wheel well fender liners. These panels are there for the specific reason to gain access to the turn siganl lights and fog lights. Once this cover is off you can see the brake duct. The duct is simply held in place against the fascia with pressure from the corrugated ribs it has. Simply pull it back a bit and place the screen in there and allow it to press back against the fascia. This should provide you with the screen right up against the painted fascia. I'll try to find a picture of the panel that needs to be removed.


Race Director
Joined: Jul 2008
Posts: 17,755
Likes: 3,688
From: The Sunshine State
2022 C5 of the Year Finalist - Modified
2021 C5 of the Year Finalist - Modified
C7 of the Year - Modified Finalist 2021
Finalist 2020 C7 of the Year -- Modified
2020 C5 of the Year Finalist - Modified
C5 of Year Finalist (appearance mods) 2019
2018 C5 of Year Finalist
Thread Starter
Drifting
Joined: Nov 2011
Posts: 1,401
Likes: 141
From: Summerville South Carolina
Well for us
hopeless narcissists with huge ego deficits, some of whom drive convertibles for added gratification, it is just a little bit more of "look at me" stuff to make us feel better. And, in addition, for us retired guys it gives us something to live for and....... well it might keep vampire bats from being sucked in and triggering our ABS on a hot summer night. It is also an economic stimulant which keeps the USPS people employed delivering stuff we don't need and may not like once installed, but can't stop buying. 

Drifting
Joined: Oct 2003
Posts: 1,932
Likes: 4
From: Warrenville Il
You can see in this thread how to remove the closeout panel
http://forums.corvetteforum.com/c5-g...b-2000-c5.html
http://forums.corvetteforum.com/c5-g...b-2000-c5.html
Thread Starter
Drifting
Joined: Nov 2011
Posts: 1,401
Likes: 141
From: Summerville South Carolina
Thanks,
You can see in this thread how to remove the closeout panel
http://forums.corvetteforum.com/c5-g...b-2000-c5.html
http://forums.corvetteforum.com/c5-g...b-2000-c5.html

Administrator


Joined: Mar 2001
Posts: 368,075
Likes: 24,732
From: In a parallel universe. Currently own 2014 Stingray Coupe.
C7 of the Year - Modified Finalist 2021
MO Events Coordinator
St. Jude Co-Organizer
St. Jude Donor '03 thru '25
NCM Sinkhole Donor
CI 5, 8 & 11 Veteran
How are you trying to install them? If you go from under the car and remove the closeout panel you can pull the duct back and easily set the screen in it and then let the duct push back against the painted fascia. Trying to install them trough the painted opening is risky since you can easily scratch the paint even with it masked off, and you are also trying to fit the larger diameter screen through the smaller opening. This also keeps the screens close to the front for a clean look. Just another suggestion if you still have trouble. Good luck.
 When I installed my front brake duct screens, I put them in going through the opening in the front - taped the fascia area to prevent any scratching of the paint. It was a PITA to get them in just right and then get them to sit in the brake duct. If I ever have to do it again, I will use the above procedure to get them installed.
Thread Starter
Drifting
Joined: Nov 2011
Posts: 1,401
Likes: 141
From: Summerville South Carolina
This is definitly the procedure I will follow.
I don't recall what the instructions might have said for mine when I did the installation but, if you can raise the front of the car you will see a plastic cover panel directly underneath the area of the brake duct. It's kind of pie shaped and about 12" across, forgive me I'm just going on memory but I'm sure someone can post a pick of the underneath front portion of the car. this panel is held on with a few hexhead screws. You do not need to pull the wheel well fender liners. These panels are there for the specific reason to gain access to the turn siganl lights and fog lights. Once this cover is off you can see the brake duct. The duct is simply held in place against the fascia with pressure from the corrugated ribs it has. Simply pull it back a bit and place the screen in there and allow it to press back against the fascia. This should provide you with the screen right up against the painted fascia. I'll try to find a picture of the panel that needs to be removed.
You can check this link for the panel details:
http://forums.corvetteforum.com/c5-g...b-2000-c5.html
You can check this link for the panel details:
http://forums.corvetteforum.com/c5-g...b-2000-c5.html

Racer
Joined: Jan 2009
Posts: 424
Likes: 0
From: Stockbridge Ga
You can see in this thread how to remove the closeout panel
http://forums.corvetteforum.com/c5-g...b-2000-c5.html
http://forums.corvetteforum.com/c5-g...b-2000-c5.html
