


DIC / HUD Led Conversion polarity documentation
Thread Starter
Burning Brakes

Joined: Jan 2014
Posts: 1,139
Likes: 28
From: Oviedo Florida
OK so I'm finally getting around to replacing the bulbs in the DIC and HUD buttons to some cool red LED's from West Coast Corvette. Question is though has anybody taken a picture and/or documented which side is + and which side is - on the button assembly? Kind of a PITA to pop in the bulbs on a hope that its is the correct polarity and then if not have to take them back out and turn them the other way. Seems like someone somewhere must have documented this so we can do it right the first time then just pop it back in the car.

Le Mans Master

Joined: Mar 2011
Posts: 6,835
Likes: 302
From: Columbia SC
OK so I'm finally getting around to replacing the bulbs in the DIC and HUD buttons to some cool red LED's from West Coast Corvette. Question is though has anybody taken a picture and/or documented which side is + and which side is - on the button assembly? Kind of a PITA to pop in the bulbs on a hope that its is the correct polarity and then if not have to take them back out and turn them the other way. Seems like someone somewhere must have documented this so we can do it right the first time then just pop it back in the car.
Can't your vendor tell you??
Drifting


Joined: Jun 2008
Posts: 1,317
Likes: 9
From: McCall Idaho
Thread Starter
Burning Brakes
Joined: Jan 2014
Posts: 1,139
Likes: 28
From: Oviedo Florida
the stock bulbs will light up with polarity switched it really doesnt matter how you put the bulbs in. With the LED bulbs though you can't do that. All every vendor tells you is to put the bulb in and if it doesn't light than you have it in backwards. Pull it out and turn in around. thats kinda of a pain and a total waste of time. So what I was looking for is if anyone documented or took a picture of their switches, tested the polarity of the sockets and marked which side was + and which was - so as to save everyone who does this the trouble of figuring out for themselves by seeing if the bulb lights up or not after its installed.
Since I can't seem to find that info I guess I'm going to do just that and I'll post a picture of the back of DIC and HUD switch housings with +and- marked. So that all the next guy will have to do is figure out which is which on the new LED bulbs (none of the vendors mark those either ) I did get 1 vendor to mark some of my old blue ones for me but I had to ask for them to do it. The new red ones came from a different vendor.
Since I can't seem to find that info I guess I'm going to do just that and I'll post a picture of the back of DIC and HUD switch housings with +and- marked. So that all the next guy will have to do is figure out which is which on the new LED bulbs (none of the vendors mark those either
) I did get 1 vendor to mark some of my old blue ones for me but I had to ask for them to do it. The new red ones came from a different vendor.
Le Mans Master
Joined: Mar 2011
Posts: 6,835
Likes: 302
From: Columbia SC
I told you how you can to do it. You can test the lights for polarity before you install them and measure the polarity of the boards when you pull out the stock bulbs.
It is easy to do, just DO IT.
It is easy to do, just DO IT.
Thread Starter
Burning Brakes
Joined: Jan 2014
Posts: 1,139
Likes: 28
From: Oviedo Florida
The only way I know how to test the board is plug it all back in, turn the lights then probably easiest to just use a test light and figure out the polarity of the socket.
I Still should mark it on the switch and post a picture so once again, nobody else has to do it the way the vendors say amd wonder if they have the bulbs in correctly and more than likely have to take the bulbs back out which I don't know if you have done this mod or not but depending on which bulbs you use (ozonium in particular) usually break coming back out. With it marked in a photo and posted others can do it right in one shot with the switches out of the car. When they go install it there would be no question as to if they put the bulbs in correctly. I can certainly figure out a bulb I'm trying to make it a little less hassle for others down the road. Nothing going on tonight so after work sometime this is what I'll do.
Last edited by Pirateslife4me; Aug 6, 2014 at 08:51 AM.
Instructor


Joined: Jan 2014
Posts: 167
Likes: 107
From: Edmond OK
I'm not sure how you're breaking the bulbs taking them out. Was no problem putting them in and taking them out when I did mine. Not to mention you shouldn't need to put them all the way in and tight to be able to see them light up.
An even easier way would be to take one of the LEDs out of the plastic mount and touch the leads directly to the board and you can see it light up without looking at the front of the cluster.
An even easier way would be to take one of the LEDs out of the plastic mount and touch the leads directly to the board and you can see it light up without looking at the front of the cluster.
Corvette Stories
The Best of Corvette for Corvette Enthusiasts

Every 2027 Corvette Engine Explained
Joe Kucinski
Designer Imagines A Corvette That Looks More Like a Corvette Than the Corvette
Verdad Gallardo
10 Ugly Corvettes That We Still Kinda Love
Joe Kucinski
Top 10 Most Expensive Corvettes Ever Sold on Bring A Trailer
Brett Foote
10 Things Every Corvette Owner Needs (2026 Edition)
Michael S. Palmer
8 Most "Only Corvette Owners Understand" Quirks and Problems
Pouria Savadkouei
10 Reasons the C6 Z06 is Still A Performance Benchmark After 20 Years
Joe Kucinski
How Much Horsepower Every Corvette Engine "LOST" in 1972
Joe Kucinski
Top 10 DOs and DON'Ts for Protecting Your Convertible Top!
Michael S. Palmer
Thread Starter
Burning Brakes
Joined: Jan 2014
Posts: 1,139
Likes: 28
From: Oviedo Florida
But Yeah I see y'alls point now and it really isn't a big deal and I guess I was wrong thinking that others may benefit from a picture showing them which way the bulbs need to go in the first time.
Last edited by Pirateslife4me; Aug 6, 2014 at 11:27 AM.
Burning Brakes

Joined: Jul 2010
Posts: 959
Likes: 50
From: Peters Colony Republic of Texas
Matey,
Not sure whether you have these links, so here you go:
http://www.spdkilz.com/techtip.html
and
http://forums.corvetteforum.com/c5-g...od-thread.html
Somewhere in there may be the pony you are seeking.
The Lizzard
Not sure whether you have these links, so here you go:
http://www.spdkilz.com/techtip.html
and
http://forums.corvetteforum.com/c5-g...od-thread.html
Somewhere in there may be the pony you are seeking.
The Lizzard
Thread Starter
Burning Brakes
Joined: Jan 2014
Posts: 1,139
Likes: 28
From: Oviedo Florida
Thanks guys, yes I've seen those links and much to my surprise with all the in depth info there is nothing showing polarity of the switch housing.
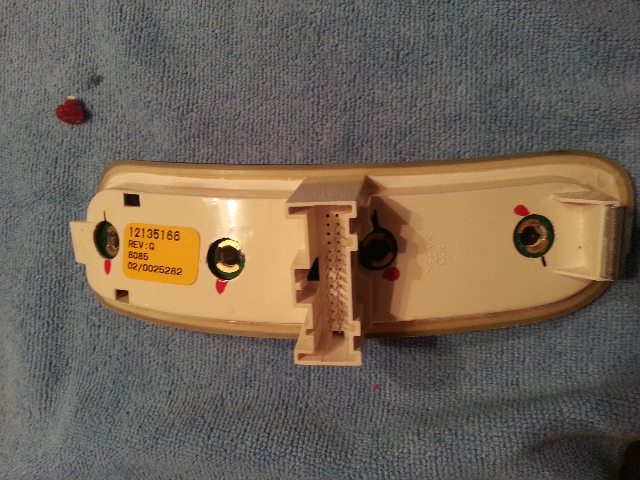
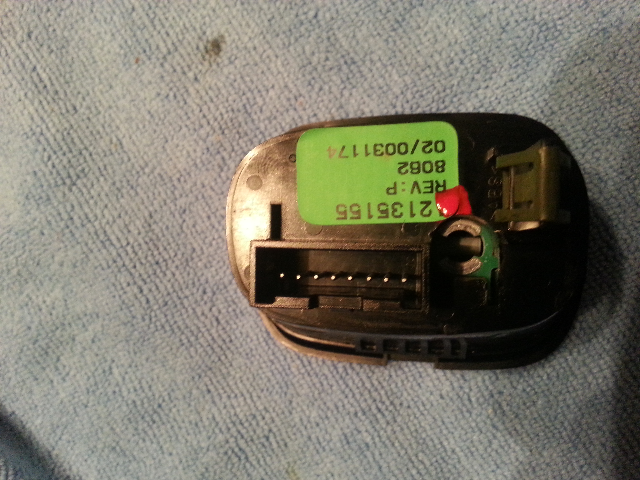
OK well here is the DIC & HUD switch housings marked for polarity.
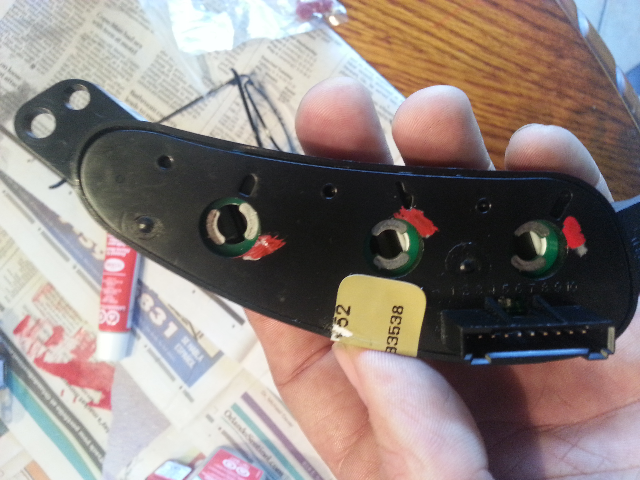
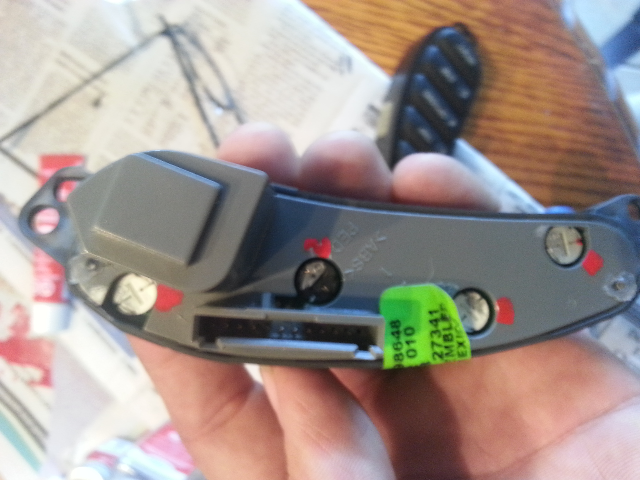
As you can see the clearence is very tight between the bulb and the housing. In fact the stock bulbs on the HUD switch don't want to come out.

And this is how they break trying to get them back out. No big deal if it's a stock bulb like this that doesn't want to come out but when it's your new LED and you didn't order a few extra and you break a bulb and need to wait a week to or your dash back together for a $2.50 bulb to come in the mail trust me it sucks. This is why it would be so much easier if we had a picture showing the polarity of the housing and why I felt the need to test and post the pictures. It's not as easy and some of y'all may think as just popping out a bulb and popping a new one in.
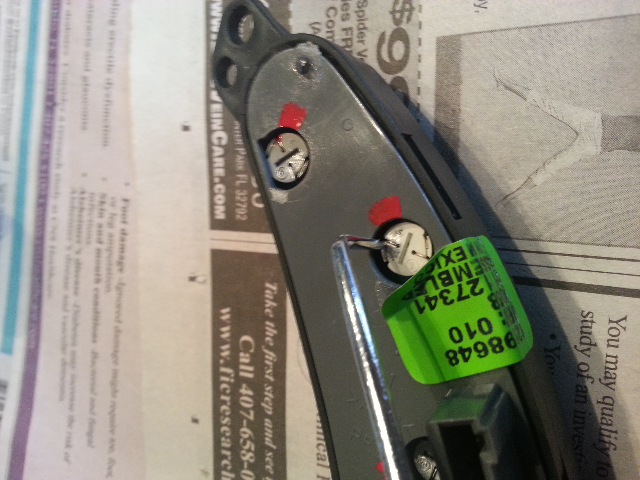
This is not how you want your car sitting waiting for that single bulb or two.
OK well here is the DIC & HUD switch housings marked for polarity.
As you can see the clearence is very tight between the bulb and the housing. In fact the stock bulbs on the HUD switch don't want to come out.
And this is how they break trying to get them back out. No big deal if it's a stock bulb like this that doesn't want to come out but when it's your new LED and you didn't order a few extra and you break a bulb and need to wait a week to or your dash back together for a $2.50 bulb to come in the mail trust me it sucks. This is why it would be so much easier if we had a picture showing the polarity of the housing and why I felt the need to test and post the pictures. It's not as easy and some of y'all may think as just popping out a bulb and popping a new one in.
This is not how you want your car sitting waiting for that single bulb or two.
Burning Brakes


Joined: Nov 2001
Posts: 1,164
Likes: 81
From: Bel Air MD
I purchased led's from one of the forum vendors and had to use a dremel with a sanding disc to get them to fit. I had to reduce the width of the locking tabs to get them to fit into the opening and had to undercut the tab to get them to rotate under the circuit board.


Thread Starter
Burning Brakes
Joined: Jan 2014
Posts: 1,139
Likes: 28
From: Oviedo Florida
 not nearly as quick and simple as it would seem is it. They sure don't just pop in and out.
 I still screwed up one of the bulbs trying to get it to fit. I pulled the wire off the led, needed to open up the socket on the board a tad bit more :/ oh well.
Thread Starter
Burning Brakes
Joined: Jan 2014
Posts: 1,139
Likes: 28
From: Oviedo Florida
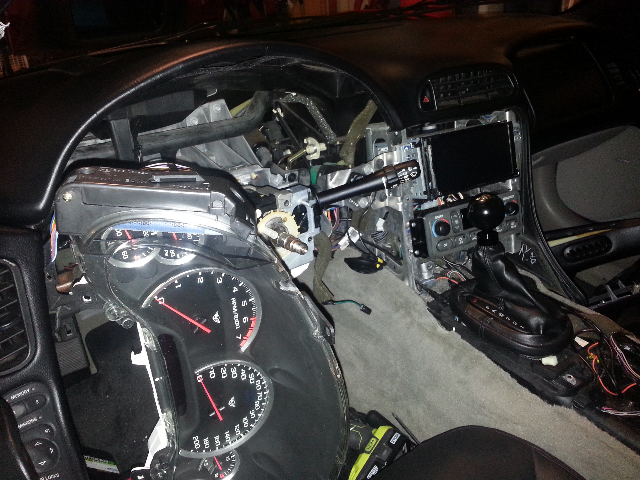
Lol... no you don't have to take the wheel off but it was actually kinda easier with it out of the way. I've been putting these led's off for about 2 months waiting until I had a another reason to tear into the dash again. I got in my new momo steering wheel in so yanked the stock wheel and had get the trim off around the column and lower dash to modify the airbag wiring so figured might as well get to this too.
Thread Starter
Burning Brakes
Joined: Jan 2014
Posts: 1,139
Likes: 28
From: Oviedo Florida
Finally here are pics of the drivers and passenger door switches and the hatch release/fog light switch marked for polarity.
Who ever does this mod can now just test their bulbs or ask the vendor to label (ozonium will do this) and once they work the bulb and housing a little bit to get them to fit in just put them in correctly the first time. No digging them back out to turn them around and risk trashing them in the process.
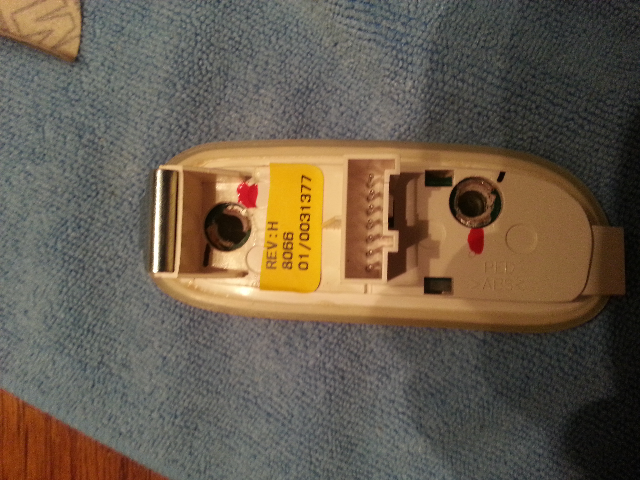
Who ever does this mod can now just test their bulbs or ask the vendor to label (ozonium will do this) and once they work the bulb and housing a little bit to get them to fit in just put them in correctly the first time. No digging them back out to turn them around and risk trashing them in the process.
