When you click on links to various merchants on this site and make a purchase, this can result in this site earning a commission. Affiliate programs and affiliations include, but are not limited to, the eBay Partner Network.
All by herself, my girlfriend bought me a mgw for my birthday. I was speechless. Anyways onto the install.
Tools you'll need
2x large flathead screwdrivers
1x small flathead screwdriver
1x small Phillip head screwdriver
10mm socket (and a ratchet)
T15 bit
T40 bit
0000 steelwool
New razor blade
Tape measure
Start by using a small flathead screwdriver to pop the front of the plastic insert of the shifter up. Then remove it.
Insert a larger screwdriver on each side of the demon key and pry it up. As you can see, mine was broken by someone else and I had to use a vise grip and screwdriver to pull it up. Putting it in 4th helped to keep it stable during the pulling/fighting process..... good luck
You need to be towards the front of the key. Here is the best pic I could get to show the tab to pry under.
Pull the shifter boot off.
Remove the center console and the radio/a.c. control bezel. There are 3x t15 screws that hold on the bezel. Use a small screwdriver to pop the cover of the interior temp sensor location. Then remove the two by the cigarette lighter/ashtray compartment.
The center console will have to be slid back to allow the radio bezel to be removed. Take the 2x 10mm nuts off the back of the console.
[Won't insert pic ��]
Pull the back of the plastic piece that houses the traction control and ride controls (if your car is equipped with that option).
Unplug the connection and set it aside. Now remove the 2x 10mm bolts. The center console can be lifted and pulled to the back. This gives extra room to work the radio bezel out.
The cigarette lighter needs to be unplugged from the back, after the bezel is pulled back. Here's the best pic I could get of the way it connects. The tabs have to be squeezed and then pulled away from the lighter.
The bezel is free to be removed now.
Remove the 4x 10mm nuts that hold the rubber dust boot to the top of the tunnel.
The 4x bolts that hold the shifter onto the stock lower box are a 3/8" but a 10mm will work. They were not very tight on mine.
Pull the shifter off. Next are the 3x t40 bolts. Remove the bolt on the shifter linkage first then the two that hold the lower box to the torque tube.
Pull the box up and to the front to remove it.
To disassemble the box remove the 2x Phillip head screws on the front that hold the plastic cover on.
Pull the shaft out the front. Polish the shaft with 0000 steelwool. If any burrs are felt, use the finest sand paper you can to smooth the shaft. Then polish it with the steelwool.
Time to assemble the lower box. Here's an exploded view.
Slide the bushings onto the shaft and place them into the semicircle cutouts.
Place the two aluminium pieces together and use the supplied bolts and t handle hex key to tighten them up.
Tighten the bolts in an "x" pattern, like you would tighten lugs on a wheel. Get these tight, but don't use a cheater bar and strip the aluminum plate.
Now it's time to put in the dynamat and heat shielding. I cleaned the torque tube but it is not necessary if yours is not dirty.
Cut the dynamat into 2x stripes 4" by 5" pieces.
The first piece goes on top and will cover the tab on the side of the torque tube. The next piece will go on the bottom and should NOT wrap over the top of the tab.
(Mgw says do this step but I'm not sure what it adds to the process, fill me in if you know...... looking at you mgw rep. My best guess is that it sticks to the torque tube better than the heat shield and keeps the shield from unsticking???)
Small hands will help with attaching the mat to the under side. Also don't cut your hand open on the sides of it.
Now use one larger foam heat shield on the side of the torque tube tunnel and one on the under side of the torque tube. But not over the tab on the side of the torque tube.. it's recommended to leave a 1/2" gap at the top of the tunnel.
Note: I placed each piece in before removing the adhesive cover to see how it needed to be maneuvered into place. And bribe a small handed person to help here.
Place the t shaped piece on the top in between the mounting tabs but not over the tab on the side. See pic for better detail.
Time to put the new lower box into the car. You will have to hold the linkage up and insert the rod into it, while inserting the box into place. Ends up looking like this.
Place locktite and insert the t40 bolt into the linkage and align the cutout on the shaft. Tighten the bolt down tight but don't strip it. Choke up tight on the ratchet to limit your torque.
Now put locktite on the other two t40 bolts and insert into the mounting tabs. Just hand tight, the box needs to be able to move back and forth.
Use the alignment hole on the front of the shaft. Position the box so that the bushing is covering half the hole. And snug one bolt down.
Now place your thumb in the cup of the shaft and move it into 3rd and 4th gear to check for clearance on the bushings.
There should be a 1/16" to 1/8" gap between the bushing and ends of the cup. If it's touching either one, loosen the bolt you snugged to move the box, retighten and check again.
Now with the box positioned correctly tighten down the two t40 bolts. And place the orange isolater on the lower box. Then place the shifter onto the box.
Put the 4x shifter bolts in and tighten in an "x" pattern. Use the supplied t handle and tighten down tight. The red vibration isolater should be pressed out evenly all around.
Now tighten the 4x set screws.
Now it's time to cut the factory rubber dust boot. Use a new razor blade and cut along the first step. Go in flat and take your time to make the cut look right.
The dust boot needs to be fitted over the shifter. Start on the driver side in between the torque tube tunnel and the shifter. This is the tightest place. Then work your way around the shifter.
Screw the shifter bolt into the shifter. Make sure to flip the washers and nut. On the bolt: first screw on the nut, then the lock washer, and lastly the flat washer. Screw the bolt in and then tighten down the nut with a 19mm.
Reassembly is the reverse of taking it apart. Test it before hitting the street, then enjoy it. I am loving mine so far.
Edited to fix typos.
Last edited by Proletariat designs; Jan 2, 2018 at 06:08 PM.
Reason: Typos
Cool, thanks for sharing. I got a new MGW shifter for Christmas and will be doing the install this week. I've read the instructions and watched their video, but the more info the better.
Cool, thanks for sharing. I got a new MGW shifter for Christmas and will be doing the install this week. I've read the instructions and watched their video, but the more info the better.
Steve
Taking all the photos it was a 3 hour process. Not bad at all. And it feels great. Not as stiff as I thought it'd be. May not even do the antivenom mod.
Got one for Xmas as well. My install went exactly as you wrote. Did the antivenom mod as well and both mods totally changed the feel of the car. BEST MOD EVER!!!
Cherry3m it feels great. I would have not bought it myself but after driving with it a couple of times, I think it was worth the price. Would recommend this product lol
Finished my install today and everything went smoothly. The MGW is like a work of art compared to the stock shifter. The extra effort moving the shifter side to side will take some getting used to, but so far I like the shift feel and shorter throws. I think the Anti Venom Mod will make it even better, so I'll being doing that I'm the next couple days.
Steve they are really nice. I have about 400 miles on mine and it's breaking in the effort it takes to get into reverse is considerably less. I will eventually do the antivenom mod too. I am waiting for a warm up. My basement is about 50*. I'm a fair weather mechanic haha.
Great write up, I like the details. This is my next planned mod. Thanks
Thanks glad I can give back to the community.
I have no idea if the shifter from a c7. would work. I'd guess it would since mgw uses the same lower box and shifter for the c5 c6 and c7. But this is JUST A GUESS. I really don't know.
Maybe I'm looking at this the wrong way, but the shifter is just a lever. It moves all the linkage and the forks in the transmittion. The different feels comes for the tighter tolerances in the bushings, and mainly the movement of the fulcrum point (or elongating the lower shaft) of the shifter. The lower box has no set pathways to dictate any gears.
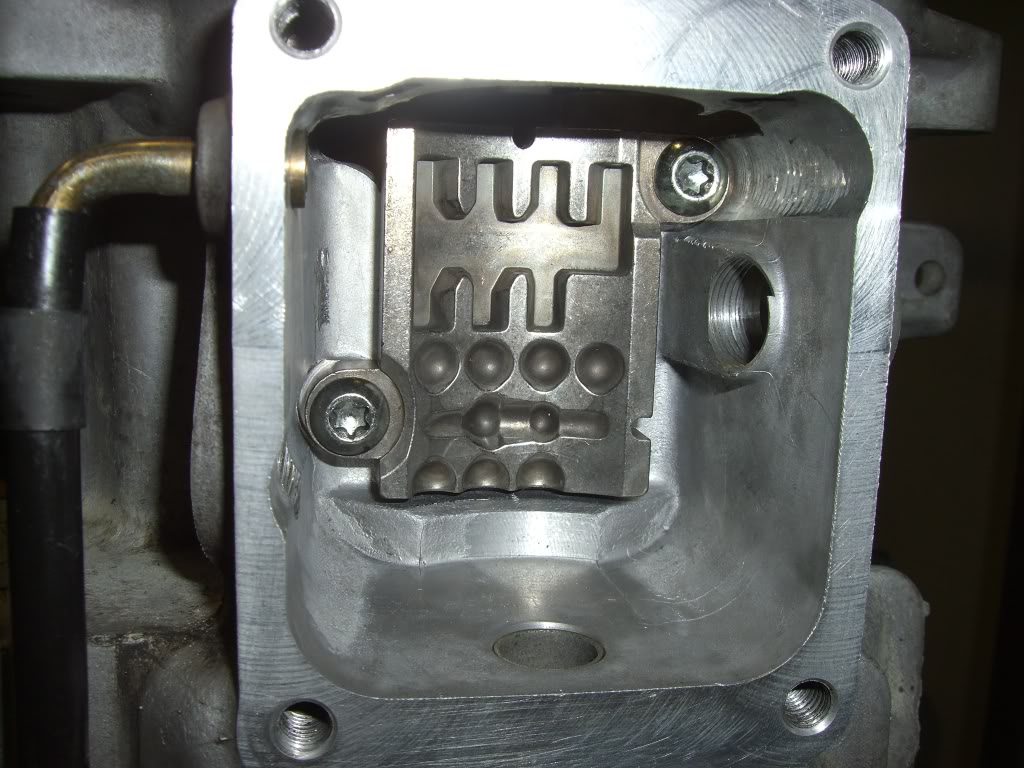
^ correct. The gear pattern is set in the transmission. There's a ball that rides in a channel and one set for detent end to end that that's were the anti-venom mod comes into play.
Less pressure on that ball that rides in the detents.
Steve they are really nice. I have about 400 miles on mine and it's breaking in the effort it takes to get into reverse is considerably less. I will eventually do the antivenom mod too. I am waiting for a warm up. My basement is about 50*. I'm a fair weather mechanic haha.
Well I have about 300 miles on the new MGW shifter now and it's does seem easier to shift or I've just gotten used to it. Today I did the Anti Venom Mod along with replacing the fluid with Royal Purple Synchromax and "wow" does it shift nice now! The Anti Venom helped return the effort to near stock and the fluid made the shifts noticeable smoother. It's perfect now! I have an extra washer if you'd like to try the mod, just send me a PM with your address.


 The Anti Venom helped return the effort to near stock and the fluid made the shifts noticeable smoother. It's perfect now! I have an extra washer if you'd like to try the mod, just send me a PM with your address.