When you click on links to various merchants on this site and make a purchase, this can result in this site earning a commission. Affiliate programs and affiliations include, but are not limited to, the eBay Partner Network.
So, I don't know how many of you guys do these. But I like documenting everything I do to my cars, so I thought I would start a build thread.
I picked this car up in July. The car wasn't quite as described, but I knew most of the things that were wrong, would be replaced anyway.
Since buying the car, I have mainly done some general maintenance and just driven the car. I picked up some 18x10.5 C6Z Reps with 295/35ZR18 Toyo Proxes for all 4 corners of the car and lowered it on cut stock bolts as well as installed a B&B Bullet Dual Tip axle back and tended to a few small interior flaws.
I drove the car about 500 miles after purchase, mostly in a 2 week period, and parked it in late October for the winter.
Before Parking it, I did a small photo shoot for fun. This was the current state of the car when parked...
I started disassembling the car this past week in preparation for the first round of upgrades. Right now, I am leaving the internal engine completely alone choosing to focus on the drive line and suspension.
The goal for this car is to be a street car first but still be a really good track car.
Full Build List as of 05.23.2019
• 18x10.5 +56 Offset C6Z Replicas with 295/35/18 Toyo Proxes on all four corners.
• ACT GM9-HDSS Clutch and Pressure Plate
• ACT Prolite Flywheel
• Quicktime SFI Bellhousing
• ARP Clutch and Flywheel Bolts
• OEM GM Pilot Bearing
• OEM GM Rear Main Seal Assembly
• RAM Slave with Remote Bleeder
• RAM Adjustable Master
• Hurst Short Shifter
• Hinson POLY Engine mounts
• RW Engineering (Pfadt style) Billet Diff Mount
• TPS Motorsports Tunnel Plate
• Hoosier PE Trans/Diff Brace
• Powermaster 9100 Starter
• Optima Red Top Battery
• AFE Control Polygraphite Bushings
• Racetronix Fuel Pump Kit
• WIX Replacement Fuel Filter
• OEM GM Sending Unit and Gasket
• Aldan American Coilovers with 600#F and 700#R Eibach Springs (professionally corner balanced)
• Eibach Sway Bars with Adjustable End Links
• AMT Camber Kit (set for track use)
• Russell Braided Stainless Brake Lines
• Summit Racing Plug Wire Boots
• 1-7/8 Longtube Headers and OR X-Pipe
• OEM GM Power Steering Cooler and all PS lines
• RPM Torque Tube Rebuild Kit
• ARP Stainless Header Bolts
• Fuel Injector Clinic O-Ring Kit
• Fuel Injector Clinic Pintle Cap Set
• ARP Intake Manifold Bolts
• MAHLE Intake Manifold Gaskets
• New OEM Knock Sensors with new OEM Harness
• MAHLE Valley Plane Gaskets
• GM Performance 12499224 Valve Springs
• GM Performance 12482063 Valve Seals
• VBP Polyurethane Shock Bushing Kit
• EFI Performance Mail Order Bolt-On Tune
• Improved Racing Oil Pan Baffle Kit
• Vararam VR-B2 Intake with Power Duct
• Anti-Venom Mod
• TPS Motorsports Catch Can
• New ACDelco Oil Temperature Sensor
• MURICA Performance "WILD" Transmission Build with 30 Spline Mainshaft, Carbon Blocker Rings, Billet Keys 1-6, Gear Bronze Pads Kit, Steel Fork, New Bearings, Cryo Treated Gears, Media Blasted and Painted Case
• MURICA Performance Full Diff Build with fresh 3.42sp gears, Pinion EDM for 30 Spline Mainshaft, New C6Z Shafts, New Differential Shaft Gears, New Locks, New HD Springs, New C6Z Clutches, New C6Z Pinion Support, New Seals and Gaskets, Media Blasted and Painted Case
I will update this thread as I go along. Next weekend will be a big weekend as the drive line will be dropping out. This is going to be a fun adventure!
Last edited by slow_pokeC5; May 24, 2019 at 02:57 PM.
A lot of it looks like maintenance stuff. The clutch factory hydraulics great for me at 880 whp so I don't see the reason to use after market parts. I am also not a fan of gears. Once you start making more power, the gears are only going to hurt you. It will make getting traction even harder. Good luck on the install and enjoy your car!
Last edited by silver408z; Mar 2, 2018 at 10:31 PM.
Damn, thanks guys! Didn't actually think anyone would care lol
I think maybe I should explain the car a little more as far as it's purpose.
I bought this car to be a track day car and fun cruiser. I need to replace the rear gears regardless due to a problem currently with the rear gears and a whine. I chose to go with the 3.90 simply based on experience with other cars I have owned over the years. Once I put my Hoosiers on for the track, traction will be much less of a concern.
The end goal power wise is not for peak numbers. I honestly do not care how much the car makes, I care more about power under the curve. I already have engine upgrades selected. Street Sweeper HT Cam, CNC Ported 243 castings by Larry's Auto Machine here in CT and a Fast 92 intake along with associated throttle body and other supporting upgrades. I also plan to freshen up the bottom end and install some forged pistons and push to 11:1 compression ratio. Whatever the car makes, it makes. I know keeping everything small will keep the car very responsive.
The reason I chose to go with aftermarket hydraulics is simple. I have used RAM components in the past, and they have never failed me. I would rather have too good of a part than not enough. I want a car that I can hop in and drive 2000 miles without thinking about it.
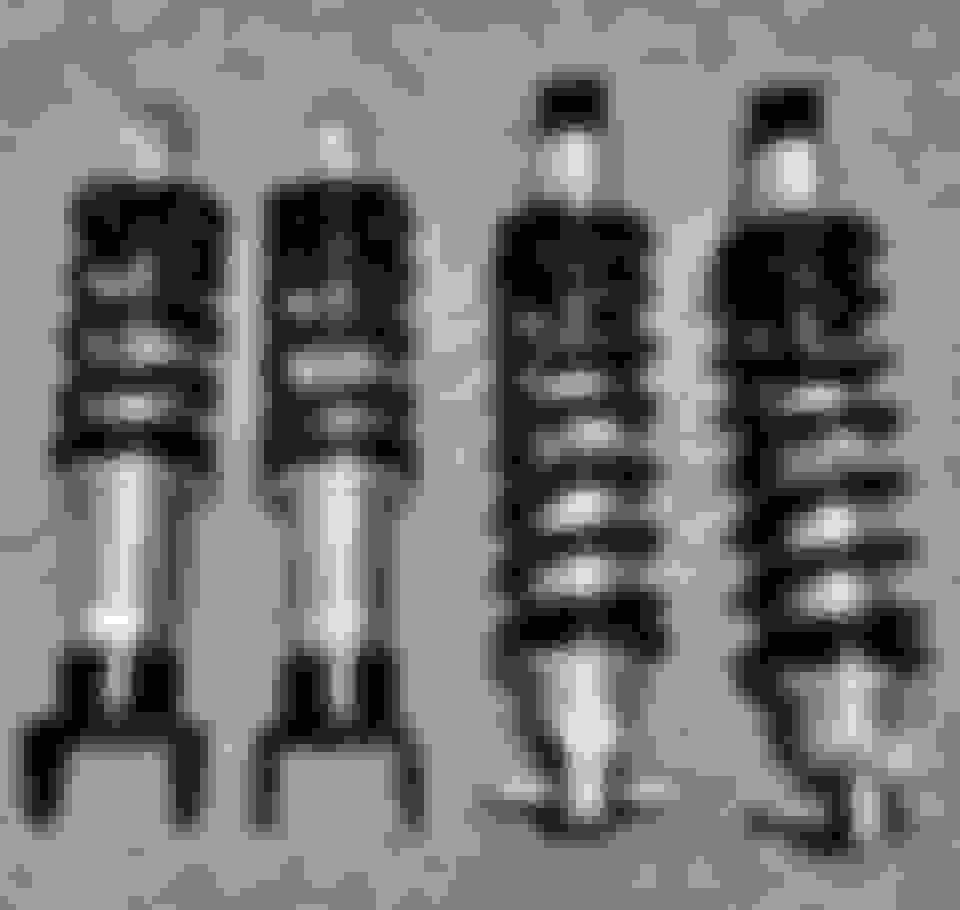
These showed up at my door finally yesterday... A bit of a longer wait from purchase date than I expected, but totally worth the weight. I disassembled them and looked them over as well as installed Coil-Over Thrust Bearings on each spring at the adjuster and I am pretty impressed with the quality for the money. A lot of guys swear by the LG or PFADT stuff, but I feel like I can do just as well for much less with these, especially because with them being a rebuild-able shock, I can take them to one of my local circle track guys and have them re-valved if I do not like their settings.
Unfortunately, the snow up here has made me decide to stay off the roads tonight (my shop is a solid 20 minute highway drive away on a good clear day) so I do not get to really get digging on the Z tonight as I planned, but I will definitely have update and progress photos start rolling in starting tomorrow.
Well last night, I finally got to start digging into taking things apart on the Z. Came across a few issues along the way but nothing out of control. Also decided to add to my list just a bit. I have decided that with the intake off, I will replace the valley tray gasket as well as both knock sensors and that harness. More of a maintenance thing, but with 143k miles on this car, I want to be sure it's all good to be driving long distances as I do plan to drive the car down to the Dragon this summer.
Also when I removed the injectors as I planned to replace the old brittle and dry O-Rings which definitely were just that, the pintle clip at the tip that holds the O-Ring in place, snapped in pieces on 3 of them. I called up Fuel Injector Connection and got their upgrade kit after a suggestion by a member of one of the C5 Facebook Groups. The biggest issue I ran into all night was the fact that the axle nut on both sides was seized on and I do not have a big enough impact available in my shop to bust it loose or press it out of the hub. I ended up removing the rear upper and lower with the hub and the axle all as one unit. It was a little bulky but actually not too difficult. I ended up loosening all 4 control arm bolts, left the top two just partially in so they would be easily removed, completely pulled the bottom out and let the lower control arm hang while I popped the axle out of the diff. Then I simply sat on my snap-on rolling chair, lifted the entire assembly up with my knees, popped the two upper bolts out and slid the entire assembly out as one and laid it on the floor. Not exactly how I wanted to do it, but it worked. Now I can separate the upper and lower from the spindle. If the need ever comes to replace these axles, it might be a bit more involved, but both axles look and feel brand new and have a very clean almost brand new sticker on them so I do not foresee any issues any time soon.
Here are a couple pictures from the night... Nothing special but it's progress.
Is it just me, or for 143k miles does that paint just look exceptional!!
Good Luck with the build!!
It took a bit of work on my part to get it that good, thanks! I still have more I want to do but for now it's fine. It's not a show car, it's a driver.
I clayed, wet sanded and buffed the entire car shortly after I got it. I'm not really up on all the current trends and technologies of waxes etc so I didn't get too crazy. Just some good Adams Polishes wax and glaze and good to go.
Those C6 Reps look great on the car. Where did you buy them from or do you know what brand they are?
Thanks! I got them from OE Wheels LLC. They are awesome. Can't wait to get the stance right once the coil-overs are on. It's not where I want it in the pictures. Should look much better after this is all done.
These showed up at my door finally yesterday... A bit of a longer wait from purchase date than I expected, but totally worth the weight. I disassembled them and looked them over as well as installed Coil-Over Thrust Bearings on each spring at the adjuster and I am pretty impressed with the quality for the money. A lot of guys swear by the LG or PFADT stuff, but I feel like I can do just as well for much less with these, especially because with them being a rebuild-able shock, I can take them to one of my local circle track guys and have them re-valved if I do not like their settings.
Unfortunately, the snow up here has made me decide to stay off the roads tonight (my shop is a solid 20 minute highway drive away on a good clear day) so I do not get to really get digging on the Z tonight as I planned, but I will definitely have update and progress photos start rolling in starting tomorrow.
I will definitely be curious as to how you like these once you get the Z back up and rolling. I read about them in Vette Magazine and was thinking they might be a nice upgrade to do next winter to mine. Looks like you are having fun already tearing her down.
Designer Imagines A Corvette That Looks More Like a Corvette Than the Corvette
Slideshow: A Jaguar designer's personal project imagines what a modern front-engined Corvette might look like if Chevrolet revisited the golden age of the Stingray.