Notices
C5 General General C5 Corvette and C5 Z06 Discussion not covered in Tech
Sponsored by:
Sponsored by:

Holley Tall LS Valve Covers Installed

Thread Tools
 
Search this Thread
 
Old 03-06-2019, 08:12 PM
  #1  
wscott62893
Burning Brakes
Thread Starter
 
wscott62893's Avatar
 
Member Since: Dec 2017
Location: Montgomery County PA
Posts: 755
Received 269 Likes on 156 Posts
Default Holley Tall LS Valve Covers Installed

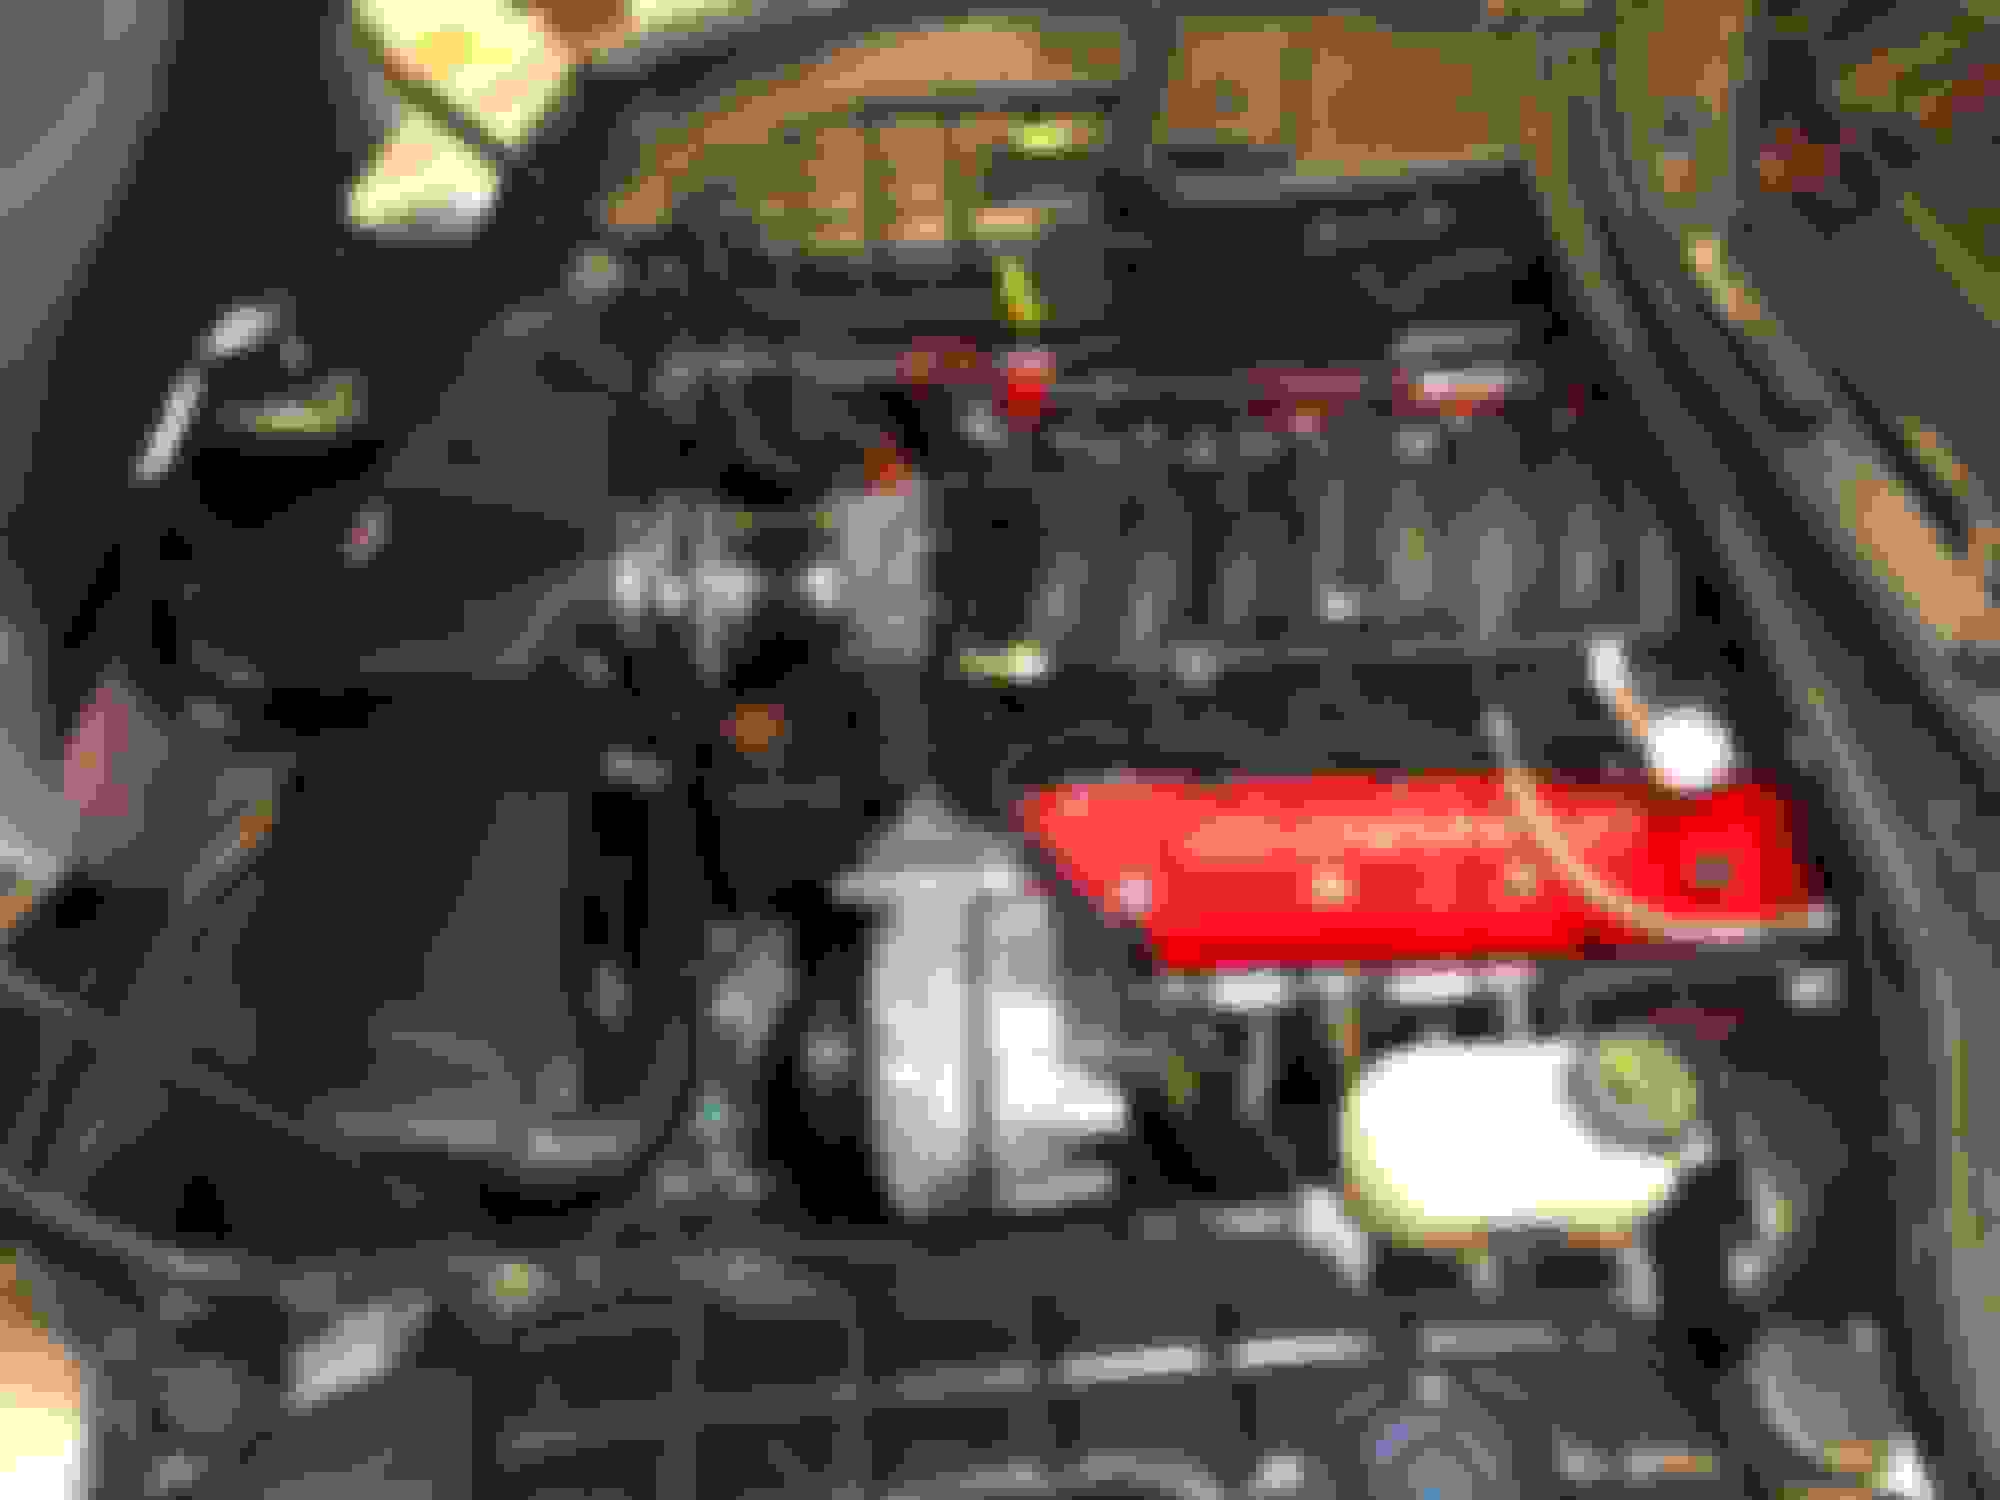
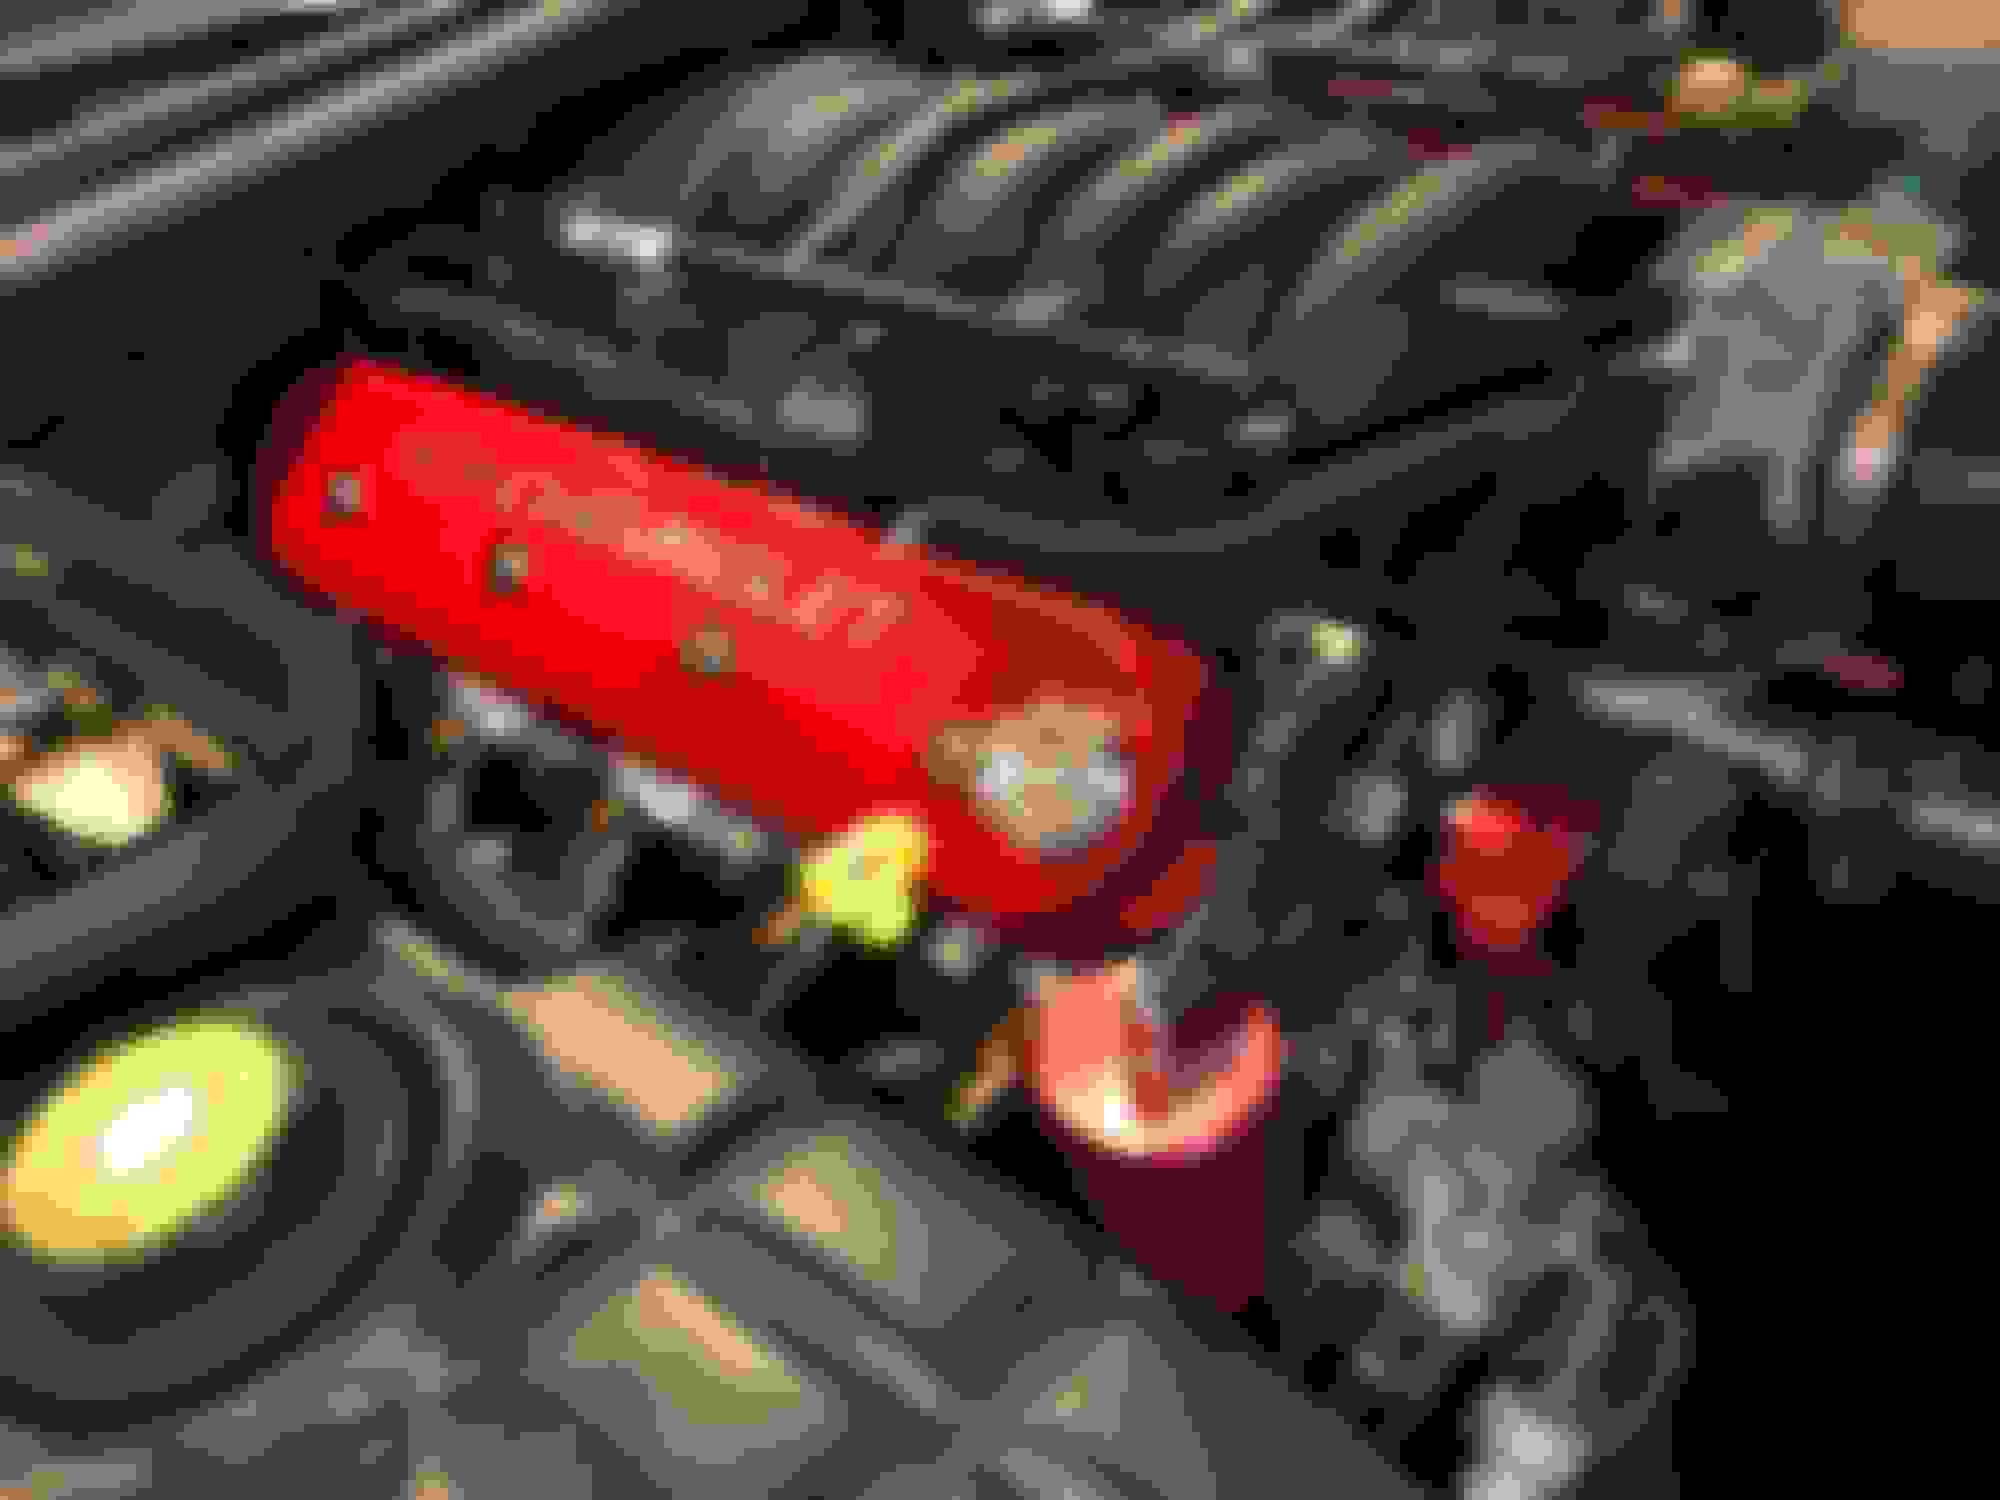
I was able to get a pair of Holley tall LS valve covers installed tonight. I typically am biased to go-fast and practical mods, but after relocating the coils months ago, I couldn’t stand the look of the factory valve covers anymore. I did quite a bit of research on what valve covers are available for the C5, but most of them are stupidly priced. At $280, I am thrilled with the form/fit/finish of these covers. The powder coat quality is excellent and the extended hardware they came with made the job seamless. There are no clearance issues with the alternator or anything like that. Additionally, they have baffles that run the full length of the cover so from a PCV circulation perspective, they should work like the OEM covers. I definitely recommend these for anyone that is on the fence. I can’t wait to get them paired up with the Fast 92 intake and Holley fuel rail I am waiting to install. Once I have enough pennies to pick up a set of heads, it’ll be go time.

Holley also makes valve covers that retain the OEM mounting points for the coil brackets if you’re not motivated to relocate all that stuff.


Last edited by wscott62893; 03-07-2019 at 08:21 AM.
The following 4 users liked this post by wscott62893:
jjc508520 (05-15-2020), Mr. Black (03-06-2019), Time for a C-5 (03-07-2019), VFR RC46 (03-07-2019)
Old 03-06-2019, 08:15 PM
  #2  
sabastian458
Melting Slicks
 
sabastian458's Avatar
 
Member Since: Jan 2009
Location: Easley/Anderson South Carolina
Posts: 2,127
Likes: 0
Received 32 Likes on 24 Posts

Default

I love them. I wish people made a fair priced set that had -10 bungs on them for crank case evac.
The following users liked this post:
FYRARMS (03-06-2019)
Old 03-06-2019, 08:18 PM
  #3  
neutron82
Race Director
Support Corvetteforum!
 
neutron82's Avatar
 
Member Since: Dec 2010
Location: Atlanta, GA
Posts: 10,426
Received 1,261 Likes on 1,056 Posts
2020 Corvette of the Year Finalist (performance mods)
C5 of Year Winner (performance mods) 2019

Default

looks so much cleaner without the coils, is that techflex f6 on the wire harness??... I used that stuff to cover my harness and it works pretty good
Old 03-06-2019, 08:34 PM
  #4  
wscott62893
Burning Brakes
Thread Starter
 
wscott62893's Avatar
 
Member Since: Dec 2017
Location: Montgomery County PA
Posts: 755
Received 269 Likes on 156 Posts
Default

Thank you!

It would be nice if someone made affordable covers with AN fittings. I am content with the OEM style PCV configuration the Holley covers have. If I was planning to run boost, then it’d be a different story.

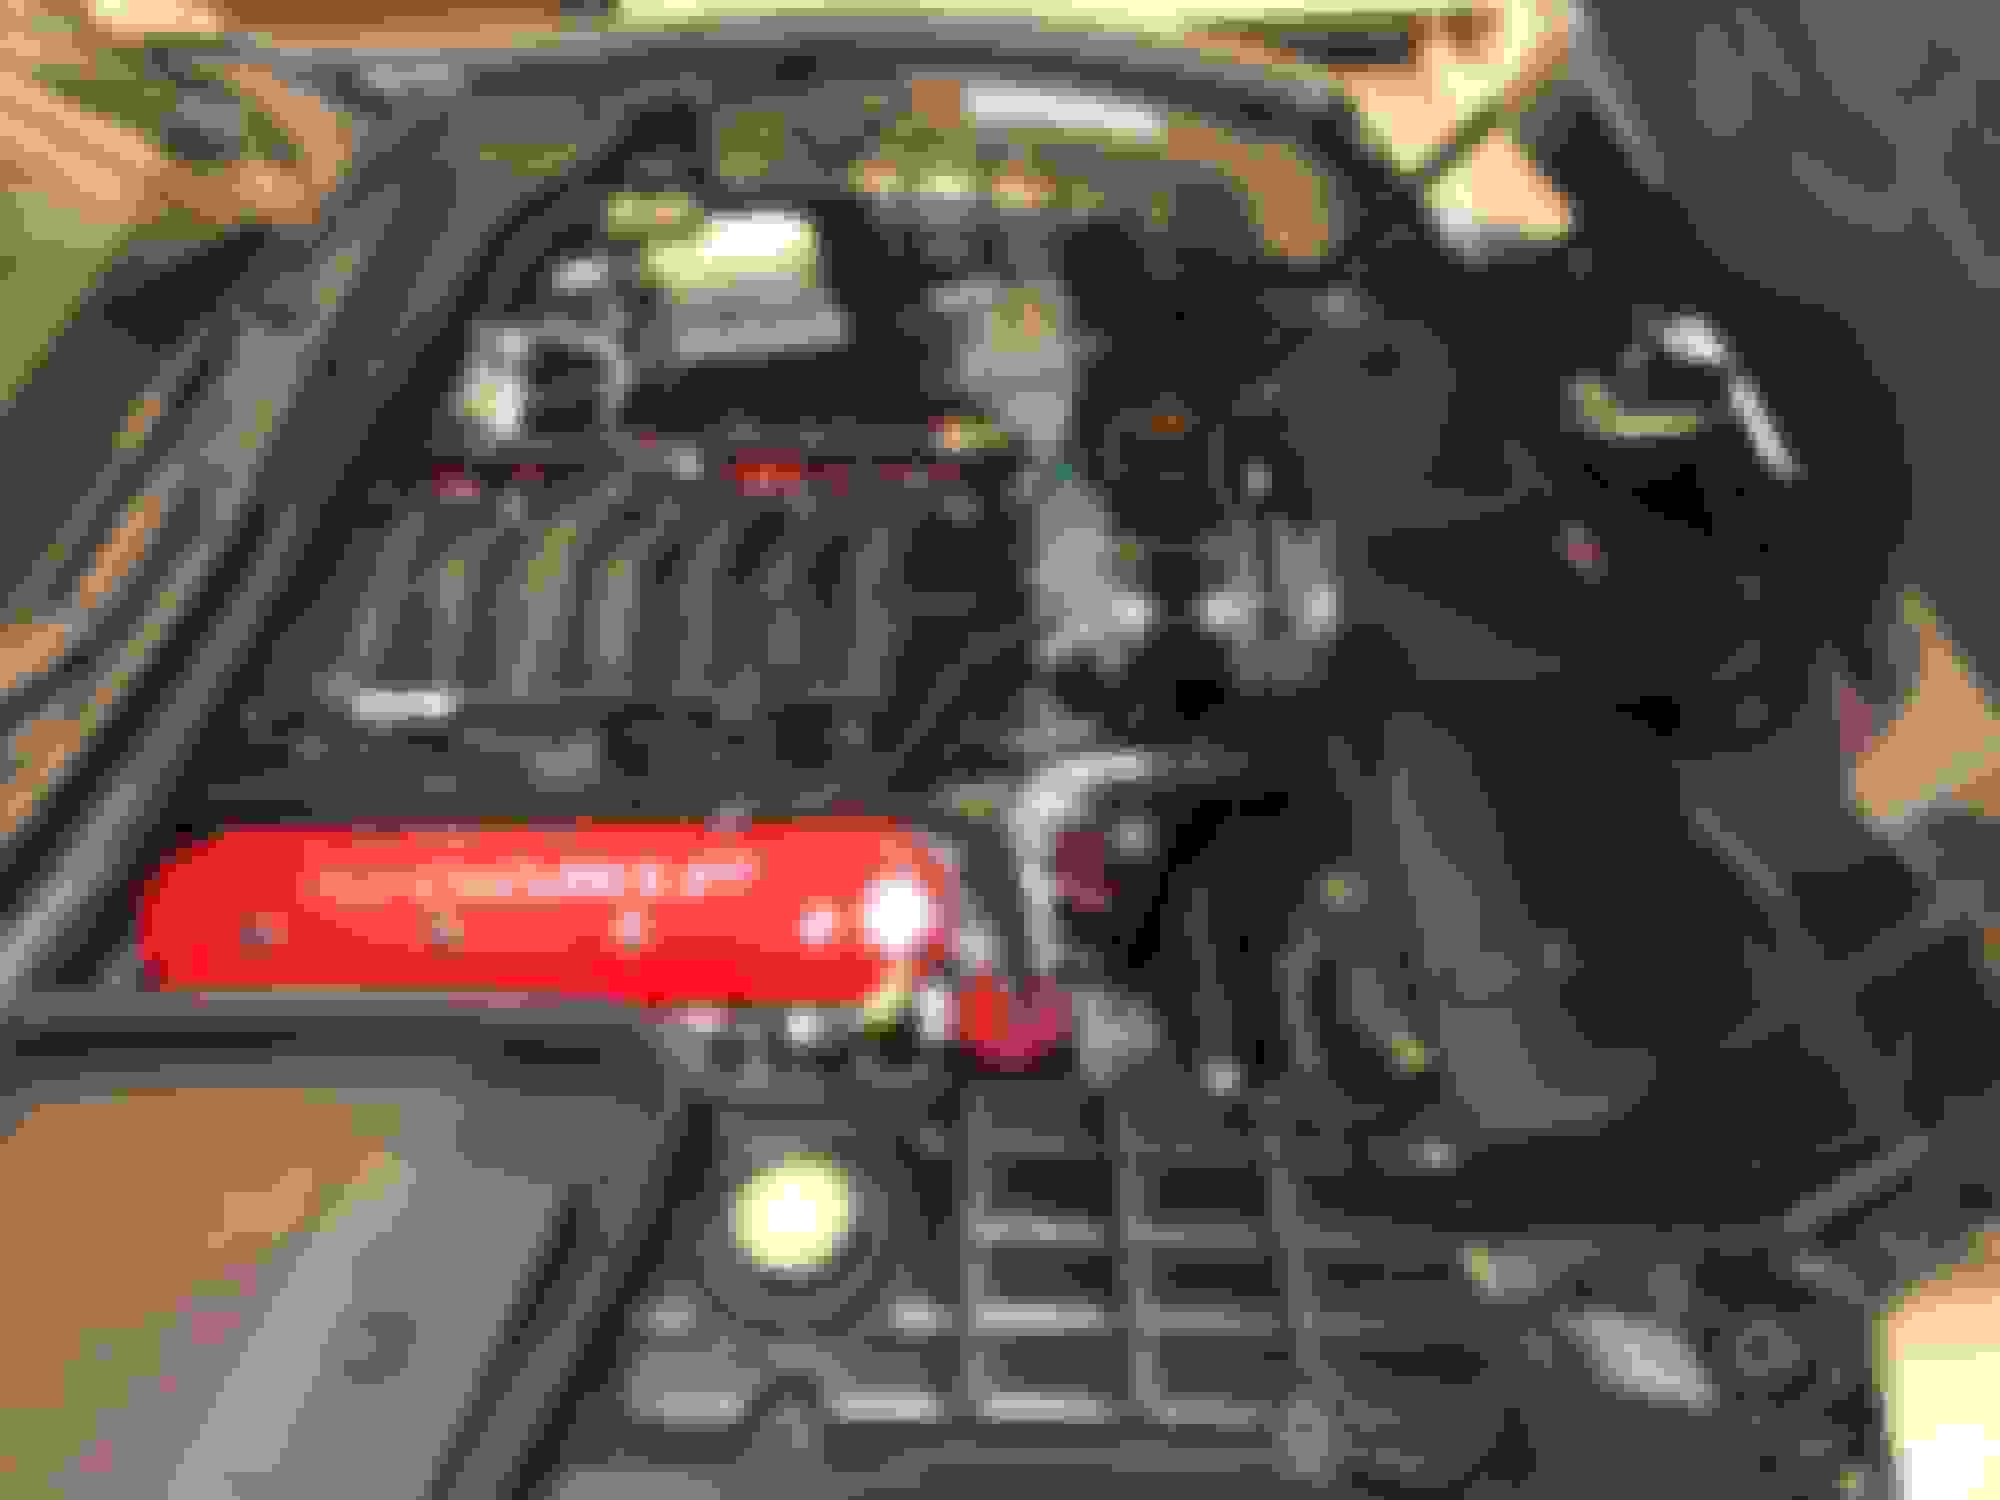
I forget what brand braided wrap it is, honestly. It’s a split loom wrap good to 400 degrees I bought off of Summit. The factory plastic loom was so brittle I decided to just replace it.

Last edited by wscott62893; 03-06-2019 at 08:35 PM.
Old 03-06-2019, 08:43 PM
  #5  
Mr. Black
Le Mans Master
 
Mr. Black's Avatar
 
Member Since: Aug 2018
Location: South Hill Wa
Posts: 6,979
Received 4,147 Likes on 1,939 Posts
2022 C5 of the Year Finalist - Modified
2021 C5 of the Year Finalist - Modified
Default

I absolutely love that look, but man it's a lot of work to get there.

I keep my hood closed. and my bay is eat off of clean.
The following users liked this post:
VFR RC46 (03-07-2019)
Old 03-06-2019, 08:45 PM
  #6  
wscott62893
Burning Brakes
Thread Starter
 
wscott62893's Avatar
 
Member Since: Dec 2017
Location: Montgomery County PA
Posts: 755
Received 269 Likes on 156 Posts
Default

Originally Posted by Mr. Black
I absolutely love that look, but man it's a lot of work to get there.

I keep my hood closed. and my bay is eat off of clean.
I agree, it is a lot of work. But we have long Winters up here in the Northeast. I had plenty of time to burn and this was one of the many upgrades I completed this Winter. I love doing all the mods but my wallet doesn’t

Last edited by wscott62893; 03-06-2019 at 08:46 PM.
The following users liked this post:
VFR RC46 (03-07-2019)
Old 03-06-2019, 09:51 PM
  #7  
04zjimc
Drifting
 
04zjimc's Avatar
 
Member Since: Aug 2014
Location: Ny long island
Posts: 1,512
Received 147 Likes on 98 Posts
Default

Looks great! Nice work! A mod long over due for me..lol..
Old 03-06-2019, 09:54 PM
  #8  
FYRARMS
Le Mans Master
 
FYRARMS's Avatar
 
Member Since: Jul 2007
Location: Oswego IL
Posts: 5,994
Received 3,236 Likes on 1,590 Posts

Default

Looks great! The car is really coming along nicely!
Old 03-07-2019, 05:52 AM
  #9  
wscott62893
Burning Brakes
Thread Starter
 
wscott62893's Avatar
 
Member Since: Dec 2017
Location: Montgomery County PA
Posts: 755
Received 269 Likes on 156 Posts
Default

Thank you Gentleman!
Old 03-07-2019, 08:12 AM
  #10  
madmatster
Pro
 
madmatster's Avatar
 
Member Since: Sep 2009
Location: old bridge nj
Posts: 518
Received 56 Likes on 23 Posts
St. Jude Donor '10

Default

have any pictures of your coil relocation?

Looks crazy nice man. well done!
Old 03-07-2019, 08:21 AM
  #11  
wscott62893
Burning Brakes
Thread Starter
 
wscott62893's Avatar
 
Member Since: Dec 2017
Location: Montgomery County PA
Posts: 755
Received 269 Likes on 156 Posts
Default

Originally Posted by madmatster
have any pictures of your coil relocation?

Looks crazy nice man. well done!
Thank you! Not off hand, but I can take some tonight if you'd like. I relocated the passenger side coils to the inside of the battery surround. I made brackets that allow me to mount them flat on the inside face of the surround. I relocated the driver side coils to the backside of the driver side wheel well. Also made a bracket for that which contours the fender for a nice fit. Driver side coils are easily accessible via the access panel in the wheel well or by removing the washer fluid tank. Passenger side requires no disassembly to access. Both sides required extending the harness which I did at the same time as re-looming the entire engine bay with the high temp wrap. I also installed the MSD 8.5mm Super Conductor custom length plug wires at the same time. It was a good bit of work, but I enjoyed the project. In parallel I was doing a clutch swap and torque tube rebuild so the coil relocation was a cake walk
Old 03-07-2019, 08:57 AM
  #12  
madmatster
Pro
 
madmatster's Avatar
 
Member Since: Sep 2009
Location: old bridge nj
Posts: 518
Received 56 Likes on 23 Posts
St. Jude Donor '10

Default

Originally Posted by wscott62893
Thank you! Not off hand, but I can take some tonight if you'd like. I relocated the passenger side coils to the inside of the battery surround. I made brackets that allow me to mount them flat on the inside face of the surround. I relocated the driver side coils to the backside of the driver side wheel well. Also made a bracket for that which contours the fender for a nice fit. Driver side coils are easily accessible via the access panel in the wheel well or by removing the washer fluid tank. Passenger side requires no disassembly to access. Both sides required extending the harness which I did at the same time as re-looming the entire engine bay with the high temp wrap. I also installed the MSD 8.5mm Super Conductor custom length plug wires at the same time. It was a good bit of work, but I enjoyed the project. In parallel I was doing a clutch swap and torque tube rebuild so the coil relocation was a cake walk
did you paint your fuel rails too?

def take some pictures if you are feeling ambitious. If you are feeling VERY ambitious, you should come to my garage and duplicate your efforts
i'm adding this to my projects list.
Old 03-07-2019, 09:25 AM
  #13  
wscott62893
Burning Brakes
Thread Starter
 
wscott62893's Avatar
 
Member Since: Dec 2017
Location: Montgomery County PA
Posts: 755
Received 269 Likes on 156 Posts
Default

Originally Posted by madmatster
did you paint your fuel rails too?

def take some pictures if you are feeling ambitious. If you are feeling VERY ambitious, you should come to my garage and duplicate your efforts
i'm adding this to my projects list.
I didn't paint the fuel rails, that's OEM coating. I will be replacing the fuel rails soon enough so I stuck with just cleaning them up.

I'll get some photos tonight, that's no problem!

Looks like you're only over in NJ (I am in Lancaster County PA). I'd be glad to lend a hand if you need it. If you want me to do it for you entirely...I could...but I'm not cheap
The following users liked this post:
madmatster (03-07-2019)
Old 03-07-2019, 10:24 AM
  #14  
Chris Draper
Drifting
 
Chris Draper's Avatar
 
Member Since: Jun 2004
Location: Gilbert, Arizona Currently Own: 1998 Coupe YouTube: My Corvette Life
Posts: 1,305
Received 494 Likes on 208 Posts

Default

Damn that looks good! Is their a tutorial on how are where to relocate the coil packs?
Old 03-07-2019, 10:41 AM
  #15  
f6john
Melting Slicks
 
f6john's Avatar
 
Member Since: Mar 2008
Location: Richmond, Ky
Posts: 2,850
Received 223 Likes on 146 Posts

Default

I love that look too. I had a set of the polished Holley covers that retained the coil mounts but they were not spaced correctly for ls1 coils so I sold them before I ever installed them. I did not know about these being available so thanks for the heads up!
Old 03-07-2019, 11:56 AM
  #16  
wscott62893
Burning Brakes
Thread Starter
 
wscott62893's Avatar
 
Member Since: Dec 2017
Location: Montgomery County PA
Posts: 755
Received 269 Likes on 156 Posts
Default

Originally Posted by Chris Draper
Damn that looks good! Is their a tutorial on how are where to relocate the coil packs?
I am not aware of any DIYs on coil relocation, but there may be one out there somewhere. It is a relatively involved process, but if you're comfortable fabricating brackets/ extending electrical harnesses/ making your own spark plug wires; it can be done in an afternoon. All other steps in the process are basic wire routing and bolting stuff together.

And thank you John!

Last edited by wscott62893; 03-07-2019 at 11:57 AM.
Old 03-07-2019, 12:31 PM
  #17  
oh1vette
Safety Car
 
oh1vette's Avatar
 
Member Since: Sep 2008
Location: Youngsville North Carolina
Posts: 4,725
Received 153 Likes on 117 Posts

Default

Originally Posted by Chris Draper
Damn that looks good! Is their a tutorial on how are where to relocate the coil packs?

Google is your friend:

https://www.google.com/search?q=C5+c...w=1536&bih=723

Get notified of new replies

To Holley Tall LS Valve Covers Installed

Old 03-07-2019, 03:39 PM
  #18  
Vetteman Jack
Administrator

Support Corvetteforum!
 
Vetteman Jack's Avatar
 
Member Since: Mar 2001
Location: In a parallel universe. Currently own 2014 Stingray Coupe.
Posts: 343,020
Received 19,307 Likes on 13,978 Posts
C7 of the Year - Modified Finalist 2021
MO Events Coordinator
St. Jude Co-Organizer
St. Jude Donor '03-'04-'05-'06-'07-'08-'09-'10-'11-'12-'13-'14-'15-'16-'17-'18-'19-
'20-'21-'22-'23-'24
NCM Sinkhole Donor
CI 5, 8 & 11 Veteran


Default

Those valve covers look great. Nice upgrade to the car.
Old 03-07-2019, 03:46 PM
  #19  
wscott62893
Burning Brakes
Thread Starter
 
wscott62893's Avatar
 
Member Since: Dec 2017
Location: Montgomery County PA
Posts: 755
Received 269 Likes on 156 Posts
Default

Originally Posted by Vetteman Jack
Those valve covers look great. Nice upgrade to the car.
Thank you!
Old 03-07-2019, 04:11 PM
  #20  
USAZR1
Le Mans Master
 
USAZR1's Avatar
 
Member Since: Jan 2000
Location: Georgetown TX
Posts: 8,435
Received 1,870 Likes on 1,085 Posts
C5 of Year Finalist (appearance mods) 2019

Default

Originally Posted by Chris Draper
Damn that looks good! Is their a tutorial on how are where to relocate the coil packs?
I've seen a couple of threads in the archives, showing how they relocated them behind the inner fender. If you do a search, I'm sure you will find the articles.


Quick Reply: Holley Tall LS Valve Covers Installed


All times are GMT -4. The time now is 06:13 PM.