


HUD Question
Thread Starter
Drifting


Joined: Sep 2001
Posts: 1,875
Likes: 27
From: Long Beach NY
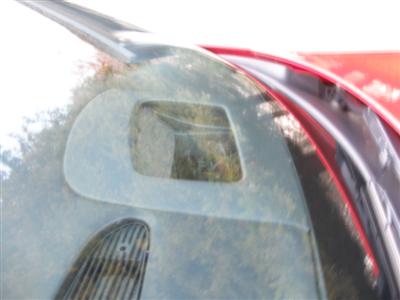
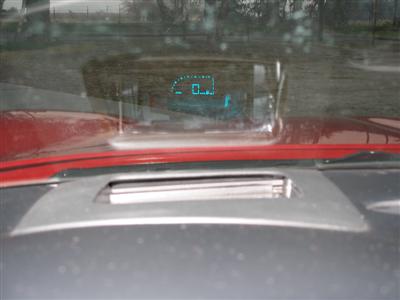
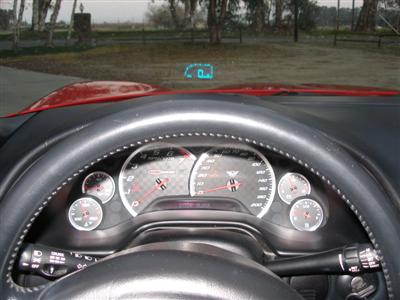
I am wondering if the edge of the cut dash is visable when the HUD is installed?
On the photos of the retrofit HUD installation I noticed that the Dash Cut seems to be rough. When the Bezel and Projector is installed can the edge be seen.
I would go out and look at some but with so much salt and sand on the ground there does not seem to be many C5s around.
Barrier
On the photos of the retrofit HUD installation I noticed that the Dash Cut seems to be rough. When the Bezel and Projector is installed can the edge be seen.
I would go out and look at some but with so much salt and sand on the ground there does not seem to be many C5s around.
Barrier
Drifting

Joined: Oct 2004
Posts: 1,384
Likes: 8
From: Southwest Virginia
If done properly you can't tell the difference from factory. The bezel is larger than the cut by about 1/2" so you can't see the cut. The main thing is to be sure to take your time and cut a little at a time until the bezel fits perfectly. The rough cut your seeing is probably before the bezel is installed, and yes, that would look a little rough on either factory or retrofit install. 
Last edited by SpeedyZ; Feb 23, 2006 at 12:58 PM.
Burning Brakes


Joined: Mar 2005
Posts: 1,227
Likes: 15
St. Jude Donor '06
Instead of cutting 90� to the dash surface cut at a 45� angle from the inside to the outside so that the edge is always trailing away from your eye. This is what I did for my install 3 weekends ago. Then, just for good measure, I colored all the newly exposed foam black with a sharpie. Even when you look at it from the outside of the the windshield, you still cant see the dash thickness,

Burning Brakes


Joined: Oct 2005
Posts: 924
Likes: 161
From: Atwater CA
2024 C7 of the Year Finalist - Unmodified
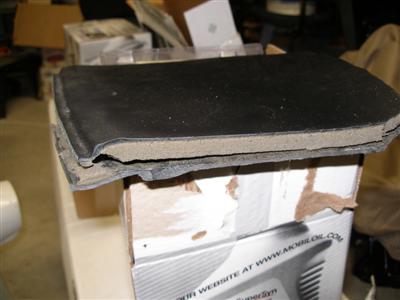
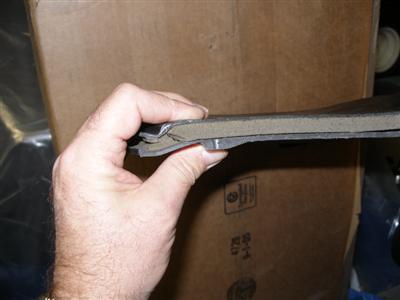
Actually the dash is like 3 layers: The Top is like really thick vinyl like 1/16" then there is like a 3/8" or 1/2" layer of foam and then there is the bottom, a hard plastic shell maybe 1/8" thick that gives the dash it's shape. If you use a 1" diameter saw blade in your Dremel, you can cut the bottom of the dash without cutting the top at all! So even if you cut the bottom two layers too much you will not be able to see a problem with the bezel installed. Then I cut the top with razor knife and some aviation (tin) snips. I cut a template out of the thick paper cardboard and made it fit the bezel perfect. I used that to transfer the shape to the dash... on the back of the cut, toward you if you are in the driver seat, there is only about a 1/4" to play with, so be careful there, the lines on the bottom of the dash are too agressive (too far from the windshield) there. There is more room for error on the sides. Take your time, small adjustments. You can do this. Mine came out perfect, yours will too!
Last edited by dataporter; Feb 23, 2006 at 10:01 PM. Reason: recollection of dimensions was wrong!

Burning Brakes

Joined: Jul 2004
Posts: 1,172
Likes: 71
From: MA
I created a templet with craft paper of the bezel flange and used this to make sure that I didn't cut the opening to large. This corresponded closely with the cut outline on the bottom of the dash pad.
Corvette Stories
The Best of Corvette for Corvette Enthusiasts

Top 10 Most Expensive Corvettes Ever Sold on Bring A Trailer
Brett Foote
10 Things Every Corvette Owner Needs (2026 Edition)
Michael S. Palmer
8 Most "Only Corvette Owners Understand" Quirks and Problems
Pouria Savadkouei
10 Reasons the C6 Z06 is Still A Performance Benchmark After 20 Years
Joe Kucinski
How Much Horsepower Every Corvette Engine "LOST" in 1972
Joe Kucinski
Top 10 DOs and DON'Ts for Protecting Your Convertible Top!
Michael S. Palmer
Top 10 Most Explosive Corvettes Ever Made: Power-to-Weight Ratio Ranked!
Joe Kucinski
150 hp to 1,250 hp: Every Corvette Generation Compared by the Specs That Matter
Joe Kucinski