
Oil pressure sender relocate
 12-31-2007, 07:53 PM
#321
Instructor


Member Since: Jul 2004
Location: Tampa FL
Posts: 177
Likes: 0
Received 0 Likes
on
0 Posts
I know it sounds like I'm a total n00b but I have done plenty of mechanical work on this and other cars. I just didn't want to cut any more than I already did and I'm VERY glad I didn't end up doing some irreversible damage to the wiring harness.
Thanks for the feedback!
 01-15-2008, 08:07 PM
#322
7th Gear

Member Since: Jan 2007
Posts: 7
Likes: 0
Received 0 Likes
on
0 Posts
Looks to me like the idea of cutting an access hole under the wipers ease the installation of the factory sending unit is the easyest way to do it. Giong to try that and I'll let ya all know the outcome.
01-15-2008, 08:36 PM
#323
Racer
Member Since: May 2000
Location: Louisville KY
Posts: 267
Likes: 0
Received 0 Likes
on
0 Posts
Cruise-In I Veteran
Cruise-In II Veteran
Cruise-In III Veteran

That's the way I did it. No problem getting the job done.
 01-21-2008, 07:54 PM
#325
Drifting

I've done the cutting method, and also recently removed the intake to replace the knock sensors. The cutting method is pretty quick, but there is limited hand access for getting to the oil sensor.
Removing of the intake takes no more than about 1/2 hr, and enables much better access for the oil sensor. It's cleaning up of all the gunk under the manifold, if the manifold had never been off, is what takes a bit of time. The only real specialty tool needed for intake r/r is a torque wrench that measures in in/lbs.
If I would've been more brave when first doing the oil sensor, I would've found that removing the intake isn't a big deal. If you do go the intake removal out and your vette has some miles on it, it would be wise to go ahead and replace the knock sensors since you already have it off. Since I had mine off, I went ahead and upgraded to an LS6 intake manifold..
01-21-2008, 08:30 PM
#326
Melting Slicks


Member Since: May 2006
Location: Westchester County New York
Posts: 2,934
Received 258 Likes
on
171 Posts

I've done the cutting method, and also recently removed the intake to replace the knock sensors. The cutting method is pretty quick, but there is limited hand access for getting to the oil sensor.
Removing of the intake takes no more than about 1/2 hr, and enables much better access for the oil sensor. It's cleaning up of all the gunk under the manifold, if the manifold had never been off, is what takes a bit of time. The only real specialty tool needed for intake r/r is a torque wrench that measures in in/lbs.
If I would've been more brave when first doing the oil sensor, I would've found that removing the intake isn't a big deal. If you do go the intake removal out and your vette has some miles on it, it would be wise to go ahead and replace the knock sensors since you already have it off. Since I had mine off, I went ahead and upgraded to an LS6 intake manifold..
Removing of the intake takes no more than about 1/2 hr, and enables much better access for the oil sensor. It's cleaning up of all the gunk under the manifold, if the manifold had never been off, is what takes a bit of time. The only real specialty tool needed for intake r/r is a torque wrench that measures in in/lbs.
If I would've been more brave when first doing the oil sensor, I would've found that removing the intake isn't a big deal. If you do go the intake removal out and your vette has some miles on it, it would be wise to go ahead and replace the knock sensors since you already have it off. Since I had mine off, I went ahead and upgraded to an LS6 intake manifold..
01-21-2008, 10:11 PM
#327
Burning Brakes


I have a oil pressure switch socket and I did not have to grind the socket to get the sensor off. For me, the biggest problem was removing the electrical connector. After cutting the hole, R&R was less than 1/2 hour. And there is much less risk of getting something wrong than removing the intake manifold.
01-24-2008, 05:08 PM
#328
Navigator
Member Since: Jan 2008
Location: Owasso OK
Posts: 9
Likes: 0
Received 0 Likes
on
0 Posts
For fittings to do a relocation of the stock sender try:
http://www.anplumbing.com/shop/index...p=&dept=Metric
They have both 16 x 1.5 male and female to AN fittings.
http://www.anplumbing.com/shop/index...p=&dept=Metric
They have both 16 x 1.5 male and female to AN fittings.
02-02-2008, 11:04 AM
#329
7th Gear
Member Since: Jan 2007
Posts: 7
Likes: 0
Received 0 Likes
on
0 Posts
HEY HEY HEY! I did the hole cutting thing and it was so easy. I used a dremmel tool for some and a hack saw for the rest. When I replace the sender I reinstalled the peice I cut out by riviting on 4 tabs to it an bondoed the cracks, a touch of paint and you really can't tell it was cut. watch out not to cut the wires to the sender that come from the drivers sid of the motor. Thanks for the idea!
02-03-2008, 01:04 PM
#330
Instructor
Member Since: Mar 2005
Location: iowa
Posts: 104
Likes: 0
Received 0 Likes
on
0 Posts
I also did the hole cutting method of changing bad oil pressure sensor. Yes be careful of the wrapped wires. I cut my square hole a little more to the rear to get behind the hose that runs by there. This does take a little time but has to be easier than removing the intake.
02-06-2008, 09:30 PM
#331
Racer
I'm taking a guess here, but tend to think they're failing due to heat. My original one(brass) lasted for many miles till it finally gave up. Replacing it with a dealer bought one, lasted a whole two weeks and was giving me real low pressure values, then died by oil bleeding through into the electronics. Another one, the PS type, relocated to the fuel rail and a little creative copper tubing, has been fine ever since. There is less heat at the fuel rail than mounted directing to and at the rear of the block. I think the internal seal can't take the heat its exposed too.
After reading about 300 posts on this sending unit problem and the inferior replacement parts situation, I'm convinced it's the higher than normal C5 engine temps that is the culprit. Our engines operate between 192 and 240 degrees most of the time. Other cars max out at about 190 for the most part. The Mexicans manufacturing these sensors are not taking into account the C5's higher operating temperature. The pressure membrane and/or oil seal cannot handle the heat.
This is what I'm thinking about now.
BTW-I'm also dealing with the "Column Lock" crapola right now too!!!
 02-09-2008, 05:17 PM
#333
Burning Brakes
I took some pictures with a tape measure. This worked awesome. I had to buy the $6 socket from autozone.
I had to hold the PCV tube out of the way but other than that it worked great.
http://www.brookins.us/2000%20corvet...soraccesshole/
I had to hold the PCV tube out of the way but other than that it worked great.
http://www.brookins.us/2000%20corvet...soraccesshole/
02-09-2008, 10:11 PM
#334
Burning Brakes
A 1 1/16 " socket will fit. It will probably have to be a deep socket to clear the connector. However, I think one should use a special pressure sender socket (from an auto store). That is what I used and I was very careful not to over tighten the unit. If you look at the sender, it is not exactly a hex nut shape - the corners are rounded off. Attached is a picture showing how the special socket fits the sender. I should also note, the special socket is smaller in diameter 0.360 " vs 0.393 " for my Craftsman 1 1/16 socket. I did not have to grind the socket but some people did to get their socket to fit in.
Last edited by white90conv; 02-09-2008 at 10:15 PM. Reason: More info
02-10-2008, 12:56 PM
#335
Melting Slicks
Great pics of the location of the 2"x2" hole Brookman! Now that you posted this if/when it happens to me I will go this route rather than try to take the intake off. Thank you.
02-11-2008, 10:42 AM
#337
Racer

Member Since: Jul 2001
Location: manahawkin,nj
Posts: 455
Likes: 0
Received 0 Likes
on
0 Posts
I took some pictures with a tape measure. This worked awesome. I had to buy the $6 socket from autozone.
I had to hold the PCV tube out of the way but other than that it worked great.
http://www.brookins.us/2000%20corvet...soraccesshole/
I had to hold the PCV tube out of the way but other than that it worked great.
http://www.brookins.us/2000%20corvet...soraccesshole/
Jerry
02-11-2008, 09:20 PM
#338
Burning Brakes
actually the hole was perfect. If you look closely you will see that I had to round out the front just a little bit to make sure the socket was perfectly vertical.
to close the hole I ended up using black duct tape on both sides.
the sendor is directly under that hose. I had to hold it forward out of the way when I removed and installed the sensor.
to close the hole I ended up using black duct tape on both sides.
the sendor is directly under that hose. I had to hold it forward out of the way when I removed and installed the sensor.
Last edited by brookman; 02-11-2008 at 09:22 PM. Reason: forgot something
 02-12-2008, 02:04 PM
#340
Safety Car

Thread Starter
First adapter: PN ATM-2268 1/8 NPT female x M16 X 1.5 male http://www.egauges.com/vdo_acce.asp?...pters&Manf=All
Second adapter: 1/4" to 1/8" brass fitting. Napa # 3200x4x2 (SAE# 130139)
And of course the Buick sensor: GM part # 12584940
Basically it's going to be this:

Then this:
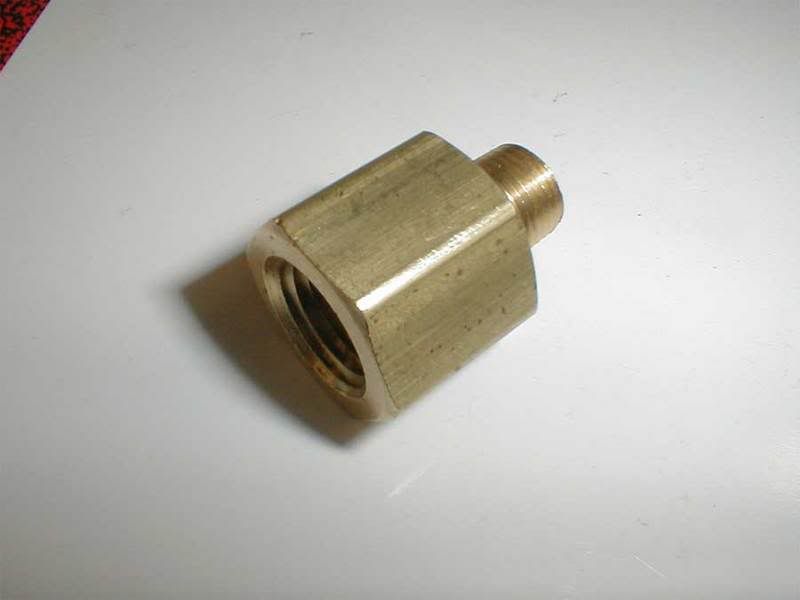
Then this:

Last edited by 426 Hemi; 02-12-2008 at 02:16 PM.