
Headlight switch failed. Decided to repair instead of replace…


 04-18-2008, 12:30 PM
#22
Melting Slicks

Instructions
I didn't write these someone else on the forum did, however I followed them to replace mine. The torex screw is a bit** but if you work at it and use the correct torex bit and a rachett wrench it will come out. This is worth the effort to keep from removing the steering whell !
1. remove the two screw on the knee pad under (Torx head screw).
2. use a thin screw driver to lift the small panel out around the trunk release switch and disconnect the switch connector..remove the screw behind the trunk release switch panel.
3. lift the small (vent looking) panel next to the ignition switch and remove the screw behind it.
4. Pull the knee pad panel out...there is a couple of spring load clips (friction fastener) holding the panel in on the left side of the panel.
5. Remove the two torx head screw under the the cover for the steering column just below the steering wheel.
6. Split the top and bottom section of this cover and remove the bottom cover. (Top and bottom covers at jointed at the base with small hooks on each side). The top cover would not be removable yet.
7. Remove the two Torx screws (silver in color...this is extended out verse the indentation you have on normal screw head...if you don't have a socket for torx, try using a small hex socket) from underneath...they hold the top half of the cover. Then remove the top cover.
8. Remove one top screw on the top part of the steering holding the turn signal switch. The second one faces you on your lower left when you are sitting in the car...try turning the steering wheel to the left so the flat part of the airbag is on the left for easier access. THIS SCREW IS KIND OF TRICKY...DON't STRIP THE TORX HEAD!!! I didn't have the right tool so I use a Torx head socket and use a slip joint plier to turn it slowly....I think it is best if you have a torx head that is the right size (25) that fits into one of those multifunction screw driver head is best then you can use an rachett box wrench or an open wrench to turn it. Loosing this is remove all the way by fingers (this is the most time consuming part). Replace switch by attaching the two screws back then swap the two connectors with the old/bad switch....
9. Reinstall the rest in reverse order....If you have the right tool for the last torx screw...you should be able to do this in less than 30 minutes.
this is the thread I used worked great, no need to remove steering wheel
04-18-2008, 12:41 PM
#23
Burning Brakes

Member Since: Aug 2006
Location: Stark County Ohio
Posts: 1,217
Likes: 0
Received 5 Likes
on
5 Posts
From the last post in this closed thread http://forums.corvetteforum.com/show....php?t=1274548
Written by “steveC5” – (It amends the previous post)
Jedicowboy those instructions rocked (thanks and thanks to whoever wrote them!) Swap took a conservative 2 hours, but now that I know what im doing, and without distractions it should take around 30 minutes.One thing I would add is step 8.5
8.5) You may have difficulties pulling out the switch wiring connectors due to clearance issues reaching with your hand. If that is the case you can remove the knee pad bracket (metal piece with styrofoam attached.) It is connected with 4 torx screws (2 on each side.) Once it is removed you should be able to pull the connector out with no problems.
Add to 9) When reinstalling in reverse order, you may need to loosen up the trim around your stereo and climate control to allow the knee pad to smoothly get underneath the overlapping stereo trim. Also keep in mind the 2 lower screws of the knee pad may be a pain. I found the best way is to attach the knee pad is with the 2 lower screws already "punched in." Also insure the clips where these 2 screws will screw into are properly positioned (one fell out on me and I had to clip it back in) so you don't end up digging around guiding the screws into the holes (that you cant see.)
For the interior temperature sensor, I had the best luck disconnecting it's cable and removing the sensor completely from the knee trim. Once the knee trim is installed and the cable is "hanging out" from the overlapping openings of both knee and stereo trims, simply connect the cable back to the sensor and insert the sensor assembly into the opening. The sensor assembly will "click" in. I don't know if it can even remain attached to the wire during the entire swap as the only way to reattach is pushing it in (rather than "pulling" it back into place.)
Thanks for all the input guys! It's a great feeling fixing a problem yourself rather than paying someone to fix it for you!
Last edited by steveC5 : 01-13-2006 at 11:16 AM.


 04-23-2008, 11:55 PM
#27
Tech Contributor
Another satisfied customer. Thank you for taking the time and energy to create this write-up. I wouldn't have figured it out on my own... Thanks to you I have tail lights again!!!
edit - As an extra bonus, on the first hard turn going to work this morning I hear my 8mm open-end wrench finally come out from under the battery tray. I stopped and picked it up off the side of the road, so now my headlight switch repair truly did cost $0.
edit - As an extra bonus, on the first hard turn going to work this morning I hear my 8mm open-end wrench finally come out from under the battery tray. I stopped and picked it up off the side of the road, so now my headlight switch repair truly did cost $0.
Last edited by chevy406; 04-24-2008 at 08:27 AM. Reason: added content
 06-12-2008, 10:53 AM
#29
Drifting

I've been having blinker problems for over a year that grounds and sockets haven't resolved. I even pulled in the great Bill Curlee to lend his hand and the car STILL stumps us. I'm starting to wonder if its the switch itself. I assume if I can get at the contacts for the turn signal too if I follow the same dissassembly directions? Sounds like another project!
06-12-2008, 04:09 PM
#30
Melting Slicks
Thread Starter


It's good to see that others have been successful with this repair procedure.
Kudos to the Corvette Forum for making it possible to share this kind of information.

Mike
06-13-2008, 03:00 PM
#31
Drifting
MIKER, you were 1000000% right! I found one contact that was badly bent (why?) and the rest of them seemed to be arcing a little. Since they're all just spring tensioned copper, I can see how they lose their spring over time. I sanded and bent the contacts that seemed to be bad, and after about the 3rd try, everything was working perfectly. Headlights on or off...the blinkers blink SLOWLY and on all 4 corners of the car! If my fix acts up again, I'll just buy the new switch now that I know what the problem is. GREAT JOB CF MEMBERS! YOU SAVED ANOTHER FELLOW MEMBER BIG BUCKS AND HEADACHES!
 06-14-2008, 06:44 PM
#33
Advanced

Member Since: Feb 2007
Location: Lacey Washington
Posts: 63
Likes: 0
Received 0 Likes
on
0 Posts
I've been having trouble with the lights staying on in the off position..
Took her apart to see that the little white nylon cog had a hole melted in the left lobe allowing the switch to return to open
Maybe after a long trip with the lights on the circuit was just a bit too hot
Considering filling the cavity with some kind of glue..
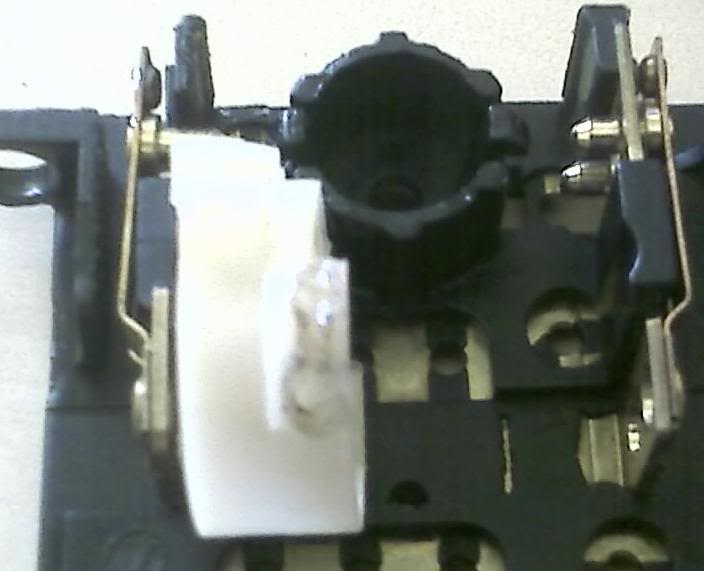
Any suggestions?
Took her apart to see that the little white nylon cog had a hole melted in the left lobe allowing the switch to return to open
Maybe after a long trip with the lights on the circuit was just a bit too hot
Considering filling the cavity with some kind of glue..
Any suggestions?
06-14-2008, 11:30 PM
#34
Melting Slicks
Thread Starter
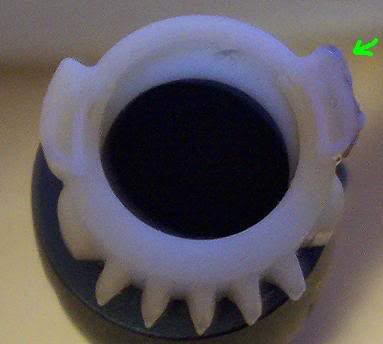
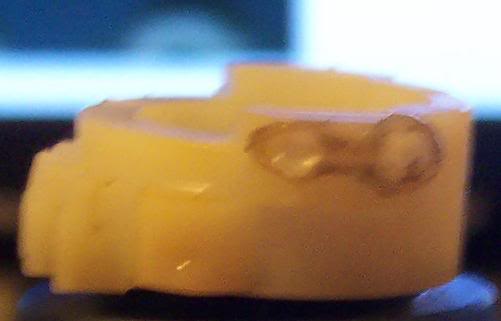
. . . .Considering filling the cavity with some kind of glue..
http://i50.photobucket.com/albums/f3...ltedzoomed.jpg
Any suggestions?
http://i50.photobucket.com/albums/f3...ltedzoomed.jpg
Any suggestions?
I have a plastic welder which I've used to repair various plastic items. It is basically a glorified soldering iron with a special shaped foot and variable temperature control.
If used carefully, I think that you could actually use an electric soldering iron to smooth out the damage on that cog. Just try not to scorch/burn the plastic too much.
If needed, you can melt/scrape some of the plastic material from an unimportant part of the cog to help fill the hole.
After filling the void you may need to smooth out the repaired area using a file or Dremel tool
A poor electrical contact can generate a LOT of heat as you can tell. If you improve the contact your repair should hold up well.
Let us know how it works out.
Mike
 06-15-2008, 01:49 PM
#36
Tech Contributor


Member Since: Dec 1999
Location: Anthony TX
Posts: 32,736
Received 2,180 Likes
on
1,583 Posts
CI 6,7,8,9,11 Vet
St. Jude Donor '08

Heres what caused your issue and a solution:
The contacts for that position were dirty and or had a poor connection. It caused the connection to heat up, transfer the heat to the pin and melt the plastic cog. Walmart sells a TWO PART PLASTIC EPXOY. I believe its made by DEVCON. Its yellow when you mix it and stinks like hell but, it works VERY good on plastic and I bet it would work well in your application.
Do you have any lighting mods that would cause the lighting circuit to draw extra current????
Make sure the contacts are clean and tight.
BC
06-17-2008, 12:22 AM
#37
Advanced
Member Since: Feb 2007
Location: Lacey Washington
Posts: 63
Likes: 0
Received 0 Likes
on
0 Posts
Picked up some permatex plastic weld 2 part solution, worked like a charm. Gear/lobe works like new. Thanks for the input 
06-17-2008, 10:18 AM
#38
Melting Slicks

threads like this are great, thanks for sharing!
I have a different problem with mine. I'm pretty sure the switch is to blame after I found someone else here who has had the same problem. once in a while (maybe 1 in 10) when I turn on the right turn signal, and only the right signal, my cruse disengages. its very wierd, but since the switch itself is the only common link to the two systems, I think its the problem. any ideas where I should look?
also, did you by any chance see the contacts in there which kill the low beams when you turn the high beams on? it would be nice to insert a little jumper in to fix this annoying problem because the relay mod has some other side effects.
06-29-2008, 08:55 PM
#39
Instructor


From the last post in this closed thread http://forums.corvetteforum.com/show....php?t=1274548
Written by “steveC5” – (It amends the previous post)
Jedicowboy those instructions rocked (thanks and thanks to whoever wrote them!) Swap took a conservative 2 hours, but now that I know what im doing, and without distractions it should take around 30 minutes.One thing I would add is step 8.5
8.5) You may have difficulties pulling out the switch wiring connectors due to clearance issues reaching with your hand. If that is the case you can remove the knee pad bracket (metal piece with styrofoam attached.) It is connected with 4 torx screws (2 on each side.) Once it is removed you should be able to pull the connector out with no problems.
Add to 9) When reinstalling in reverse order, you may need to loosen up the trim around your stereo and climate control to allow the knee pad to smoothly get underneath the overlapping stereo trim. Also keep in mind the 2 lower screws of the knee pad may be a pain. I found the best way is to attach the knee pad is with the 2 lower screws already "punched in." Also insure the clips where these 2 screws will screw into are properly positioned (one fell out on me and I had to clip it back in) so you don't end up digging around guiding the screws into the holes (that you cant see.)
For the interior temperature sensor, I had the best luck disconnecting it's cable and removing the sensor completely from the knee trim. Once the knee trim is installed and the cable is "hanging out" from the overlapping openings of both knee and stereo trims, simply connect the cable back to the sensor and insert the sensor assembly into the opening. The sensor assembly will "click" in. I don't know if it can even remain attached to the wire during the entire swap as the only way to reattach is pushing it in (rather than "pulling" it back into place.)
Thanks for all the input guys! It's a great feeling fixing a problem yourself rather than paying someone to fix it for you!
Last edited by steveC5 : 01-13-2006 at 11:16 AM.
Written by “steveC5” – (It amends the previous post)
Jedicowboy those instructions rocked (thanks and thanks to whoever wrote them!) Swap took a conservative 2 hours, but now that I know what im doing, and without distractions it should take around 30 minutes.One thing I would add is step 8.5
8.5) You may have difficulties pulling out the switch wiring connectors due to clearance issues reaching with your hand. If that is the case you can remove the knee pad bracket (metal piece with styrofoam attached.) It is connected with 4 torx screws (2 on each side.) Once it is removed you should be able to pull the connector out with no problems.
Add to 9) When reinstalling in reverse order, you may need to loosen up the trim around your stereo and climate control to allow the knee pad to smoothly get underneath the overlapping stereo trim. Also keep in mind the 2 lower screws of the knee pad may be a pain. I found the best way is to attach the knee pad is with the 2 lower screws already "punched in." Also insure the clips where these 2 screws will screw into are properly positioned (one fell out on me and I had to clip it back in) so you don't end up digging around guiding the screws into the holes (that you cant see.)
For the interior temperature sensor, I had the best luck disconnecting it's cable and removing the sensor completely from the knee trim. Once the knee trim is installed and the cable is "hanging out" from the overlapping openings of both knee and stereo trims, simply connect the cable back to the sensor and insert the sensor assembly into the opening. The sensor assembly will "click" in. I don't know if it can even remain attached to the wire during the entire swap as the only way to reattach is pushing it in (rather than "pulling" it back into place.)
Thanks for all the input guys! It's a great feeling fixing a problem yourself rather than paying someone to fix it for you!
Last edited by steveC5 : 01-13-2006 at 11:16 AM.
07-04-2008, 11:59 PM
#40
Le Mans Master

Thanks, just did mine. Had no lights at all after 4 weeks of flakey operation.
Just remember before you put the switch halves back together, to make sure the little white toothed wheel is in the running lights off position , as in no contact, and the selector is completely in the off position.
I put mine back together and the running lights were stuck on:o

Just remember before you put the switch halves back together, to make sure the little white toothed wheel is in the running lights off position , as in no contact, and the selector is completely in the off position.
I put mine back together and the running lights were stuck on:o