



DIY Auto Transmission Fluid Replacement?

Thread Starter
Heel & Toe

Joined: Feb 2008
Posts: 21
Likes: 0
 DIY Auto Transmission Fluid Replacement?
I am looking for a DIY transmission fluid replacement on a C5, i am really looking for pictures on where the full plug is or where the sending unit is, thanks

Team Owner


Joined: Mar 2005
Posts: 32,269
Likes: 35
From: Somewhere between mild insanity and complete psychosis
Have fun with that, definitely not an easy DIY unless you have a lift.
The filler/cap is either on or near the tranny (never did it myself, just watched) so jack-stands will be a PITA. I can't remember the exact procedure, but after you fill it to a certain point you have to start the car and let it run while you top it off.
The filler/cap is either on or near the tranny (never did it myself, just watched) so jack-stands will be a PITA. I can't remember the exact procedure, but after you fill it to a certain point you have to start the car and let it run while you top it off.

Advanced
Joined: May 2006
Posts: 67
Likes: 0
From: Dahlgren Virginia
I'm doing a refill in my '99. The drain plug is the fill plug it seems. I think there should be a tube going up attached to the plug so that the level will be higher than the level at the plug in the pan. I guess there is no way to check the level unless you fill it and see how much it takes. Mine has been leaking from the back near the pan for a long time.
Corvette Stories
The Best of Corvette for Corvette Enthusiasts

Top 10 Most Expensive Corvettes Ever Sold on Bring A Trailer
Brett Foote
10 Things Every Corvette Owner Needs (2026 Edition)
Michael S. Palmer
8 Most "Only Corvette Owners Understand" Quirks and Problems
Pouria Savadkouei
10 Reasons the C6 Z06 is Still A Performance Benchmark After 20 Years
Joe Kucinski
How Much Horsepower Every Corvette Engine "LOST" in 1972
Joe Kucinski
Top 10 DOs and DON'Ts for Protecting Your Convertible Top!
Michael S. Palmer
Top 10 Most Explosive Corvettes Ever Made: Power-to-Weight Ratio Ranked!
Joe Kucinski
150 hp to 1,250 hp: Every Corvette Generation Compared by the Specs That Matter
Joe Kucinski
8 Coolest Corvette Pace Cars (and Replicas) of All Time
Verdad Gallardo
Burning Brakes

Joined: Aug 2006
Posts: 1,217
Likes: 5
From: Stark County Ohio
To check for proper automatic trans fluid level, the car must be running and be up to temperature.
It helps to have the car up on a lift, but it can be done with the car properly supported on jack stands.
Fluid will be HOT and you are working in close proximity to the HOT exhaust pipe. Wear mechanics gloves and protect your arms.
The drain plug and fill plug are one and the same.
1. With the transmission up to temperature, the car RUNNING, and the car level; shift through all the gears, finally placing the trans in “Park”.
2. Keep car running. (In “Park”)
3. Remove fill plug. Proper level hot is just at the bottom of the drain/fill hole. Add fluid to the point that it trickles out of the drain/fill hole.
4. Reinstall plug bolt.
Flushing the fluid is another matter. Yes you must have a machine to “fully” flush the fluid. Removing the pan and changing the filter will only remove a fraction of the fluid. (1/3? ½?)
If it were me, I would insist on watching the procedure to be sure they are actually doing the flush, but that’s just me.
It helps to have the car up on a lift, but it can be done with the car properly supported on jack stands.
Fluid will be HOT and you are working in close proximity to the HOT exhaust pipe. Wear mechanics gloves and protect your arms.
The drain plug and fill plug are one and the same.
1. With the transmission up to temperature, the car RUNNING, and the car level; shift through all the gears, finally placing the trans in “Park”.
2. Keep car running. (In “Park”)
3. Remove fill plug. Proper level hot is just at the bottom of the drain/fill hole. Add fluid to the point that it trickles out of the drain/fill hole.
4. Reinstall plug bolt.
Flushing the fluid is another matter. Yes you must have a machine to “fully” flush the fluid. Removing the pan and changing the filter will only remove a fraction of the fluid. (1/3? ½?)
If it were me, I would insist on watching the procedure to be sure they are actually doing the flush, but that’s just me.

Tech Contributor


Joined: Jan 2007
Posts: 19,470
Likes: 1,171
From: Dyer, IN
The pump is a good idea. Really helps to get most of the fluid out before dropping the pan for filter replacement. I advise you to get a service manual and not rely on procedures and pics online. You can follow it step by step and do the job right every time. 


Team Owner


Joined: Sep 2001
Posts: 23,283
Likes: 906
From: Lake Elsinore, CA
Automatic Transmission Fluid/Filter Replacement
Removal Procedure
Caution
When the transmission is at operating temperatures, take necessary precautions when removing the check/fill plug, to avoid being burned by draining fluid.
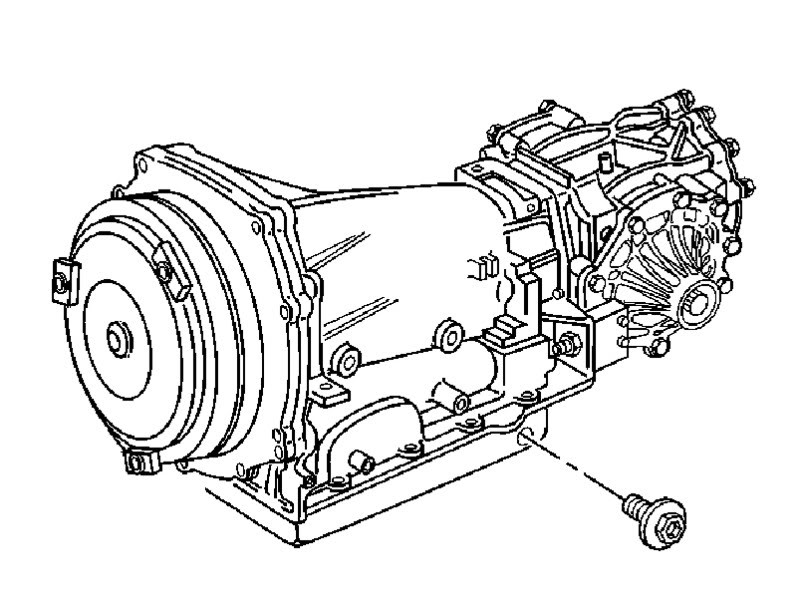
1. Raise and suitably support the vehicle. Refer to Lifting and Jacking the Vehicle in General Information.
2. Place a drain pan under the transmission.
3. Clean any dirt from around the transmission check/fill plug.
4. Remove the transmission fluid check/fill plug and allow the fluid to drain.
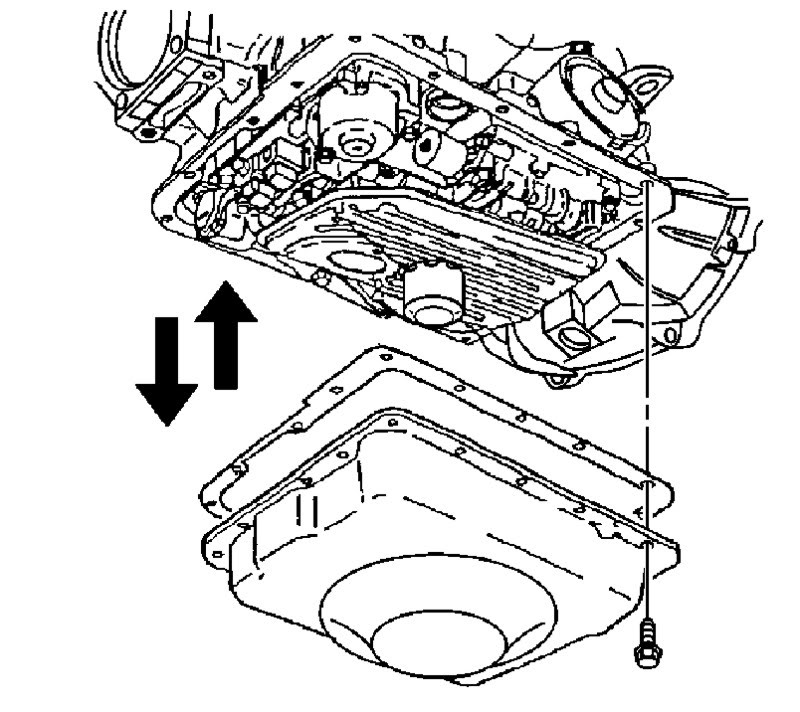
5. Support the transmission oil pan.
6. Remove the transmission oil pan bolts.
7. Loosely reinstall the fluid check/fill plug.
8. Lightly tap the oil pan with a rubber mallet or pry gently in order to loosen the pan.
9. Remove the transmission oil pan.
10. Drain the remaining fluid from the oil pan.
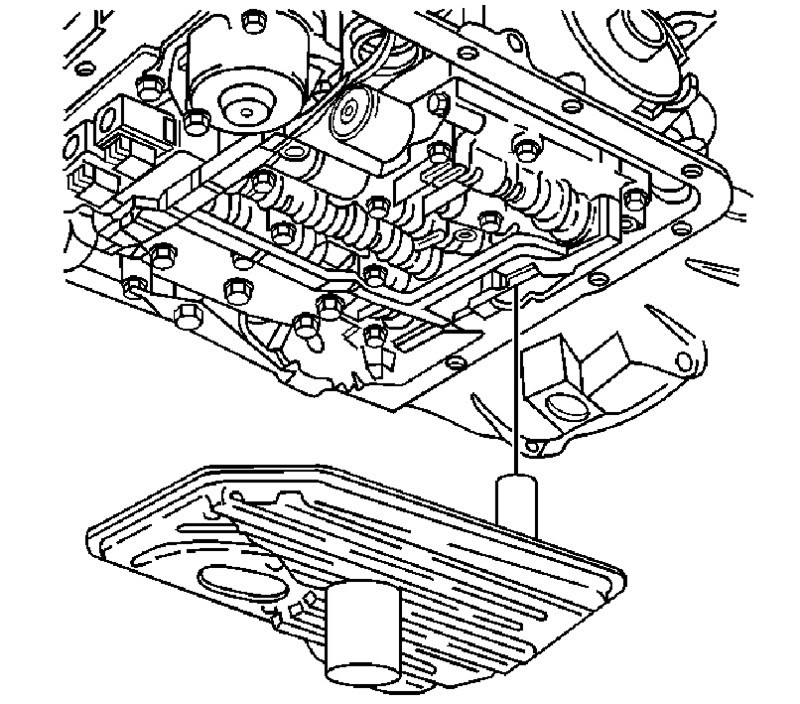
Important
Note the position of the filter before removal to aid in installation.
11. Grasp firmly while pulling down with a twisting motion in order to remove the filter.
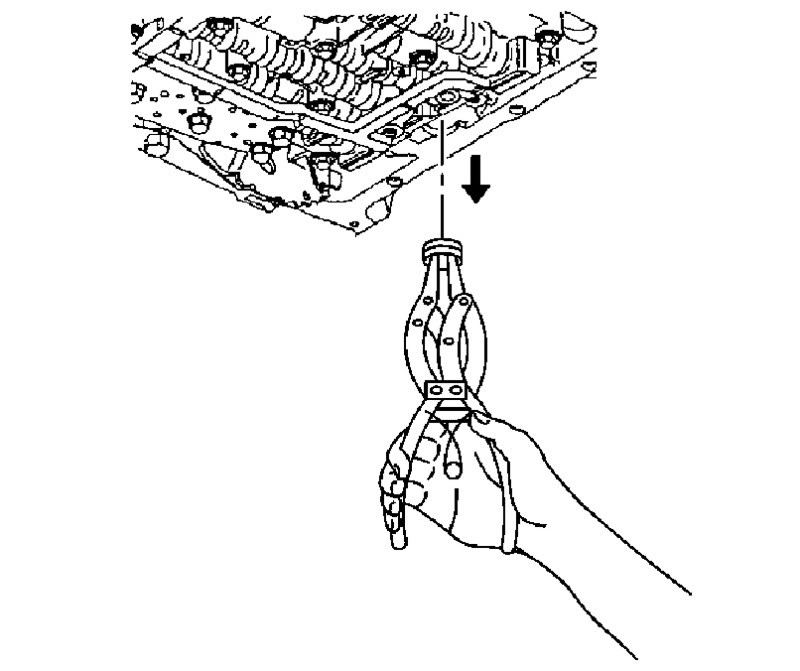
12. Remove the filter seal. The filter seal may be stuck in the pump, if necessary, carefully use plyers or another suitable tool to remove the seal.
13. Discard the seal.
14. Inspect the transmission fluid. Refer to Transmission Fluid Checking Procedure .
15. Inspect the transmission fluid filter. Pry the metal crimping away from the top of the filter and pull apart. The filter may contain evidence for root cause diagnosis:
o Clutch material
o Bronze slivers indicating bushing wear
o Steel particles
Important
Remove ALL traces of old gasket material from the transmission case and the oil pan gasket surfaces.
16. Clean the oil pan gasket mating surfaces, on both the transmission case and the transmission oil pan, with solvent and air dry.
Installation Procedure
Tools Required
J 36850 Transmission Assembling Lubricant (Transjel™)
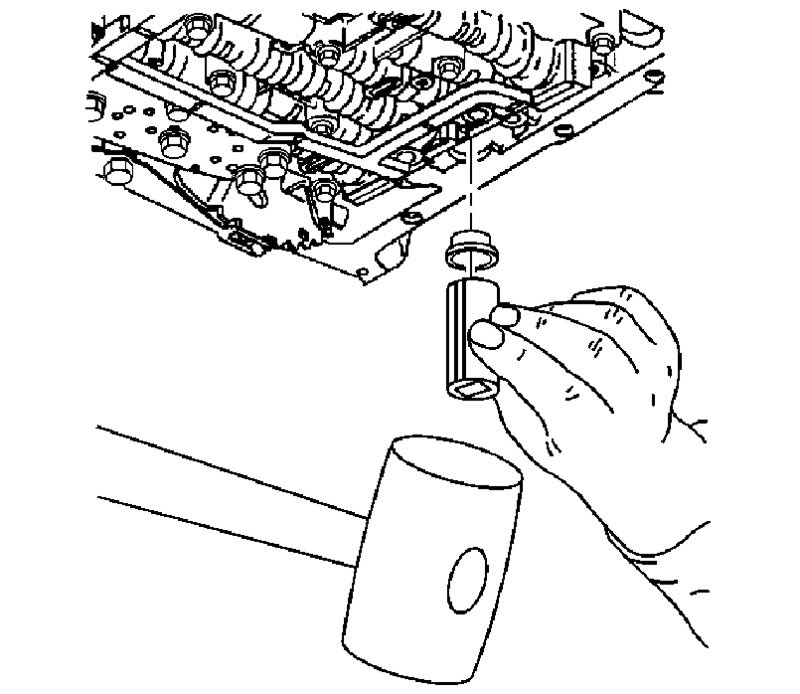
1. Coat the new filter seal with a small amount of J 36850 or equivalent.
2. Install the new filter seal into the transmission case. Gently tap the seal into place using a suitable size socket.
3. Install the new oil filter into position as noted during removal.
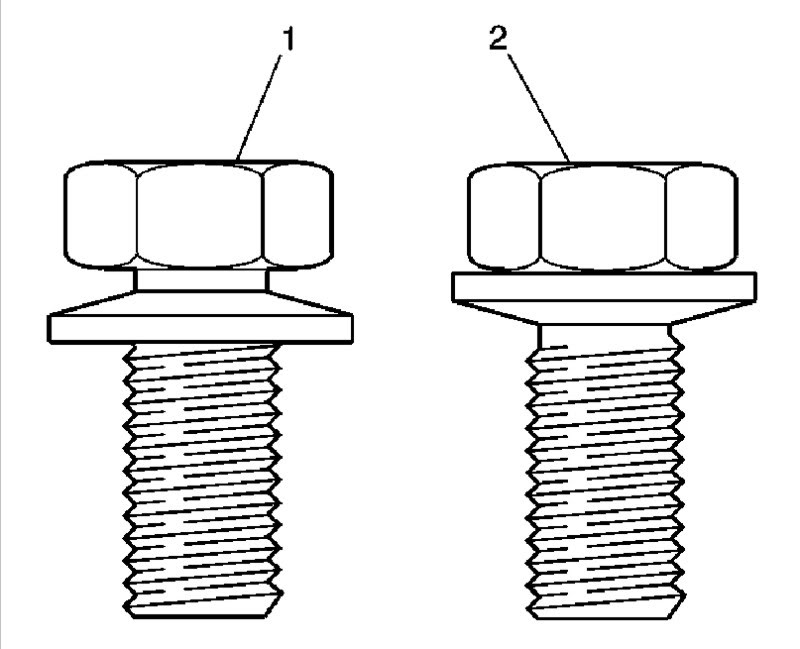
4. Inspect the oil pan bolts and washers to determine if the conical washers are reversed.
o Reuse the oil pan bolts and washers if the conical washers are NOT reversed (1).
o Replace the oil pan bolts and washers if the conical washers are reversed (2).
5. Install the new oil pan gasket to the oil pan sealing surface.
6. Position the oil pan to the transmission case and support the oil pan.
7. Install the oil pan bolts. Tighten the transmission oil pan bolts alternately and evenly to 11 N·m (97 lb in).
Notice
Use the correct fastener in the correct location. Replacement fasteners must be the correct part number for that application. Fasteners requiring replacement or fasteners requiring the use of thread locking compound or sealant are identified in the service procedure. Do not use paints, lubricants, or corrosion inhibitors on fasteners or fastener joint surfaces unless specified. These coatings affect fastener torque and joint clamping force and may damage the fastener. Use the correct tightening sequence and specifications when installing fasteners in order to avoid damage to parts and systems.
8. Remove the transmission fluid check/fill plug.
9. Fill the transmission with DEXRON®-III automatic transmission fluid through the check/fill plug hole until fluid begins to pour out, then install the check/fill plug hand-tight.
10. Complete filling the transmission with fluid to the proper level. Refer to Automatic Transmission Fluid Level Check/Fill .
11. Inspect the oil pan gasket for leaks.
Automatic Transmission Fluid Level Check/Fill
Inspection Procedure
1. Raise and suitably support the vehicle. Refer to Lifting and Jacking the Vehicle in General Information.
2. Start and run the engine at idle.
3. Apply the brakes.
4. Shift the transmission into each gear for at least 2 seconds per gear.
5. Shift the transmission into NEUTRAL and continue to idle the engine for 3 minutes to stabilize the transmission fluid level.
6. After allowing the fluid level stabilization time and while still in NEUTRAL (engine still running at idle), check the transmission fluid temperature on the driver information center. Specification
Transmission fluid level temperature: 30 to 50°C (86 to 122°F)
7. If the fluid temperature is above specification, turn off the engine and allow the transmission to cool, then repeat the procedure to this point before proceeding.
8. With the engine still running at idle, loosen the check/fill plug on the LH side of the transmission oil pan.
9. Inspect the fluid level:
o Any excess fluid will drain when the check/fill plug is loosened.
o If no fluid drains, remove the check/fill plug and fill the transmission with DEXRON®-III transmission fluid until the fluid begins to overflow.
10. Install the check/fill plug. Tighten the fill plug to 30 N·m (22 lb ft).
11. Shift the transmission into PARK.
12. Release the brakes.
13. Turn off the engine.
14. Lower the vehicle.
Removal Procedure
Caution
When the transmission is at operating temperatures, take necessary precautions when removing the check/fill plug, to avoid being burned by draining fluid.
1. Raise and suitably support the vehicle. Refer to Lifting and Jacking the Vehicle in General Information.
2. Place a drain pan under the transmission.
3. Clean any dirt from around the transmission check/fill plug.
4. Remove the transmission fluid check/fill plug and allow the fluid to drain.
5. Support the transmission oil pan.
6. Remove the transmission oil pan bolts.
7. Loosely reinstall the fluid check/fill plug.
8. Lightly tap the oil pan with a rubber mallet or pry gently in order to loosen the pan.
9. Remove the transmission oil pan.
10. Drain the remaining fluid from the oil pan.
Important
Note the position of the filter before removal to aid in installation.
11. Grasp firmly while pulling down with a twisting motion in order to remove the filter.
12. Remove the filter seal. The filter seal may be stuck in the pump, if necessary, carefully use plyers or another suitable tool to remove the seal.
13. Discard the seal.
14. Inspect the transmission fluid. Refer to Transmission Fluid Checking Procedure .
15. Inspect the transmission fluid filter. Pry the metal crimping away from the top of the filter and pull apart. The filter may contain evidence for root cause diagnosis:
o Clutch material
o Bronze slivers indicating bushing wear
o Steel particles
Important
Remove ALL traces of old gasket material from the transmission case and the oil pan gasket surfaces.
16. Clean the oil pan gasket mating surfaces, on both the transmission case and the transmission oil pan, with solvent and air dry.
Installation Procedure
Tools Required
J 36850 Transmission Assembling Lubricant (Transjel™)
1. Coat the new filter seal with a small amount of J 36850 or equivalent.
2. Install the new filter seal into the transmission case. Gently tap the seal into place using a suitable size socket.
3. Install the new oil filter into position as noted during removal.
4. Inspect the oil pan bolts and washers to determine if the conical washers are reversed.
o Reuse the oil pan bolts and washers if the conical washers are NOT reversed (1).
o Replace the oil pan bolts and washers if the conical washers are reversed (2).
5. Install the new oil pan gasket to the oil pan sealing surface.
6. Position the oil pan to the transmission case and support the oil pan.
7. Install the oil pan bolts. Tighten the transmission oil pan bolts alternately and evenly to 11 N·m (97 lb in).
Notice
Use the correct fastener in the correct location. Replacement fasteners must be the correct part number for that application. Fasteners requiring replacement or fasteners requiring the use of thread locking compound or sealant are identified in the service procedure. Do not use paints, lubricants, or corrosion inhibitors on fasteners or fastener joint surfaces unless specified. These coatings affect fastener torque and joint clamping force and may damage the fastener. Use the correct tightening sequence and specifications when installing fasteners in order to avoid damage to parts and systems.
8. Remove the transmission fluid check/fill plug.
9. Fill the transmission with DEXRON®-III automatic transmission fluid through the check/fill plug hole until fluid begins to pour out, then install the check/fill plug hand-tight.
10. Complete filling the transmission with fluid to the proper level. Refer to Automatic Transmission Fluid Level Check/Fill .
11. Inspect the oil pan gasket for leaks.
Automatic Transmission Fluid Level Check/Fill
Inspection Procedure
1. Raise and suitably support the vehicle. Refer to Lifting and Jacking the Vehicle in General Information.
2. Start and run the engine at idle.
3. Apply the brakes.
4. Shift the transmission into each gear for at least 2 seconds per gear.
5. Shift the transmission into NEUTRAL and continue to idle the engine for 3 minutes to stabilize the transmission fluid level.
6. After allowing the fluid level stabilization time and while still in NEUTRAL (engine still running at idle), check the transmission fluid temperature on the driver information center. Specification
Transmission fluid level temperature: 30 to 50°C (86 to 122°F)
7. If the fluid temperature is above specification, turn off the engine and allow the transmission to cool, then repeat the procedure to this point before proceeding.
8. With the engine still running at idle, loosen the check/fill plug on the LH side of the transmission oil pan.
9. Inspect the fluid level:
o Any excess fluid will drain when the check/fill plug is loosened.
o If no fluid drains, remove the check/fill plug and fill the transmission with DEXRON®-III transmission fluid until the fluid begins to overflow.
10. Install the check/fill plug. Tighten the fill plug to 30 N·m (22 lb ft).
11. Shift the transmission into PARK.
12. Release the brakes.
13. Turn off the engine.
14. Lower the vehicle.

Advanced
Joined: May 2006
Posts: 67
Likes: 0
From: Dahlgren Virginia
Thanks for the information. I have one question, the fill plug seems very low on the trans to be the level the fluid is supposed to be at. It's right near the bottom of the pan, there couldn't be more than a couple quarts in there before it would be flowing over that hole it seems like.
I'll be doing the job today after having to order the filter and gasket yesterday.
I'll be doing the job today after having to order the filter and gasket yesterday.
Burning Brakes
Joined: Aug 2006
Posts: 1,217
Likes: 5
From: Stark County Ohio
Thanks for the information. I have one question, the fill plug seems very low on the trans to be the level the fluid is supposed to be at. It's right near the bottom of the pan, there couldn't be more than a couple quarts in there before it would be flowing over that hole it seems like.
I'll be doing the job today after having to order the filter and gasket yesterday.
I'll be doing the job today after having to order the filter and gasket yesterday.
However - also be aware that the dip stick in an automatic transmission (on any car) DOES reach down into the pan.

Safety Car


Joined: Aug 2000
Posts: 4,933
Likes: 30
From: San Rafael CA
Thanks for the information. I have one question, the fill plug seems very low on the trans to be the level the fluid is supposed to be at. It's right near the bottom of the pan, there couldn't be more than a couple quarts in there before it would be flowing over that hole it seems like.
I'll be doing the job today after having to order the filter and gasket yesterday.
I'll be doing the job today after having to order the filter and gasket yesterday.
If you took the drain plug out of the transmission with the engine OFF you could (depending on how long the engine was off) get quite a bit of hydraulic fluid coming out of the drain plug.

Burning Brakes
Joined: Aug 2006
Posts: 1,217
Likes: 5
From: Stark County Ohio
Notice that the procedure to check the fluid level specifies the engine has to be RUNNING. This ensures that the internal hydraulic system in the transmission is "primed" or "filled" with hydraulic fluid.
If you took the drain plug out of the transmission with the engine OFF you could (depending on how long the engine was off) get quite a bit of hydraulic fluid coming out of the drain plug.
If you took the drain plug out of the transmission with the engine OFF you could (depending on how long the engine was off) get quite a bit of hydraulic fluid coming out of the drain plug.

Drifting

Joined: Jul 2004
Posts: 1,321
Likes: 0
From: Dallas Texas
This procedure really sucks specially if you have 3" exhaust like I do. I have had a flush done by a buddy at Chevy with RP a year ago but I had to add a bit cause I added a big trans cooler. I had the ever loving crap burned out of me! Then I got smart and wrapped it with exhaust wrap.
Shahram
Shahram
Team Owner
Joined: Sep 2001
Posts: 23,283
Likes: 906
From: Lake Elsinore, CA
I had to top the tranny fluid off last summer in the wife's A4 when I put in the TC and 3.42 gears along with a tranny cooler. Let me tell you that this procedure sucks even with a lift.
Never remove the plug without the engine running unless you purposefully want to empty the tranny of a large portion of the fluid. And be careful doing a fill with the engine running as that exhaust gets hot quickly.
Never remove the plug without the engine running unless you purposefully want to empty the tranny of a large portion of the fluid. And be careful doing a fill with the engine running as that exhaust gets hot quickly.