


Installing BendPak HD-9

Thread Starter
Racer


Joined: Nov 2002
Posts: 278
Likes: 1
From: Bushwood MD
Finally got around to putting my lift together (and my buddy's). His on Saturday, mine on Sunday. Wasn't as bad as I had imagined. My main complaint is the the instructions from BendPak are less than clear in some areas.
Main question I'm looking to get answered from you guys that have done your own install is how far do you tighten the nut securing the hydraulic cylinder piston to the flange plate / cable retainer? And how did you hold the piston to tighten the nut?
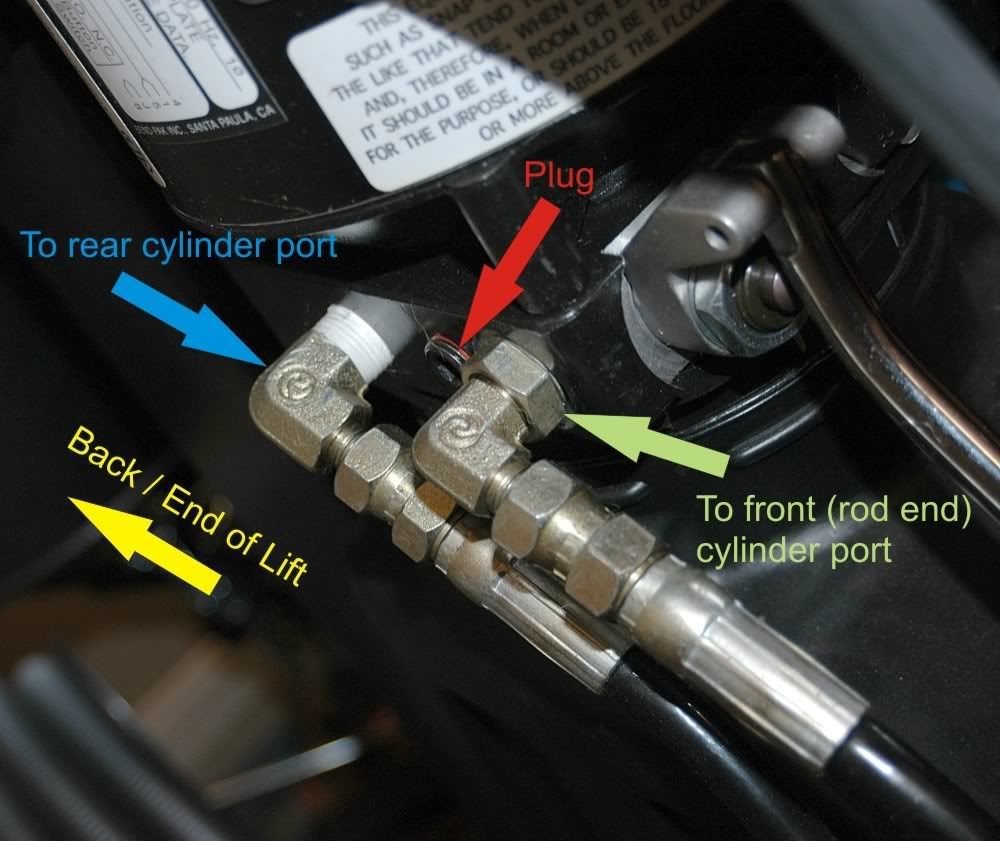
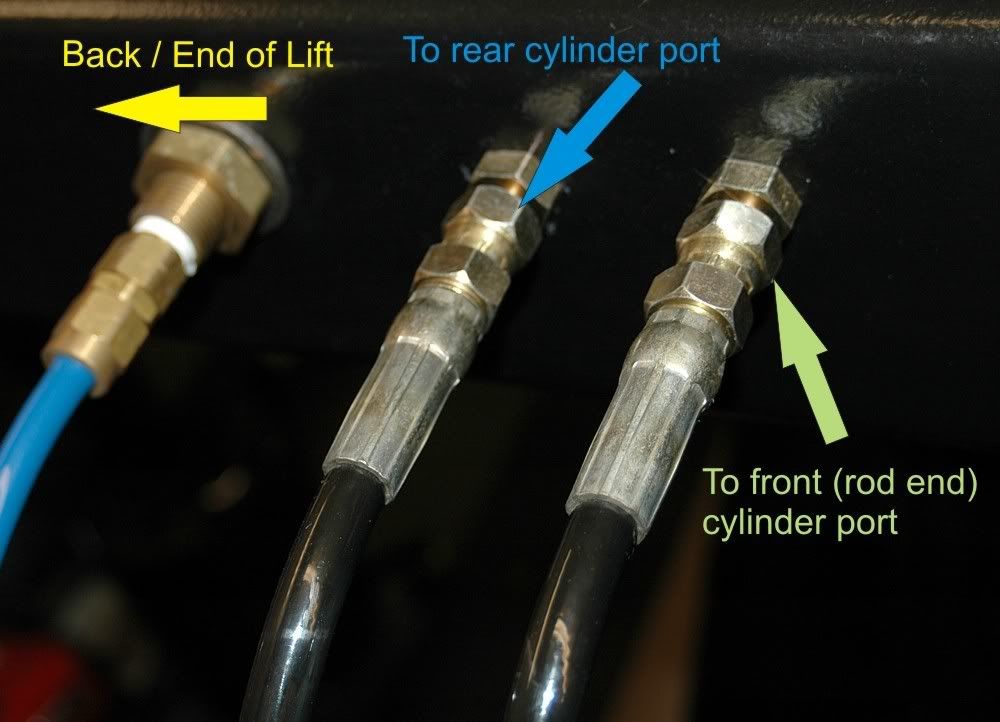
Another question concerning the coiled air hose that goes from the Push Button Air Valve to the Bulkhead Coupler - seems awfully short. Doesn't this coiled tube have to track with the lift when raising and/or lowering? Anyone have a pic of this coiled tube in place?
Did a search and couldn't find answers. Patches' write up and pics of his install is excellent and he mentions the topic of the the piston and nut but doesn't give the measurement. Patches - you out there?
Anyway - almost to the point of doing an operational check-out but wanted to make sure everything is right.
Thanks guys!
RP
Main question I'm looking to get answered from you guys that have done your own install is how far do you tighten the nut securing the hydraulic cylinder piston to the flange plate / cable retainer? And how did you hold the piston to tighten the nut?
Another question concerning the coiled air hose that goes from the Push Button Air Valve to the Bulkhead Coupler - seems awfully short. Doesn't this coiled tube have to track with the lift when raising and/or lowering? Anyone have a pic of this coiled tube in place?
Did a search and couldn't find answers. Patches' write up and pics of his install is excellent and he mentions the topic of the the piston and nut but doesn't give the measurement. Patches - you out there?
Anyway - almost to the point of doing an operational check-out but wanted to make sure everything is right.
Thanks guys!
RP
Team Owner


Joined: Sep 2001
Posts: 23,283
Likes: 906
From: Lake Elsinore, CA
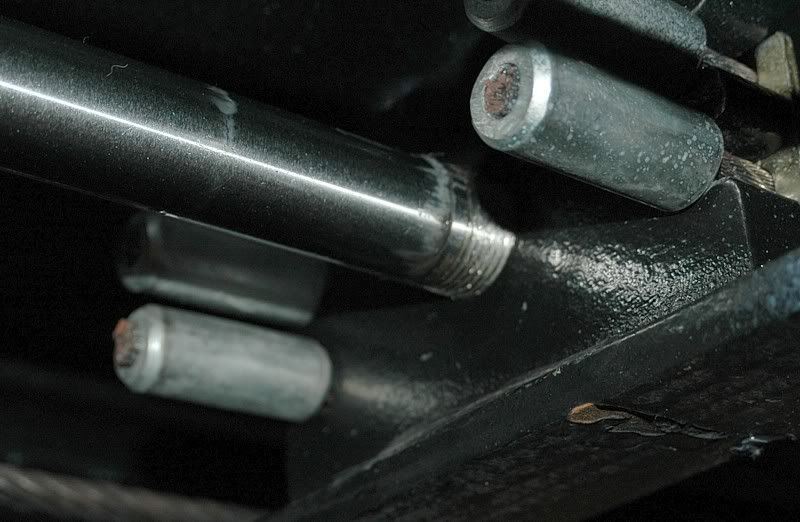
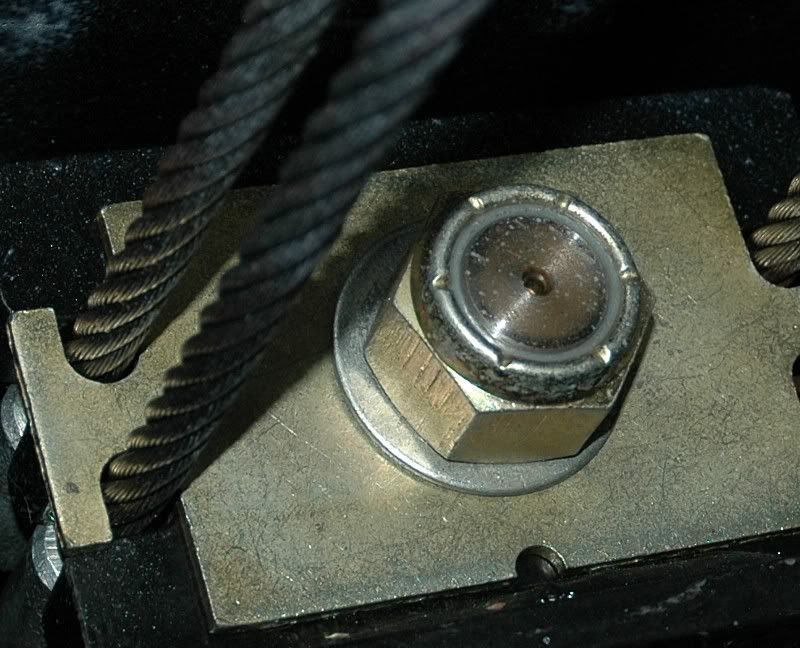
The cylinder rod nut tightening task turned out to be a bit of a puzzle since they don't detail it in the instructions. The cylinder is not a non-rotating version and there are no flats machined on the end of the rod near the threads so there is no easy way to hold the rod while torqueing the nut, which happens to be a nylock. Also, I didn't have a wrench or socket big enough for the nut even though the directions indicated a size I did have.
I finally decided to pull out my BigAzz Channel Lock Pliers to grip the rod just past the threads on the back side of the cable anchor plate. Luckily, my next-door neighbor happened to have the equivalent of a BigAzz ratchet with a BigAzz socket that fit the nut. With me holding the rod with all my might, he wrenched on the nut until the distal end was flush with the rod end.
You can see the teeth marks from the pliers just past the threads
The nut after torqueing
The coiled air line is really not a problem and I actually like that it is somewhat tight at full extension (although it's quite adequate) as it keeps the line from snaring on the lift as it rises and lowers and keeps me from tripping over it.
The line in it's retracted state

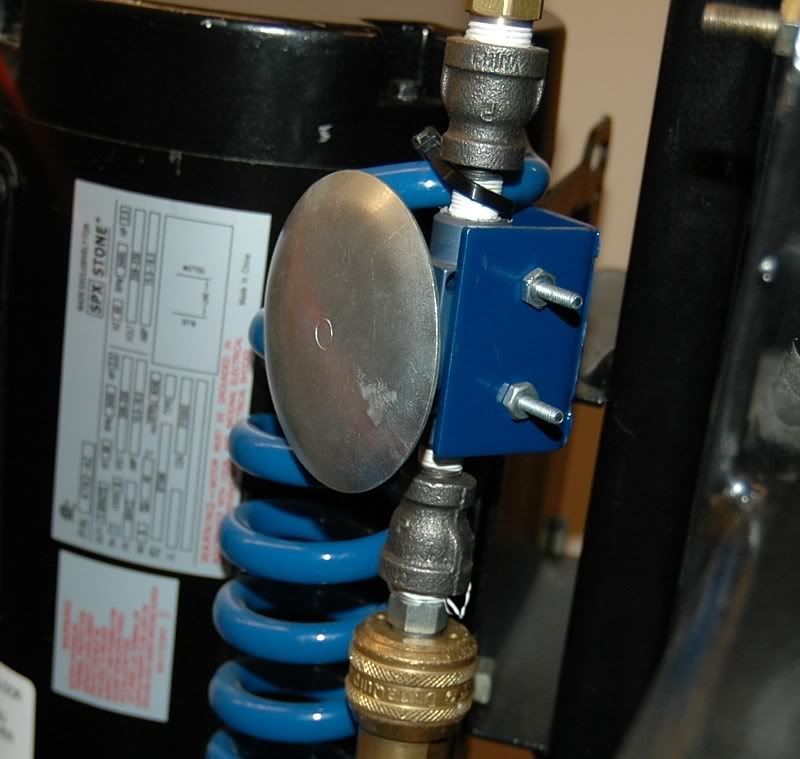
How I mounted the pneumatic switch
I finally decided to pull out my BigAzz Channel Lock Pliers to grip the rod just past the threads on the back side of the cable anchor plate. Luckily, my next-door neighbor happened to have the equivalent of a BigAzz ratchet with a BigAzz socket that fit the nut. With me holding the rod with all my might, he wrenched on the nut until the distal end was flush with the rod end.
You can see the teeth marks from the pliers just past the threads
The nut after torqueing
The coiled air line is really not a problem and I actually like that it is somewhat tight at full extension (although it's quite adequate) as it keeps the line from snaring on the lift as it rises and lowers and keeps me from tripping over it.
The line in it's retracted state
How I mounted the pneumatic switch
Thread Starter
Racer
Joined: Nov 2002
Posts: 278
Likes: 1
From: Bushwood MD
Patches - thanks for the info. Can't look at the pics until I get home this evening (Network ***** locked us out of photobucket...).
Appreciate the help - ok if I have to contact you to pick your brain again?
Appreciate the help - ok if I have to contact you to pick your brain again?
Thread Starter
Racer
Joined: Nov 2002
Posts: 278
Likes: 1
From: Bushwood MD
All - finally sorted everything out yesterday afternoon w/Patches' help. Everything hooked up, operational checks complete! Thanks Bro!
Bottom line - love the lift - hate the crappy instructions.
Patches' lift has minor difference than mine as mine is 2 years newer and the assembly instructions don't capture the changes. Even went online to BendPak's website and downloaded their latest assembly manual dated 10-27-07, still subpar, didn't have the variances incorporated into this version either.
Anyway - thanks to Patches, couldn't have done it without your help. and in the vein of the Corvette Brotherhood, I'll offer up my learning experiences to any of you guys starting down this road.
So - if any of you guys get hung up (and you will) installing your BendPak HD-9 PM me or put something here on the Forum.
B/R,
RP

Race Director


Joined: Jan 2006
Posts: 10,554
Likes: 33
From: Not on either liberal coast.
My HD9 was installed with the air valve on the right side as reflected in the above image. I chose to move it to the left side of the motor...just a little more convenient for me.
BEND PAK continues to make changes to their lifts. One change I recently discovered was the vertical gussets at the ends of the cross members used to be angle cut with a sharp point that could potentially damage the tires/wheels on the narrow width model. The company has since rounded the gussets to reduce that chance.
I have my shop compressor permanently connected to my lift. I used some fittings to provide myself with a convenient air hose source at the lift motor...
http://i114.photobucket.com/albums/n...p011608014.jpg
I also have a three port manifold (HOME DEPOT) at the compressor for additional connections for air hoses.
Last edited by hotwheels57; Mar 13, 2008 at 12:36 PM.
Corvette Stories
The Best of Corvette for Corvette Enthusiasts

Top 10 Most Expensive Corvettes Ever Sold on Bring A Trailer
Brett Foote
10 Things Every Corvette Owner Needs (2026 Edition)
Michael S. Palmer
8 Most "Only Corvette Owners Understand" Quirks and Problems
Pouria Savadkouei
10 Reasons the C6 Z06 is Still A Performance Benchmark After 20 Years
Joe Kucinski
How Much Horsepower Every Corvette Engine "LOST" in 1972
Joe Kucinski
Top 10 DOs and DON'Ts for Protecting Your Convertible Top!
Michael S. Palmer
Top 10 Most Explosive Corvettes Ever Made: Power-to-Weight Ratio Ranked!
Joe Kucinski
150 hp to 1,250 hp: Every Corvette Generation Compared by the Specs That Matter
Joe Kucinski
8 Coolest Corvette Pace Cars (and Replicas) of All Time
Verdad GallardoDrifting


Joined: Dec 2002
Posts: 1,386
Likes: 5
From: Reno, NV
Where did you get the pneumatic switch, was it part of the lift system? What purpose does it serve? Is it used to release the pneumatic locks? I've been thinking on getting a bend pak lift and thought I'd take advantage of the info you posted.
Race Director
Joined: Jan 2006
Posts: 10,554
Likes: 33
From: Not on either liberal coast.
BEND PAK uses a secondary air locking system as opposed to a manual lever than many lift companies use.
The air valve comes with the BEND PAK lifts and requires an air source (compressor) for operation. It takes two deliberate acts by the operator to lower the lift to the next locking point or to the ground.
Racer

Joined: Dec 2005
Posts: 474
Likes: 3
From: Chandler Arizona
All - finally sorted everything out yesterday afternoon w/Patches' help. Everything hooked up, operational checks complete! Thanks Bro!
Bottom line - love the lift - hate the crappy instructions.
Patches' lift has minor difference than mine as mine is 2 years newer and the assembly instructions don't capture the changes. Even went online to BendPak's website and downloaded their latest assembly manual dated 10-27-07, still subpar, didn't have the variances incorporated into this version either.
Anyway - thanks to Patches, couldn't have done it without your help. and in the vein of the Corvette Brotherhood, I'll offer up my learning experiences to any of you guys starting down this road.
So - if any of you guys get hung up (and you will) installing your BendPak HD-9 PM me or put something here on the Forum.
B/R,
RP
Bottom line - love the lift - hate the crappy instructions.
Patches' lift has minor difference than mine as mine is 2 years newer and the assembly instructions don't capture the changes. Even went online to BendPak's website and downloaded their latest assembly manual dated 10-27-07, still subpar, didn't have the variances incorporated into this version either.
Anyway - thanks to Patches, couldn't have done it without your help. and in the vein of the Corvette Brotherhood, I'll offer up my learning experiences to any of you guys starting down this road.
So - if any of you guys get hung up (and you will) installing your BendPak HD-9 PM me or put something here on the Forum.
B/R,
RP

Team Owner
Joined: Sep 2001
Posts: 23,283
Likes: 906
From: Lake Elsinore, CA
I recently bought a 600 ft. lb impact that would make short work of that nut - but there is no practical way to prevent the rod from spinning under even moderate torque. If you have a trick up your sleeve that would accomplish that, now's the time . . .
Race Director
Joined: Jan 2006
Posts: 10,554
Likes: 33
From: Not on either liberal coast.
As a mechanical engineer, this is certainly not news to me; however, it was a herculean effort to get it even flush where it is. At least it's a nylock. It has not budged a single mm in 2.5 years and I maintain the lift religiously. I check it out thoroughly often and retension the cable system when necessary.
I recently bought a 600 ft. lb impact that would make short work of that nut - but there is no practical way to prevent the rod from spinning under even moderate torque. If you have a trick up your sleeve that would accomplish that, now's the time . . .
I recently bought a 600 ft. lb impact that would make short work of that nut - but there is no practical way to prevent the rod from spinning under even moderate torque. If you have a trick up your sleeve that would accomplish that, now's the time . . .
Burning Brakes

Joined: Aug 2000
Posts: 1,052
Likes: 1
From: traveling nowhere fast, FL
As a mechanical engineer, this is certainly not news to me; however, it was a herculean effort to get it even flush where it is. At least it's a nylock. It has not budged a single mm in 2.5 years and I maintain the lift religiously. I check it out thoroughly often and retension the cable system when necessary.
I recently bought a 600 ft. lb impact that would make short work of that nut - but there is no practical way to prevent the rod from spinning under even moderate torque. If you have a trick up your sleeve that would accomplish that, now's the time . . .
I recently bought a 600 ft. lb impact that would make short work of that nut - but there is no practical way to prevent the rod from spinning under even moderate torque. If you have a trick up your sleeve that would accomplish that, now's the time . . .

I would try a couple of different things:
take the pressure off the cylinder so you only have the friction of the thread and not of the washer and plate.
if your wipe pattern gives you enough room for a pipe wrench on the end of the rod you are golden, pipe wrench>>vise grip any day
if the wipe pattern goes to the end you'll need to clean off part of the rod and try a good strap wrench, I would think a good strap wrench and a quick blast from a good impact should run it home.
If that doesn't work, you can always disconnect the rod and grind some wrench flats on the end of the rod, just under the threads, which looks like what the factory should have done for you anyway

or run as is and fuggitabotit

Melting Slicks

Joined: Sep 2006
Posts: 2,173
Likes: 0
From: San Mateo CA
on my lift, the cylinder rod end does have flats ground into it, and as delivered the nut was tightened all the way down to the end of the threads; leaving about 1/2 diameter of rod exposed. the nut is the nylock type. there is additionally a circumferential slot and a retaining clip installed at the end of the rod.
the funniest thing on mine is that on one side of the power unit is a sticker "usa made" with an outline of the usa colored in with flag colors. on the other side is a sticker, made in mexico.