
Turn Signal/DRL Replacement
 05-16-2008, 03:16 AM
#1
Burning Brakes

Thread Starter

Member Since: Feb 2001
Location: Milwaukee & Long Beach WI & CA
Posts: 793
Likes: 0
Received 2 Likes
on
1 Post

I recently had to replace one of the daytime running lights (DRL)/turn signals on my car. When it went, the turn signal on that side of the car didn't work and the relay would click fast when I tried to use it.
There's also good info in this thread in C5 general.
Here are the replacement bulbs. The larger one is the DRL/turn signal, the smaller the side marker. I replaced them both. The bulb number for the DRL is 4157, which can be had in clear or amber (I think 4157A is the amber). The store I was at was out of the regular Sylvania 4157 in amber, so I got the silverstar version for twice the price I've still got the OEM bulb on the other side and I can't tell the difference between it and the silverstar. I'm sure it's worth at least 5HP on the dyno though

I accessed the bulbs from underneath. In this thread in C5 general people talk about how to do it from the top. With the car up on ramps this is what the access panel looks like. It's just in front of the front tire.

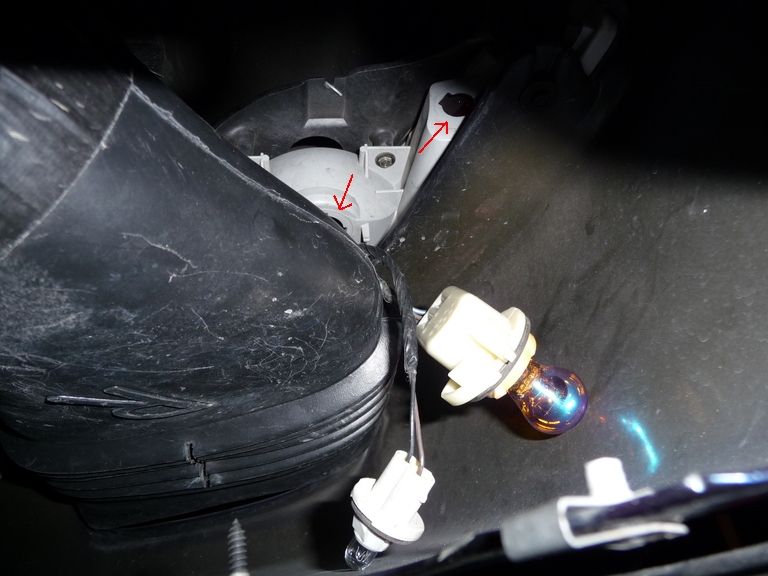
Remove the screws (I think it was a 7mm socket) and then you'll be able to remove the panel. Reach around the brake duct and get to the bulbs. The arrows show the holes in the turn signal housing where the bulbs go.

The DRL/turn signal bulb is the bigger one and it goes into the hole on the left. It actually sit straight up. Grab the plastic socket and twist and pull to out of the turn signal housing. Then you can just pull the bulb straight from the white plastic socket.
It's pretty easy
There's also good info in this thread in C5 general.
Here are the replacement bulbs. The larger one is the DRL/turn signal, the smaller the side marker. I replaced them both. The bulb number for the DRL is 4157, which can be had in clear or amber (I think 4157A is the amber). The store I was at was out of the regular Sylvania 4157 in amber, so I got the silverstar version for twice the price
I've still got the OEM bulb on the other side and I can't tell the difference between it and the silverstar. I'm sure it's worth at least 5HP on the dyno though I accessed the bulbs from underneath. In this thread in C5 general people talk about how to do it from the top. With the car up on ramps this is what the access panel looks like. It's just in front of the front tire.
Remove the screws (I think it was a 7mm socket) and then you'll be able to remove the panel. Reach around the brake duct and get to the bulbs. The arrows show the holes in the turn signal housing where the bulbs go.
The DRL/turn signal bulb is the bigger one and it goes into the hole on the left. It actually sit straight up. Grab the plastic socket and twist and pull to out of the turn signal housing. Then you can just pull the bulb straight from the white plastic socket.
It's pretty easy
Last edited by mathia; 05-16-2008 at 06:49 PM. Reason: Thought the side marker was the turn signal. The DRL and turn signal are the same bulb, the small bulb is the side marker.

The following 2 users liked this post by mathia:
02GoldVette (09-20-2015),
WetMountainMan (07-16-2018)
05-16-2008, 03:31 AM
#2
Burning Brakes
Very nice job,
although if you pop your held lights and take o off the surrounding black plastic you can just put your hand in side and do it like that, these way you don�t have to raise the car(huge pain in the AS ) and no bolts to on bolt. still very nice pictures.
although if you pop your held lights and take o off the surrounding black plastic you can just put your hand in side and do it like that, these way you don�t have to raise the car(huge pain in the AS
) and no bolts to on bolt. still very nice pictures.
05-16-2008, 10:04 PM
#4
Night Owl for life

Member Since: Nov 2003
Location: Bugs Bunny should'a made a left turn here
Posts: 23,201
Received 3,247 Likes
on
1,668 Posts
nice writeup and good info for folks with the NPU lights.
05-18-2008, 01:47 PM
#5
Intermediate


Member Since: Jul 2000
Location: Cupertino CA
Posts: 34
Likes: 0
Received 0 Likes
on
0 Posts
Great instructions. My driver side bulb went out this week. The dealer wanted $62 (plus the hassle to schedule an appointment). I have the Vette manuals but the instructions say to remove retaining springs ... and it is not very clear in the illustrations.
I followed your instructions and excellent pictures and was done in less than 30 minutes taking it slowing. It will only take less than 10 minutes next time. I raised up on Rino racks. The only additional instruction is the bulb housing has a tab that you must press then turn counter-clockwise then pull downward. I replaced the side marker bulb since I had things opened up - no tab, just turn counter-clockwise and pull outward.
Thank you for taking the time to post pictures.
 09-06-2012, 06:46 PM
#7
Cruising

Member Since: Feb 2010
Location: Suwanee, GA 30024
Posts: 14
Likes: 0
Received 0 Likes
on
0 Posts
I know this is a bit old, but a great post! I tried both ways, but my arms were too big to go the top route. The bottom was a bit easier than I figured. I changed from the white driving lights to Amber on my black 02 Z06! Thank you!
09-06-2012, 06:59 PM
#8
Burning Brakes
 But thanks for taking the time write it all up and great pictures by the way!
01-18-2013, 10:43 AM
But thanks for taking the time write it all up and great pictures by the way!
01-18-2013, 10:43 AM
#9
Melting Slicks


Member Since: Jul 2010
Location: Leesburg Fl
Posts: 2,793
Received 333 Likes
on
236 Posts
2018 C5 of Year Finalist
St. Jude Donor '14,'18

Just replaced the front turn signal by removing the headlite shroud and the cover to access the bulb. Couldn't get to it with the cover on.
02-05-2013, 08:57 PM
#10
Racer
Hi Mathia,
just looking at your post... the piece of material that sandwiches the socket assembly and the light housing...sorta looks like a gasket of sorts... what kinda of material is that and can be be bought at a local parts store?
just asking because I recently found out its missing on the left...
http://forums.corvetteforum.com/c5-t...post1565483303
-Mark
I recently had to replace one of the daytime running lights (DRL)/turn signals on my car. When it went, the turn signal on that side of the car didn't work and the relay would click fast when I tried to use it.
There's also good info in this thread in C5 general.
Here are the replacement bulbs. The larger one is the DRL/turn signal, the smaller the side marker. I replaced them both. The bulb number for the DRL is 4157, which can be had in clear or amber (I think 4157A is the amber). The store I was at was out of the regular Sylvania 4157 in amber, so I got the silverstar version for twice the price I've still got the OEM bulb on the other side and I can't tell the difference between it and the silverstar. I'm sure it's worth at least 5HP on the dyno though
I accessed the bulbs from underneath. In this thread in C5 general people talk about how to do it from the top. With the car up on ramps this is what the access panel looks like. It's just in front of the front tire.
Remove the screws (I think it was a 7mm socket) and then you'll be able to remove the panel. Reach around the brake duct and get to the bulbs. The arrows show the holes in the turn signal housing where the bulbs go.
The DRL/turn signal bulb is the bigger one and it goes into the hole on the left. It actually sit straight up. Grab the plastic socket and twist and pull to out of the turn signal housing. Then you can just pull the bulb straight from the white plastic socket.
It's pretty easy
There's also good info in this thread in C5 general.
Here are the replacement bulbs. The larger one is the DRL/turn signal, the smaller the side marker. I replaced them both. The bulb number for the DRL is 4157, which can be had in clear or amber (I think 4157A is the amber). The store I was at was out of the regular Sylvania 4157 in amber, so I got the silverstar version for twice the price
I've still got the OEM bulb on the other side and I can't tell the difference between it and the silverstar. I'm sure it's worth at least 5HP on the dyno though I accessed the bulbs from underneath. In this thread in C5 general people talk about how to do it from the top. With the car up on ramps this is what the access panel looks like. It's just in front of the front tire.
Remove the screws (I think it was a 7mm socket) and then you'll be able to remove the panel. Reach around the brake duct and get to the bulbs. The arrows show the holes in the turn signal housing where the bulbs go.
The DRL/turn signal bulb is the bigger one and it goes into the hole on the left. It actually sit straight up. Grab the plastic socket and twist and pull to out of the turn signal housing. Then you can just pull the bulb straight from the white plastic socket.
It's pretty easy
02-05-2013, 09:09 PM
#11
Race Director

Member Since: Apr 2007
Location: South Western Ontario
Posts: 11,061
Received 845 Likes
on
721 Posts

It's a piece of foam like material. I've never seen anything posted about buying it separately.
You really didn't need to quote the whole post plus link the one picture again into your post.
You really didn't need to quote the whole post plus link the one picture again into your post.

 after that it was easy thanks

 07-26-2015, 03:22 PM
#16
4th Gear

Member Since: Aug 2014
Posts: 4
Likes: 0
Received 0 Likes
on
0 Posts
I spent a while staring at all of the threads, with three alternative methods proposed to replace the DRL/ turn signal/ side marker lights on a C5. First of all, the Z06 spoiler doesn't allow enough free space to move the brake ducts out of the way enough to reach in comfortably. Jacking up the car or rolling it up some ramps seemed unduly complicated and fraught with danger on my steep driveway, so I tried the method through the headlight... worked great! Manually lift the headlight and remove the three sheet metal screws that secure the plastic cover. It's a little easier to do the inside screws while down, and then lift the cover and do the outboard screw. Either way works. Then study the way the lamp holders fit in the light case on this thread. The visibility is poor, but it's easy to locate both lamp sockets and remove them by turning CCW about 1/8 turn- don't forget to squeeze the lock tab on the DRL/turn signal. The side marker can be replaced (on my car) my lifting the socket to just under the headlamp. The DRL was a little more difficult to do by feel, but went smoothly. I'm 6 ft and 170 and my arm fit in easily without removing the hood closing adjustment screw. Don't forget to engage the tab on the top of the plastic headlight cover and don't forget to manually wind the headlight back down. Thanks to everyone who posted on the list, and especially for the images so i knew what I was feeling.
08-03-2015, 10:23 PM
#17
Racer
When I first tried this in 2015, I failed the easy method and jacked the car up and removed that shroud, etc. Today I tried it again - it helps to KNOW how difficult it can be to unscrew the bulb housing from the car so you don't give up so easily!
As above I unplugged power to headlight - manually raised the headlight - removed the 4 screws holding the black plastic shroud to it - went in with my phone camera and got myself a good look at the turn signal bulb housing layout in there - with my right arm, reached down and in, at the gap at the front right corner (I'm doing drive side turn light fyi) of the headlight, its tight but doable (maybe not for guys with big arms!!) - found the bulb housing and that release clip - pressed the clip, and tried turning CCW as instructed.
I almost gave up, it's difficult, that thing has been in place for 90K miles and 14 years! I then pushed the brake cooling shroud out of the way (back, and down) and got my left hand up in there also. That helped me apply torque and 'work' it loose.
I then found I could pull the bulb in its housing completely out the front of the car through that brake cooling window to change the bulb. Tested it, fine, back together completely and working in maybe 10 minutes max.
Some pics attached hopefully.
THANKS to the guys who supplied these tips above, it does work!
=======================
Thanks eagleye49, good tips you added here but, wow this was difficult on my '03. I'll cut to the chase and say the ONLY way I could get the torque on the DRL bulb housing to both break it loose to twist it CCW while pressing that tab in (which is blocked by other stuff really badly) was to come in from the bottom, removing all 5 of the 7mm hex head screws that hold that plastic housing in place there, and really just 'go for it' to twist that puppy out while holding the tab.
I drove my car up on some planks I keep for this purpose, but that only gets it about an extra 5-6" off the garage floor. If you get it higher or have a lift it will be some to much, much easier I'm thinking. It's just a horrible thing to work on without a lift.
I did find that it helped to watch what I was doing via the air duct/vent in front, by moving the tube behind it out of the way. How the gentleman did the repair by sticking his hand in there in the photo post above, I have NO freaking idea. I'm slender and no way I could have got in there and done this job. Good on ya man.
So using that duct as a view port, I finally got it done. I tried coming down around the headlight, just couldn't pull it off. Maybe I'll try it again next time.
Thanks to all the contributors here as always. Without these tips, I'd have been off to a garage to pay $100 to fix a stupid $3.00 part after I gave up trying.
Last edited by DWC4; 10-20-2017 at 03:09 PM. Reason: 10-2017 update
08-04-2015, 05:00 PM
#18
Drifting

My driver's side DRL (or turn signal light, don't remember which) burned out, so I drove to my local Ace hardware/NAPA store and bought another bulb. Then, in the parking lot outside the store, I used Junkman's method as above and had the bulb changed out in about a minute. The hardest, and also the funniest part, was to explain to passersby what I was doing with my knee on the ground and my arm up inside the car. Very easy to do, no sweat at all, thank you Junkman.
If you use the method for attacking this from above, through the headlight area, either disconnect the lights or pull the fuse for the motors after you open them up, because after 10-15 min, they will automatically close again, and if your arm is in there, your are trapped (plus that will really hurt).
If you use the method for attacking this from above, through the headlight area, either disconnect the lights or pull the fuse for the motors after you open them up, because after 10-15 min, they will automatically close again, and if your arm is in there, your are trapped (plus that will really hurt).
Last edited by mrlmd; 08-04-2015 at 05:04 PM.

 09-09-2017, 03:26 PM
#20

I have a similiar problem: my right front turn signal does not work, replaced the bulb still nothing, thought maybe I purchased a bad bulb so I used another one, still nothing. The dash right turn signal flashes rapidly biut nothing on theright front.