
Headlight Switch / Blinker Arm Removal: A How-To
 05-23-2008, 10:03 AM
#1
Safety Car

Thread Starter

Hi guys...
This write-up will show the steps involved with removing the headlight switch / blinker arm / multi-function switch assembly, either for repair or replacement. There wasn't a good picture-rich write-up that I could find so I documented my process, and maybe it'll help somebody out.
My particular problem was that when I turn on the headlights, the taillights wouldn't work and the instrument panel would not illuminate. After removing and repairing my headlight switch, I'm fully functional once again.
I did this two days ago and am going from memory, so please point out any errors or omissions and I'll update the original post accordingly!
I also want to thank Bill Curlee and Zephyr1999 for providing some info on this whole mess in the first place, that led to me understand the problem I had and decide I could fix it.
Tools Needed:
-Beer of Choice (to be used whenever the heck you feel like it!)
-Torx driver or keys, for the following: T15, T20, and T25.
If you are going to open the headlight switch, add T8 to the list.
-The T25 should be a one-inch bit, OR an L-shaped key with a one-inch leg.
-1/4" open-end wrench
-Diagonal cutters (optional)
-Flat-bladed screwdriver or other thin prying device
10mm socket, 4mm socket, 7mm socket, socket wrench, and 6" extension (or equivalent set of nut-drivers)
The Procedure:
In order to get to the blinker switch, we'll be removing the knee panel that goes under and beside the steering wheel; the steering column covers; and we'll loosen the center console pieces. Here's how to do all this.
0. Turn the steering wheel such that the TOP of the wheel is facing LEFT. You'll see why in step 10.
1. First, I'd recommend loosening the center console and radio bezel. This just makes it easier/safer to remove the paneling around the steering wheel I think. For a good procedure on this, check out this guide at Vette Essentials:
Beginning with step 2 in that guide, it'll show you how to remove/loosen these pieces. That guide also parallels some of my writeup here, so you can refer to that guide for additional pictures/info. Once you have those panels removed or loose, come back here and continue on!
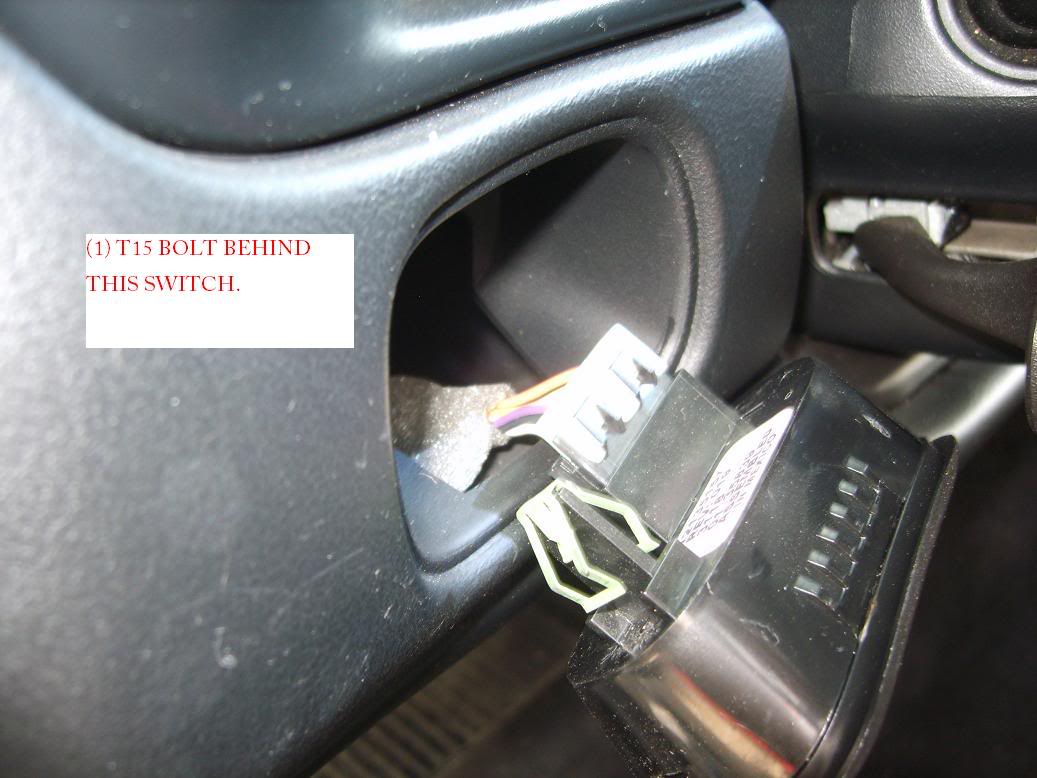
2. Remove the trunk release switch panel by using a flat screwdriver or somesuch to pop it out of the dash panel. It's connected to a wire which easily unplugs once you pull the switch foward.
Behind this switch is a T15 torx bolt; unscrew that and set aside with the trunk switch.
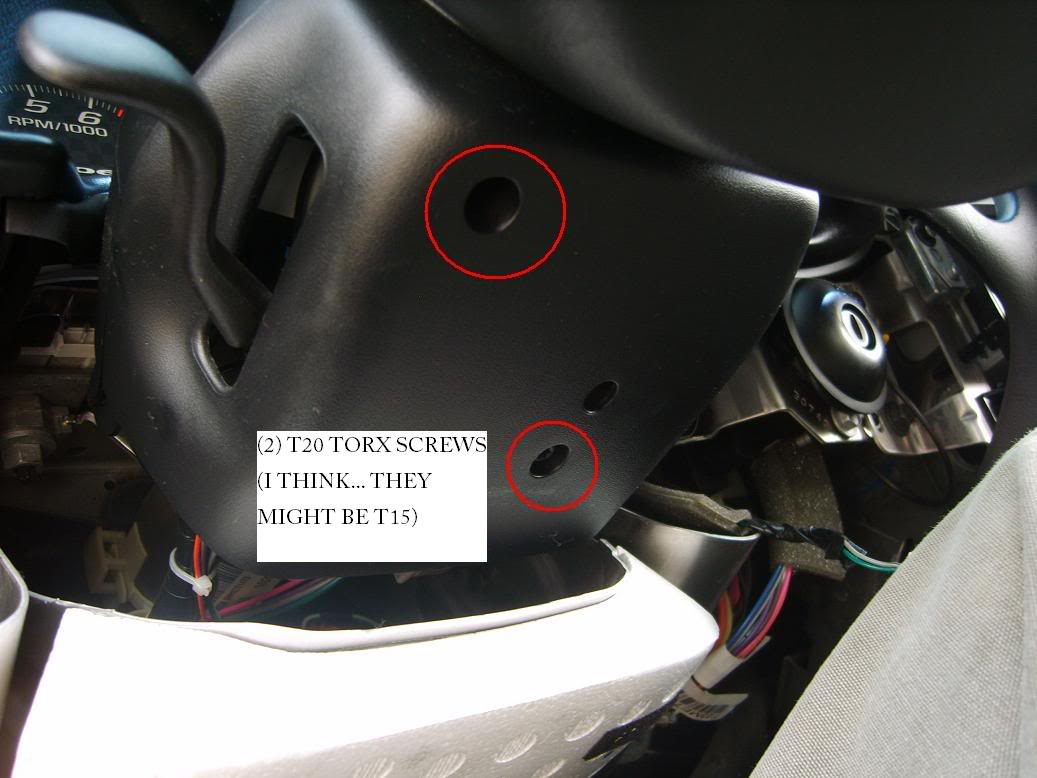
3. Next, we'll unscrew the big knee panel under the steering wheel. There are two T15 torx bolts that hold it in place... unscrew those.
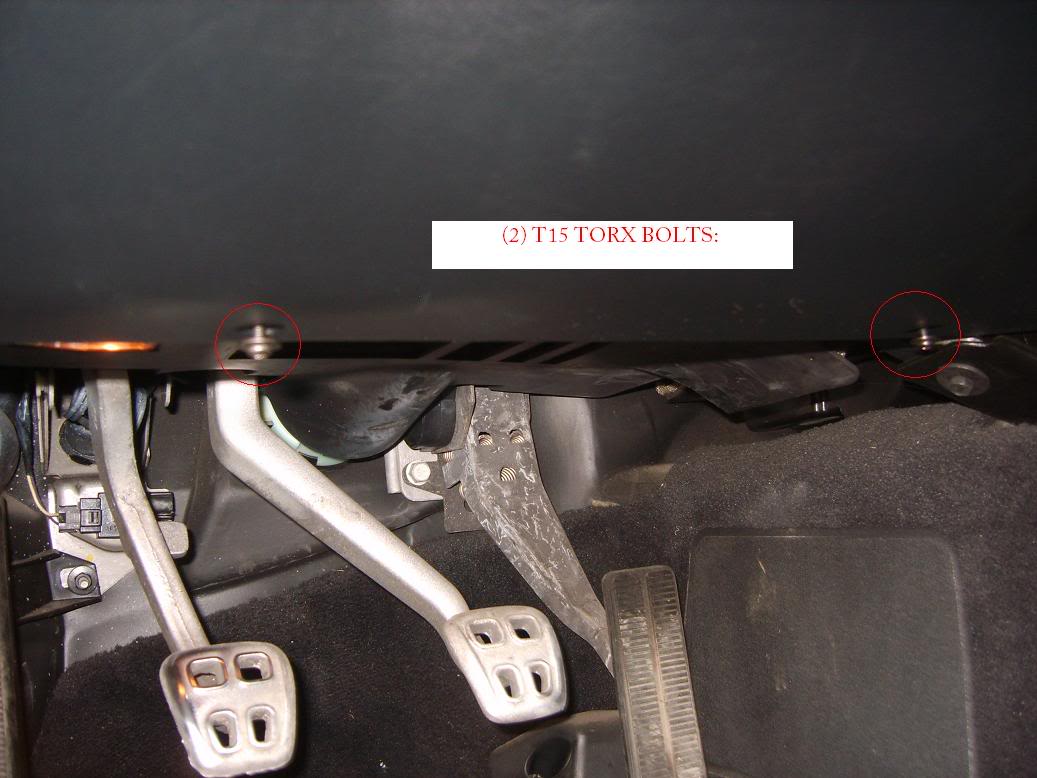
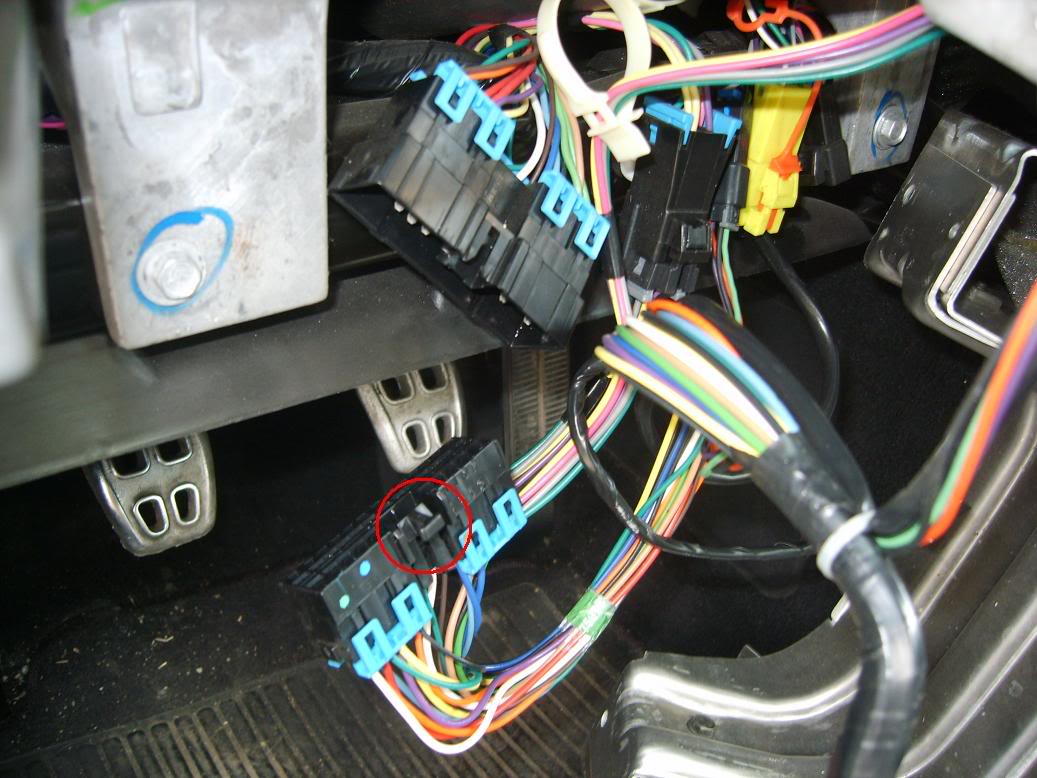
4. To remove this panel after having unscrewed those two bolts, you'll need to pull TOWARDS YOU from the LEFT SIDE of the panel. There are two tight clips that you need to unsnap: (red circles are where these fasteners attach; you'll see those once you pull the panel off). The blue circle is the wire that was attached to the trunk release button.
5. When you have the left half of the knee panel loose, carefully begin to work the right half of the panel free. The HVAC sensor is attached; so mind the connecting wire (red circle in below picture). It's easily disconnected; and at that point you should be able to remove the knee panel completely and set it aside.
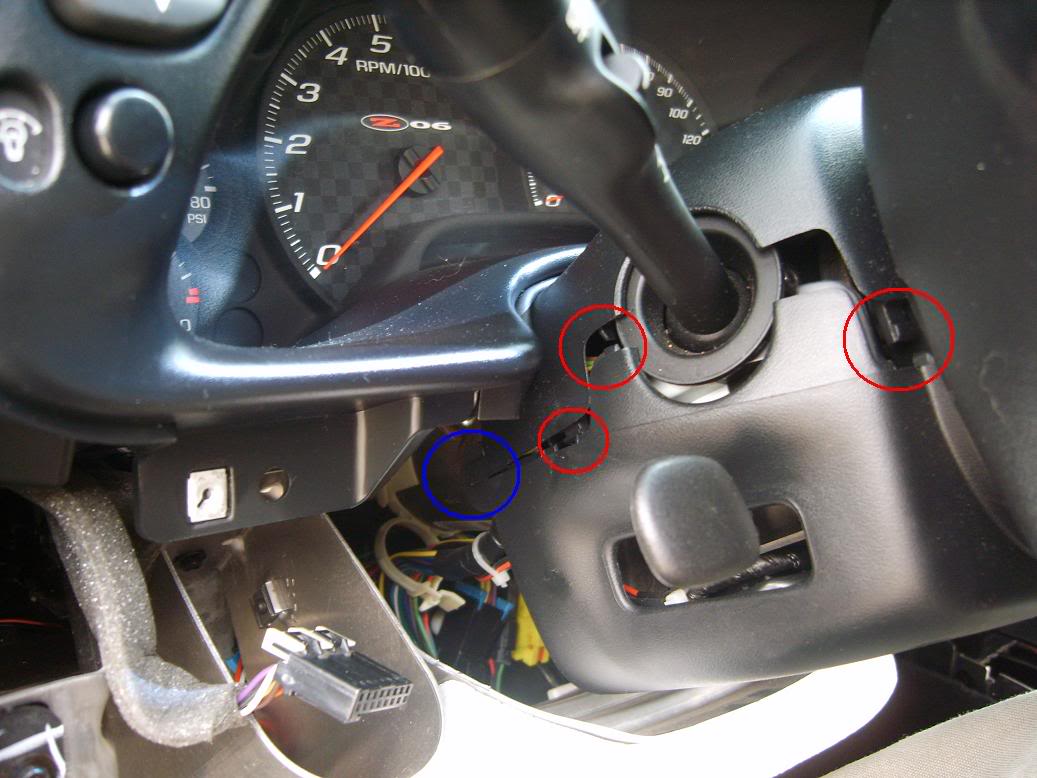
6. Next, let's remove the steering column covers. First we'll need to remove the bottom half. It's held on by two T20 screws, located as follows:
Once those screws are out, gently pull downward on the bottom half. It will separate from the top half... they are connected at this point solely by plastic latches (red circles) and hooks (blue circle), as shown below. With some maneuvering, the bottom piece will come free. The tricky part is getting it off from and around the tilt steering lever.
7. Unfortunately I didn't get pictures of this step; but I'll try to explain the removal of the top half of the steering column: It's held on by two torx bolts from underneath. However, these are not normal torx bolts. Instead of the torx pattern being recessed like most bolts; this star-pattern is RAISED. I dont know about you, but I don't have torx equipment for those bolts. I found that a 4mm socket does the trick nicely. A six-inch extension is preferred to reach the bolts with. There will be one bolt on each side of the steering wheel. You can see them if you can get your head underneath and look up. Unscrew these bolts, and the top half of the steering column cover will come right off.
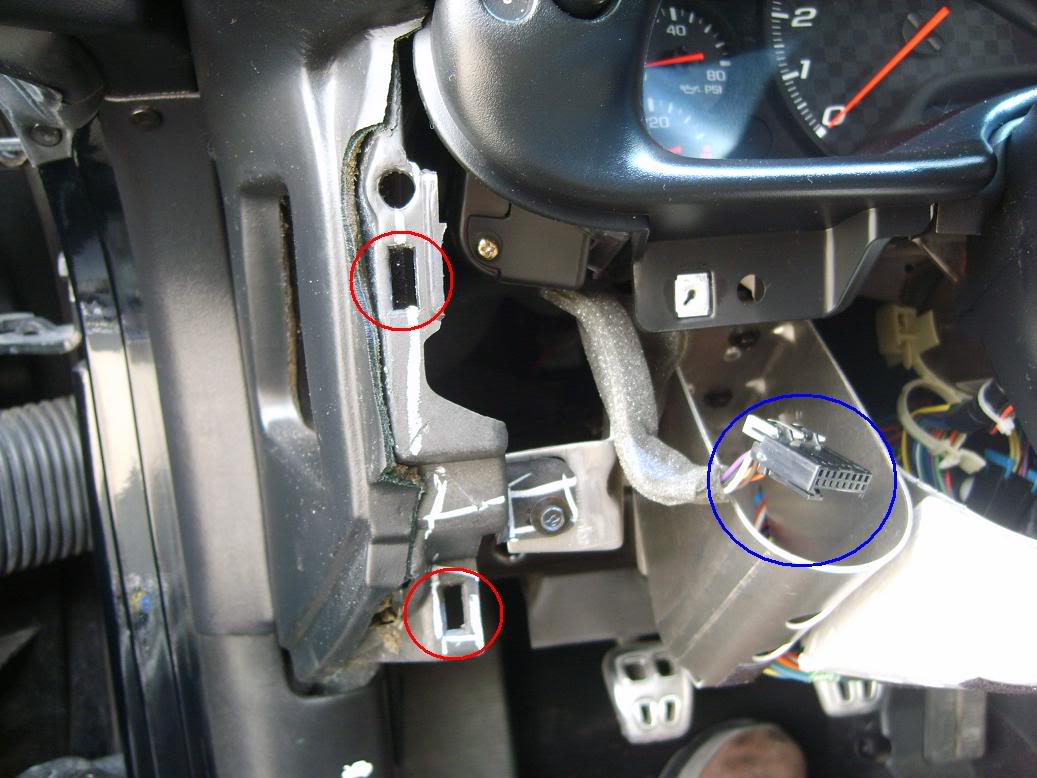
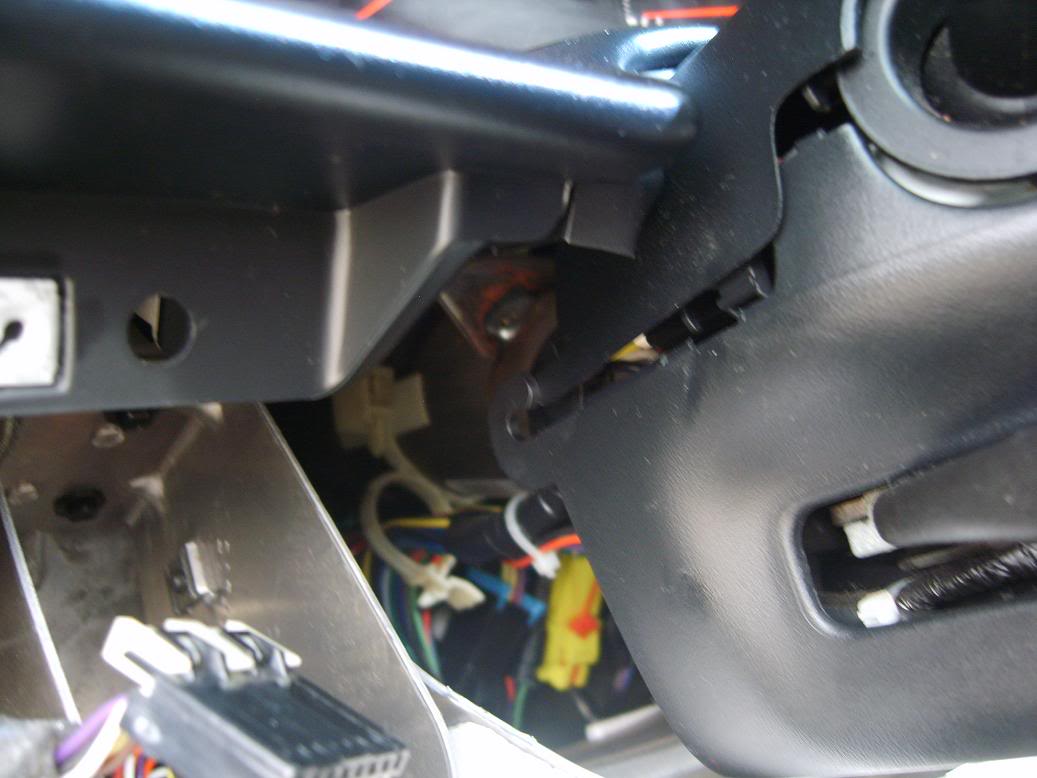
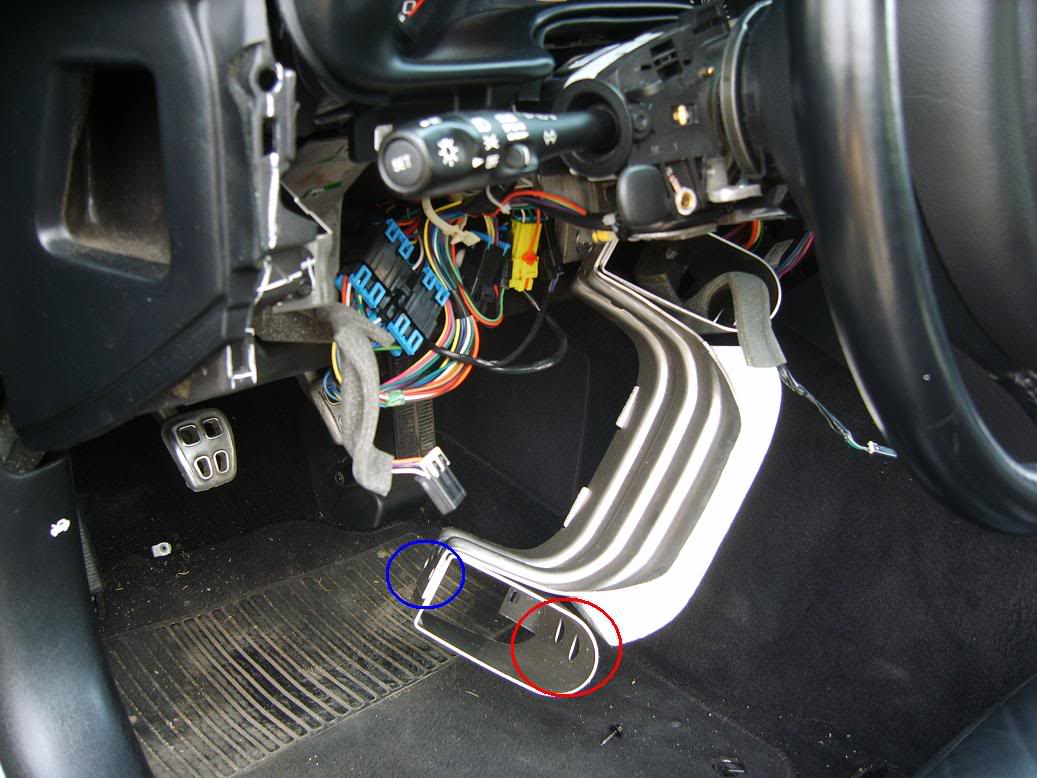
8. Now we have the headlight switch exposed, but before we remove the thing, let's tend to the wires first. To get to them easier, I would remove the metal guard that sits behind the knee panel we removed. (It's got the styrofoam on it). You'll want the 7mm socket and a 6" extension to easily do this: Insert the socket/extension through the holes (circled in red) to get at the bolts (circled in blue). Obviously, this picture is AFTER the guard has been detached but you can still see where and how to get at the bolts.
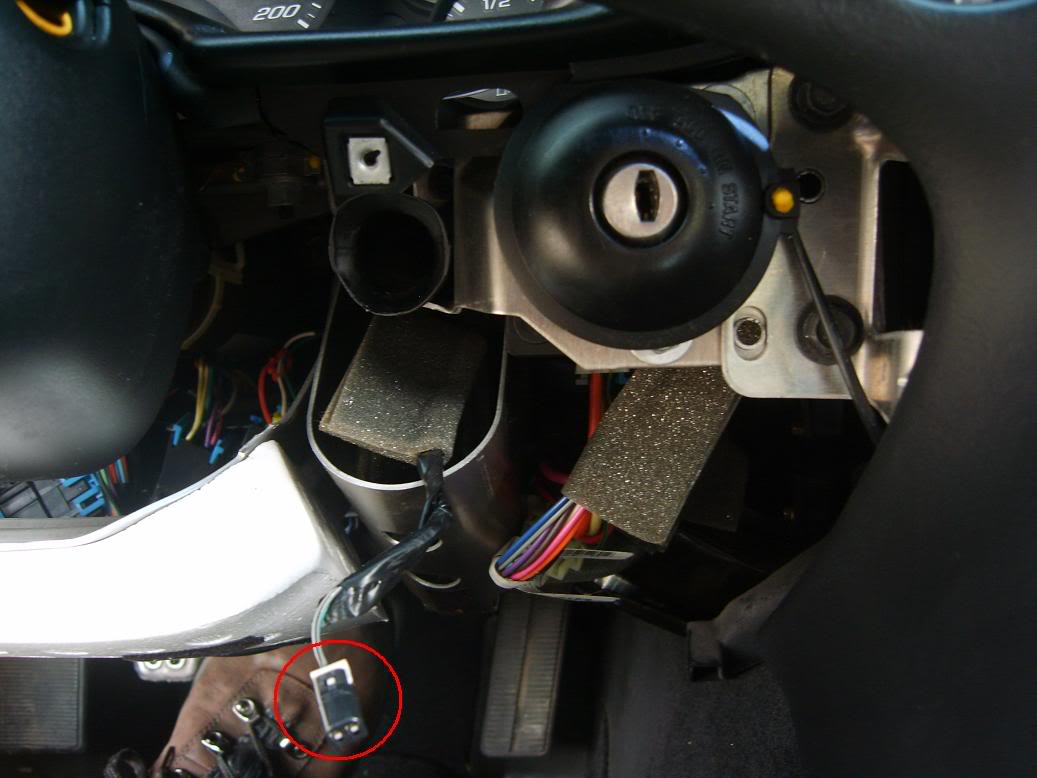
9. The wiring from the headlight switch attaches in two locations to the car: There is a large blue connector and a small black connector. You'll want to unplug both of these. They are shown below. (To detach the blue connector... push on the small tab (circled in red) and pull apart.
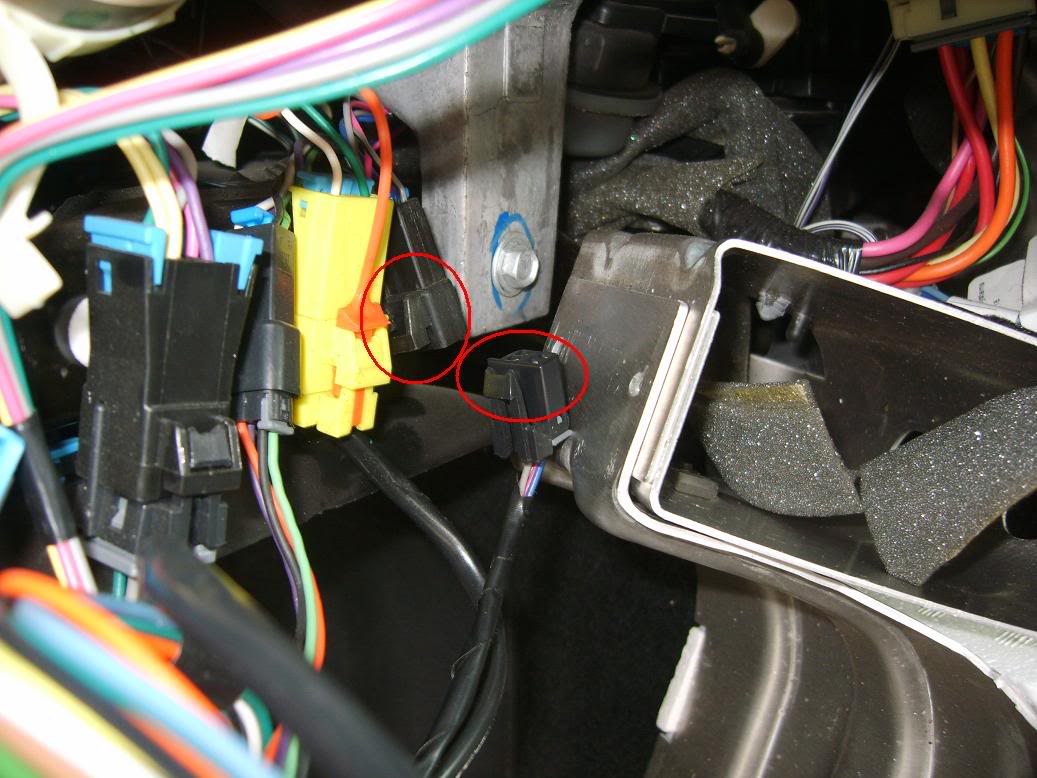
You may also find that the wires from the headlight switch are cable-tied together with some other wires... If this is the case, use some diagonal cutters to cut the tie away so you can fully free the wires from the headlight switch. There is another, larger clasp/cable tie that can simply be undone without cutting it through.
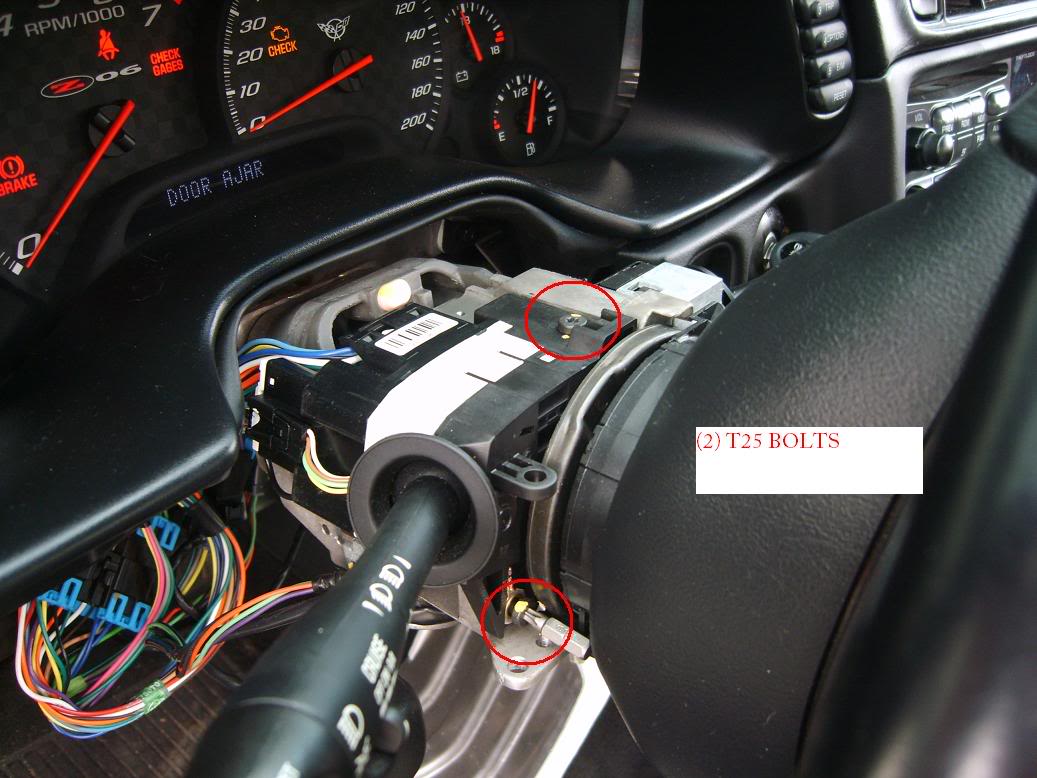
10. Now we can remove the part! For this step you'll need the T25 bit/driver and the 1/4 open-end wrench. here's the part, fully exposed: Note there are TWO bolts; both T25's. The one on top is easy to get at if you tilt the steering down as far as it will go. The one facing forward, however, sits behind the steering wheel.
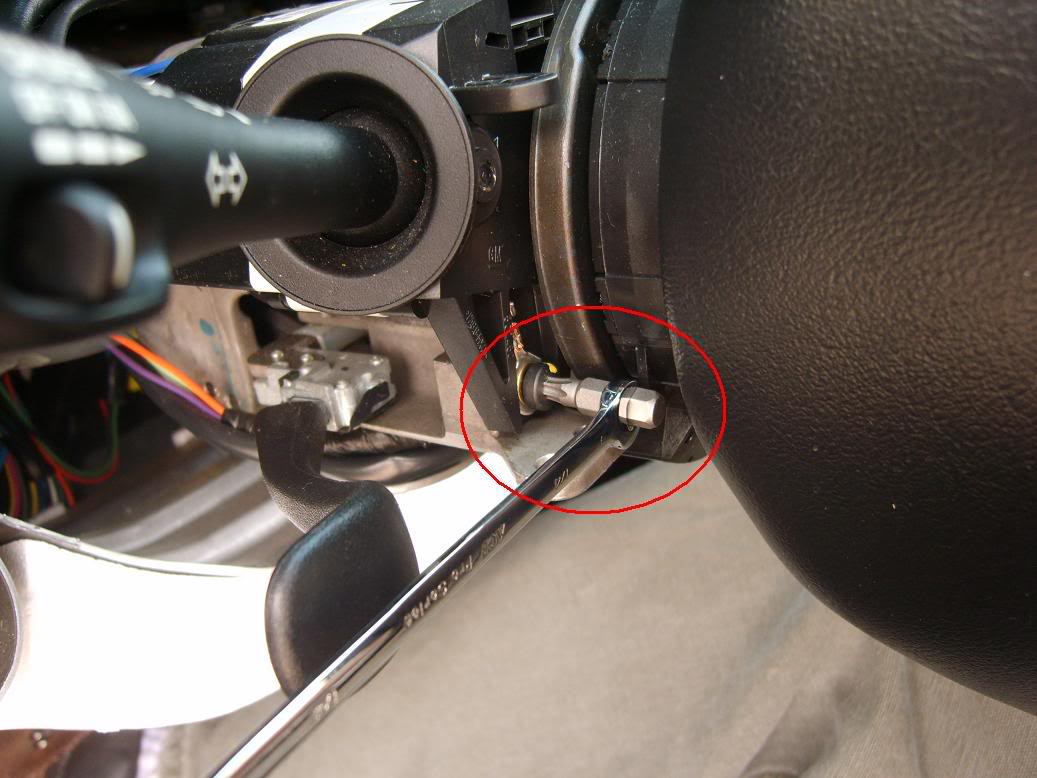
To remove this, we'll simply use our 1" T25 torx bit and the 1/4 inch wrench to turn it from the side: Real easy!

Get these bolts removed, and you're home free.
One word of advice... when you remove the headlight switch, you may inadvertently beep your horn. The front of the switch has a small brass pin that sticks out, that... upon touching the steel disc at the base of the steering wheel, evidently makes the horn sound off. Remember playing that game "Operation" in preschool? It's rather like that!
At this point... your switch is free of the car and ready for repair or replacement.
If you're looking to rebuild/repair the switch like I did, take the T8 torx bit and the instructions from here:
http://forums.corvetteforum.com/show....php?t=1826359
This write-up will show the steps involved with removing the headlight switch / blinker arm / multi-function switch assembly, either for repair or replacement. There wasn't a good picture-rich write-up that I could find so I documented my process, and maybe it'll help somebody out.
My particular problem was that when I turn on the headlights, the taillights wouldn't work and the instrument panel would not illuminate. After removing and repairing my headlight switch, I'm fully functional once again.
I did this two days ago and am going from memory, so please point out any errors or omissions and I'll update the original post accordingly!
I also want to thank Bill Curlee and Zephyr1999 for providing some info on this whole mess in the first place, that led to me understand the problem I had and decide I could fix it.
Tools Needed:
-Beer of Choice (to be used whenever the heck you feel like it!)
-Torx driver or keys, for the following: T15, T20, and T25.
If you are going to open the headlight switch, add T8 to the list.
-The T25 should be a one-inch bit, OR an L-shaped key with a one-inch leg.
-1/4" open-end wrench
-Diagonal cutters (optional)
-Flat-bladed screwdriver or other thin prying device
10mm socket, 4mm socket, 7mm socket, socket wrench, and 6" extension (or equivalent set of nut-drivers)
The Procedure:
In order to get to the blinker switch, we'll be removing the knee panel that goes under and beside the steering wheel; the steering column covers; and we'll loosen the center console pieces. Here's how to do all this.
0. Turn the steering wheel such that the TOP of the wheel is facing LEFT. You'll see why in step 10.
1. First, I'd recommend loosening the center console and radio bezel. This just makes it easier/safer to remove the paneling around the steering wheel I think. For a good procedure on this, check out this guide at Vette Essentials:
Beginning with step 2 in that guide, it'll show you how to remove/loosen these pieces. That guide also parallels some of my writeup here, so you can refer to that guide for additional pictures/info. Once you have those panels removed or loose, come back here and continue on!
2. Remove the trunk release switch panel by using a flat screwdriver or somesuch to pop it out of the dash panel. It's connected to a wire which easily unplugs once you pull the switch foward.
Behind this switch is a T15 torx bolt; unscrew that and set aside with the trunk switch.
3. Next, we'll unscrew the big knee panel under the steering wheel. There are two T15 torx bolts that hold it in place... unscrew those.
4. To remove this panel after having unscrewed those two bolts, you'll need to pull TOWARDS YOU from the LEFT SIDE of the panel. There are two tight clips that you need to unsnap: (red circles are where these fasteners attach; you'll see those once you pull the panel off). The blue circle is the wire that was attached to the trunk release button.
5. When you have the left half of the knee panel loose, carefully begin to work the right half of the panel free. The HVAC sensor is attached; so mind the connecting wire (red circle in below picture). It's easily disconnected; and at that point you should be able to remove the knee panel completely and set it aside.
6. Next, let's remove the steering column covers. First we'll need to remove the bottom half. It's held on by two T20 screws, located as follows:
Once those screws are out, gently pull downward on the bottom half. It will separate from the top half... they are connected at this point solely by plastic latches (red circles) and hooks (blue circle), as shown below. With some maneuvering, the bottom piece will come free. The tricky part is getting it off from and around the tilt steering lever.
7. Unfortunately I didn't get pictures of this step; but I'll try to explain the removal of the top half of the steering column: It's held on by two torx bolts from underneath. However, these are not normal torx bolts. Instead of the torx pattern being recessed like most bolts; this star-pattern is RAISED. I dont know about you, but I don't have torx equipment for those bolts. I found that a 4mm socket does the trick nicely. A six-inch extension is preferred to reach the bolts with. There will be one bolt on each side of the steering wheel. You can see them if you can get your head underneath and look up. Unscrew these bolts, and the top half of the steering column cover will come right off.
8. Now we have the headlight switch exposed, but before we remove the thing, let's tend to the wires first. To get to them easier, I would remove the metal guard that sits behind the knee panel we removed. (It's got the styrofoam on it). You'll want the 7mm socket and a 6" extension to easily do this: Insert the socket/extension through the holes (circled in red) to get at the bolts (circled in blue). Obviously, this picture is AFTER the guard has been detached but you can still see where and how to get at the bolts.
9. The wiring from the headlight switch attaches in two locations to the car: There is a large blue connector and a small black connector. You'll want to unplug both of these. They are shown below. (To detach the blue connector... push on the small tab (circled in red) and pull apart.
You may also find that the wires from the headlight switch are cable-tied together with some other wires... If this is the case, use some diagonal cutters to cut the tie away so you can fully free the wires from the headlight switch. There is another, larger clasp/cable tie that can simply be undone without cutting it through.
10. Now we can remove the part! For this step you'll need the T25 bit/driver and the 1/4 open-end wrench. here's the part, fully exposed: Note there are TWO bolts; both T25's. The one on top is easy to get at if you tilt the steering down as far as it will go. The one facing forward, however, sits behind the steering wheel.
To remove this, we'll simply use our 1" T25 torx bit and the 1/4 inch wrench to turn it from the side: Real easy!
Get these bolts removed, and you're home free.
One word of advice... when you remove the headlight switch, you may inadvertently beep your horn. The front of the switch has a small brass pin that sticks out, that... upon touching the steel disc at the base of the steering wheel, evidently makes the horn sound off. Remember playing that game "Operation" in preschool? It's rather like that!
At this point... your switch is free of the car and ready for repair or replacement.
If you're looking to rebuild/repair the switch like I did, take the T8 torx bit and the instructions from here:
http://forums.corvetteforum.com/show....php?t=1826359
Last edited by Alaskanpilot; 10-06-2009 at 08:46 PM. Reason: typos. how unprofessional of me!

The following 10 users liked this post by Alaskanpilot:
1motime (10-08-2016),
black match box (12-03-2015),
Bullitt68 (03-01-2018),
Ed Bard (09-08-2019),
kentuckybluegrass (11-27-2022),
and 5 others liked this post.
05-23-2008, 01:27 PM
#2
Burning Brakes

Nice write-up! This should enable anyone to tackle the job!
I swapped my switch a couple months back. I used the torx bit/wrench for getting that front bolt, too...much easier than removing the steering wheel!

I swapped my switch a couple months back. I used the torx bit/wrench for getting that front bolt, too...much easier than removing the steering wheel!
05-24-2008, 08:05 AM
#3
Team Owner


Excellent write-up. Theses tend to be under-appreciated until you need a specific how-to and then it can be a huge time/money saver, not to mention a big frustration-buster. Thanks for taking the time to stop and take photos and then edit and upload them. A lot of folks don't realize how much more time and work a good write-up can add to a job.
I have torn apart a lot of stuff on C5s over the years but this is the first time I've seen pics of this one besides the drawings in the manual.
I have torn apart a lot of stuff on C5s over the years but this is the first time I've seen pics of this one besides the drawings in the manual.
The following users liked this post:
Ed Bard (09-08-2019)
 06-19-2008, 07:58 PM
#7
Le Mans Master

Hi Jason -
I just ran across this excellent post - thanks for taking time to do this!
best regards -
mqqn
I just ran across this excellent post - thanks for taking time to do this!
best regards -
mqqn
06-20-2008, 09:45 AM
#9
Safety Car
Thread Starter
Best part is, I threw this together at work so I got PAID to do it!
(and I'm getting paid for posting this too... )
*looks over shoulder for the Boss...*
06-29-2008, 06:24 PM
#10

where is the best place to buy a new switch/stalk for a remove and replace. Great "how To DIY" pics and text. Thank you. I'm at the end of a few days troubleshooting and I guess I'm going to have to bite the bullet and change or repair the lt. sw. on the stalk.

 08-10-2008, 04:40 AM
#14
Le Mans Master


 04-17-2009, 09:20 AM
#18
2nd Gear


Member Since: Apr 2009
Posts: 2
Likes: 0
Received 0 Likes
on
0 Posts
One word...AWESOME! Can't thank you enough for the hard work you put into this project. Your efforts have saved folks like me tons of money. Your analysis of my problem was spot on, and I even saved over $70 dollars by buying the switch on ebay (thepartsladi), and depending where you shop you can save even more...GM wants almost $300 for the same part. So, for you folks out there that have this same problem, don't go any further...here is your solution. Thanks a mil!!!
Hammer2034
Hammer2034
Last edited by Hammer2034; 04-17-2009 at 04:56 PM.
04-17-2009, 09:30 AM
#19
2nd Gear
Member Since: Apr 2009
Posts: 2
Likes: 0
Received 0 Likes
on
0 Posts
I just repaired my 99 C5 last night and it fixed my problem...what a good feeling. Purchased my switch on ebay from - thepartsladi. Just type in c5 Corvette turn signal switch. I paid $143. + $8 s/h. You may find it cheaper else where though, but be careful. The partsladi has an oustanding rating. Good luck!
Hammer2034
Hammer2034
Last edited by Hammer2034; 04-17-2009 at 09:33 AM.


