


Depo non pop up projecter light install issues
Thread Starter
Burning Brakes


Joined: Aug 2003
Posts: 1,164
Likes: 1
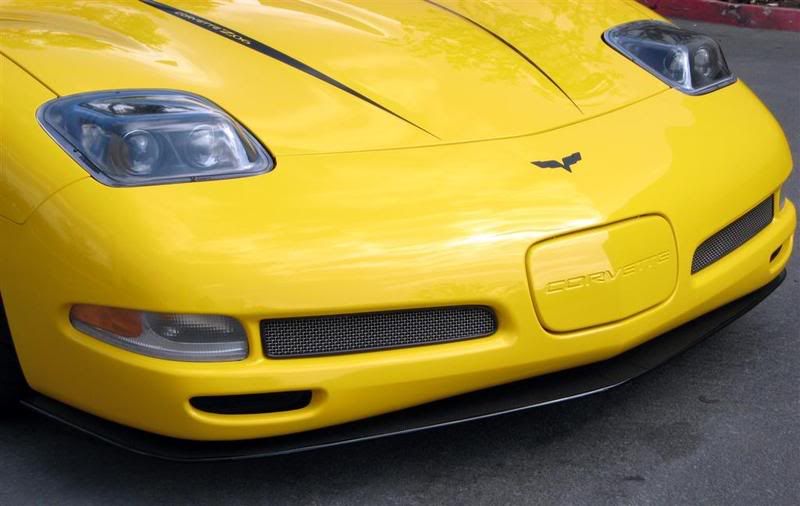
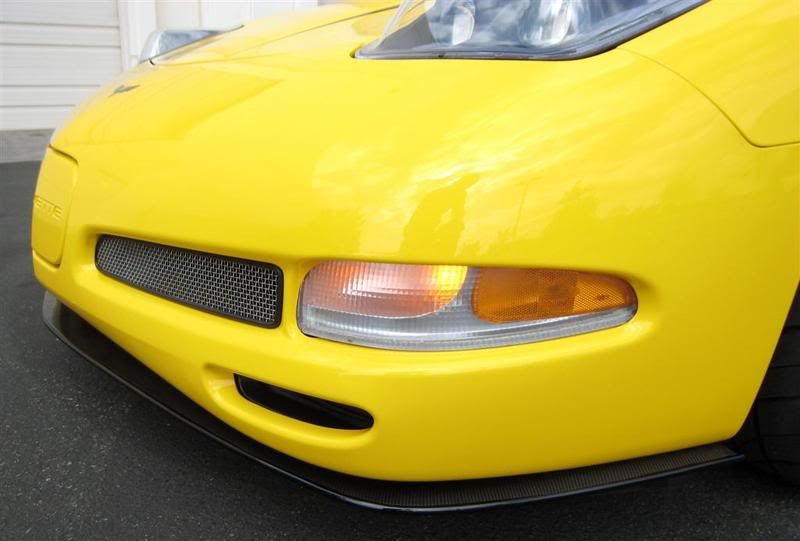
I just got my depos installed by a top tuner shop. They are not evenly installed (the gaps between the lights and fender/bumber/hood is uneven. The amount of space is not even. The tuner shop that installed them explained that because of the bracket and bolt positions, one side of the light has to be bolted closer to the fender/bumber leaving a big gap on the other side. They tried to make each side have the exact same gap spacing so at least both sides look identical but the spacing is off.
Has anyone who has had these lights installed encountered the same problem and do you have a solution? did you use shims between the bolts to push the lights into a more centered position between the fender/bumber/hood? from a distance you cant tell but when you look close up you can see the gaps.
I cant believe these companies that make these type of lights for the
C5 cant get it right after all these yrs..
Race Director


Joined: May 2005
Posts: 15,960
Likes: 21
From: West Norriton PA
St. Jude Donor '08
I just got my depos installed by a top tuner shop. They are not evenly installed (the gaps between the lights and fender/bumber/hood is uneven. The amount of space is not even. The tuner shop that installed them explained that because of the bracket and bolt positions, one side of the light has to be bolted closer to the fender/bumber leaving a big gap on the other side. They tried to make each side have the exact same gap spacing so at least both sides look identical but the spacing is off.
Has anyone who has had these lights installed encountered the same problem and do you have a solution? did you use shims between the bolts to push the lights into a more centered position between the fender/bumber/hood? from a distance you cant tell but when you look close up you can see the gaps.
I cant believe these companies that make these type of lights for the
C5 cant get it right after all these yrs..
Has anyone who has had these lights installed encountered the same problem and do you have a solution? did you use shims between the bolts to push the lights into a more centered position between the fender/bumber/hood? from a distance you cant tell but when you look close up you can see the gaps.
I cant believe these companies that make these type of lights for the
C5 cant get it right after all these yrs..
You obviously do not have a lot of experience with body work.
There are slight variations between all cars and that is why most items (body parts) have some adjustability.
Without some pictures of your problem it's to tell you what might help the problem.
The lights you have, have brackets underneath that are bolted to the rails. You may have to take out the lights and lengthen the or widen the adjustment slots on the brakets to achieve a better fit. You can also use some larger washers to move (shim) the brackets from side to side. Try to figure out you much the gap is off from each side to figure out how thick of a washer to use.

Advanced


Joined: Aug 2008
Posts: 64
Likes: 0
From: Boulder Creek CA
I read that by opening up the stock holes in the depo brackets you can get a lot more play. I did that on mine and used a washer or two and got them OK. I think unless you are willing to take the front clip off, adjust the lights and reinstall and repeat until you get it right they won't be perfect. It looked like a PITA to me so I installed them by removing the front turn signal and the side skirts and fenderwell in front of the tires. Even that way it took me the better part of a day and I work on lots of cars.
Good luck but I would just learn to live with it, I don't even notice the gaps on mine anymore. A shop in my area would probably charge $500 to get them perfect. Do some searches cuz very few people have them installed perfectly, uneven gaps are very comon.
Good luck but I would just learn to live with it, I don't even notice the gaps on mine anymore. A shop in my area would probably charge $500 to get them perfect. Do some searches cuz very few people have them installed perfectly, uneven gaps are very comon.
Last edited by grnmchn; Jan 8, 2009 at 02:39 AM.
Thread Starter
Burning Brakes
Joined: Aug 2003
Posts: 1,164
Likes: 1
Thanks for the replies.. I had a well known tuner place install them not a body shop...they obviously did not shim anything or try to get the spacing perfect, they just installed them and just that was a p.i.t.a..
I guess I have to live with it for now until I have a body shop work on correcting the gaps. At least both sides look exactly the same.
Are there any special tools(nuts,bolts,shims, whatever) that you used to get them perfect so I can pass on the knowledge to my body shop?
thanks.
I guess I have to live with it for now until I have a body shop work on correcting the gaps. At least both sides look exactly the same.
Are there any special tools(nuts,bolts,shims, whatever) that you used to get them perfect so I can pass on the knowledge to my body shop?
thanks.
Race Director
Joined: May 2005
Posts: 15,960
Likes: 21
From: West Norriton PA
St. Jude Donor '08
Thanks for the replies.. I had a well known tuner place install them not a body shop...they obviously did not shim anything or try to get the spacing perfect, they just installed them and just that was a p.i.t.a..
I guess I have to live with it for now until I have a body shop work on correcting the gaps. At least both sides look exactly the same.
Are there any special tools(nuts,bolts,shims, whatever) that you used to get them perfect so I can pass on the knowledge to my body shop?
thanks.
I guess I have to live with it for now until I have a body shop work on correcting the gaps. At least both sides look exactly the same.
Are there any special tools(nuts,bolts,shims, whatever) that you used to get them perfect so I can pass on the knowledge to my body shop?
thanks.
1.) The easiest way to work on them is to drive up or jack up the front of the car.
2.)Remove the front side spoliers (left & Rright) 7mm screw caps and then remove the front coverings from the fascia.
3.) Take some 3M painters tape and put it around the outer edges of the headlight opening so that you don't scratch up the paint.
4.) Get a straight ruler and measure the gaps on each side and top to bottom. Add the two together and then divide by two to get the proper spacing needed on each side. Once you have figure out which side you want to adjust and measure the current gap and figure out if you need some spacers (washers) to correct. You may have to slightly bend the brackets.
4.) Diconnect the light power connector and then remove the bracket bolts or just lossen them up a bit. Use a drop light so that you can look at the brackets to see if you need to grind them some etc ...
Tech Contributor


Joined: Jan 2007
Posts: 19,448
Likes: 1,155
From: Dyer, IN
Don't know why you would pay anyone to install them as it is a pretty simple task, just time consuming.
1.) The easiest way to work on them is to drive up or jack up the front of the car.
2.)Remove the front side spoliers (left & Rright) 7mm screw caps and then remove the front coverings from the fascia.
3.) Take some 3M painters tape and put it around the outer edges of the headlight opening so that you don't scratch up the paint.
4.) Get a straight ruler and measure the gaps on each side and top to bottom. Add the two together and then divide by two to get the proper spacing needed on each side. Once you have figure out which side you want to adjust and measure the current gap and figure out if you need some spacers (washers) to correct. You may have to slightly bend the brackets.
4.) Diconnect the light power connector and then remove the bracket bolts or just lossen them up a bit. Use a drop light so that you can look at the brackets to see if you need to grind them some etc ...
 I installed Specterwerks fixed headlights in a friends 2002. They were very time consuming. To add to the alignment issues, he had a tigershark front end, and a maggie hood.....so getting everything shimmed and aligned was fun. Just be patient, and take your time.
Corvette Stories
The Best of Corvette for Corvette Enthusiasts

Top 10 Most Expensive Corvettes Ever Sold on Bring A Trailer
Brett Foote
10 Things Every Corvette Owner Needs (2026 Edition)
Michael S. Palmer
8 Most "Only Corvette Owners Understand" Quirks and Problems
Pouria Savadkouei
10 Reasons the C6 Z06 is Still A Performance Benchmark After 20 Years
Joe Kucinski
How Much Horsepower Every Corvette Engine "LOST" in 1972
Joe Kucinski
Top 10 DOs and DON'Ts for Protecting Your Convertible Top!
Michael S. Palmer
Top 10 Most Explosive Corvettes Ever Made: Power-to-Weight Ratio Ranked!
Joe Kucinski
150 hp to 1,250 hp: Every Corvette Generation Compared by the Specs That Matter
Joe Kucinski
8 Coolest Corvette Pace Cars (and Replicas) of All Time
Verdad GallardoBurning Brakes
Joined: Jan 2004
Posts: 1,158
Likes: 6
From: Winter Springs Fla
I installed my set yesterday .
I had a buddy watching the spacing on top while i tightened the 2 bolts and 2 nuts without taking off any thing but the bottom cover panel and l/r rubber air dams .
We had them both in in an hour .
Its is very time consuming to get the spacing exact but it can be done .
Now i just need to adjust the lights down out of the trees ,, lol