


A/C belt change instructions
Thread Starter
Racer


Joined: Jul 2005
Posts: 427
Likes: 12
From: Ft. Lauderdale Florida
Can anyone show me a diagram of how to change the ac belt or just the instructions? It is squealing/chirping and I just changed the belt 3 months ago. My old one didnt chirp or squeal but I changed it as it was beginning to show dry rot. I put a new one on and it squeals/chirps every morning when I start it, but when warm it goes away. I sprayed silicone and belt dressing and after 1 day it comes back. I am going to buy an expensive goodyear belt but I forget if I just have to move the tensioner pully with a pry bar or do I have to loosen up the ac bolts? Any help appreciated
Last edited by mbella2000; Aug 9, 2009 at 03:59 PM.
Melting Slicks


Joined: Oct 2007
Posts: 2,383
Likes: 14
From: Kinston North Carolina
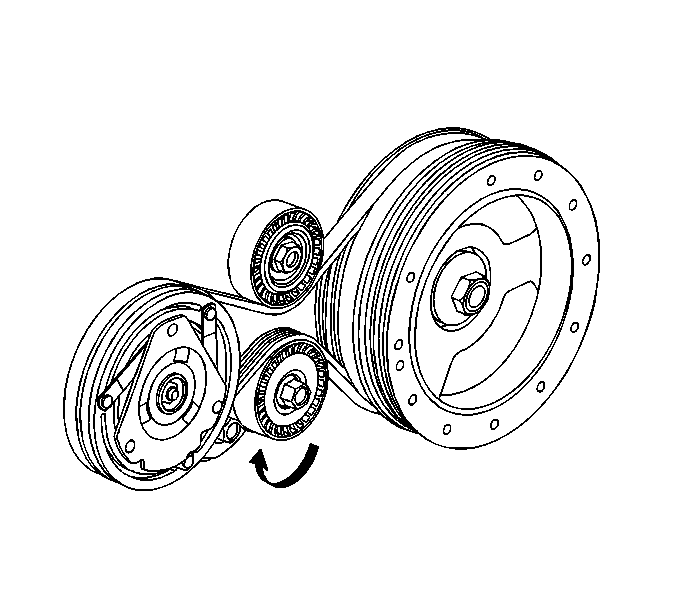
Drive Belt Replacement - Air Conditioning
Removal Procedure
Remove the accessory drive belt. Refer to Drive Belt Replacement - Accessory .
Install a breaker bar with hex-head socket to the air conditioning (A/C) drive belt tensioner bolt.
Rotate the A/C drive belt tensioner clockwise in order to relieve tension on the drive belt.
Remove the A/C drive belt from the pulleys.
Slowly release tension on the A/C drive belt tensioner.
Remove the breaker bar and socket from the A/C drive belt tensioner bolt.
Clean and inspect the drive belt surfaces of the pulleys.
Installation Procedure
Install the A/C drive belt around the crankshaft balancer.
Install a breaker bar with hex-head socket to the A/C drive belt tensioner bolt.
Rotate the A/C drive belt tensioner clockwise in order to relieve tension on drive belt tensioner.
Install the A/C drive belt under the idler pulley.
Install the A/C drive belt over the A/C compressor pulley.
Slowly release tension on the A/C belt tensioner.
Remove the breaker bar and socket from the A/C drive belt tensioner bolt.
Inspect the A/C drive belt for correct alignment.
Install the accessory drive belt. Refer to Drive Belt Replacement - Accessory .
Thread Starter
Racer
Joined: Jul 2005
Posts: 427
Likes: 12
From: Ft. Lauderdale Florida
Thank you so much! Perfect
Drive Belt Replacement - Air Conditioning
Removal Procedure
Remove the accessory drive belt. Refer to Drive Belt Replacement - Accessory .
Install a breaker bar with hex-head socket to the air conditioning (A/C) drive belt tensioner bolt.
Rotate the A/C drive belt tensioner clockwise in order to relieve tension on the drive belt.
Remove the A/C drive belt from the pulleys.
Slowly release tension on the A/C drive belt tensioner.
Remove the breaker bar and socket from the A/C drive belt tensioner bolt.
Clean and inspect the drive belt surfaces of the pulleys.
Installation Procedure
Install the A/C drive belt around the crankshaft balancer.
Install a breaker bar with hex-head socket to the A/C drive belt tensioner bolt.
Rotate the A/C drive belt tensioner clockwise in order to relieve tension on drive belt tensioner.
Install the A/C drive belt under the idler pulley.
Install the A/C drive belt over the A/C compressor pulley.
Slowly release tension on the A/C belt tensioner.
Remove the breaker bar and socket from the A/C drive belt tensioner bolt.
Inspect the A/C drive belt for correct alignment.
Install the accessory drive belt. Refer to Drive Belt Replacement - Accessory .
Removal Procedure
Remove the accessory drive belt. Refer to Drive Belt Replacement - Accessory .
Install a breaker bar with hex-head socket to the air conditioning (A/C) drive belt tensioner bolt.
Rotate the A/C drive belt tensioner clockwise in order to relieve tension on the drive belt.
Remove the A/C drive belt from the pulleys.
Slowly release tension on the A/C drive belt tensioner.
Remove the breaker bar and socket from the A/C drive belt tensioner bolt.
Clean and inspect the drive belt surfaces of the pulleys.
Installation Procedure
Install the A/C drive belt around the crankshaft balancer.
Install a breaker bar with hex-head socket to the A/C drive belt tensioner bolt.
Rotate the A/C drive belt tensioner clockwise in order to relieve tension on drive belt tensioner.
Install the A/C drive belt under the idler pulley.
Install the A/C drive belt over the A/C compressor pulley.
Slowly release tension on the A/C belt tensioner.
Remove the breaker bar and socket from the A/C drive belt tensioner bolt.
Inspect the A/C drive belt for correct alignment.
Install the accessory drive belt. Refer to Drive Belt Replacement - Accessory .

Drifting

Joined: Feb 2005
Posts: 1,592
Likes: 3
From: St Louis MO
Can anyone show me a diagram of how to change the ac belt or just the instructions? It is squealing/chirping and I just changed the belt 3 months ago. My old one didnt chirp or squeal but I changed it as it was beginning to show dry rot. I put a new one on and it squeals/chirps every morning when I start it, but when warm it goes away. I sprayed silicone and belt dressing and after 1 day it comes back. I am going to buy an expensive goodyear belt but I forget if I just have to move the tensioner pully with a pry bar or do I have to loosen up the ac bolts? Any help appreciated
Corvette Stories
The Best of Corvette for Corvette Enthusiasts

Corvette & Porsche 911: How Two Icons Conquered the Last 25 Years
Joe Kucinski
2027 Chevrolet Silverado 1500 First Look: Everything You NEED to Know!
Michael S. Palmer
5 Best & 5 Worst Corvette Daily Drivers
Joe Kucinski
The Headlights of Every Corvette Generation Explained
Joe Kucinski
5 Best & 5 Most Overrated Corvette Track Packages of All Time!
Joe Kucinski
Every 2027 Corvette Engine Explained
Joe Kucinski
Designer Imagines A Corvette That Looks More Like a Corvette Than the Corvette
Verdad Gallardo
10 Ugly Corvettes That We Still Kinda Love
Joe Kucinski
Top 10 Most Expensive Corvettes Ever Sold on Bring A Trailer
Brett FooteTeam Owner


Joined: May 2001
Posts: 87,438
Likes: 1,598
From: Western NY

Instructor
Joined: Dec 2014
Posts: 165
Likes: 5
From: Phoenix Az.
Bumping this thread since I found out my A/C issue is that my car apparently tossed the A/C belt.  It's just not there any more.
Anyway, does one approach this belt swap from above or beneath the car? I don't see a ton of room to get at it from the top, unless you have the hands of an eight year old.
S.C.
It's just not there any more.Anyway, does one approach this belt swap from above or beneath the car? I don't see a ton of room to get at it from the top, unless you have the hands of an eight year old.
S.C.
Instructor
Joined: Dec 2014
Posts: 165
Likes: 5
From: Phoenix Az.
And since I'm in there, I was feeling up the pulleys. They didn't feel great, but they spun OK. I yanked them for a closer look.


Mmmm.Yeah. These are going in the trash.
BTW, Damn you, GM, for making that pulley bolt a 15mm! Can't we keep it all SAE, or all metric?
S.C.
Mmmm.Yeah. These are going in the trash.
BTW, Damn you, GM, for making that pulley bolt a 15mm! Can't we keep it all SAE, or all metric?
S.C.

Intermediate

Joined: Aug 2011
Posts: 37
Likes: 6
It was difficult, but I did get my AC idler pulley and tensioner off. To remove the belt, I bought a crows-foot 15mm and used the breaker bar and almost had a disaster: The breaker bar and crowsfoot socket is too long to fit between the tensioner idler pulley and those two tubes that are right in front of there. Luckily there was no damage done to those tubes (they must be making that stuff more better these days because I can't count the number of times I've damaged various and sundry tubing: gas, oil, brake, etc). The crowsfoot fell off the bolt and luckily fell beneath the car. If I had used a regular socket, I'm sure I would have damaged those tubes, requiring a tow truck. There's a youtube video where Froggy recommends the crowsfoot. I had no idea the tensioner would pull back so far. When putting the belt back on, I will use a 15mm open-end or perhaps box-end wrench which does fit between the pulley and the 2 tubes.
I easily regreased my idler pulley, but the tensioner pulley had to be replaced, as the bearings had flat spots. I was unable to put the tensioner back in place, (those tubes again), so I removed the tensioner pulley again and then I hung the tensioner by some copper wire over the drive belt tensioner pulley. The height was adjusted by looking under the car until the bolt was about the right height, then the tensioner was re-attached from the top, first finger tight then I used my 15mm socket from below the car.
Then things got a little interesting. The bolt holding the tensioner pulley was too long to get it between the tensioner and the 2 tubes which are positioned directly in front of the tensioner. I read a different post that said those tubes were "bungeed" forward. I tried that, and the tubes didn't move very much, but just enough to get that bolt and tensioner pulley in place. I cut a piece of wood to hold the tensioner in place while I tightened the pulley bolt. The upper idler pulley went on with no problem. Except that I almost forgot that thin fiber washer on the bolt.
But now, I'm stuck.
I got the belt around the balancer, again positioning it from below, but I cant get it to stay above the tensioner pulley. It's got to stay above that tensioner pulley because once I put the 15mm open end wrench on the tensioner pulley bolt, I won't be able get the belt around.
If I get the belt to stay on top of the tensioner pulley, I'm not sure how I can hold the open-end wrench pushing the tensioner pulley and get that belt to go around the AC pulley and under the top idler pulley. I think there is no way from the top.
I think this may be a 3 person job.
Hopefully someone who's done this before will make a suggestion to me.
While I wait (maybe forever?) for some suggestions, I will go ahead and regrease my drive belt tensioner pulley and idler pulley, since they are spinning freely and definitely need grease. I wonder why they don't make better grease seals. It wouldn't cost any more than these formed washers I have.
Also, I do not believe this job can be done just from the top. I am using ramps which I use when I change my oil.

Instructor
Joined: Nov 1999
Posts: 200
Likes: 0
From: Allen, Texas
As my C5's AC compressor belt decided to call it quits during this morning's commute AND it also threw my main serpentine belt AND it is running 100degrees during the day, I just reinstalled the serpentine and waited until after sundown to tackle replacing the AC compressor belt. Damn, could GM have made that installation a bit tighter? /s.
I was able to do the whole thing from above as I could really NOT see that working from below bought me a whole hell of lot. (yes I had it on ramps and did crawl underneath to investigate).
I did investigate the idler and tensioner pulleys for wear, wobble, noise when spun, but found all was well as they had both been replace previously.
The way I finally got it to work as to first run the belt over the harmonic balancer, then over the TOP of the idler pulley, then around the tensioning pulley, then while relieving a bit of the tensioning pulley, I slipped it over the compressor. Then I got as much rotation on the tensioner pulley as possible and was able to slip the belt from the top of the idler puller, to underneath it (i.e. normal position). I had to relieve the tensioner a bit and adjust the belt alignment on the harmonic balancer once I had it in place, but that was easy.
Cranked it up and NO belts went flying!. Fired up the AC and all is once again cool and comfortable.
Melting Slicks
Joined: Oct 2007
Posts: 2,375
Likes: 426
Try removing the bolt from the tensioner or pulley and putting the belt in place. Then install the bolt (careful - don't cross thread - it's aluminum).
I laughed when I read the instructions. They don't give a clue to how much of a biotch this job can be.
I laughed when I read the instructions. They don't give a clue to how much of a biotch this job can be.
Intermediate
Joined: Aug 2011
Posts: 37
Likes: 6
I can't figure out how it can be done from the top. I'm guessing BlackBeauty has a manual transmission without the cooling tubes in the way.
I did it johnson-rod's way. Then to get the belt over the compressor, I had my son hold the open-end wrench (socket or crow's foot doesn't fit between the tubes and the bolt) over against the motor and from underneath I got the belt over the compressor.
Thanks, Johnson-rod. If this system ever makes noise again, it's going to the shop. Maybe if I take it to the shop, I can have them re-bend the tranny cooling tubes so they aren't in the way.
Safety Car


Joined: Dec 2018
Posts: 4,529
Likes: 41
From: CA
C5 of Year Finalist (stock) 2019
St. Jude Donor '19-'20
Just changed out both my air conditioner pulleys and belt. Did the entire job from above on passenger side. Used a ratchet with a swivel and a 15 mm socket. Really took a long time to get the belt lined up just right. I left the socket on the tensioner pulley and hung the belt on the socket then inserted the swivel ratchet to put the belt on the tensioner pulley last. Tried a bunch of different configurations but that worked best for reinstalling the belt. If you're not mechanically inclined definitely take it to a shop on this one. Car sounds great now.
Last edited by coletrickle35; Dec 21, 2018 at 07:22 PM. Reason: Misspelling

Instructor
Joined: Jan 2018
Posts: 124
Likes: 16
I just did this yesterday for the first time. Took an hour to replace the belt, idler, and tensioner. Probably 30 minutes next time.
The accessory belt was already off. With the car lifted I put 15mm wrench on the tensioner and removed the belt from the crank first. After that it wasn't hard to pull it all the way out.
The idler pulley was removed from the top using a normal sized 3/8" drive ratchet. Install was the same.
The tensioner was replaced from the bottom using the 3/8" drive ratchet. Getting the tensioner out meant I had to go over and in front of the power steering cooler. Install was opposite of removal.
To get the belt on, I started under the car at the crank. Once the belt was around the crank, I switched to the top. From there I put the belt around the AC pulley, then under the idler.
Back under the car, release the tensioner with a wrench, put the belt on, and done.
My hands are pretty big. Got scrapped up a bit but nothing horrible. I used a 3/8" drive torque wrench on the idler/tensioner without issue.

Intermediate
Joined: Oct 2018
Posts: 37
Likes: 3
From: MA.
Have replaced small a/c belt, tensioner and idler pulley. The items don't line up and is squealing until it is warmed
up. Can see that the belt is not completely on the idler pulley Think I may have put the idler pulley flanges on wrong.
Backwards maybe ? Are people using belt dressing to make the squealing go way until it warms up. Know it's not
the correct fix to do long term. Comments appreciated. Help !

Le Mans Master

Joined: Jul 2010
Posts: 6,039
Likes: 732
Speaking of aluminum. Is everyone using torque wrenches to install new a/c belt tensioner and idler pulley ?
Have replaced small a/c belt, tensioner and idler pulley. The items don't line up and is squealing until it is warmed
up. Can see that the belt is not completely on the idler pulley Think I may have put the idler pulley flanges on wrong.
Backwards maybe ? Are people using belt dressing to make the squealing go way until it warms up. Know it's not
the correct fix to do long term. Comments appreciated. Help !
