


"oil pressure sensor replacement".

Thread Starter
Heel & Toe

Joined: Oct 2005
Posts: 17
Likes: 0
Any advice on replacing the oil pressure sensor, seen sugested idea of cutting plastic to get to it and simple replacement, is this the typical way, what could i expect to pay for GM garage to replace by not cutting this piece of plastic. any links to help with this method or other would be appreciated.

Race Director


Joined: Jan 2006
Posts: 10,554
Likes: 33
From: Not on either liberal coast.
Just one thread on the same issue makes it easier for members to follow and advise. You can click on your original thread and add another reply or question...
http://forums.corvetteforum.com/c5-t...-at-130-a.html
A dealer will probably charge at least $75/hour just in labor.
I think most will advise that it's cleaner to remove the intake manifold and make the repair the suggested way. But some do manage to get their hands down there with the right tools and change the sensor out w/o removing the manifold. Cutting a hole in the wiper surround is quick and easy, but it wouldn't be my choice.
Another option is to plug off the oem position of the sensor and install an after market (or homemade) remotely mounted sensor.
The DIY sticky topic at the very top of the C5 Tech sub-forum has a number of useful threads on how to remove the manifold or install a remote mount oil pressure sensor.
Last edited by hotwheels57; Jan 16, 2012 at 03:43 PM.
Burning Brakes


Joined: May 2010
Posts: 1,068
Likes: 2
From: Spiro Oklahoma
Yes, that's right, a do-it-yourself video on YOUTUBE. A twenty minuite procedure and you're done. I am no mechanic, but when the dealership said $117.50 an hour is what their mechanics cost. I watched this video and replaced it myself in thirty min on my "98 Coupe. Here is the link; why don't you give it a shot.
http://www.youtube.com/watch?v=5PvlDLcyXX8
Let us know how it turns out. Okay? (smile)
http://www.youtube.com/watch?v=5PvlDLcyXX8
Let us know how it turns out. Okay? (smile)
Team Owner


Joined: Jul 2006
Posts: 22,201
Likes: 4,187
From: Kannapolis NC
And if you do get it changed using that video, post back here. You'll be one of the very few who claim it worked. I couldn't do it on a 2001 because of the extra things not shown in the video that were in the way.
Melting Slicks


Joined: Jan 2007
Posts: 2,170
Likes: 6
From: Oilerville Edmonton
St. Jude Donor '08
I'm in the middle of this proceedure right now. It is a really simple task so if you've got the tools, do it yourself. I agree about the youtube video 'howto' not being much help. I have skinny wrist and hands and I would not be able to get down in there. I am upgrading to an LS6 intake any way so I was taking the manifold off either way. Good luck with the fix 
Drifting

Joined: Sep 2008
Posts: 1,389
Likes: 3
From: somewhere shooting my assault rifles

Intermediate
Joined: Sep 2009
Posts: 29
Likes: 0
I just replaced the sending unit and have a couple of tips.
No need to remove the front clamp to the filter. Just remove the hose and clamp at the thottle body and prop up with a block of wood.
After manifold is loose, remove the hose from the brake booster allows you to pull the manifold further forward to remove that hose at the back of the manifold in addition to small hose and electrical connector.
After putting in all new seals you must go back and re-torque the manifold bolts after a short run. I will go and do it again.
The foam covered black plactic tube on the driver side against the manifold separated and I rejoined with a rubber hose. Don't know why it broke, but it was a clean brake.
Thank you Forum for all the help. Made the job doable and saved lots of $$$.
Ciao
Corvette Stories
The Best of Corvette for Corvette Enthusiasts

Every 2027 Corvette Engine Explained
Joe Kucinski
Designer Imagines A Corvette That Looks More Like a Corvette Than the Corvette
Verdad Gallardo
10 Ugly Corvettes That We Still Kinda Love
Joe Kucinski
Top 10 Most Expensive Corvettes Ever Sold on Bring A Trailer
Brett Foote
10 Things Every Corvette Owner Needs (2026 Edition)
Michael S. Palmer
8 Most "Only Corvette Owners Understand" Quirks and Problems
Pouria Savadkouei
10 Reasons the C6 Z06 is Still A Performance Benchmark After 20 Years
Joe Kucinski
How Much Horsepower Every Corvette Engine "LOST" in 1972
Joe Kucinski
Top 10 DOs and DON'Ts for Protecting Your Convertible Top!
Michael S. Palmer
Advanced
Joined: May 2005
Posts: 60
Likes: 11
From: Valencia CA
I just did this and wrote up about it in two different threads (by request, not some desire to duplicate everything I do).
http://forums.corvetteforum.com/c5-g...he-rescue.html
http://forums.corvetteforum.com/c5-t...he-rescue.html
Hope it helps. You CAN do this yourself. Your hand does NOT have to reach all the way down there. Your fingers do have to be able to just reach the top of the sensor when you're just starting it in the hole while re-installing it, but only enough to get it to seat and stay by itself while you drop the socket on it to finish the job.
It took me about 45min because I worry about everything and quadruple check stuff as I go along. It could definitely be done faster.

Instructor
Joined: Feb 2012
Posts: 183
Likes: 2
From: Long Island New York
New member here, but been lurking for awhile.
Just did this repair today, read all the threads here on it and found all of them very helpful.
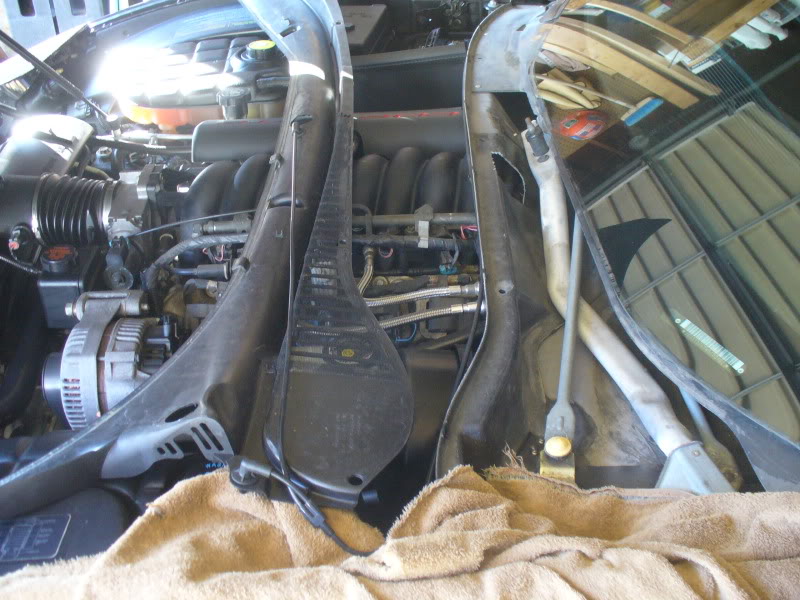
As for that Video, I have no idea how he replaced it that way, it took me a day to think about it, but ended up cutting a hole, will take photos tomorrow if it will help others, was afraid to remove the manifold.
And being my friends sensor on his car has gone bad a few times now, this approach will take only minutes in the future for me if it goes bad again.
Hardest part was removing and reinstalling the wire clip portion, couldn't get finger down there, didn't want to cut a large hole, I used a screwdriver to open the clip and a long thin needle nose pliers to pull it off, when it was time to reinstall the clip, it now had to be rotated 180 to get it on, didn't want to tighten the sensor any more to get it back to the original position, hard to get it to the new position with the needle nose, not much room to turn it when opened on the clip, but finally got it.
In the future, this repair will be a snap now that the access hole is there, removing the wipers and plastic shield only takes a few minutes.
Once everything is back together you will will never know that access hole is there, will place heating tape and spray it black to cover and seal it.
Pep boys carries the socket made just for this, fits perfect over it, it's called a sensor socket, makes sense eh, nice and thin so it doesn't hit anything around it.
I placed a thin strip of tape on the inside of the socket so the sensor was snug when removing and installing, it won't fall out this way causing everyone's problems of losing it down in the abyss.
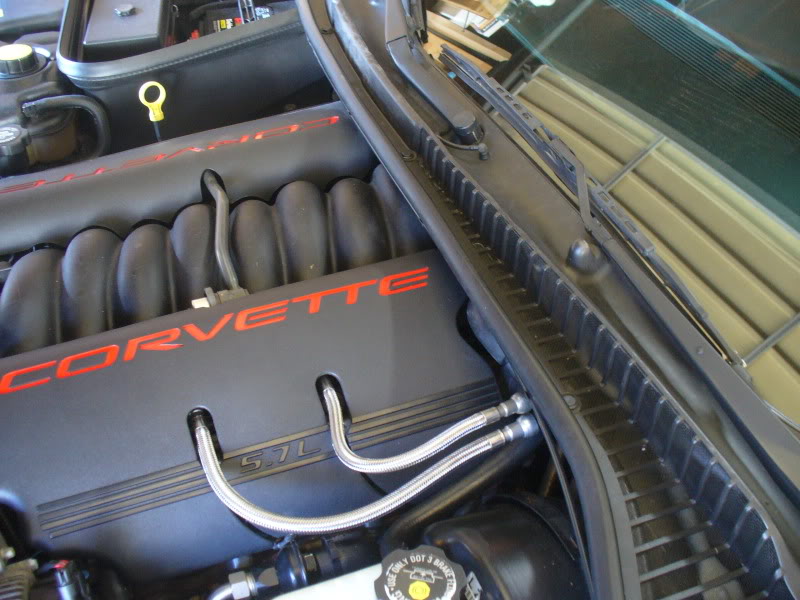
Here are the photos of the new one installed.
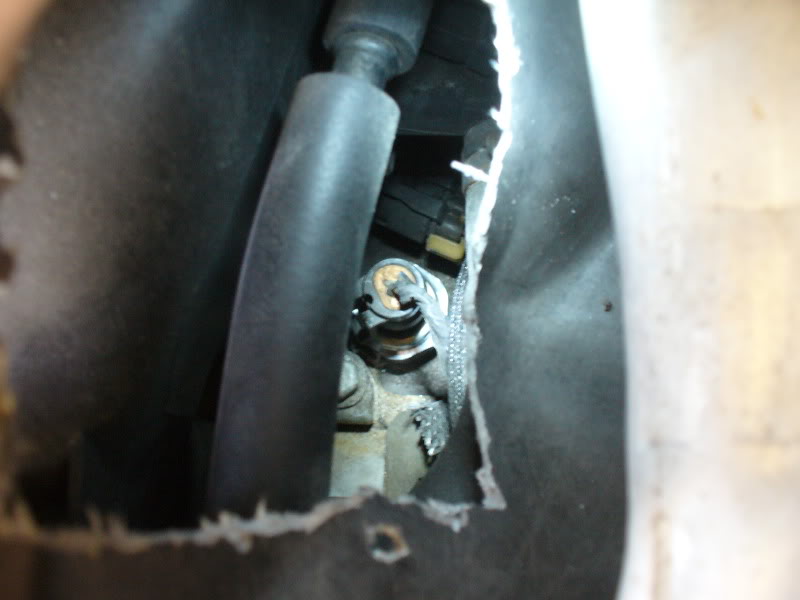
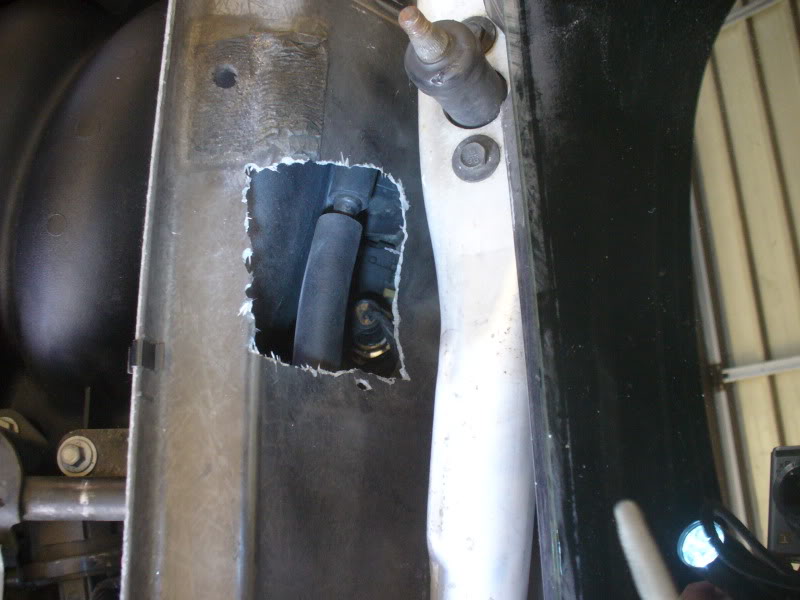
Hole, what hole.

Just did this repair today, read all the threads here on it and found all of them very helpful.
As for that Video, I have no idea how he replaced it that way, it took me a day to think about it, but ended up cutting a hole, will take photos tomorrow if it will help others, was afraid to remove the manifold.
And being my friends sensor on his car has gone bad a few times now, this approach will take only minutes in the future for me if it goes bad again.
Hardest part was removing and reinstalling the wire clip portion, couldn't get finger down there, didn't want to cut a large hole, I used a screwdriver to open the clip and a long thin needle nose pliers to pull it off, when it was time to reinstall the clip, it now had to be rotated 180 to get it on, didn't want to tighten the sensor any more to get it back to the original position, hard to get it to the new position with the needle nose, not much room to turn it when opened on the clip, but finally got it.
In the future, this repair will be a snap now that the access hole is there, removing the wipers and plastic shield only takes a few minutes.
Once everything is back together you will will never know that access hole is there, will place heating tape and spray it black to cover and seal it.
Pep boys carries the socket made just for this, fits perfect over it, it's called a sensor socket, makes sense eh, nice and thin so it doesn't hit anything around it.
I placed a thin strip of tape on the inside of the socket so the sensor was snug when removing and installing, it won't fall out this way causing everyone's problems of losing it down in the abyss.
Here are the photos of the new one installed.
Hole, what hole.
Last edited by Rich98; Feb 7, 2012 at 12:04 PM.


Intermediate
Joined: Aug 2009
Posts: 32
Likes: 0
I cut the hole too with a Dremel and would do it again. I put metal tabs on the cutout with small screws and screwed it back into place and sealed with some black Permatex. Cost of gaskets and the frequency of failure made my decision.
Race Director


Joined: Jul 2004
Posts: 16,795
Likes: 62
From: Lake Havasu City, AZ
The Dealership did it this way for a friend of mine when he complained about what they wanted to do it removing the manifold.

4th Gear
Joined: Feb 2006
Posts: 4
Likes: 0
Im going to pull the intake 2morrow and swap oil sender out and clean up intake and throttle body while it's out, I like the cut out idea if it's going to keep happening but I would use a drill and hole saw to cut a nice clean circle and cover the hole with one of those plastic caps used on an office desk, just my 2 cents.
Intermediate
Joined: Sep 2009
Posts: 29
Likes: 0
I put sealant on the thread of the intake manifold bolts per the factory manual. I also put new seal from Fel Pro, all eight.
I have had to re torque at least 6 times at the required 87 in-lbs after a run and when engine in cold. Don't know if factory seals would need so much re torquing.
I have had to re torque at least 6 times at the required 87 in-lbs after a run and when engine in cold. Don't know if factory seals would need so much re torquing.
Tech Contributor


Joined: Jan 2007
Posts: 19,493
Likes: 1,178
From: Dyer, IN

Former Vendor
Joined: Apr 2006
Posts: 2,470
Likes: 2
From: Portland OR
St. Jude Donor '10-'11-'12
Here is a write up with lots of pics.
http://ls1tech.com/forums/generation...n-dummies.html
http://ls1tech.com/forums/generation...n-dummies.html
Cutting a hole because you want to save time? Seen that on Fbody's instead of dropping the gas tank but thats the first time I've seen that hack on a Vette.

Last edited by 99blancoss; Mar 10, 2012 at 02:28 PM.

Burning Brakes
Joined: Nov 2011
Posts: 765
Likes: 30
From: Vacaville California
Just replaced my sensor. Cut the hole. It's easy to remove the wipers and the plastic section so you can get to the cut location. Prior to drilling a starter hole and cutting I put a piece of sheet metal between the fiberglass and the wires, hoses etc. so I did not have to worry aBout damaging them during my drilling and cutting . I used a rotodrill similar to the dremel it worked great I used alum duct tape underneath the cut out to hold the piece that I cut out and rubber hot glued back into place smoothed everything out and it looks fine and I can still get into it later if I need to. Put everything back together and you can even see that anything was done. I did try the remove the sender by just slipping a socket in there as shown in that Video I had a lot more things in the way than the video showed. Even with the help of my daughters very small hands it wasn't going to work.
Last edited by rbrumm; Mar 10, 2012 at 05:15 PM.