






97 ball joint w/press
Thread Starter
Pro


Joined: May 2004
Posts: 503
Likes: 1
From: WC MO
 97 ball joint w/press
Hey everyone. I've rented a ball joint press and can't get it to work. Well, I don't know how to use the tool. I've been looking for a video or some type of instructions on how to place the press correctly over the ball joints. The upper ball joint points down and the lower point upward. Looking for help.
Thanks for any help.
T.J.
Thanks for any help.
T.J.

Safety Car


Joined: Jul 2010
Posts: 4,027
Likes: 388
From: Chandler AZ
I have a cheaper one I bought at Harbour Freight tools, if it's like the one you have, you have one cup called a receiver cup, it goes on the outside of the control arm, to "catch" or make room for it to slip out.
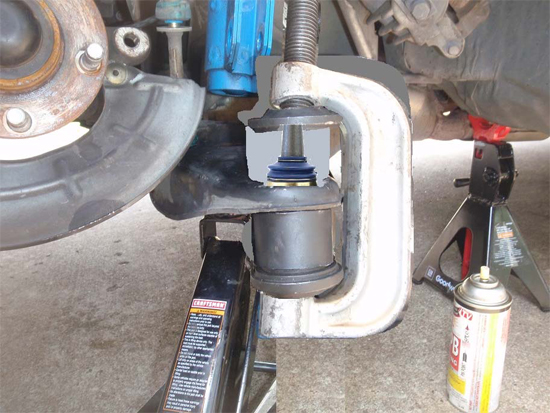
That is just a picture I found from google search for ball joint press, not sure what car.
That is just a picture I found from google search for ball joint press, not sure what car.
Last edited by 1999corvettels1; Nov 8, 2013 at 10:15 PM.
Safety Car
Joined: Jul 2010
Posts: 4,027
Likes: 388
From: Chandler AZ
Looks like he has that tool "**** eyed"
Kinda the same idea, then you reverse the receiver cup, and the other part when putting new balljoint in.
I did this on my 1965 Chevy truck, on it, only the lower balljoints press out, the uppers had rivets that were hell to get out, never noticed how they are on the C5.
Kinda the same idea, then you reverse the receiver cup, and the other part when putting new balljoint in.
I did this on my 1965 Chevy truck, on it, only the lower balljoints press out, the uppers had rivets that were hell to get out, never noticed how they are on the C5.
Thread Starter
Pro
Joined: May 2004
Posts: 503
Likes: 1
From: WC MO
I have a cheaper one I bought at Harbour Freight tools, if it's like the one you have, you have one cup called a receiver cup, it goes on the outside of the control arm, to "catch" or make room for it to slip out.
That is just a picture I found from google search for ball joint press, not sure what car.
That is just a picture I found from google search for ball joint press, not sure what car.


Race Director


Joined: Apr 2007
Posts: 11,153
Likes: 892
From: South Western Ontario
Try Google Images. Something like "ball joint press use"
Typically, you put a sleeve big enough to clear the outer OD of the ball joint so it supports the loop in the arm going around the ball joint on the back side. There will be a large machined washer that fits to it and also fits the press. Then, you do a similar thing on the other side but use a smaller diameter sleeve that will go around the stud and press on the ball joint.
Be careful with the C5 arms. You will likely destroy the arm if you get the joint crooked.
That picture is crappy. Looks like a poor photochop. You also typically don't want to press on the stud because it can pivot off to the side and make everything go crooked.
Typically, you put a sleeve big enough to clear the outer OD of the ball joint so it supports the loop in the arm going around the ball joint on the back side. There will be a large machined washer that fits to it and also fits the press. Then, you do a similar thing on the other side but use a smaller diameter sleeve that will go around the stud and press on the ball joint.
Be careful with the C5 arms. You will likely destroy the arm if you get the joint crooked.
That picture is crappy. Looks like a poor photochop. You also typically don't want to press on the stud because it can pivot off to the side and make everything go crooked.
Corvette Stories
The Best of Corvette for Corvette Enthusiasts

Corvette & Porsche 911: How Two Icons Conquered the Last 25 Years
Joe Kucinski
2027 Chevrolet Silverado 1500 First Look: Everything You NEED to Know!
Michael S. Palmer
5 Best & 5 Worst Corvette Daily Drivers
Joe Kucinski
The Headlights of Every Corvette Generation Explained
Joe Kucinski
5 Best & 5 Most Overrated Corvette Track Packages of All Time!
Joe Kucinski
Every 2027 Corvette Engine Explained
Joe Kucinski
Designer Imagines A Corvette That Looks More Like a Corvette Than the Corvette
Verdad Gallardo
10 Ugly Corvettes That We Still Kinda Love
Joe Kucinski
Top 10 Most Expensive Corvettes Ever Sold on Bring A Trailer
Brett Foote
Safety Car

Joined: Dec 2010
Posts: 3,938
Likes: 498
From: Fords, NJ
Be very careful and make sure the ball joint is square to the control arm and the hole. If it's even the slightest bit cocked to one side you could run the risk of screwing up the control arms. You DO NOT want to see Aluminum shavings coming out of the top around the stud as your pressing it in. What I did with mine was put all 4 ball joints in the freezer over night. Believe it or not the metal will contract or shrink a wee bit and make pressing it in a bit easier. 



Racer

Joined: Jun 2007
Posts: 371
Likes: 22
From: Woodstock GA
Need some advice. I got the upper ball joint out, but can't seem to get the new in straight. I am using an autozone press. The Moog has a metal spiral looking ring. This seems to be the reason it won't go in even. Any suggestions?
Safety Car
Joined: Dec 2010
Posts: 3,938
Likes: 498
From: Fords, NJ
Lightly tap the ball joint into place, making sure it stays square and even all the way around. Once you have it seated and it's square you can use the press to seat it the rest of the way.