N2MB WOT Box Wiring

Thread Starter
Racer


Joined: Sep 2015
Posts: 275
Likes: 17
From: peachtree city ga
 N2MB WOT Box Wiring
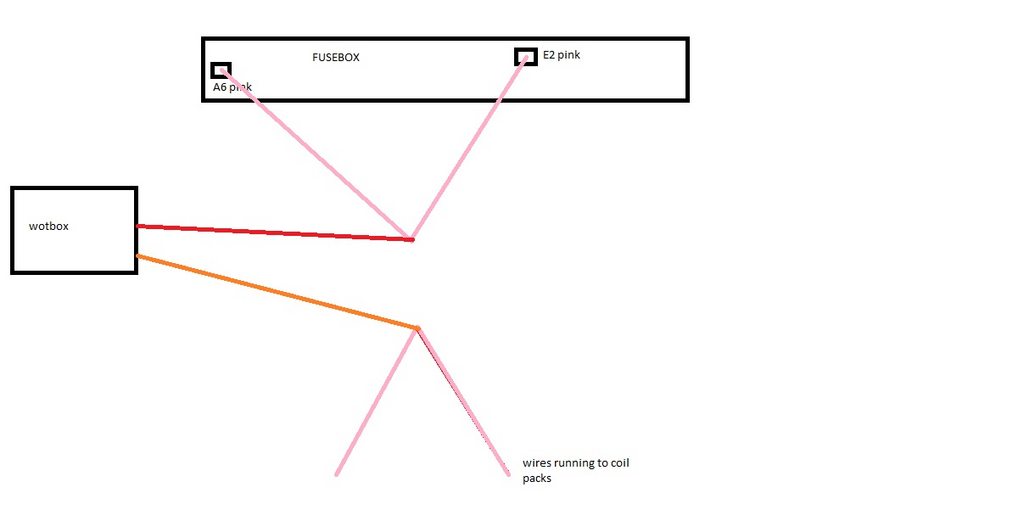
Trying to install my wot box. The directions state to run two wires to your under hood electronic control fuse block. Instructions state to find the two pink wires at Pins a6 & e2. I pulled the top off and there are a lot of pink wires w little room to work let alone find these two pins.
I cannot find a good diagram that shows me where these pink wires are. Any help would be appreciated and trying to find them.
I cannot find a good diagram that shows me where these pink wires are. Any help would be appreciated and trying to find them.
Pro


Joined: Dec 2015
Posts: 660
Likes: 181
From: Knoxville TN
It's been a couple years since I installed mine but if I remember correctly the pink wires your looking for go to your coil packs, there is one for each side, look for your injector fuses there should be 2 of them one for each side of engine and verify if that's the wires your trying to find
and also you don't splice the wires in to the pink ones you have to cut them, 2 go to one wire from n2mb box and 2 go to the other and I would solder them don't use the crappy connectors that come with it
and also you don't splice the wires in to the pink ones you have to cut them, 2 go to one wire from n2mb box and 2 go to the other and I would solder them don't use the crappy connectors that come with it
Thread Starter
Racer
Joined: Sep 2015
Posts: 275
Likes: 17
From: peachtree city ga
How did you...
find the two pinks (assuming they are both pink)? Sounds like you didn't bother with finding pins A6 and E2. You just knew they were the FI wires.
I pulled the fuse block up with very little give. If I am reading you correctly, there should be a PNK wire on each injector bank fuse?
Trying to read the instructions without a good pic of the cuts is very confusing. Probably only get one shot at this.
Anyone with pix at the fuse block, please jump in.
I pulled the fuse block up with very little give. If I am reading you correctly, there should be a PNK wire on each injector bank fuse?
Trying to read the instructions without a good pic of the cuts is very confusing. Probably only get one shot at this.
Anyone with pix at the fuse block, please jump in.
It's been a couple years since I installed mine but if I remember correctly the pink wires your looking for go to your coil packs, there is one for each side, look for your injector fuses there should be 2 of them one for each side of engine and verify if that's the wires your trying to find
and also you don't splice the wires in to the pink ones you have to cut them, 2 go to one wire from n2mb box and 2 go to the other and I would solder them don't use the crappy connectors that come with it
and also you don't splice the wires in to the pink ones you have to cut them, 2 go to one wire from n2mb box and 2 go to the other and I would solder them don't use the crappy connectors that come with it
Pro
Joined: Dec 2015
Posts: 660
Likes: 181
From: Knoxville TN
I know I took the battery out and removed the large plastic part under the fuse block to get more room but I think once I found the pink wires I "thought" were correct I may have used a tester to confirm the correct wires, disconnected the harness at coils and put my testor on that wire then tested wires at fuse block till I found the right ones
Thread Starter
Racer
Joined: Sep 2015
Posts: 275
Likes: 17
From: peachtree city ga
Duh.
I did not think about OHMing the wires.
I will get back at this in the morning.
Thanx.
I will get back at this in the morning.
Thanx.
I know I took the battery out and removed the large plastic part under the fuse block to get more room but I think once I found the pink wires I "thought" were correct I may have used a tester to confirm the correct wires, disconnected the harness at coils and put my testor on that wire then tested wires at fuse block till I found the right ones

Pro


Joined: Jan 2016
Posts: 680
Likes: 255
2021 C5 of the Year Finalist - Modified
Thread Starter
Racer
Joined: Sep 2015
Posts: 275
Likes: 17
From: peachtree city ga
Corvette Stories
The Best of Corvette for Corvette Enthusiasts

How Much Horsepower Every Corvette Engine "LOST" in 1972
Joe Kucinski
Top 10 DOs and DON'Ts for Protecting Your Convertible Top!
Michael S. Palmer
Top 10 Most Explosive Corvettes Ever Made: Power-to-Weight Ratio Ranked!
Joe Kucinski
150 hp to 1,250 hp: Every Corvette Generation Compared by the Specs That Matter
Joe Kucinski
8 Coolest Corvette Pace Cars (and Replicas) of All Time
Verdad Gallardo
Top 10 Corvette Engines RANKED by Peak Torque (70+ Years of Muscle!)
Joe Kucinski
Corvette ZR1X Will Be Pacing the Indy 500, And Could Probably Race, Too!
Verdad Gallardo
Top 10 Corvettes Coming to Mecum Indy 2026!
Brett Foote
Top 10 C9 Corvette MUST-HAVES to Fix These C8 Generation Flaws!
Michael S. Palmer
Melting Slicks


Joined: Jun 2002
Posts: 2,246
Likes: 66
From: Middletown CT
Found this on their Website. With this and the info I sent you, you should be able to make some progress.
[B]Important update to the Installation instructions found in the wotbox instructions pdf.
WOT Box Installation Instructions
HARNESS REVISION AS OF 3/24/14
If your harness is equipped with an ORANGE wire it will replace the 16 gauge BLACK wire of the RED / BLACK paired wires in the instructions below. Whenever the BLACK of the RED / BLACK pair is mentioned, use the ORANGE wire. The instructions will be updated to reflect this change shortly.
To summarize the functions of the wires:
RED - Ignition coil power IN
ORANGE - Ignition coil power OUT
BLACK - Ground
GREEN - Clutch wire input
BLUE - Throttle position sensor or accelerator pedal position sensor input
YELLOW - RPM input"
[B]Important update to the Installation instructions found in the wotbox instructions pdf.
WOT Box Installation Instructions
HARNESS REVISION AS OF 3/24/14
If your harness is equipped with an ORANGE wire it will replace the 16 gauge BLACK wire of the RED / BLACK paired wires in the instructions below. Whenever the BLACK of the RED / BLACK pair is mentioned, use the ORANGE wire. The instructions will be updated to reflect this change shortly.
To summarize the functions of the wires:
RED - Ignition coil power IN
ORANGE - Ignition coil power OUT
BLACK - Ground
GREEN - Clutch wire input
BLUE - Throttle position sensor or accelerator pedal position sensor input
YELLOW - RPM input"
Last edited by Greg_E; Oct 10, 2017 at 06:32 AM. Reason: Added "Aid to Installation" and my wiring diagram. All in one place.
Pro
Joined: Jan 2016
Posts: 680
Likes: 255
2021 C5 of the Year Finalist - Modified
When they are talking about 2 pink wires on Pin E2 and pin A6, Red wire from WOTbox connected to wire ends that lead TO the fusebox and orange wire connected to wire that lead to the coils...
Which pink wire leads to the fusebox and which leads to the coils?
Which pink wire leads to the fusebox and which leads to the coils?

Pro
Joined: Jan 2016
Posts: 680
Likes: 255
2021 C5 of the Year Finalist - Modified
Will update this thread with my progress. If anyone could confirm my wiring, that would be great... Also my box came with parameters set for srt4 dodge. Can anyone share their settings that work for c5z?
The progress:
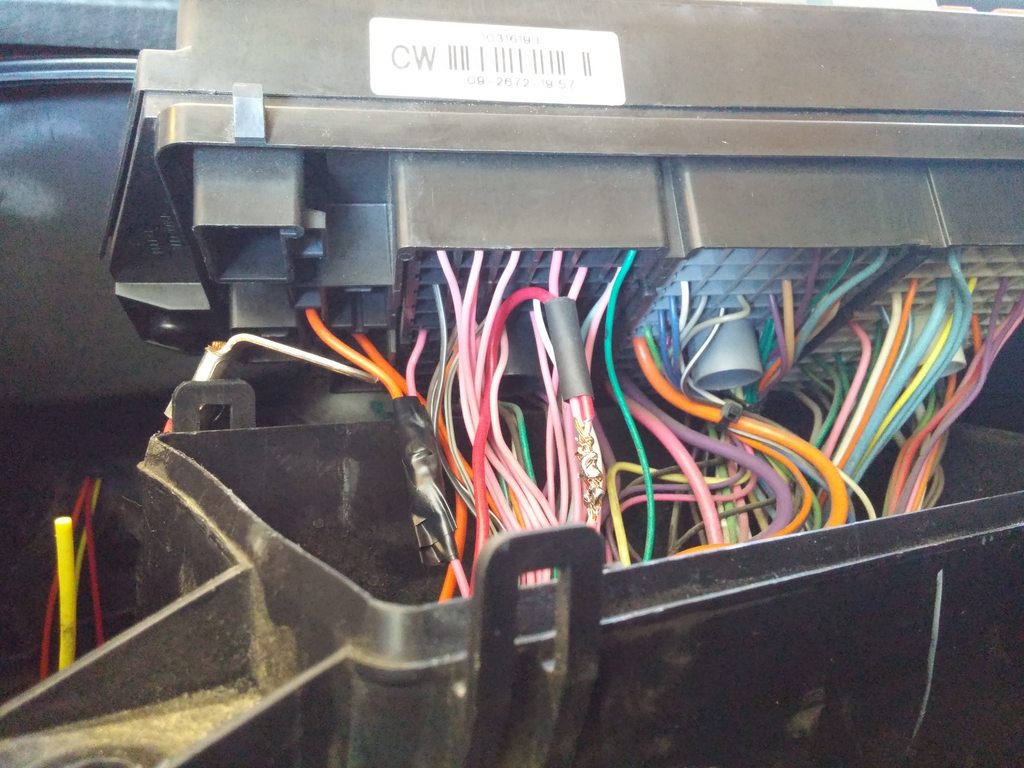
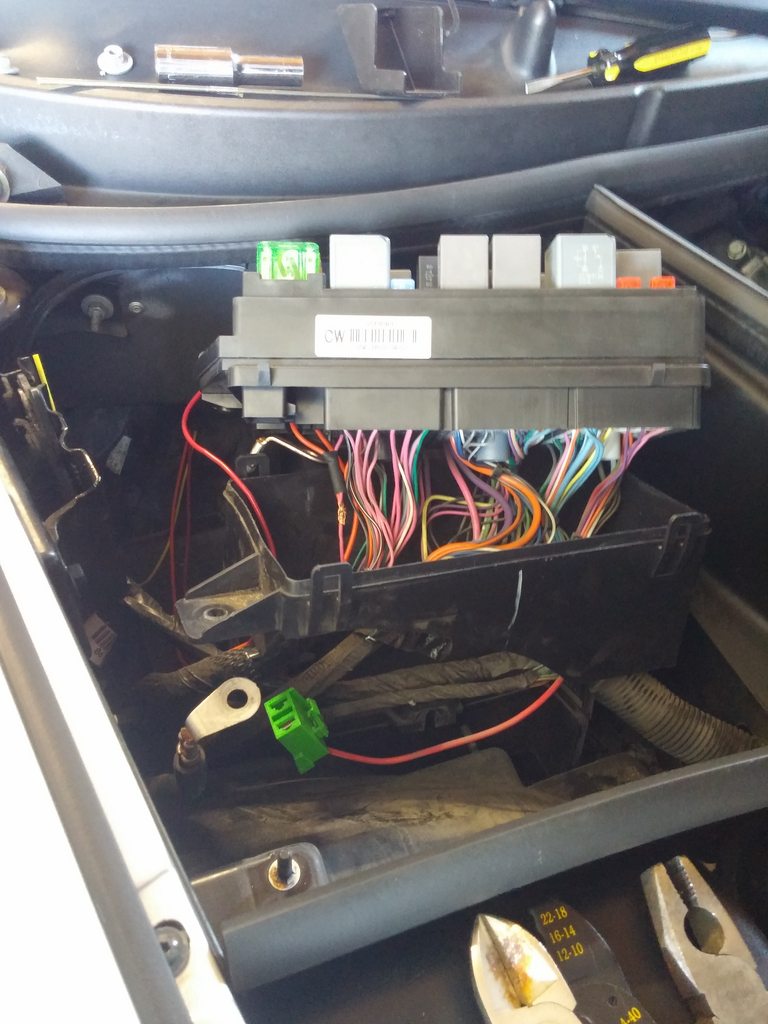
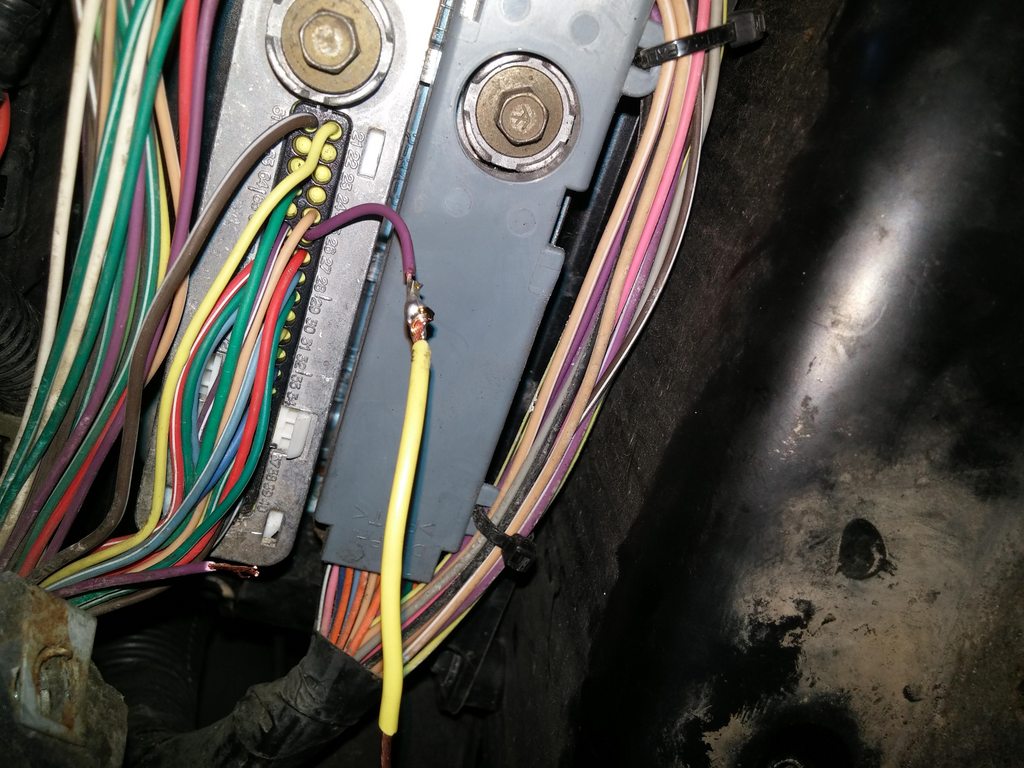
The progress:
Melting Slicks
Joined: Jun 2002
Posts: 2,246
Likes: 66
From: Middletown CT
I just found this on their website
"WOT Box Installation Instructions
HARNESS REVISION AS OF 3/24/14
If your harness is equipped with an ORANGE wire it will replace the 16 gauge BLACK wire of the RED / BLACK paired wires in the instructions below. Whenever the BLACK of the RED / BLACK pair is mentioned, use the ORANGE wire. The instructions will be updated to reflect this change shortly.
To summarize the functions of the wires:
RED - Ignition coil power IN
ORANGE - Ignition coil power OUT
BLACK - Ground
GREEN - Clutch wire input
BLUE - Throttle position sensor or accelerator pedal position sensor input
YELLOW - RPM input"
They don't make clear in their instructions whether or not you are just tapping into the factory wiring or cutting the factory wire and replacing it with the wire from the N2MB. If you zoom up the picture of the clutch pedal position switch in the instructions, you can see that they cut the gray wire crimped on a butt splice connector and then inserted both the gray wire and green wire to the N2MB into the other end of the butt connector. The picture for the purple wire to Yellow wire on the N2MB is not clear enough to tell if the purple wire is cut and replaced by the yellow wire or the yellow wire is just piggybacked into the purple wire. My guess is that the APP and PCM wire are also piggy backed to the existing wires but I don't know that for certain. I don't think the TAC module would be happy if it didn't see the APP input and the PCM wire is RPMs.
I've been working with Rich behind the scene until we get this sorted out. I have a document that I want him to check and if it looks OK we can post it. Why don't you hold up for a little bit.
Last edited by Greg_E; May 19, 2017 at 08:47 PM.
Pro
Joined: Jan 2016
Posts: 680
Likes: 255
2021 C5 of the Year Finalist - Modified
Thanks for the update. Yes i re-read the instructions before proceeding. From my pics, you can see i cut E2 pink wire and spliced in RED wire from wotbox.
I cut A6 pink wire and spliced in ORANGE wire from wotbox...
I hope that's correct.
I cut A6 pink wire and spliced in ORANGE wire from wotbox...
I hope that's correct.
Melting Slicks
Joined: Jun 2002
Posts: 2,246
Likes: 66
From: Middletown CT
Look at the NOTES FOR ALL MODELS just below figure 2 in the instructions. Disregard the reference to the black wire. Yours is orange.
Last edited by Greg_E; May 19, 2017 at 12:25 PM.