


 Looks great, really compliments the other stripes and blackout treatment you have done on the car. Good job.









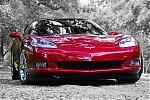


Painted headlight liners.

Thread Starter
Pro


Joined: Jan 2010
Posts: 629
Likes: 65
From: Freedom PA
 Painted headlight liners.
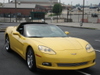
At Robert's, (RLSebring,) urging here are a couple of pictures of my headlight painted satin black.
I don't take criticism well, so please, positive comments only.
The left side, which I did first, went real well
On the right side I decided to bump the oven up to 300 for 25 minutes. The plan was to not have to go through 6 heat cycles in the oven for 15 minutes at 250 each.
Well, 300 for 25 minutes will craze the lens. Now I'm waiting for a right side lens from Robert.
If your tuned in Robert, did you get my PayPal payment?
The weather has turned, and I want to get her on the road.
Ed


I don't take criticism well, so please, positive comments only.
The left side, which I did first, went real well
On the right side I decided to bump the oven up to 300 for 25 minutes. The plan was to not have to go through 6 heat cycles in the oven for 15 minutes at 250 each.
Well, 300 for 25 minutes will craze the lens. Now I'm waiting for a right side lens from Robert.
If your tuned in Robert, did you get my PayPal payment?
The weather has turned, and I want to get her on the road.
Ed
Last edited by Old Yellow; Mar 20, 2010 at 08:05 PM. Reason: Spelling
Corvette Stories
The Best of Corvette for Corvette Enthusiasts

10 Reasons the C6 Z06 is Still A Performance Benchmark After 20 Years
Joe Kucinski
How Much Horsepower Every Corvette Engine "LOST" in 1972
Joe Kucinski
Top 10 DOs and DON'Ts for Protecting Your Convertible Top!
Michael S. Palmer
Top 10 Most Explosive Corvettes Ever Made: Power-to-Weight Ratio Ranked!
Joe Kucinski
150 hp to 1,250 hp: Every Corvette Generation Compared by the Specs That Matter
Joe Kucinski
8 Coolest Corvette Pace Cars (and Replicas) of All Time
Verdad Gallardo
Top 10 Corvette Engines RANKED by Peak Torque (70+ Years of Muscle!)
Joe Kucinski
Corvette ZR1X Will Be Pacing the Indy 500, And Could Probably Race, Too!
Verdad Gallardo
Top 10 Corvettes Coming to Mecum Indy 2026!
Brett Foote
Burning Brakes


Joined: Nov 2008
Posts: 1,068
Likes: 17
From: Middlefield, OH
I thought the adhesive wasn't conducive to the oven method. When I had my TT, the forum talked about baking them all the time to get to the inside, but I don't see that at all here. Any insight into your method would be appreciated. I have two "fogged" lenses on my '05.

Thread Starter
Pro
Joined: Jan 2010
Posts: 629
Likes: 65
From: Freedom PA
Can't make it any clearer. I took the headlight out of the car. Took it apart, painted the inner liner satin black and glued it back together.
Thanks all. I've seen so many negative comments on other peoples mods that I swore I wouldn't post it, But Robert (RLSebring) convinced me.
The oven method just barely softens the adhesive, and I only had about 4-5 minutes working time before the lens cooled, and had to be reheated.
The first heating just allowed me to stretch the adhesive near the top. On the second heating cycle I was able to open a space about two inches long. Put a couple strips of thin steel in the gaps so they wouldn't close back up, then heat it again. Repeating this over and over until it came apart.
I allowed the paint to cure for a week before re-assembly.
There are three nuts on the bottom side of the light housing, near the front, that must be removed first, so that the inner liner comes off with the clear lens.
Then there are four Torx screws holding the inner liner to the clear lens at the top.
The two polished bezels and, the parking light lens are held in place with more Torx screws. I removed the bezels, and painted them seperately, to make it easier to get good coverage on the liner, around their openings. Of course I also removed the parking light lenses before painting the liner. (Figured I'd add that little detail, because someone will ask if I painted them as well.)
In efect the three pieces are mechanicaly attached together, but at opposite ends. So there really isn't much strength to the assembly without the glue to hold, and seal the clear lens to the main housing.
The liner, that you want painted, is just screwed to the two outer sections.
It was a hard job, and because I got impatient, I ruined the one lens.
Thanks to Robert, and his lens removal and sales service, that mistake will only cost me $155.00.
I would never do anyone elses headlights because I did some cosmetic damage to the back housing while prying them apart. No cracks or breaks just some nicks in the outer flange.
It's all completely hidden once the rubber gasket is installed, and the light put back in the car. I just wouldn't do that to somebody elses lights.
The lens itself, is quit hard. It suffered no damage at all from prying.
Ed
The first heating just allowed me to stretch the adhesive near the top. On the second heating cycle I was able to open a space about two inches long. Put a couple strips of thin steel in the gaps so they wouldn't close back up, then heat it again. Repeating this over and over until it came apart.
I allowed the paint to cure for a week before re-assembly.
There are three nuts on the bottom side of the light housing, near the front, that must be removed first, so that the inner liner comes off with the clear lens.
Then there are four Torx screws holding the inner liner to the clear lens at the top.
The two polished bezels and, the parking light lens are held in place with more Torx screws. I removed the bezels, and painted them seperately, to make it easier to get good coverage on the liner, around their openings. Of course I also removed the parking light lenses before painting the liner. (Figured I'd add that little detail, because someone will ask if I painted them as well.)
In efect the three pieces are mechanicaly attached together, but at opposite ends. So there really isn't much strength to the assembly without the glue to hold, and seal the clear lens to the main housing.
The liner, that you want painted, is just screwed to the two outer sections.
It was a hard job, and because I got impatient, I ruined the one lens.
Thanks to Robert, and his lens removal and sales service, that mistake will only cost me $155.00.
I would never do anyone elses headlights because I did some cosmetic damage to the back housing while prying them apart. No cracks or breaks just some nicks in the outer flange.
It's all completely hidden once the rubber gasket is installed, and the light put back in the car. I just wouldn't do that to somebody elses lights.
The lens itself, is quit hard. It suffered no damage at all from prying.
Ed
Pro

Joined: Jul 2009
Posts: 696
Likes: 0
From: Houston TX
[QUOTE=Old Yellow;1573488425]Can't make it any clearer. I took the headlight out of the car. Took it apart, painted the inner liner satin black and glued it back together.
I got that it was just the sentences with all the commas and use of certain words.
Non the less, looks great.
I got that it was just the sentences with all the commas and use of certain words.
Non the less, looks great.

Le Mans Master


Joined: Apr 2006
Posts: 7,158
Likes: 152
From: Chicago IL


Drifting

Joined: Jun 2001
Posts: 1,270
Likes: 0
From: Prescott AZ

Melting Slicks

Joined: Feb 2006
Posts: 2,574
Likes: 136
From: Simi Valley California
St. Jude Donor '06-'07-'10, '15. '22-'23
I think it looks fantastic with the yellow! Let us know how it holds up when you are done. I am sure it will be bullet-proof, sounds like they will be good as new when you are done!