
Headlight assembly adjustment?
 03-21-2010, 08:57 AM
#1
Racer

Thread Starter
I was installing my speed lingerie bra yesterday and noticed that the passenger side headlight assembly was about 1/8" from sealing where the top of the headlight seal is supposed to meet the fender. It's not noticeable unless you swat down and look directly at it, but there is a gap there that you can see in behind the assembly. I don't really know that it will hurt anything, but concerned about rain and such getting in there.
Is there a way for me to adjust this? Is it nothing to worry about, or is this something I need a dealer to look at?
Thanks for you help,
Billy
Is there a way for me to adjust this? Is it nothing to worry about, or is this something I need a dealer to look at?
Thanks for you help,
Billy
 03-21-2010, 09:17 AM
#2
Team Owner


I was installing my speed lingerie bra yesterday and noticed that the passenger side headlight assembly was about 1/8" from sealing where the top of the headlight seal is supposed to meet the fender. It's not noticeable unless you swat down and look directly at it, but there is a gap there that you can see in behind the assembly. I don't really know that it will hurt anything, but concerned about rain and such getting in there.
Is there a way for me to adjust this? Is it nothing to worry about, or is this something I need a dealer to look at?
Thanks for you help,
Billy
Is there a way for me to adjust this? Is it nothing to worry about, or is this something I need a dealer to look at?
Thanks for you help,
Billy
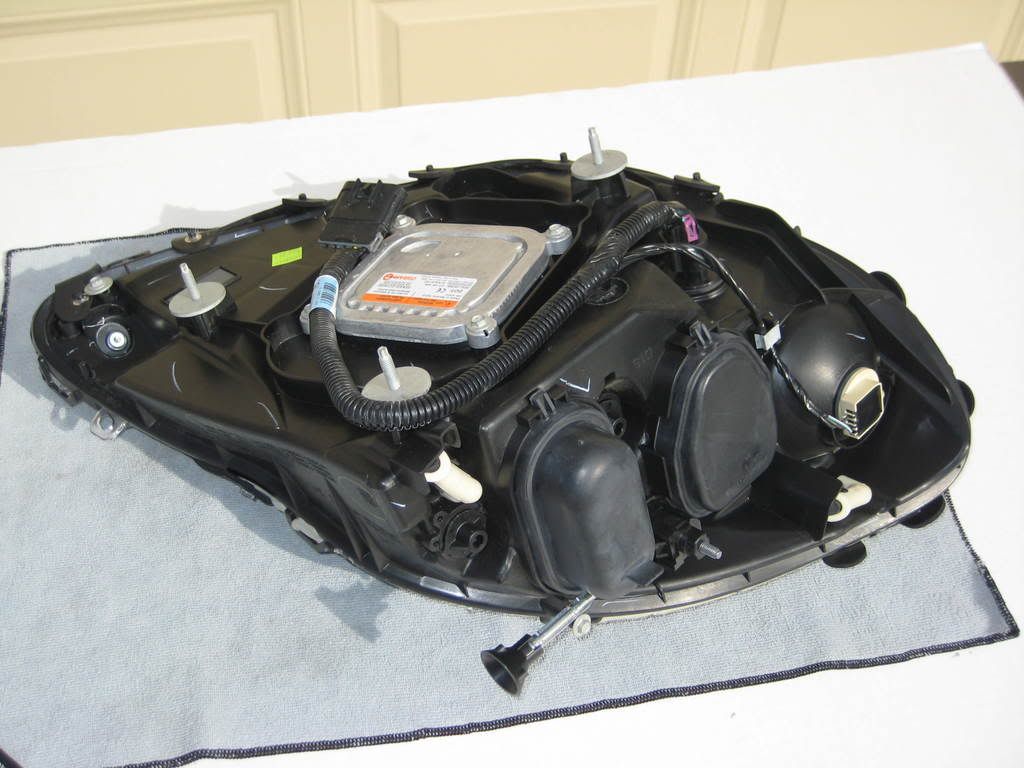
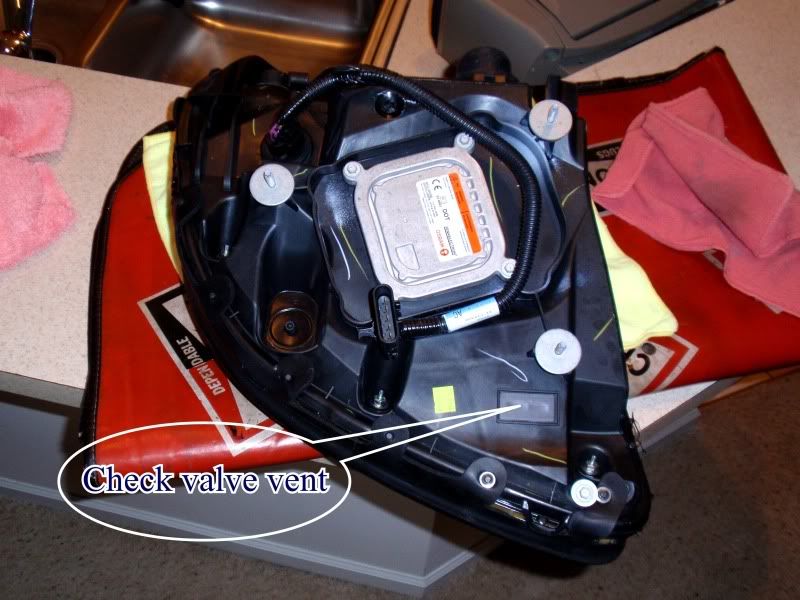
This is what the headlight assembly looks like from the bottom and you can see the three bolts and washers that hold it in place:
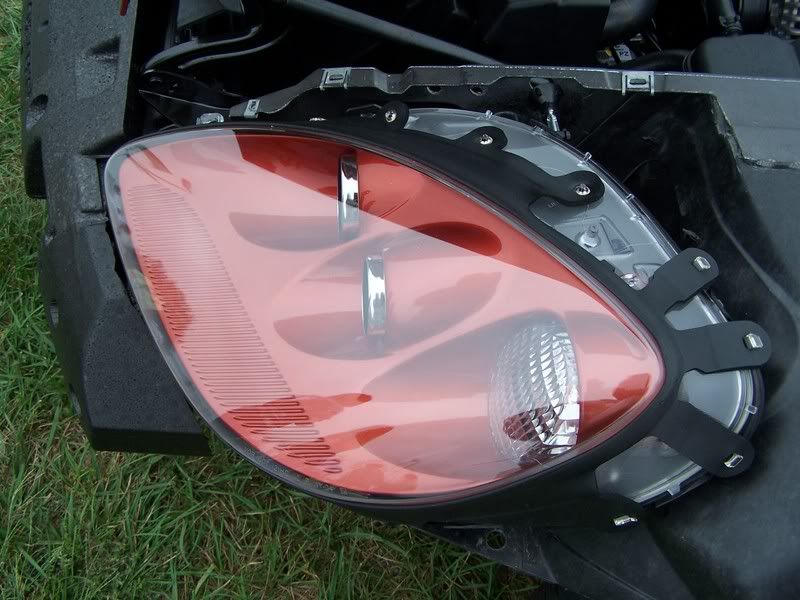
This is what the gasket looks like on the light assembly.
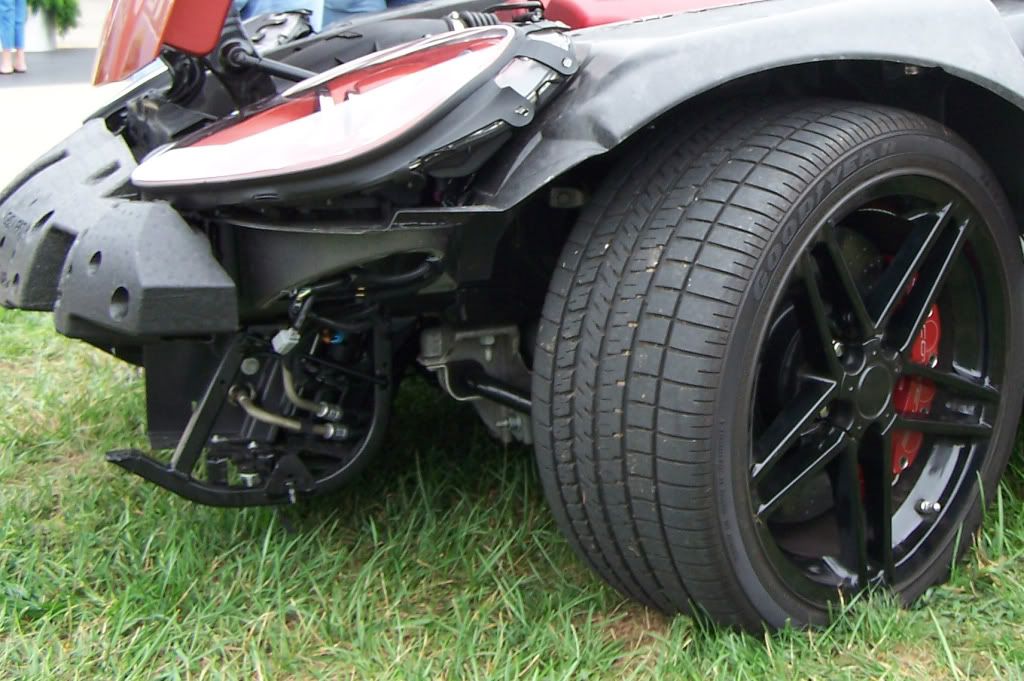
This is what the headlight assembly looks like attached to the car and you can see the relationship of the gasket to the light assembly
 07-19-2010, 02:04 PM
#4
Melting Slicks


The bolts that hold the headlights on are accessed by removing the wheel and wheel well liner on the side that you need to adjust. In your case it could be just the gasket out of location or it could be the headlight itself. If it is the gasket you will need to remove the front fascia and at least the screws that hold the front half of the fender in place to get to the top of the light assembly and the gasket.

TIA
07-31-2010, 12:00 PM
#5
Melting Slicks
As for cleaning the inside, you can get a wire with a small piece of rag attached inside (around the outside of the high beam enclosure/lense), but, there is not much maneuverability. At total PITA.
And, FWIW, the unit is not really sealed. Each of the bulbs has a rubber cover/gasket, but they are removable and presumably not absolutely airtight.
02-14-2011, 12:25 PM
#6

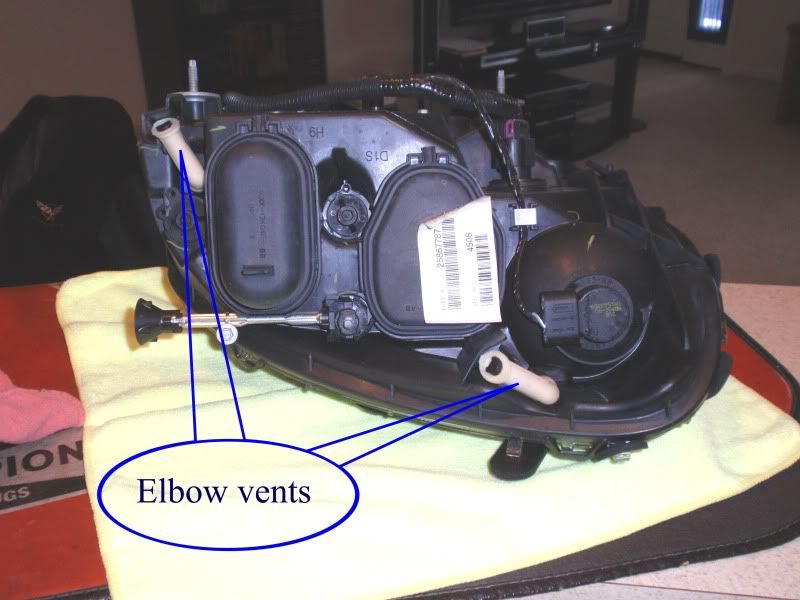
If you ever have your headlights out of the car be sure to check that these filters are in their proper location. If you have the elbows off you will see what I mean.
On the bottom of the headlight base there is also a rectangular pad that feels like electrical tape, but is a flat back color. This is a check valve type of vent in that it will allow air to flow through, but not water or dust. Make sure this tape is not torn or loose.
These are all places to look for foreign matter to enter the headlights, but you can only check them once the lights are out of the car.
Ed
 09-16-2011, 07:49 AM
#7
Instructor
Member Since: Aug 2008
Location: Fort Myers FL
Posts: 141
Likes: 0
Received 0 Likes
on
0 Posts

I took my headlights apart and had to change base or bucket; the focal assembly that adjustments can be made for light positioning has to be installed in the new bucket. I am looking for the black plastic retaining clips that hold the adjustment rods into place on the focal assembly. Any ideas on part# or where I can locate new or an assembly schematic.... thanks for any help.
01-04-2012, 07:53 PM
#8
Cruising

Member Since: Apr 2007
Posts: 14
Likes: 0
Received 0 Likes
on
0 Posts
I took my headlights apart and had to change base or bucket; the focal assembly that adjustments can be made for light positioning has to be installed in the new bucket. I am looking for the black plastic retaining clips that hold the adjustment rods into place on the focal assembly. Any ideas on part# or where I can locate new or an assembly schematic.... thanks for any help.
01-04-2012, 08:13 PM
#9
Team Owner
The headlight units are not sealed because that would cause problems with condensation and also would make them subject to pressure changes when the car goes up into the mountains.
01-04-2012, 09:41 PM
#10
Supporting Vendor
Member Since: Sep 2007
Location: Pensacola Florida GO GATORS!!! www.rlsebring.com www.c6c7vette.com
Posts: 11,216
Received 174 Likes
on
92 Posts
St. Jude Donor '17

I took my headlights apart and had to change base or bucket; the focal assembly that adjustments can be made for light positioning has to be installed in the new bucket. I am looking for the black plastic retaining clips that hold the adjustment rods into place on the focal assembly. Any ideas on part# or where I can locate new or an assembly schematic.... thanks for any help.
I have them. 6.00 each plus shipping. Before anybody says corvette tax I am paying less than this of course but had to order 3500 of them to get tinnerman to sell to me. Try tinnerman and find out first hand. No body else has these, at least new. I know first hand.
01-04-2012, 10:05 PM
#11
Melting Slicks
Not sure why all the advice is being given here ... since THERE WASN'T A PHOTO POSTED. Sheesh, post a photo, get the perfect answer, what's so hard about that ...

01-05-2012, 09:53 PM
#13
Supporting Vendor
Member Since: Sep 2007
Location: Pensacola Florida GO GATORS!!! www.rlsebring.com www.c6c7vette.com
Posts: 11,216
Received 174 Likes
on
92 Posts
St. Jude Donor '17
My paypal is RLSEBRING@***.NET Put a note on there that payment is for the projector clips. Add 4.95 for shipping.
01-06-2012, 06:52 AM
#14
Pro

OP,
Talon's response answers your original question. A little more info here.
When I changed out my headlights for a different color, the replacements had gaps with the fender that the original headlights didn't have. I learned quickly that the washers on the three screw mounts made the difference. You may have to add or remove a washer to make the adjustment. And yes, you'll have to remove the headlight to do it.
The other thing I noticed was the difference between a new OEM gasket around the headlight and one that's been exposed to weather. The thickness and position of that gasket can make a gap difference. A new gasket may be in order.
01-06-2012, 11:24 AM
#15
Supporting Vendor
Member Since: Sep 2007
Location: Pensacola Florida GO GATORS!!! www.rlsebring.com www.c6c7vette.com
Posts: 11,216
Received 174 Likes
on
92 Posts
St. Jude Donor '17
Good Post! The new original gasket starts off a strong 1/8" to 3/16" then over time and exposure with compress down to 1/16". I've seen plenty that were paper thin.
OP,
Talon's response answers your original question. A little more info here.
When I changed out my headlights for a different color, the replacements had gaps with the fender that the original headlights didn't have. I learned quickly that the washers on the three screw mounts made the difference. You may have to add or remove a washer to make the adjustment. And yes, you'll have to remove the headlight to do it.
The other thing I noticed was the difference between a new OEM gasket around the headlight and one that's been exposed to weather. The thickness and position of that gasket can make a gap difference. A new gasket may be in order.
Talon's response answers your original question. A little more info here.
When I changed out my headlights for a different color, the replacements had gaps with the fender that the original headlights didn't have. I learned quickly that the washers on the three screw mounts made the difference. You may have to add or remove a washer to make the adjustment. And yes, you'll have to remove the headlight to do it.
The other thing I noticed was the difference between a new OEM gasket around the headlight and one that's been exposed to weather. The thickness and position of that gasket can make a gap difference. A new gasket may be in order.
01-06-2012, 09:24 PM
#16
Team Owner

Member Since: Sep 2000
Location: Far NW 'burbs of Chicago
Posts: 23,940
Received 2,051 Likes
on
1,362 Posts
St. Jude Donor '13

OP,
Talon's response answers your original question. A little more info here.
When I changed out my headlights for a different color, the replacements had gaps with the fender that the original headlights didn't have. I learned quickly that the washers on the three screw mounts made the difference. You may have to add or remove a washer to make the adjustment. And yes, you'll have to remove the headlight to do it.
The other thing I noticed was the difference between a new OEM gasket around the headlight and one that's been exposed to weather. The thickness and position of that gasket can make a gap difference. A new gasket may be in order.
Talon's response answers your original question. A little more info here.
When I changed out my headlights for a different color, the replacements had gaps with the fender that the original headlights didn't have. I learned quickly that the washers on the three screw mounts made the difference. You may have to add or remove a washer to make the adjustment. And yes, you'll have to remove the headlight to do it.
The other thing I noticed was the difference between a new OEM gasket around the headlight and one that's been exposed to weather. The thickness and position of that gasket can make a gap difference. A new gasket may be in order.
Last edited by Gearhead Jim; 01-23-2012 at 01:19 PM.
01-06-2012, 09:56 PM
#17
Team Owner

Member Since: Aug 2007
Location: I live my life by 2 rules. 1) Never share everything you know. 2)
Posts: 136,148
Received 2,402 Likes
on
1,366 Posts
St. Jude Donor '11-'12-'13, '16-'17-'18
01-23-2012, 01:15 PM
#18
Cruising
Member Since: Apr 2007
Posts: 14
Likes: 0
Received 0 Likes
on
0 Posts
Hi All,
RLSebring (see above) sent my "headlight adjustment clips" Received them last week. I have searched everywhere, this is the only place I have found them, short of buying a used headlight.
RLSebring (see above) sent my "headlight adjustment clips" Received them last week. I have searched everywhere, this is the only place I have found them, short of buying a used headlight.
01-24-2012, 06:14 AM
#19
Instructor
Member Since: Aug 2008
Location: Fort Myers FL
Posts: 141
Likes: 0
Received 0 Likes
on
0 Posts
RLSebring assisted me about 6 months ago with the same clips these are unatainable, i was so appreciative to get them I sent him a damaged light pod i bought off ebay where he could retreive to assist someone else in future... glad to hear he has been able to get his hands on new ones.
01-24-2012, 10:31 AM
#20
OP,
Talon's response answers your original question. A little more info here.
When I changed out my headlights for a different color, the replacements had gaps with the fender that the original headlights didn't have. I learned quickly that the washers on the three screw mounts made the difference. You may have to add or remove a washer to make the adjustment. And yes, you'll have to remove the headlight to do it.
The other thing I noticed was the difference between a new OEM gasket around the headlight and one that's been exposed to weather. The thickness and position of that gasket can make a gap difference. A new gasket may be in order.
Talon's response answers your original question. A little more info here.
When I changed out my headlights for a different color, the replacements had gaps with the fender that the original headlights didn't have. I learned quickly that the washers on the three screw mounts made the difference. You may have to add or remove a washer to make the adjustment. And yes, you'll have to remove the headlight to do it.
The other thing I noticed was the difference between a new OEM gasket around the headlight and one that's been exposed to weather. The thickness and position of that gasket can make a gap difference. A new gasket may be in order.