
Grand Sport brake pad swapout
 01-31-2012, 10:06 PM
#1
Burning Brakes

Thread Starter
Have any of you grand sport owners swapout your stock pads for ceramic low dust? I noticed that Hawk now offers a new one piece pad instead of the individual small pads. Has anybody installed these pads on there grand sport/Zo6 yet? What's opinion on these pads? What's technique to doing a pad swapout on these six piston calipers. Any words of misdom would be greatly appreaciated, thanks.
P.S. It's good to be back on the forum, but I still have my V.
Mike P.
P.S. It's good to be back on the forum, but I still have my V.
Mike P.
 01-31-2012, 10:42 PM
#2
Le Mans Master

Member Since: Aug 2007
Location: Glassboro New Jersey
Posts: 7,251
Likes: 0
Received 3 Likes
on
3 Posts

I don't know about the pads, but the install is just like any other brake job. You have to compress all the pistons.
Here is a link that may help.
http://www.101corvetteprojects.com/2...rvette-c6-z06/
Here is a link that may help.
http://www.101corvetteprojects.com/2...rvette-c6-z06/
01-31-2012, 10:46 PM
#3
The Consigliere


Member Since: May 2006
Location: 2023 Z06 & 2010 ZR1
Posts: 22,252
Received 5,447 Likes
on
2,272 Posts

Welcome back.
I haven't run the Hawk one piece. But I have and do run the Carbotech Monoblock Bobcat one piece pads. And I'm very satisfied with them.
I haven't run the Hawk one piece. But I have and do run the Carbotech Monoblock Bobcat one piece pads. And I'm very satisfied with them.
02-01-2012, 12:25 AM
#5

Its the first thing I did when I got my '12GS. I used the Hawk "padlets" because the original style is the 6 padlets per caliper up front and 4 in the back. It is not difficlut to do other than to understand that you cannot just swap two by two. The star headed pad bolts (referred to as Pins sometimes) all have to be out to get all the pads out. Each pad has a notch cutout nearer the top of the pad and the pins go in betweent these notches to wedge the padlets from coming out of the caliper. Right where the padlet steel backing is located is where the pin has a stainless steel bushing on it, this allows for the pads to float and not wear the shank of the retaining pin, you will see it when you remove and clean the pin. Compressing the piston back in is straight forward, do not pry against the rotor at any time. So reassembly is like a domino effect, working the inbord our outboard side is the same, remove the pins, withdraw the old pads, compress the pistons Slowly, wipe and clean pins for reuse. The hawk pads come with high temp grease for the stainless collar, USE IT SPARINGLY on the stainless steel collars.
Working from the bottom to the top install the first pad, install lowest pin(finger tight but it shoud go flush to the caliper) now install the second(middle)pad, install the second from the bottom pin making sure it seats betweent he two pads in the notched areas.
Third pad and third and fourth pin. The Torque setting is 26 FtLbs. for the retainer bolts/pins. You just did 1/2 of a front caliper. The next side will go like a flash now that you are not intimidated by what you see.
Remember to properly bed in pads as with any new brake job.
I think the ceramic pads stop better when warmed up. to keep my car as it was I marked the stud that lines up with the valvestem so everything will go back as it came off.
Retorque wheel to 110ftlbs in a crisscross patter.
JoeI hope this helped,
The following users liked this post:
Itshakes (10-14-2015)
02-01-2012, 01:02 AM
#6
Burning Brakes
Member Since: Dec 2010
Location: Orlando FL
Posts: 886
Likes: 0
Received 1 Like
on
1 Post
St. Jude Donor '12-'13-14

I switched to Carbotechs 1 piece pads last month and they have been great. I did not pull the pins or anything like PGSJOE did, I just compressed the pistons, undid the clips, pulled out old pads, put in new pads (use grease on the back) and clips and done.
I can easily go 2 weeks now w/o having to wash the wheels vs only 2 days with stock pads.
02-01-2012, 05:17 AM
#7
Sr.Random input generator

Its the first thing I did when I got my '12GS. I used the Hawk "padlets" because the original style is the 6 padlets per caliper up front and 4 in the back. It is not difficlut to do other than to understand that you cannot just swap two by two. The star headed pad bolts (referred to as Pins sometimes) all have to be out to get all the pads out. Each pad has a notch cutout nearer the top of the pad and the pins go in betweent these notches to wedge the padlets from coming out of the caliper. Right where the padlet steel backing is located is where the pin has a stainless steel bushing on it, this allows for the pads to float and not wear the shank of the retaining pin, you will see it when you remove and clean the pin. Compressing the piston back in is straight forward, do not pry against the rotor at any time. So reassembly is like a domino effect, working the inbord our outboard side is the same, remove the pins, withdraw the old pads, compress the pistons Slowly, wipe and clean pins for reuse. The hawk pads come with high temp grease for the stainless collar, USE IT SPARINGLY on the stainless steel collars.
Working from the bottom to the top install the first pad, install lowest pin(finger tight but it shoud go flush to the caliper) now install the second(middle)pad, install the second from the bottom pin making sure it seats betweent he two pads in the notched areas.
Third pad and third and fourth pin. The Torque setting is 26 FtLbs. for the retainer bolts/pins. You just did 1/2 of a front caliper. The next side will go like a flash now that you are not intimidated by what you see.
Remember to properly bed in pads as with any new brake job.
I think the ceramic pads stop better when warmed up. to keep my car as it was I marked the stud that lines up with the valvestem so everything will go back as it came off.
Retorque wheel to 110ftlbs in a crisscross patter.
JoeI hope this helped,
Working from the bottom to the top install the first pad, install lowest pin(finger tight but it shoud go flush to the caliper) now install the second(middle)pad, install the second from the bottom pin making sure it seats betweent he two pads in the notched areas.
Third pad and third and fourth pin. The Torque setting is 26 FtLbs. for the retainer bolts/pins. You just did 1/2 of a front caliper. The next side will go like a flash now that you are not intimidated by what you see.
Remember to properly bed in pads as with any new brake job.
I think the ceramic pads stop better when warmed up. to keep my car as it was I marked the stud that lines up with the valvestem so everything will go back as it came off.
Retorque wheel to 110ftlbs in a crisscross patter.
JoeI hope this helped,
02-01-2012, 06:01 AM
#8
Race Director


Member Since: May 2006
Location: SOFLA
Posts: 12,973
Received 1,013 Likes
on
599 Posts
2016 Corvette of Year
2015 C6 of Year Finalist
I changed pads frequently between track and street pads, and you do not need to remove the pins for padlets or once piece. I use carbotech one piece pads for the track and have padlets for the street.
02-01-2012, 06:27 AM
#9
Burning Brakes

I did not have good luck with the ceramics on my 07. On the GS I put the Porterfield one piece Carbon Kevlar. Not dust free, but no comparison to the factory. Super quiet and rotor friendly.
 02-01-2012, 09:50 AM
#10
Supporting Vendor
Member Since: Oct 2002
Location: Cleveland OH
Posts: 50,209
Received 492 Likes
on
419 Posts
St. Jude Donor '11,'13

Take a look at this compound. We are the first company to design a 1 piece pad.
The Carbotech� 1521� is our high performance street compound. The 1521� compound is known for its release and modulation, along with unmatched rotor friendliness. 1521� is also a very low dusting and low noise compound with an excellent initial bite. This compound's excellent linear torque production provides incredible braking force without ABS intervention. Carbotech� 1521� operating range starts out at ambient and goes up to 800�F (426�C+). 1521� is suitable for ALL street cars, perfect for your tow vehicle or fleet vehicle. Carbotech� 1521� is NOT recommended for ANY track use.
The Carbotech� 1521� is our high performance street compound. The 1521� compound is known for its release and modulation, along with unmatched rotor friendliness. 1521� is also a very low dusting and low noise compound with an excellent initial bite. This compound's excellent linear torque production provides incredible braking force without ABS intervention. Carbotech� 1521� operating range starts out at ambient and goes up to 800�F (426�C+). 1521� is suitable for ALL street cars, perfect for your tow vehicle or fleet vehicle. Carbotech� 1521� is NOT recommended for ANY track use.
__________________
Adam Adelstein
Amp�D Autosport.com
Internet's largest retailer of Carbotech Performance Brake Pads.
PH:216-780-8825.
Email: sales@ampdautosport.com
Web Site & Direct ordering http://ampdautosport.com/
All major CC and Pay Pal accepted.
Check out Promo code:z28
Adam Adelstein
Amp�D Autosport.com
Internet's largest retailer of Carbotech Performance Brake Pads.
PH:216-780-8825.
Email: sales@ampdautosport.com
Web Site & Direct ordering http://ampdautosport.com/
All major CC and Pay Pal accepted.
Check out Promo code:z28
02-01-2012, 10:16 AM
#11
Racer

Member Since: Jul 2011
Location: Saint Augustine Florida
Posts: 466
Received 24 Likes
on
19 Posts
St. Jude Donor '12

I'm considering the Carbotech pads. After my last long trip, the brake dust was ludicrous. I think I am finally over it...I've tried the Armor All Wheel Protectant and like the way the dust rinses off, but it's just a PITA that so much collects.
02-01-2012, 10:39 AM
#12
Instructor
Any reputable vendors hear have them available (One piece pads)? My GS SSB pads are wearing and I wouldn't mind having less break dust.
Last edited by traxz4000; 02-01-2012 at 10:41 AM. Reason: adding
 02-01-2012, 01:01 PM
#15
Race Director
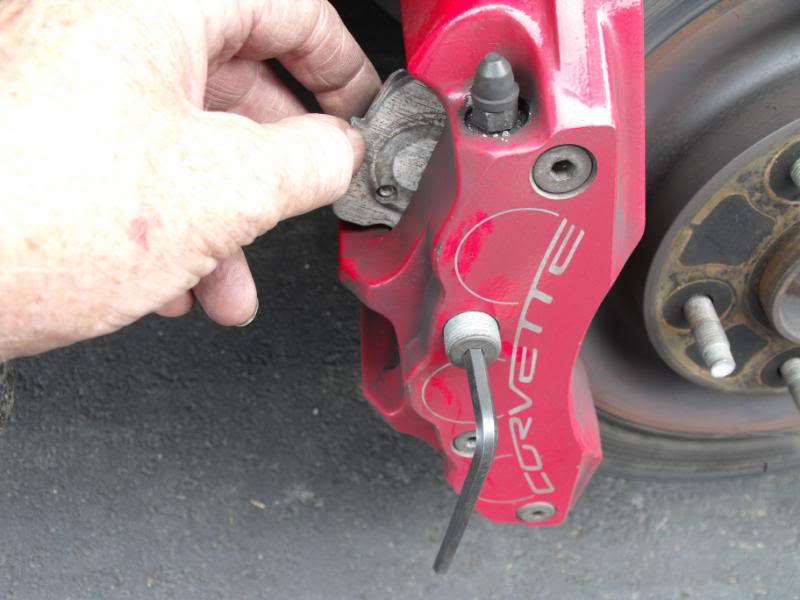
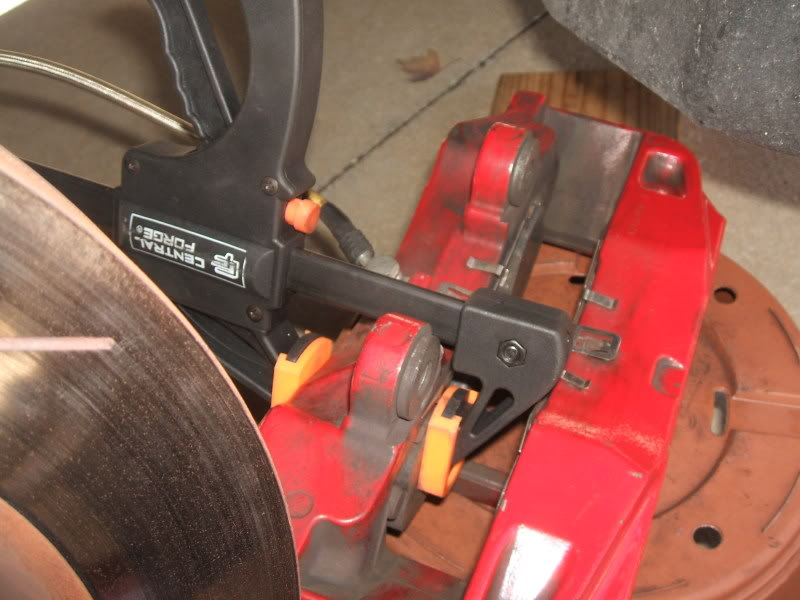
You can see in the above picture of the front caliper that I have one pad pin bolt removed, and I'm able to remove the top padlet.
I can also remove the center padlet with just that one pad pin bolt removed.
To remove the bottom padlet I just have to remove the other "center" pad pin bolt.
THERE IS ABSOLUTELY NO NEED TO REMOVE THE TOP AND BOTTOM PINS!!!

The same thing for the rear calipers - they have 3 pad pin bolts and 2 padlets on each side of the caliper, and you only need to remove the one center pad pin bolt to remove both padlets, as you can see in the picture below:
HOWEVER - I do a lot of pad swapping for the track, and I hardly ever swap padlets by removing those pad pin bolts, I always remove the calipers to swap pads or padlets.
Removing the pad pin bolts is usually a real PITA - many owners have busted off allen wrench/torx bits, or stripped out the fitting in the bolt when trying to remove them.
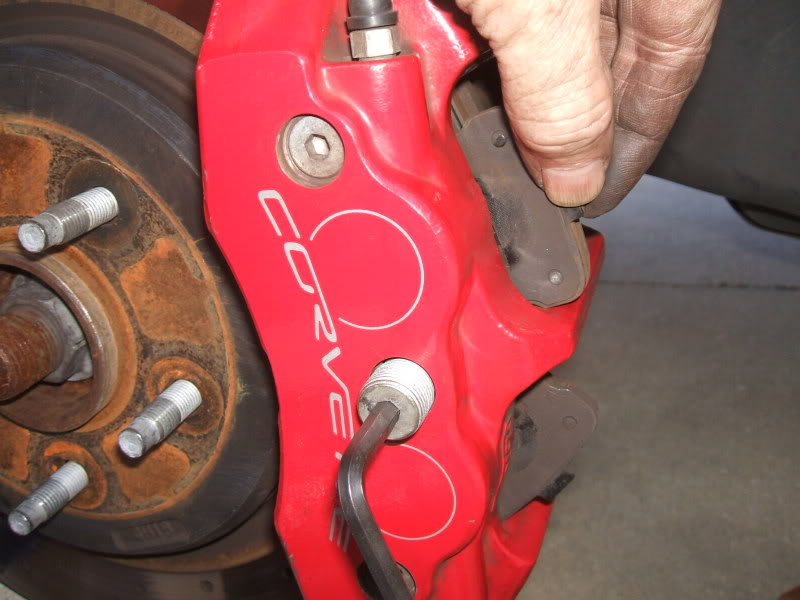
You must COMPLETELY remove the caliper to swap pads or padlets - these monobloc fixed calipers are not like the floating calipers on a base C6 - there isn't a "bracket", the GS/Z06/ZR1 calipers bolt directly to the suspension. You cannot simply remove one caliper bolt and swing the caliper out to remove/replace pads - you must remove both large caliper bolts and completely remove the caliper in order to access the pads.
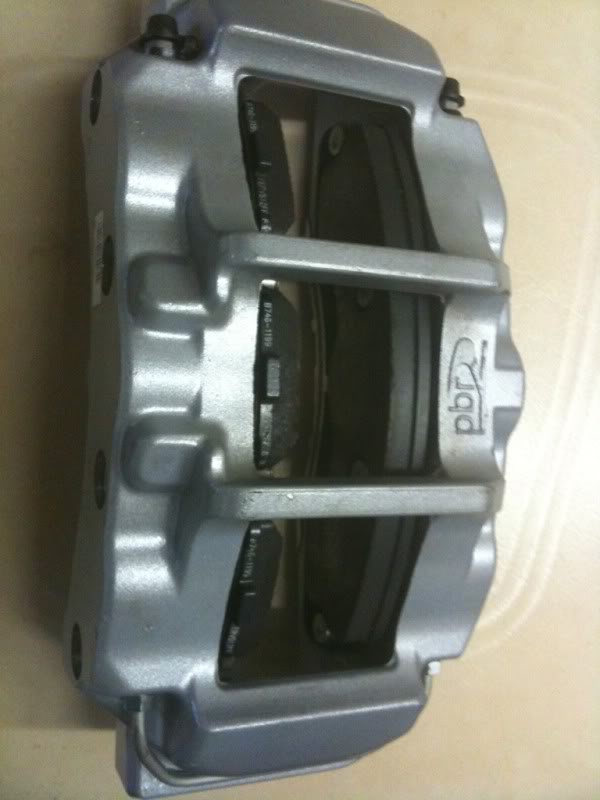
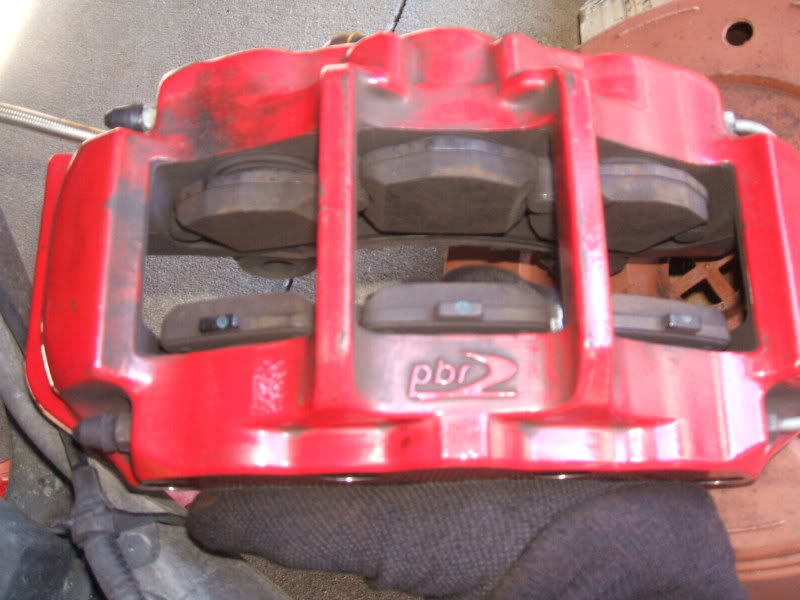
In the picture below of a GS caliper removed from the car, you can see that I have padlets in one side and a single-piece pad on the other.
There is no way you can remove/install the one-piece pad by just removing the pad pin bolts - you must remove the caliper, which is easier than removing the pad pin bolts anyway:
BTW some of the component torque specs are:
Pad pin bolts: 30 lb ft
Caliper bolts: 129 lb ft
Wheel lug nuts: 100 lb ft
Happy wrenching - and driving!!!Caliper bolts: 129 lb ft
Wheel lug nuts: 100 lb ft

Bob
 02-01-2012, 02:47 PM
#16
Melting Slicks

Thank You for the post above! I appreciate the hint about the padlet pins 
You can see in the above picture of the front caliper that I have one pad pin bolt removed, and I'm able to remove the top padlet.
I can also remove the center padlet with just that one pad pin bolt removed.
To remove the bottom padlet I just have to remove the other "center" pad pin bolt.
THERE IS ABSOLUTELY NO NEED TO REMOVE THE TOP AND BOTTOM PINS!!!
The same thing for the rear calipers - they have 3 pad pin bolts and 2 padlets on each side of the caliper, and you only need to remove the one center pad pin bolt to remove both padlets, as you can see in the picture below:
HOWEVER - I do a lot of pad swapping for the track, and I hardly ever swap padlets by removing those pad pin bolts, I always remove the calipers to swap pads or padlets.
Removing the pad pin bolts is usually a real PITA - many owners have busted off allen wrench/torx bits, or stripped out the fitting in the bolt when trying to remove them.
You must COMPLETELY remove the caliper to swap pads or padlets - these monobloc fixed calipers are not like the floating calipers on a base C6 - there isn't a "bracket", the GS/Z06/ZR1 calipers bolt directly to the suspension. You cannot simply remove one caliper bolt and swing the caliper out to remove/replace pads - you must remove both large caliper bolts and completely remove the caliper in order to access the pads.
In the picture below of a GS caliper removed from the car, you can see that I have padlets in one side and a single-piece pad on the other.
There is no way you can remove/install the one-piece pad by just removing the pad pin bolts - you must remove the caliper, which is easier than removing the pad pin bolts anyway:
BTW some of the component torque specs are:
Bob
I can also remove the center padlet with just that one pad pin bolt removed.
To remove the bottom padlet I just have to remove the other "center" pad pin bolt.
THERE IS ABSOLUTELY NO NEED TO REMOVE THE TOP AND BOTTOM PINS!!!
The same thing for the rear calipers - they have 3 pad pin bolts and 2 padlets on each side of the caliper, and you only need to remove the one center pad pin bolt to remove both padlets, as you can see in the picture below:
HOWEVER - I do a lot of pad swapping for the track, and I hardly ever swap padlets by removing those pad pin bolts, I always remove the calipers to swap pads or padlets.
Removing the pad pin bolts is usually a real PITA - many owners have busted off allen wrench/torx bits, or stripped out the fitting in the bolt when trying to remove them.
You must COMPLETELY remove the caliper to swap pads or padlets - these monobloc fixed calipers are not like the floating calipers on a base C6 - there isn't a "bracket", the GS/Z06/ZR1 calipers bolt directly to the suspension. You cannot simply remove one caliper bolt and swing the caliper out to remove/replace pads - you must remove both large caliper bolts and completely remove the caliper in order to access the pads.
In the picture below of a GS caliper removed from the car, you can see that I have padlets in one side and a single-piece pad on the other.
There is no way you can remove/install the one-piece pad by just removing the pad pin bolts - you must remove the caliper, which is easier than removing the pad pin bolts anyway:
BTW some of the component torque specs are:
Pad pin bolts: 30 lb ft
Caliper bolts: 129 lb ft
Wheel lug nuts: 100 lb ft
Happy wrenching - and driving!!!Caliper bolts: 129 lb ft
Wheel lug nuts: 100 lb ft
Bob
02-01-2012, 03:26 PM
#17
Race Director
Here are some additional things to maybe help with your brake job:
In the picture below I'm using a clamp to pull the pad off the rotor. The clamp can grab the "tab" on the top of the padlet so you can use it to push the piston in slightly so the pads aren't tight on the rotor - with the pads loose, you can easily slip the caliper off the rotor when you take out the 2 large caliper bolts. If you're concerned about the cosmetics of your caliper, put a piece of cardboard or something similar on the face of the caliper to avoid messing it up:
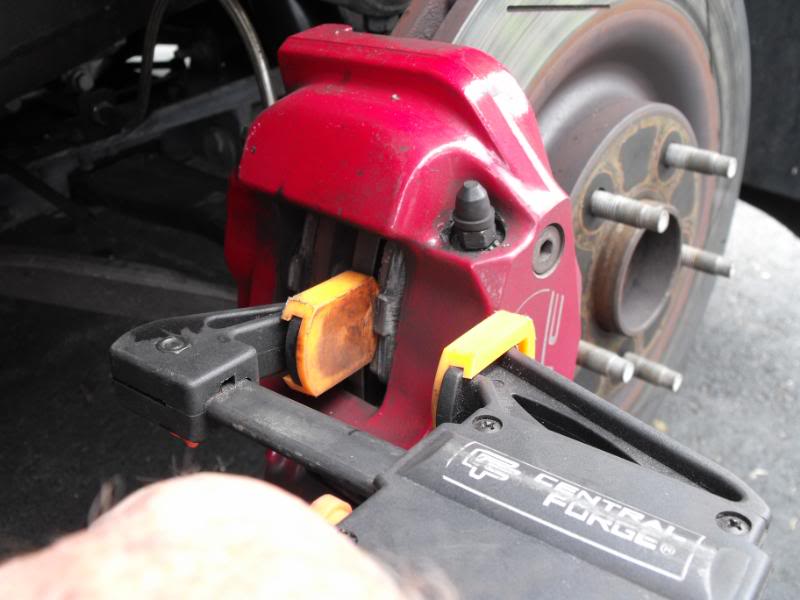
In the picture below the caliper has been completely removed, and I'm pushing the pistons all the way back into the caliper so new/thicker pads will fit over the rotor when I reinstall the caliper. The brake line hose is still connected to the caliper, so I have a bucket or box to set the caliper on to avoid putting tension on the hose. Additionally, make sure your brake fluid master cylinder reservoir isn't too full or when you push the pistons in and fluid goes back up the lines and into the reservoir, it could overflow - remove some fluid if it's much above the "min" line on the reservoir before compressing the pistons:
Of course, when you install the new pads make sure the backing plate is against the piston and the brake pad compound will be pushing on the rotor. They can be installed backwards - but I guess nobody would do that, would they?
Likewise, the padlets can be installed upside down (can't do that with the one-piece!!). Make sure the "tabs" on the padlets are sticking out toward the outside of the caliper/wheel. They can be installed upside down as you can see in the photo below:
The pads at the bottom of the picture above are installed correctly, but the ones at the top are installed upside down.
As mentioned in an earlier post, be sure to bed in your new pads.
If you're going to the track, you should consider flushing in some DOT 4 fluid.
Even if you just drive on the street, it's a good idea to flush new fluid into the system every couple years.
Overall, a brake pad swap is very easy for the shadetree mechanic!!
Happy wrenching!
Bob
In the picture below I'm using a clamp to pull the pad off the rotor. The clamp can grab the "tab" on the top of the padlet so you can use it to push the piston in slightly so the pads aren't tight on the rotor - with the pads loose, you can easily slip the caliper off the rotor when you take out the 2 large caliper bolts. If you're concerned about the cosmetics of your caliper, put a piece of cardboard or something similar on the face of the caliper to avoid messing it up:
In the picture below the caliper has been completely removed, and I'm pushing the pistons all the way back into the caliper so new/thicker pads will fit over the rotor when I reinstall the caliper. The brake line hose is still connected to the caliper, so I have a bucket or box to set the caliper on to avoid putting tension on the hose. Additionally, make sure your brake fluid master cylinder reservoir isn't too full or when you push the pistons in and fluid goes back up the lines and into the reservoir, it could overflow - remove some fluid if it's much above the "min" line on the reservoir before compressing the pistons:
Of course, when you install the new pads make sure the backing plate is against the piston and the brake pad compound will be pushing on the rotor. They can be installed backwards - but I guess nobody would do that, would they?
Likewise, the padlets can be installed upside down (can't do that with the one-piece!!). Make sure the "tabs" on the padlets are sticking out toward the outside of the caliper/wheel. They can be installed upside down as you can see in the photo below:
The pads at the bottom of the picture above are installed correctly, but the ones at the top are installed upside down.
As mentioned in an earlier post, be sure to bed in your new pads.
If you're going to the track, you should consider flushing in some DOT 4 fluid.
Even if you just drive on the street, it's a good idea to flush new fluid into the system every couple years.
Overall, a brake pad swap is very easy for the shadetree mechanic!!
Happy wrenching!
Bob
Last edited by BEZ06; 02-01-2012 at 03:30 PM.
The following users liked this post:
11c6Gs11 (03-23-2020)
02-01-2012, 03:26 PM
#18
Racer
Member Since: Oct 2004
Location: Centennial Colorado
Posts: 388
Likes: 0
Received 3 Likes
on
2 Posts
I replaced my OEM padlets on my 2011 GS when I had my caliper Powder Coated. I found them in O'Reilly Auto Parts.
They are BrakeBest Select Ceramic - Brake Pads
and cost me a total of $167.76.
Part Numbers
Front #C1419
Rear #C1419A
I have had them on about 1 month and the dust has been cut down almost 90%. It's there but you just do not see it. So far no kind of noise at all. I am verry happy with them!!!
They are BrakeBest Select Ceramic - Brake Pads
and cost me a total of $167.76.
Part Numbers
Front #C1419
Rear #C1419A
I have had them on about 1 month and the dust has been cut down almost 90%. It's there but you just do not see it. So far no kind of noise at all. I am verry happy with them!!!
02-01-2012, 03:34 PM
#19
Team Owner


I replaced my OEM padlets on my 2011 GS when I had my caliper Powder Coated. I found them in O'Reilly Auto Parts.
They are BrakeBest Select Ceramic - Brake Pads
and cost me a total of $167.76.
Part Numbers
Front #C1419
Rear #C1419A
I have had them on about 1 month and the dust has been cut down almost 90%. It's there but you just do not see it. So far no kind of noise at all. I am verry happy with them!!!
They are BrakeBest Select Ceramic - Brake Pads
and cost me a total of $167.76.
Part Numbers
Front #C1419
Rear #C1419A
I have had them on about 1 month and the dust has been cut down almost 90%. It's there but you just do not see it. So far no kind of noise at all. I am verry happy with them!!!