
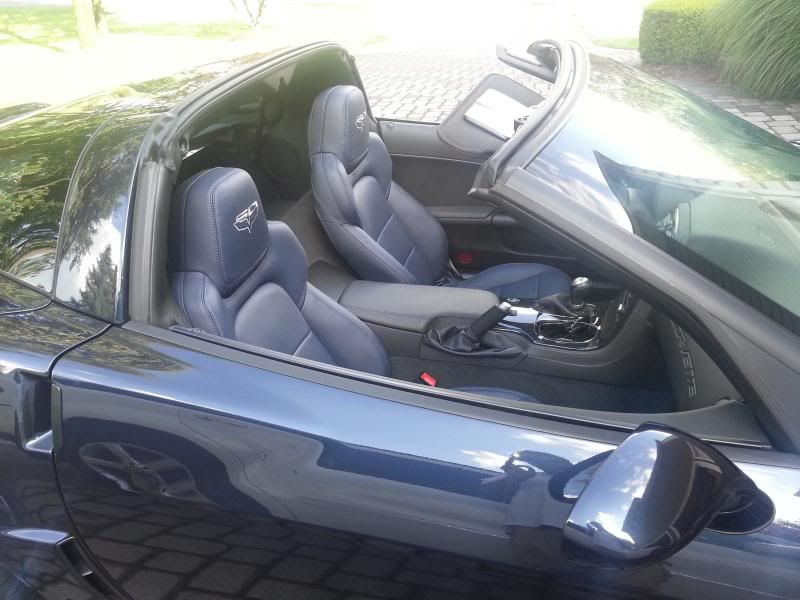
Ugraded to 2013 60th Anniversary Seats and added Seat Heaters to my 1LT
 07-27-2013, 10:38 PM
#1
Burning Brakes

Thread Starter

Just finished upgrading my 13’s 1LT ebony seats to these, and added heated seats while I was at it:
I purchased my NRB GS 1LT Couple last fall, going from a 2008 3LT couple to a 1LT GS. I didn’t think I’d miss HUD, Nav,
and heated seats, but quickly realized my kids missed the heated seats out here in the NE. The 60th Anniversary seats always
caught my eye, so after reading ncvette’s thread:
http://forums.corvetteforum.com/c6-c...s-of-pics.html
I decided to upgrade the 1LT seats on my 2013 to the 60th Anniversary seats. I contacted Kevin at Partstaxi, and
ordered up the new covers, and a few weeks later they were in my garage just waiting for installation. I just want
to add here while I’m talking about PartsTaxi, the customer service from Kevin & Parts Taxi is is second to none – I’ve
used other guys on this forum over the years, but will never use anyone else for my gm parts moving forward.
So continuing on, I decided while the covers were off, I would look into adding heated seats. After doing a little
research, I bought a pair of carbon fiber seat heater pads off ebay, for all of $ 40.00 for a pair of seats.
These are the seat heater kits I bought:
http://www.ebay.com/itm/Round-switch-seat-heater-2-seats-heated-seat-kit-fit-12V-cars-auto-truck-/130835347889?pt=Motors_Car_Truck_Parts_Accessories&hash=item1e7664f9b1&vxp=mtr
I won’t go into the details of removing/replacing the covers (ncvette did a great job on his thread). I will add a few comments –
(1) Don’t take the covers off w/o buying the black plastic retainers – you will ruin the ones you take off.
(2) Lay the seat on its back to get the outer seat back fastened securely – lots of stretching involved.
(3) Don’t sweat w/ removing the hog rings and replacing them w/ cable ties – they both do the same thing.
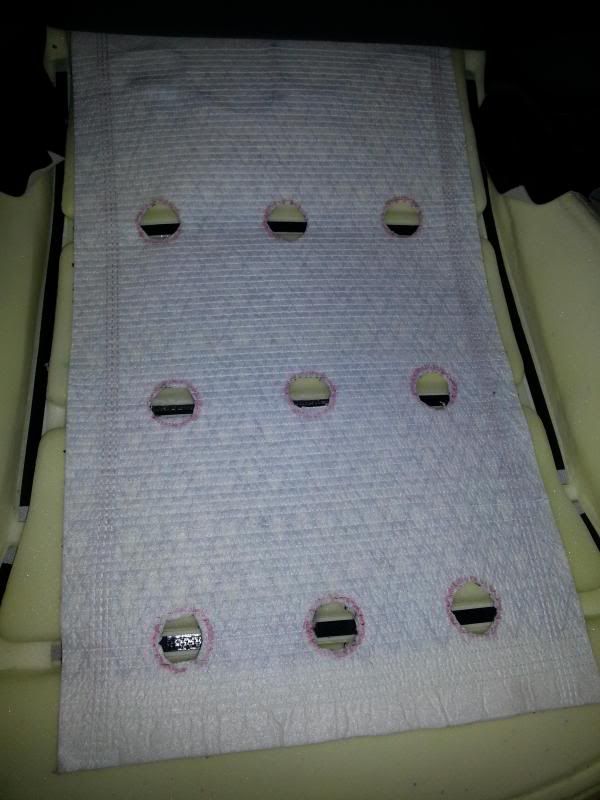
When you have the covers off, install the pads. You will have to place them on the foam pads like this:
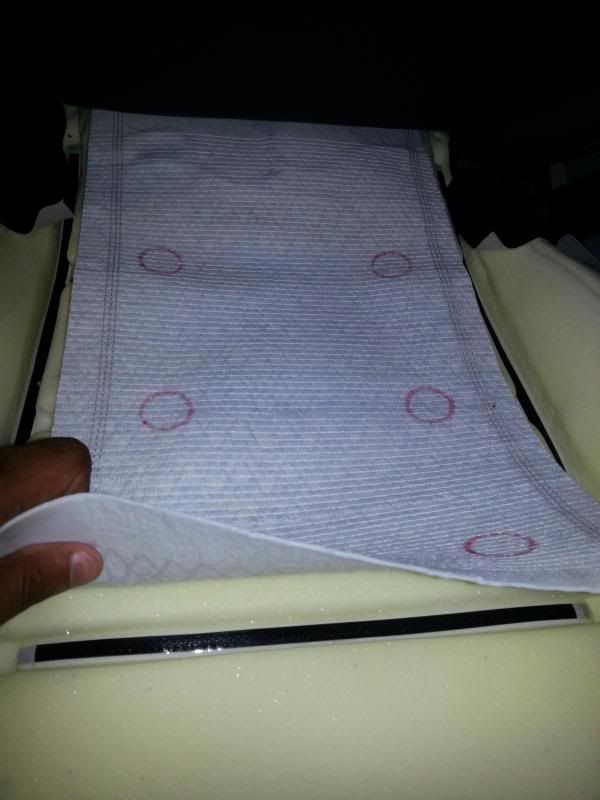
Once you have the heating pads centered, mark where the listing (Velcro) for the seats are, and cut quarter sized holes
for each listing. I did three holes per horizontal listing. Notice the carbon fiber wires form a honeycomb pattern – so the
heat will travel around the holes via the wires. Here is a pic of the pad w/ the holes cut:
At this point, work in reverse and put the seat covers back on. For my install it was easy since I was replacing my 13’ covers
with different 13 covers, so everything matched (holes/patterns/etc.). Next step was to wire the seat heaters. All that’s
needed is power, but it should be only live with the ignition on. There in lies the problem (finding a 10 Amp switched power
source capable of handling the draw of the seats). I ended up installing a relay under the seat to do this. I got the relay
from Pepboys, pic of the relay and how to wire it:
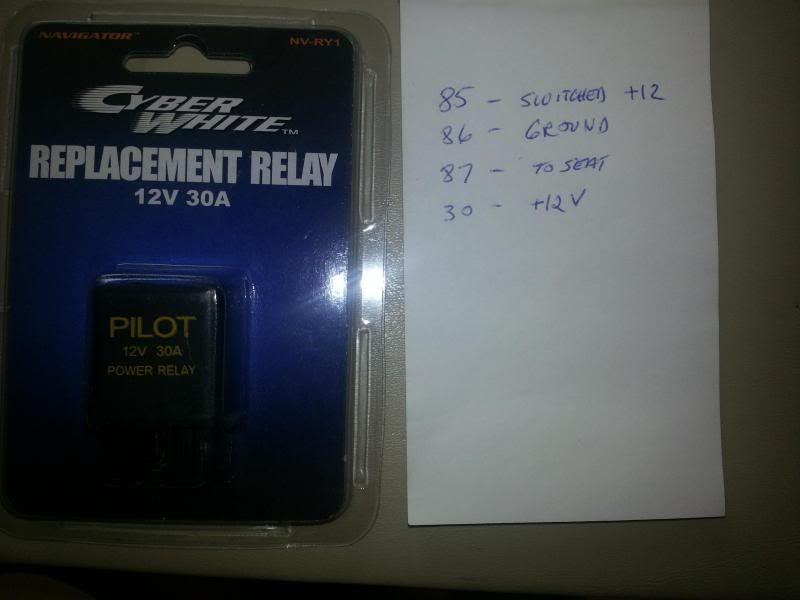
I figured out the power for the OEM heated seats was already in the harness under the seat (but the power was always
on since the BCM controls everything) thanks to Ray Kawal’s site:
www.kawal.net/power seats.htm
So ground and +12V were already under the seat. I ran a fuse tapped wire from the Seat heater/Wiper Relay fuse to the new
relay which I located under the seat, and I was all set.
Last part was installing the switches. Yes – they’re not factory, but I put them in the factory spots anyway, figuring if I
didn’t like them, I could always pickup another ashtray and move the switches.
Here’s the finished console pic:
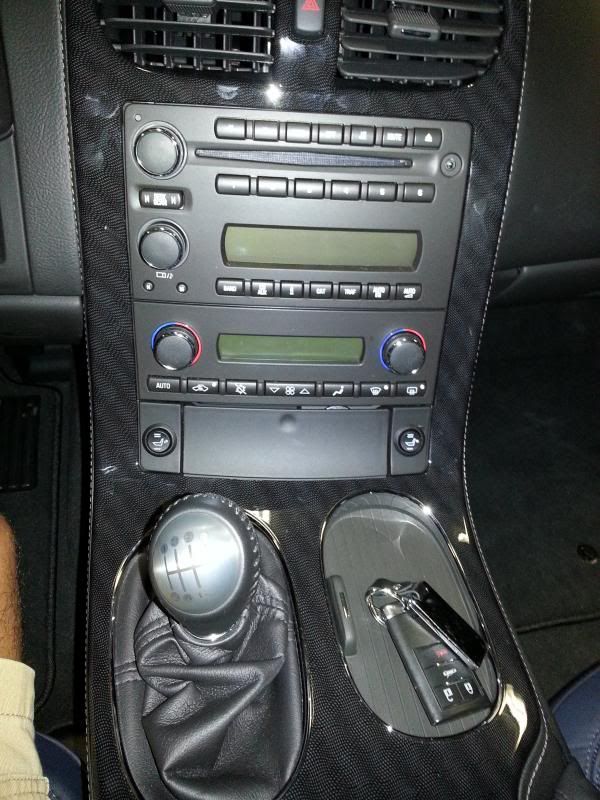
They actually don’t look too bad IMO, I’m going to live w/ them for a while and see how I like them.
I know there were more than a few posts asking about adding heated seats, hopefully this will help.
Aceman
I purchased my NRB GS 1LT Couple last fall, going from a 2008 3LT couple to a 1LT GS. I didn’t think I’d miss HUD, Nav,
and heated seats, but quickly realized my kids missed the heated seats out here in the NE. The 60th Anniversary seats always
caught my eye, so after reading ncvette’s thread:
http://forums.corvetteforum.com/c6-c...s-of-pics.html
I decided to upgrade the 1LT seats on my 2013 to the 60th Anniversary seats. I contacted Kevin at Partstaxi, and
ordered up the new covers, and a few weeks later they were in my garage just waiting for installation. I just want
to add here while I’m talking about PartsTaxi, the customer service from Kevin & Parts Taxi is is second to none – I’ve
used other guys on this forum over the years, but will never use anyone else for my gm parts moving forward.
So continuing on, I decided while the covers were off, I would look into adding heated seats. After doing a little
research, I bought a pair of carbon fiber seat heater pads off ebay, for all of $ 40.00 for a pair of seats.
These are the seat heater kits I bought:
http://www.ebay.com/itm/Round-switch-seat-heater-2-seats-heated-seat-kit-fit-12V-cars-auto-truck-/130835347889?pt=Motors_Car_Truck_Parts_Accessories&hash=item1e7664f9b1&vxp=mtr
I won’t go into the details of removing/replacing the covers (ncvette did a great job on his thread). I will add a few comments –
(1) Don’t take the covers off w/o buying the black plastic retainers – you will ruin the ones you take off.
(2) Lay the seat on its back to get the outer seat back fastened securely – lots of stretching involved.
(3) Don’t sweat w/ removing the hog rings and replacing them w/ cable ties – they both do the same thing.
When you have the covers off, install the pads. You will have to place them on the foam pads like this:
Once you have the heating pads centered, mark where the listing (Velcro) for the seats are, and cut quarter sized holes
for each listing. I did three holes per horizontal listing. Notice the carbon fiber wires form a honeycomb pattern – so the
heat will travel around the holes via the wires. Here is a pic of the pad w/ the holes cut:
At this point, work in reverse and put the seat covers back on. For my install it was easy since I was replacing my 13’ covers
with different 13 covers, so everything matched (holes/patterns/etc.). Next step was to wire the seat heaters. All that’s
needed is power, but it should be only live with the ignition on. There in lies the problem (finding a 10 Amp switched power
source capable of handling the draw of the seats). I ended up installing a relay under the seat to do this. I got the relay
from Pepboys, pic of the relay and how to wire it:
I figured out the power for the OEM heated seats was already in the harness under the seat (but the power was always
on since the BCM controls everything) thanks to Ray Kawal’s site:
www.kawal.net/power seats.htm
So ground and +12V were already under the seat. I ran a fuse tapped wire from the Seat heater/Wiper Relay fuse to the new
relay which I located under the seat, and I was all set.
Last part was installing the switches. Yes – they’re not factory, but I put them in the factory spots anyway, figuring if I
didn’t like them, I could always pickup another ashtray and move the switches.
Here’s the finished console pic:
They actually don’t look too bad IMO, I’m going to live w/ them for a while and see how I like them.
I know there were more than a few posts asking about adding heated seats, hopefully this will help.
Aceman


 !!! And the seats look good.


 07-28-2013, 03:07 AM
#7
Melting Slicks

Great Job! Now unfortunately you're going to have to go with some blue stitching, blue ebrake boot, blue shift boot, etc., etc. It never really ends, does it?
Now unfortunately you're going to have to go with some blue stitching, blue ebrake boot, blue shift boot, etc., etc. It never really ends, does it?
07-28-2013, 08:35 AM
#8
Burning Brakes
Thread Starter
Thanks - i was kicking around the center armrest, but i think all ebony w/ just blue seats accents the interior well enough. I'd be lying if i told you I hadn't asked kevin @ partstaxi about the parts yet
Aceman
07-28-2013, 09:42 AM
#10
Safety Car

Wow, nice job and looks great. Which seat covers did you replace with, the 1LT to 1LT or 1LT to 3LT? The 1LT seats are two pieces, but the 3LT seats are four pieces. Did you swap out the foam pads too?
 07-28-2013, 12:11 PM
#13
Burning Brakes
Thread Starter
Since mine was a 2013, replacing w/ 2013 covers was a straight swap, no foam needed - its the same foam as far as i know for 1LT and 3LT and 60th anniversary.
Aceman

 Nice looking new seats, goes great with your exterior color

