When you click on links to various merchants on this site and make a purchase, this can result in this site earning a commission. Affiliate programs and affiliations include, but are not limited to, the eBay Partner Network.
Hey Guys: On my 08 the switch's on the drivers door that control both windows will not roll up my passenger side window up, it will roll it down, but not up?. The switch on the passenger door works fine. I removed the unit from the drivers door but I can't get it apart (Yet).It looks like it comes apart or do I have to buy the complete unit?..I hope not!...Thanks for any help.
Last edited by Cherokee Nation; Jan 15, 2016 at 08:51 PM.
Reason: correct
Components of the switch are not available you must replace the whole switch. Contact one of the Forum Chevrolet parts dealers.
OK,but how do I get that switch out of the complete unit that also has the switches for the mirrors? I removed the whole unit and unplugged it and have it here on my desk and those parts sites do not have any pictures that make since....
Last edited by Cherokee Nation; Jan 15, 2016 at 11:17 PM.
Reason: change
Best to pull the door panel to remove the switch bank from it, but it can be removed this way as well.
The switch breaks down to the upper analog side that the rockers press against contacts, and the lower digital side that takes the rocker presses and turns them into a digital signal to send out on the gm lan bus.
If you look close, you will see the snap locks that hold the switch housing together, so you can pull it apart to check not only the board for a cold solder joints, but to check the contacts on the rockers to the mother board as well (read soda in the switch that is causing rocket contract problems).
So these side tabs that is holding the bottom to the side pieces,
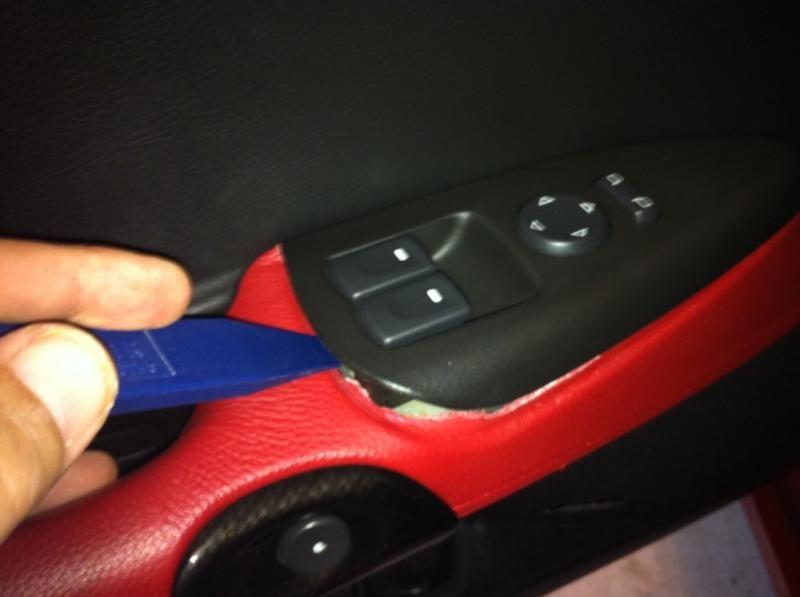
Have to be popped out like this, to release the bottom cover from the top/side cover. Hence the bottom cover popped off, will allow you to pull the board and check the rocket contact pieces to the board contact pieces to start with.
So you can clean all the rocket contact parts to start with, then check the board for any bad/cold solder joints as well.
Best to pull the door panel to remove the switch bank from it, but it can be removed this way as well.
The switch breaks down to the upper analog side that the rockers press against contacts, and the lower digital side that takes the rocker presses and turns them into a digital signal to send out on the gm lan bus.
If you look close, you will see the snap locks that hold the switch housing together, so you can pull it apart to check not only the board for a cold solder joints, but to check the contacts on the rockers to the mother board as well (read soda in the switch that is causing rocket contract problems).
So these side tabs that is holding the bottom to the side pieces,
Have to be popped out like this, to release the bottom cover from the top/side cover. Hence the bottom cover popped off, will allow you to pull the board and check the rocket contact pieces to the board contact pieces to start with.
So you can clean all the rocket contact parts to start with, then check the board for any bad/cold solder joints as well.
Thanks Dano,I removed the unit from the door with a screw driver. I know the switches can be taken out,i just need 2 more hands..lol then I will try to repair it myself...
No worries, and if any of the buttons worked on the switch bank, then means that the board side is sending the data on the GM land for the the rockers that are making a good connection to the board when the working switches are move; leaving the question of why the other switches when moved are not making a good connection to their contacts on the board isntead.
Most off the time you will just find a layer of coffee/soda/armorall on the board/switch contacts points that is not allowing a clean connection of the two.
When you get the switch apart, post some photos, and should be an easy "finding Waldo" to point out the troubled areas. Also, a light coat of dielectric grease on the rocker and board contact points will slow down the problem from happening again once the parts have been cleaned.
In the door release switch I posted above, it always the two gold contact points to the board contact points that is the problem, while on the hatch release switch below, petty much the same thing as well.
No worries, and if any of the buttons worked on the switch bank, then means that the board side is sending the data on the GM land for the the rockers that are making a good connection to the board when the working switches are move; leaving the question of why the other switches when moved are not making a good connection to their contacts on the board isntead.
Most off the time you will just find a layer of coffee/soda/armorall on the board/switch contacts points that is not allowing a clean connection of the two.
When you get the switch apart, post some photos, and should be an easy "finding Waldo" to point out the troubled areas. Also, a light coat of dielectric grease on the rocker and board contact points will slow down the problem from happening again once the parts have been cleaned.
In the door release switch I posted above, it always the two gold contact points to the board contact points that is the problem, while on the hatch release switch below, petty much the same thing as well.
I took it apart Yesterday the switch parts are all made of plactic,so no problems there. I pulled the control board out and cleaned it with spray cleaner and a Q-Tip and 91% achcohol I looked at it under a magnifier light and did not see any broken paths, so I suspect a bad component on the board. Rain water has gotten on those switch's more then once due to having my window cracked when the rained. I don't think I can buy just the circuit board online.I'm going to plug in only the circuit broad and then use a small pair of jumpers and put 12 V to the 'UP contract on the broad and see what happens.Then???
Need photos, or I can't play "lets find waldo" with a cold solder joint/ broken board path.
Also, have you traces the board with a multi-meter as well. With water on the board, it could have caused a separation between a chip leg to board trace that easily solve with just a small piece of wire solder in to make the connection again.
Also, water on the end of a micro resistor is a quick way for a colder solder joint to break apart too.
If push comes to shove, a new switch is only $100, but that's when all else fails, kind of thing instead.
Need photos, or I can't play "lets find waldo" with a cold solder joint/ broken board path.
Also, have you traces the board with a multi-meter as well. With water on the board, it could have caused a separation between a chip leg to board trace that easily solve with just a small piece of wire solder in to make the connection again.
Also, water on the end of a micro resistor is a quick way for a colder solder joint to break apart too.
If push comes to shove, a new switch is only $100, but that's when all else fails, kind of thing instead.
I have a newer tower with windows 7 and when I plug in my canon camera it will not upload my photos?. Like I said I found no broken paths. In the center of the board there is a large can and it has a burned spot on it.I don't know what that can is, but it might be the problem. Where can I get the switch bank at? I looked on GM Parts Direct site, like other sites they do not have photos I will call them today to get more information. Thanks Dano.
I have a newer tower with windows 7 and when I plug in my canon camera it will not upload my photos?. Like I said I found no broken paths. In the center of the board there is a large can and it has a burned spot on it.I don't know what that can is, but it might be the problem. Where can I get the switch bank at? I looked on GM Parts Direct site, like other sites they do not have photos I will call them today to get more information. Thanks Dano.
On the camera, go to the below link, search for your camera model, then download the needed windows driver for it so you can download the photo off it to your computer. Hence with the needed driver loaded and camera usb plugged in and camera power on, just go to computers folders, the drive that it loaded to (Most of the time it will be D drive), in the folders in D drive (or could be E if you have a thumb drive plugged in as well), your looking for the dcim folder that will have the photo's in folder a layer down that is labled something like folder photo's.
Hence folder address. > Computer > D > DCIM > 100PHOTO, and should show all the thumbnails of the photo in the camera in that folder.
Now when you post the photos, I can take a look at the board (both sides, and the other parts), and if needed if something burnt, point to you the replacement part that you can order from Mouser for dollar or two, to just replace it on the mother board to solve the problem.
I have a newer tower with windows 7 and when I plug in my canon camera it will not upload my photos?. Like I said I found no broken paths. In the center of the board there is a large can and it has a burned spot on it.I don't know what that can is, but it might be the problem. Where can I get the switch bank at? I looked on GM Parts Direct site, like other sites they do not have photos I will call them today to get more information. Thanks Dano.
Could check with Gene at Cultrag performance also.
Could check with Gene at Cultrag performance also.
Missing the point, since he can just buy a whole new switch for around $100. But what we are trying to do is fix the switch for only a few dollars or for free instead.
On the camera, go to the below link, search for your camera model, then download the needed windows driver for it so you can download the photo off it to your computer. Hence with the needed driver loaded and camera usb plugged in and camera power on, just go to computers folders, the drive that it loaded to (Most of the time it will be D drive), in the folders in D drive (or could be E if you have a thumb drive plugged in as well), your looking for the dcim folder that will have the photo's in folder a layer down that is labled something like folder photo's.
Hence folder address. > Computer > D > DCIM > 100PHOTO, and should show all the thumbnails of the photo in the camera in that folder.
Now when you post the photos, I can take a look at the board (both sides, and the other parts), and if needed if something burnt, point to you the replacement part that you can order from Mouser for dollar or two, to just replace it on the mother board to solve the problem.
I have the disk for my camera which I down loaded on this newer tower with windows 7 and it did not work because this version of windows or?? had it's own driver to down load photos. It was working until this past October and I got a malware in it and I had to pay $199.99 to get it worked on it, but it still is not working right Damm it, 'if I have any luck at all it is bad luck'My little cannon is outdated it was not listed on the cannon website, in witch I checked that about a month ago. I'm due for a new one anyway. I will go into town some day and get me one like I got my Daughter. A Rebel SLR.But for now I plugged in the unit so I can use my driver window and adjust my mirrors. If I need to use the passenger window I just have to reach over and use the switch for it.But for now with the nice weather we have down here 70ths with sunshine I'm doing some cleaning and etc on it.When we get a bad day I will bring the unit into my place and recheck it over again...Anyway Dano thanks for the time to work with me on this problem. I'll be back...
Dano,This is the best picture i could get.I used my old computer.As you look at the board the 'white' dot on the bottom is the contract for the right window to go down,the blue rubber piece goes on the board i marked the 'Problem' with some white out.When you pull up on the switch it presses down on the blue rubber thing which has (Did Have) some type of metal to make contract with the board and closes the circuit and that is how it works.The other ones are ok looks like like a flint for my zippo,but smaller.I used a piece of 18 gage wire with the unit plugged in to the connector on the drivers door and it worked,so the board is fine.I can get the complete unit for $75.00,but i do not use that window very often anyway. On the nice days we are having down here 84 degrees this week i will roll it 1/2 way down on my ride and when i park i reach over and use the switch on the passenger door to roll it up...No Problem...
Last edited by Cherokee Nation; Feb 12, 2016 at 08:57 PM.
Reason: add
Flip the blue cover over, and check to make sure that is still has it contact piece in the center of the cup.
Hence the blue rubber cover bump parts are the part that will hold the contact disc up off the board like a spring, and when you pull the rocker switch, it pushes the rubber cup section down so the lower inner sections make contact to the board contact pads to make the connection (like what you did with the wire).
So either you need to break out a Q tip with some cleaner to clean the blue cover contacts (on the bottom of it in the center of the cups), or one of the cover contacts fell out, and just needs to be glued back in place on the bottom of the blue section.
Also, take a look at the bottom of the actual rocker switch, and make sure that the post legs are still in play, and even between the two. It could that the opposing posts on once side has something that is stuck it it, making one post side longer than the other/ both contacts are not being pushed down the same to active both switches on the board at the same time.
Really flip the blue cover over, the rocker switch bank over, take a photo and post it. As stated, above, either the the blue rubber contact has falling off/ has gunk that needs to be clean off it and the reason that it not making the cross connection on the board pad, or one of the rocker post legs is longer than the other that pushes the blue pad cups down, and the problem instead.
Can you repost the photos? The photos about how to separate the switches from the plastic housing/bezel without breaking the housing. They seem to now be "unavailable". See DANO 523 comment on 01-16-2016
Last edited by Szymo; Nov 30, 2018 at 04:33 PM.
Reason: Clarification
Thanks Dano,I removed the unit from the door with a screw driver. I know the switches can be taken out,i just need 2 more hands..lol then I will try to repair it myself...
Dano, can you repost the pictures?
How do you get the switches out without breaking their housing/bezel. There must be a trick to get the tabs to release.
Designer Imagines A Corvette That Looks More Like a Corvette Than the Corvette
Slideshow: A Jaguar designer's personal project imagines what a modern front-engined Corvette might look like if Chevrolet revisited the golden age of the Stingray.








 How do i remove switch for window








 My little cannon is outdated it was not listed on the cannon website, in witch I checked that about a month ago. I'm due for a new one anyway. I will go into town some day and get me one like I got my Daughter. A Rebel SLR.But for now I plugged in the unit so I can use my driver window and adjust my mirrors. If I need to use the passenger window I just have to reach over and use the switch for it.But for now with the nice weather we have down here 70ths with sunshine I'm doing some cleaning and etc on it.When we get a bad day I will bring the unit into my place and recheck it over again...Anyway Dano thanks for the time to work with me on this problem. I'll be back...


