When you click on links to various merchants on this site and make a purchase, this can result in this site earning a commission. Affiliate programs and affiliations include, but are not limited to, the eBay Partner Network.
Upgrading my 05 to later wheel. I bought my new clock spring. Supposed to be one without radio controls (19153102), but when opening the box, GM has superseded that part with (26133714). At the steering wheel male/female connection there are 4 wires in the white connector on the new clock spring. Green Black Blue Grey. The 2 wires from the 05 for the horn are Black/Tan. Anybody give me a clue on which 2 of the four wires I need for my horn?
I did this project with my 05, have a kenwood and got the Bluetooth buttons working in left side of the wheel. See attachment
From your directions:In this case, pin 1 (Horn Relay Control) from the new white connector was repined to pin A on the old black connector. Likewise, pin 2 (Ground) was inserted in pin B, pin 3 (Ignition 1 Voltage) into pin C and pin 4 (Remote Shift Selector Signal) into pin D.
So wire A horn relay from old connector (yellow) goes with new connector 1 (gray)
wire B ground old connector (Black) goes with new connector 2 (DkBlu)
Like I said in original post, just interested in horn connection.
Thanks!
From your directions:In this case, pin 1 (Horn Relay Control) from the new white connector was repined to pin A on the old black connector. Likewise, pin 2 (Ground) was inserted in pin B, pin 3 (Ignition 1 Voltage) into pin C and pin 4 (Remote Shift Selector Signal) into pin D. So wire A horn relay from old connector (yellow) goes with new connector ay wire B ground old connector (Black) goes with new connector 2 (DkBlu) Like I said in original post, just interested in horn connection. Thanks!
I made the same change 2005 to 2012 wheel. If all you're doing is hooking up the horn I would say just hook it up the way you think best.
I did just that. Then one in every 5 door closings +/- the theft alarm would go off. You would have to honk the horn several times rapidly to get it to turn off. I flipped the two wires and that fixed the problem. YMMV
As I recall the original connector had 4 connections and only the two for the horn are used/wired.
From your directions:In this case, pin 1 (Horn Relay Control) from the new white connector was repined to pin A on the old black connector. Likewise, pin 2 (Ground) was inserted in pin B, pin 3 (Ignition 1 Voltage) into pin C and pin 4 (Remote Shift Selector Signal) into pin D.
So wire A horn relay from old connector (yellow) goes with new connector 1 (gray)
wire B ground old connector (Black) goes with new connector 2 (DkBlu)
Like I said in original post, just interested in horn connection.
Thanks!
It helps if I'm seeing this correctly: I'm using the original black connector with the yellow in A and the grey in B position. According to post #9 my new clock spring wires are yellow to grey for the horn relay and grey to dk blu for the ground, correct.
It helps if I'm seeing this correctly: I'm using the original black connector with the yellow in A and the grey in B position. According to post #9 my new clock spring wires are yellow to grey for the horn relay and grey to dk blu for the ground, correct.
From the 05/06 documentation I have the original MALE connections are
Pin A YE Horn Relay
Pin B BK Ground
Pin C PK Ignition Voltage
Pin D PU Shift Selector
original FEMALE connections are
Pin A TN Horn Relay
Pin B BK Ground
Pin C PK Ignition Voltage
Pin D PU Shift Selector
The NEW 8 PIN Connector
Pin 1 GY Horn Relay
Pin 2 BU Ground
(6 other pins for shift and radio)
If you have a manual trans you should only have pins A and B. I hooked it up as shown above (I think) and had the alarm problem. I reversed the 1&2 wires and have been running that way for 3 years without any issues.
So you should remove the yellow wire from the old connector and put the grey wire from the new connector in its place, then remove the black wire from the old connector, and put the blue wire from the new connector in its place. Since the old connector on your car originally only had two wires (mine was the same), the other two wires from the new connector (green and black) won't be used so you can either just cut them off, or put them in the old connector as shown even thought they won't do anything, which is what I did. Just out of curiosity, why are you changing to the newer style steering wheel if you're not getting the audio controls ? Is it just the looks you're going for ?
So you should remove the yellow wire from the old connector and put the grey wire from the new connector in its place, then remove the black wire from the old connector, and put the blue wire from the new connector in its place. Since the old connector on your car originally only had two wires (mine was the same), the other two wires from the new connector (green and black) won't be used so you can either just cut them off, or put them in the old connector as shown even thought they won't do anything, which is what I did. Just out of curiosity, why are you changing to the newer style steering wheel if you're not getting the audio controls ? Is it just the looks you're going for ?
Just going for the looks and I change my mind (too much) and I'm tired of trying to get the 05 air bag off. Thanks for all your help (everyone)! Black Green Blue Gray wires in the black connector are the same as mine only my new connector was white.
Just going for the looks and I change my mind (too much) and I'm tired of trying to get the 05 air bag off. Thanks for all your help (everyone)! Black Green Blue Gray wires in the black connector are the same as mine only my new connector was white.
Getting the airbag off is really easy, here's a video showing how it's done. I'm sure you probably already know this but make sure you disconnect the battery for about 10 minutes before attempting to remove it. This thread might help also https://www.corvetteforum.com/forums...er-2005-a.html
I would follow the directions of the excellent video exactly with one exception. I would suggest that you get some plastic panel tools. When you loosen one pin shove in the plastic tool between the airbag and the wheel and do that for each pin. With the last pin the airbag will come loose.
The other tricky part is finding and pushing the spring clip. I used the long side of a long Allen wrench that just barely fit into the access hole in the steering wheel. Pushing down the airbag a bit makes it easier to feel if you are pushing on the spring clip as shown in the video. I know you know this but MAKE SURE THE BATTERY IS UNHOOKED for a while before you start this.
Getting the airbag off is really easy ---- after you have done it once !!!





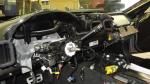

 Clock Spring Wiring ?