
*** Special on Magnuson Heartbeat this Fall **
 06-01-2017, 12:30 PM
#1081
Burning Brakes


Thanks man. Will do. I'll wait until I get the new belt on as well, as hopefully the boost will stabilise then. It looks like that RPM belt is coming on a "slow boat from China", though. When I ordered it last week, I meant to click on "FedEx Economy" and clicked "Economy" instead, which is some company called Landmark (which coincidentally is the name of my office building where it's being delivered to ) and, according to their tracking system, it hasn't even started moving as yet!
BTW: Rockauto's pricing on the RPM belt went up by ~$10 whilst I was ordering it!
) and, according to their tracking system, it hasn't even started moving as yet!BTW: Rockauto's pricing on the RPM belt went up by ~$10 whilst I was ordering it!

 06-01-2017, 06:18 PM
#1082
06-05-2017, 12:34 AM
#1083
Started the ECS fuel system install today but ran into a few problems.
First of all, a word of warning to anyone that wants to install the ECS fuel block. It's a really nice peice of machined aluminium, but boy is it ever a major PITA to install with the tank in the car. The little piece of wire that they send with the kit is hard to hold onto and once it rotates it will drop the backing plate into the tank. That must've happened to me at least 50 times. I finally got one of the bolts threaded into the backing plate and then installed the other one and started to tighten it down. Then the next thing that happened was that the o-ring seemed to grow all of a sudden, possibly from swelling from the gas that splashed on it. I tried everything to get it to sit back in the groove, but it was just too big to fit back. I decided to carefully pull the two halves together anyway, and then use a small screwdriver to seat the o-ring as I was tightening it down.
But, if that wasn't bad enough, the shoulder of the fuel block that is supposed to insert into the hole in the tank (so that the o-ring can seat and seal against the tank surface) would not enter the hole, and no matter how tight I tried to pull the two bolts down, each a little bit at a time, they started to bind, and the fuel block simply would not seat flush on the fuel tank.
Turns out that the hole saw that came with the kit did not, could not have, cut the hole in the tank big enough. When I measured the hole saw, it was just over 1.70" whereas the shoulder on the fuel block is 1.79" (I'll upload some photos later, since the internet here has slowed down to a frigging crawl as well).
There is no way that the fuel block shoulder can enter the hole in the tank. I need to try to find an actual 1.75" hole saw (which is what the one in the kit is supposed to be) and maybe I can ream it a bit to get the hole big enough.
All in all, a very aggravating experience, especially since the whole fukin garage smells like raw gas now, and I had to simply stuff a rag in the hole in the tank until tomorrow, when, hopefully, I can get back to it.
Right about now, I wish I had just done what Carson did with his car (like Dudeman did) and just drill and tap the tank and put a fitting straight into it. At this rate, it will probably end up being more work than if I had dropped the drivetrain to get the tanks out.
If I have to put up with this **** much longer, I'll probably drop it off the lift and push it into the road and light it on fire and have a neighborhood marshallow toast.
Last edited by CI GS; 06-05-2017 at 12:36 AM.
06-05-2017, 10:23 AM
#1084
Melting Slicks

Member Since: Mar 2007
Location: Santa Barbara CA
Posts: 2,391
Likes: 0
Received 23 Likes
on
23 Posts

See what happens? I go away for a while and miss all the fun. So what's the deal Sammy? Looks like you got that IW balancer installed, along with the Camaro lid. Are you trying to use the manual tensioner from an ECS kit?
06-05-2017, 07:05 PM
#1085
Race Director

Member Since: May 2004
Location: Raleigh, NC
Posts: 16,664
Received 1,194 Likes
on
1,053 Posts
St. Jude Donor '15
Started the ECS fuel system install today but ran into a few problems.
First of all, a word of warning to anyone that wants to install the ECS fuel block. It's a really nice peice of machined aluminium, but boy is it ever a major PITA to install with the tank in the car. The little piece of wire that they send with the kit is hard to hold onto and once it rotates it will drop the backing plate into the tank. That must've happened to me at least 50 times. I finally got one of the bolts threaded into the backing plate and then installed the other one and started to tighten it down. Then the next thing that happened was that the o-ring seemed to grow all of a sudden, possibly from swelling from the gas that splashed on it. I tried everything to get it to sit back in the groove, but it was just too big to fit back. I decided to carefully pull the two halves together anyway, and then use a small screwdriver to seat the o-ring as I was tightening it down.
But, if that wasn't bad enough, the shoulder of the fuel block that is supposed to insert into the hole in the tank (so that the o-ring can seat and seal against the tank surface) would not enter the hole, and no matter how tight I tried to pull the two bolts down, each a little bit at a time, they started to bind, and the fuel block simply would not seat flush on the fuel tank.
Turns out that the hole saw that came with the kit did not, could not have, cut the hole in the tank big enough. When I measured the hole saw, it was just over 1.70" whereas the shoulder on the fuel block is 1.79" (I'll upload some photos later, since the internet here has slowed down to a frigging crawl as well).
There is no way that the fuel block shoulder can enter the hole in the tank. I need to try to find an actual 1.75" hole saw (which is what the one in the kit is supposed to be) and maybe I can ream it a bit to get the hole big enough.
All in all, a very aggravating experience, especially since the whole fukin garage smells like raw gas now, and I had to simply stuff a rag in the hole in the tank until tomorrow, when, hopefully, I can get back to it.
Right about now, I wish I had just done what Carson did with his car (like Dudeman did) and just drill and tap the tank and put a fitting straight into it. At this rate, it will probably end up being more work than if I had dropped the drivetrain to get the tanks out.
If I have to put up with this **** much longer, I'll probably drop it off the lift and push it into the road and light it on fire and have a neighborhood marshallow toast.
First of all, a word of warning to anyone that wants to install the ECS fuel block. It's a really nice peice of machined aluminium, but boy is it ever a major PITA to install with the tank in the car. The little piece of wire that they send with the kit is hard to hold onto and once it rotates it will drop the backing plate into the tank. That must've happened to me at least 50 times. I finally got one of the bolts threaded into the backing plate and then installed the other one and started to tighten it down. Then the next thing that happened was that the o-ring seemed to grow all of a sudden, possibly from swelling from the gas that splashed on it. I tried everything to get it to sit back in the groove, but it was just too big to fit back. I decided to carefully pull the two halves together anyway, and then use a small screwdriver to seat the o-ring as I was tightening it down.
But, if that wasn't bad enough, the shoulder of the fuel block that is supposed to insert into the hole in the tank (so that the o-ring can seat and seal against the tank surface) would not enter the hole, and no matter how tight I tried to pull the two bolts down, each a little bit at a time, they started to bind, and the fuel block simply would not seat flush on the fuel tank.
Turns out that the hole saw that came with the kit did not, could not have, cut the hole in the tank big enough. When I measured the hole saw, it was just over 1.70" whereas the shoulder on the fuel block is 1.79" (I'll upload some photos later, since the internet here has slowed down to a frigging crawl as well).
There is no way that the fuel block shoulder can enter the hole in the tank. I need to try to find an actual 1.75" hole saw (which is what the one in the kit is supposed to be) and maybe I can ream it a bit to get the hole big enough.
All in all, a very aggravating experience, especially since the whole fukin garage smells like raw gas now, and I had to simply stuff a rag in the hole in the tank until tomorrow, when, hopefully, I can get back to it.
Right about now, I wish I had just done what Carson did with his car (like Dudeman did) and just drill and tap the tank and put a fitting straight into it. At this rate, it will probably end up being more work than if I had dropped the drivetrain to get the tanks out.
If I have to put up with this **** much longer, I'll probably drop it off the lift and push it into the road and light it on fire and have a neighborhood marshallow toast.
He's using the spring loaded tensioner and tensioner bracket from an ECS kit. It's separate from the supercharger bracket on their setup. Then a fixed manual tensioner in place of the factory tensioner up top.. their tensioner is strong as hell so hopefully it helps after belts stop stretching
06-05-2017, 07:15 PM
#1086
Le Mans Master

Surprised so much of an issue installing this. Mine went very smooth with no issues.
Did you lightly grind down the surface of the tank to make it flat?
Did you lightly grind down the surface of the tank to make it flat?
06-06-2017, 08:25 PM
#1087
Lol. Yep, I've been tinkering. Not that it's gotten me anywhere.
I don't have the Camaro lid as yet. Nor a bigger throttle body. But I have plans for both, hence the new hood.
I've installed the ECS HD spring tensioner, which worked out nicely in the end, but I have a Napa yellow stripe belt, which seems to stretch just sitting on the car. I have a Gates RPM belt coming from Rockauto. I'm hoping to get the boost to stabilize at ~12psi, which is what I saw briefly the other day, before the belt stretched and started slipping. Then I'll see what the lid and throttle body is worth in terms of boost.
06-06-2017, 08:47 PM
#1088
Man that's a pain, that bulkhead looks nice, that's crazy they sent the wrong size hole saw. Hopefully they either get you the right one or you can find one down there. Drilling that hole out should be tons of fun
He's using the spring loaded tensioner and tensioner bracket from an ECS kit. It's separate from the supercharger bracket on their setup. Then a fixed manual tensioner in place of the factory tensioner up top.. their tensioner is strong as hell so hopefully it helps after belts stop stretching
He's using the spring loaded tensioner and tensioner bracket from an ECS kit. It's separate from the supercharger bracket on their setup. Then a fixed manual tensioner in place of the factory tensioner up top.. their tensioner is strong as hell so hopefully it helps after belts stop stretching
Yep, I think that they either need to make the shoulder smaller or use a 1 7/8" hole saw, which is what I did. It was quite easy to re-drill the hole oversize to 1 7/8", actually. All I did was to stack a 1 3/4" holesaw inside the 1 7/8" holesaw, which fit very snugly, so that protruded out enough to act as a guide, and then punched the hole out to 1 7/8" in no time flat. I had to spend quite a bit of time fishing the shavings out of the tank though. I doubt I got it all. I hope none of that **** doesn't get into something and clog it up.
The 1 7/8" hole is slightly larger than the shoulder but a good bit smaller than the diameter of the oring, so it should seal. I put aside the little wire thing that they use to hold the backing plate and opted to use a 6" long 5/16" dia bolt instead. That made things much easier once I figured out how to rotate it etc.
If this fuel system fails, I'm tossing the whole goddamn thing and installing a fuel cell and a full return system, even if I have to ditch the mufflers to do so.
Getting the Tee in the fuel line and getting the -8AN hose end screwed on to that was almost as much fun as putting the ECS bulkhead in the tank. It's a neat system, but not fun to install if you're working at it from the side of the car reaching in over the rear suspension etc.
I finished up the install of the hard parts last night. Need to run the wires, and test it now. Hopefully it doesn't leak.
Here's some pictures that speak for themselves:
06-06-2017, 08:51 PM
#1089

Yep, I took a sanding disc and brushed off the word "AUTO" smoothed it and then took a sanding block and some 180 grit sand paper and then finished it with 400 grit. I'm not sure if it's perfect though. Hope it doesn't leak. The frigging o-ring also drove me mad by swelling up and falling out of the groove, until I got some glue and glued it in.
06-07-2017, 01:54 AM
#1090
Finished up the wiring tonight (except for the Hobbs switch) and test ran the pump by grounding the trigger wire that goes to the Hobbs switch and the pump runs fine. I had very slight leak on the output side of the pump, on the 180* -8AN hose end. Ended up having to back that off to rotate it a bit and had fuel spray everywhere! BTW: I am of the view that that particular fitting could be a 150 or even 130 degree instead of a 180* and it would then take less hose to reach the tee fitting. The tee fitting could also use a 45 degree hose end, rather than the 90* it comes with (see picture). All in all it turned out decent though.
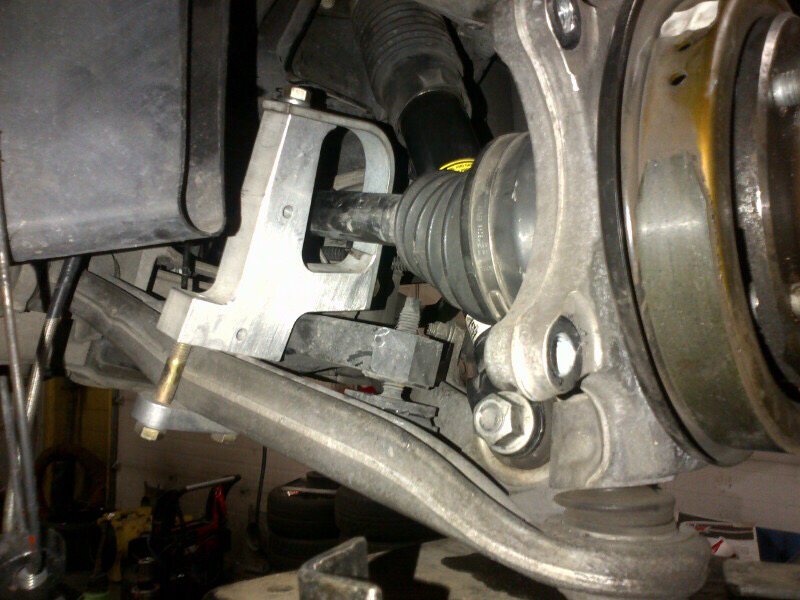
I also took the opportunity to bolt on the ECS axle shaft safety hoop on the drivers side. I'll do the other side tomorrow evening. I'm assuming that I have it in the right place, but I can't find any instructions or pictures online for the C6 version. Last time I checked, all ECS had on their site was instructions for the C5 version. Not that it takes a degree in nuclear physics to figure it out.
I also took the opportunity to bolt on the ECS axle shaft safety hoop on the drivers side. I'll do the other side tomorrow evening. I'm assuming that I have it in the right place, but I can't find any instructions or pictures online for the C6 version. Last time I checked, all ECS had on their site was instructions for the C5 version. Not that it takes a degree in nuclear physics to figure it out.
06-07-2017, 02:45 AM
#1091
Le Mans Master
It's really hard to tell from pics. It seems a different orientation to mine. Then again, it probably doesn't matter as long as it's not interfering with anything.
Last edited by realcanuk; 06-07-2017 at 02:46 AM.
06-07-2017, 08:34 AM
#1092
It's really hard to tell from pics. It seems a different orientation to mine. Then again, it probably doesn't matter as long as it's not interfering with anything.
Attachment 48101140
Attachment 48101140
 06-07-2017, 08:38 AM
#1093
Le Mans Master
Thanks Jody. I think it's about the same position. It's actually the only place where the axle shaft is more or less centered inside the hoop, and is about as far outboard as it can be. I'll check it again with the suspension laoded, once I get the tires back on. What a neat way to add an element of safety though. That was the easiest install of a car part ever. Took me like 4 minutes tops, 2 of which involved some head-scratching.
The thing to watch is the brake lines. Mine are very near and can rub. I put a piece of hose around them just in case.
The following users liked this post:
CI GS (06-07-2017)
06-07-2017, 09:10 AM
#1094
Race Director
Member Since: May 2004
Location: Raleigh, NC
Posts: 16,664
Received 1,194 Likes
on
1,053 Posts
St. Jude Donor '15
It does look like a different angle fitting coming off of the fuel block on the tank would fit a little better
Looks good though, I like the crimped lines (well, as long as you never have to change them)
Looks good though, I like the crimped lines (well, as long as you never have to change them)
06-07-2017, 09:32 AM
#1095
That leaky 180* fitting gave me some grief (and a gasoline bath
) last night though. I hope that I got the fuel leak/seep on that sorted.I recognize the the fuel block might not be exactly where it should be, because I tried to find the flattest/smoothest part of the tank that would work, rather than measuring it, so that might have something to do with the positioning of the hoses.
06-07-2017, 10:44 AM
#1096
Race Director
Member Since: May 2004
Location: Raleigh, NC
Posts: 16,664
Received 1,194 Likes
on
1,053 Posts
St. Jude Donor '15
Did you end up just sticking with the way ECS normally routes their stage 1 kits? i.e. new pump is connected to factory feed basically? Looks like it but I know you had thought about doing a new line all the way to the front
06-07-2017, 08:19 PM
#1097
06-07-2017, 10:46 PM
#1098
Had to share this. I have had some strange experiences with shipping companies over the years. I've had a transmission builder ship a transmission to the Grand Canyon - which is almost understandable, since that does resemble Grand Cayman. I've also had USPS send a set of very expensive Big Block heads around the globe to Sofia, Bulgaria, only to return them to me 6 weeks later, after I had given up hope. And I've had the BAP for my car shipped an extra 8,000+ miles, from California all the way to the U.K. and back to me.
Now, I just checked the tracking for my Gates RPM belt via this shitty shipping service that Rockauto uses under the moniker of "Economy" and saw that it was shipped from Columbus, Ohio all the way to Belgium. Yes, fukin Belgium!
How in gods name could anyone be so stupid as to consider it "economic" to send a fan belt an extra ~10,000 miles or so round trip? WTF?? I give up. I'm convinced that at some point I slipped into a worm hole or something and I'm now living in an upside-down fantasy world.
06-08-2017, 09:07 AM
#1099
Race Director
Member Since: May 2004
Location: Raleigh, NC
Posts: 16,664
Received 1,194 Likes
on
1,053 Posts
St. Jude Donor '15
I think the worst I've had is I overnighted something to SC one time (from NC) and the next morning it was in California. Needless to say it was a day late
I can't even imagine how sending it to Belgium is the best way to do it.. that's just crazy. Hopefully it shows up, eventually?
I can't even imagine how sending it to Belgium is the best way to do it.. that's just crazy. Hopefully it shows up, eventually?
06-08-2017, 09:53 AM
#1100
I think the worst I've had is I overnighted something to SC one time (from NC) and the next morning it was in California. Needless to say it was a day late
I can't even imagine how sending it to Belgium is the best way to do it.. that's just crazy. Hopefully it shows up, eventually?
I can't even imagine how sending it to Belgium is the best way to do it.. that's just crazy. Hopefully it shows up, eventually?
I'm thinking I'll just order another belt from Rockauto and have it FedEx'd to me. How much you wanna bet that it won't get here quicker than the one that I ordered 2 weeks ago, that's currently taking a European tour...