
Deburring and Polishing Engine Parts


 06-11-2017, 04:41 PM
#24
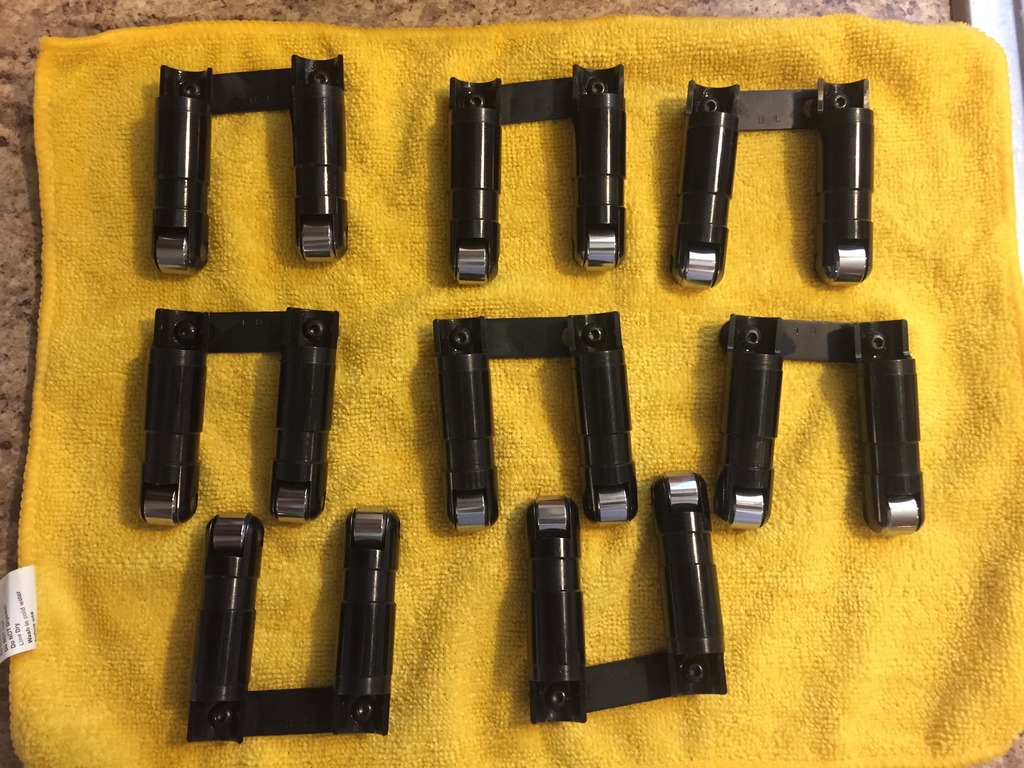
I flushed all of the oil out of the needle bearings in the rollers on the lifters then ran the roller dry at slightly elevated RPMs of what they will see inside the engine. This was to burnish the needle bearings into the roller. I cleaned them again and then oiled the bearings. After I let the oil soak in for about 10minutes I ran then rollers at the same elevated RPMs as before. Great results!!! You can almost breathe on them and make them spin!

 06-12-2017, 12:14 PM
#26
Wrote this to explain to some that don't believe in Dry film lubricants (or thermal coatings) and worry about them damaging a engine or component. I know the internet is full of people that think these coatings come off and damage your engine or are worthless time and money investments. Well the internet is full of people stuck thinking that you need a certain amount of roughness to retain oil on metal surfaces. That is way way old technology used by racers back in the day. They wanted a certain amount of roughness because bare metal repels oil whereas Dry film retains it. Smoother is better in every way and dry film moly coatings improve the surface down at the microscopic level all while retaining oil better (due to asperities not being able to wipe the surface). Dry film lubricants are widely used in OEM and aftermarkets engines and their parts. Bearings, piston skirts, camshafts and the list goes on and on. Have you ever heard of a engine failure because the dry film lubricant delaminated from the surface? Not once....The dry film moly is softer than the metal substrate unlike a particle of dirt or other metal which means it won't score the metal and it actually prevents galling/spalling of metal parts. A particle of dirt or metal as small as 5 microns in size (a human hair is roughly 70microns and pollenis 10 microns) on the other hand is as hard or harder than metal surfaces. The 5 micron piece of dirt or metal dust can ruin your engine! A molecule, shavings/dust, or at worst a sheet of moly that has delaminated from its surface will simply form into the metal at the mircoscopic level if it gets between bearing surfaces. That's why they coat engine bearings with it! You don't want the bearing to be harder than part riding on it! Moly also keeps microscopic asperities (small jagged peaks) in the metal surface from being able to "grab" one another and rip/tear each other off which creates debris that in turn catches and creates more asperities. The slippery moly binds to and stacks up on the asperity which doesn't allow an opposing asperity to grab onto it. Moly works in dry form and with a oil boundary layer. With a oil boundary layer moly prevents asperities from wiping the oil film off which is what you want. Of course the metal substrate needs to be as smooth as possible prior to coating because the moly is not a fix but rather a force multiplier. Moly may burnish to where it nots visible anymore but the moly platelets are still there at the mircoscopic level putting in work.
06-13-2017, 06:35 AM
#27
Drifting

Man I looked at this before I went to bed last night. I can't see the pictures at work. I have to tell you I'm impressed with your work as it looks really consistent and even on all the surfaces you've done especially for a DIY project. Great job I hope it works as intended. I like all the coating a lot as well as micro polishing parts. Mad props to you putting in the time and effort!
06-13-2017, 12:39 PM
#28
Thanks much. Most people on other forums have been not so nice. It's the internet though doesn't bother me haha. Maybe someone that's interested in coatings or taking the time detail/inspect each piece of their engine will now have some starting points to research on and make their own decisions with.
06-13-2017, 07:24 PM
#29
Drifting
Thanks much. Most people on other forums have been not so nice. It's the internet though doesn't bother me haha. Maybe someone that's interested in coatings or taking the time detail/inspect each piece of their engine will now have some starting points to research on and make their own decisions with.
06-13-2017, 08:27 PM
#30
Im the same way haha....I'm no pro engine builder myself but I don't mind giving stuff a try.
I had ERL build my shortblock about a year and half ago and it's sat in the laundry room ever since while I've been saving up to buy parts. Anywho since they shut their vehicle engine building business down to focus on the marine side of the engine building business I figured what do I have to lose by taking the shortblock apart. I want to coat a few things and double check the build spec sheet anyways so I opened the bag up for the first time and found this:
Disappointed in ERL to find these burrs left on the bottom edges of the lifter bores. Touching them with my finger was enough to make them come off. Will be getting a Flex hone for the bores to remove them when I disassemble the shortblock.
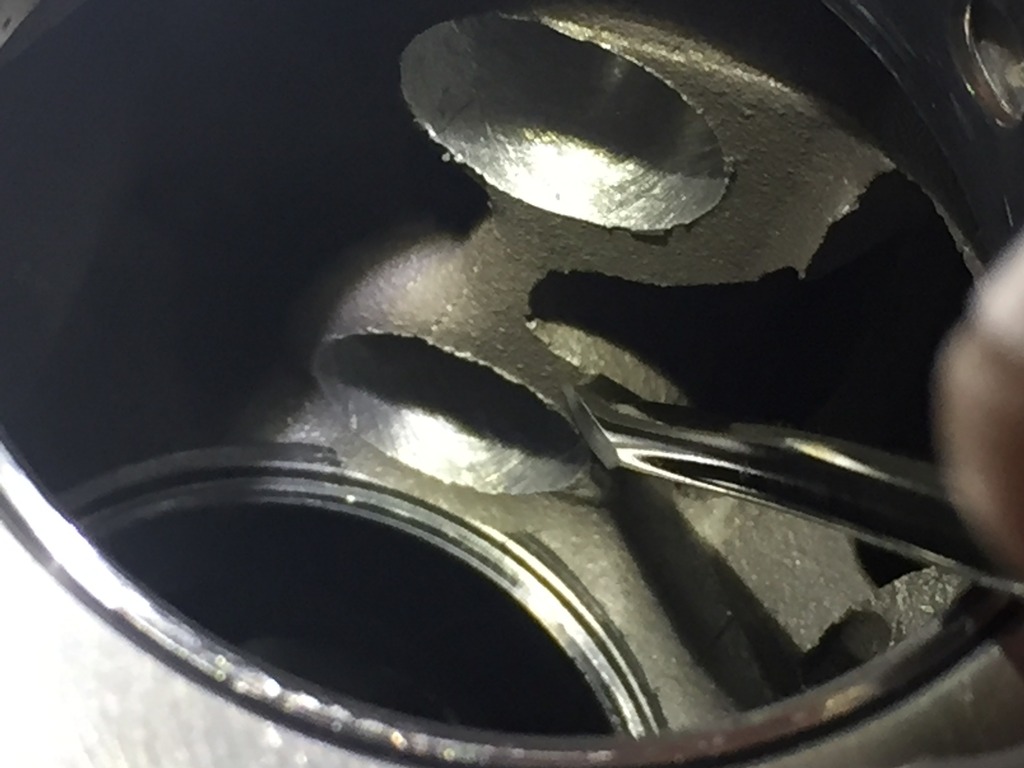

Last edited by Petraszewsky; 06-13-2017 at 08:28 PM.
06-13-2017, 08:34 PM
#31
Funny thing is that the deck surfaces are all deburred and chamfered. All the bolt holes, water passages, cylinder bores etc. so this surprised me. I've read some other threads about piston rings filed improperly and some other issues with ERL builds. I hope none of that is true when I disassemble it here soon.
06-13-2017, 09:35 PM
#32
Drifting
Yeah nothing surprises me anymore. I've seen great shops mess up basic things before. It happens when you can't do everything your self and you have employees. Things get overlooked ppl make mistakes etc... So don't be afraid there is nothing magical about engine building and you seem to have the attention to detail down. And double check any measurements you have doubts about.
06-16-2017, 04:27 PM
#33
Thanks again for the encouragement
The piston rings look good. They are filed nice and straight and aren't pointed. The ring lands are nice and deburred/chamfered along with the piston top. But there are burrs on the oil ring land where it meets the wrist pin. I'll take those off before I apply the coatings though. I'll be coating the ring lands, skirts, and underside with Cerakote Mircoslick and the tops with Cerakote Piston Coat thermal barrier. I plan on using E85 after break in and the alcohol has less lubricity than regular pump gas so the moly in the ring lands should help with oil rentention which is good because the crank scraper also means less oil flying around and hitting the cylinder walls. The retained oil film with help with lubrication, better combustion seal, and prevent micro welding of the rings.
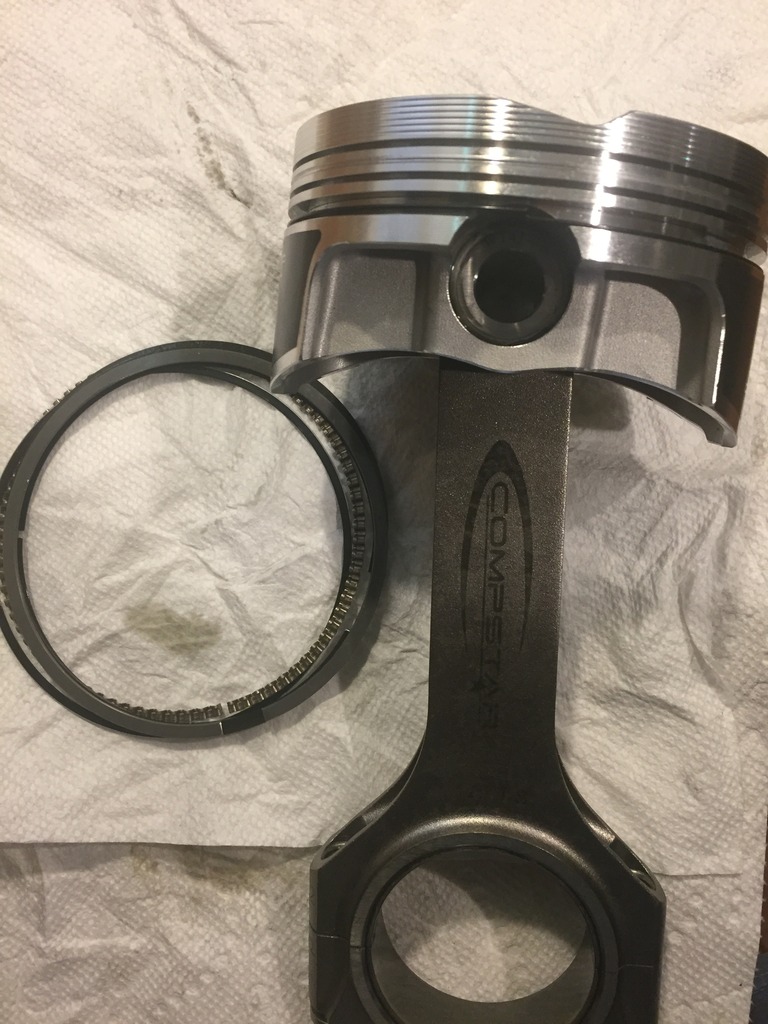
Don't mind the paper towel "dust". The burrs really tore into it with just a light wipe.


 06-16-2017, 09:04 PM
#35
Thanks let's hope I put it back together the way it's supposed to be. Lots of notes and pictures to take
Damn wrist pin only had assembly lube on one side...The other side is bone dry and the small end on the rod is bone dry as well. Damn shame
Damn wrist pin only had assembly lube on one side...The other side is bone dry and the small end on the rod is bone dry as well. Damn shame
06-21-2017, 01:18 PM
#36
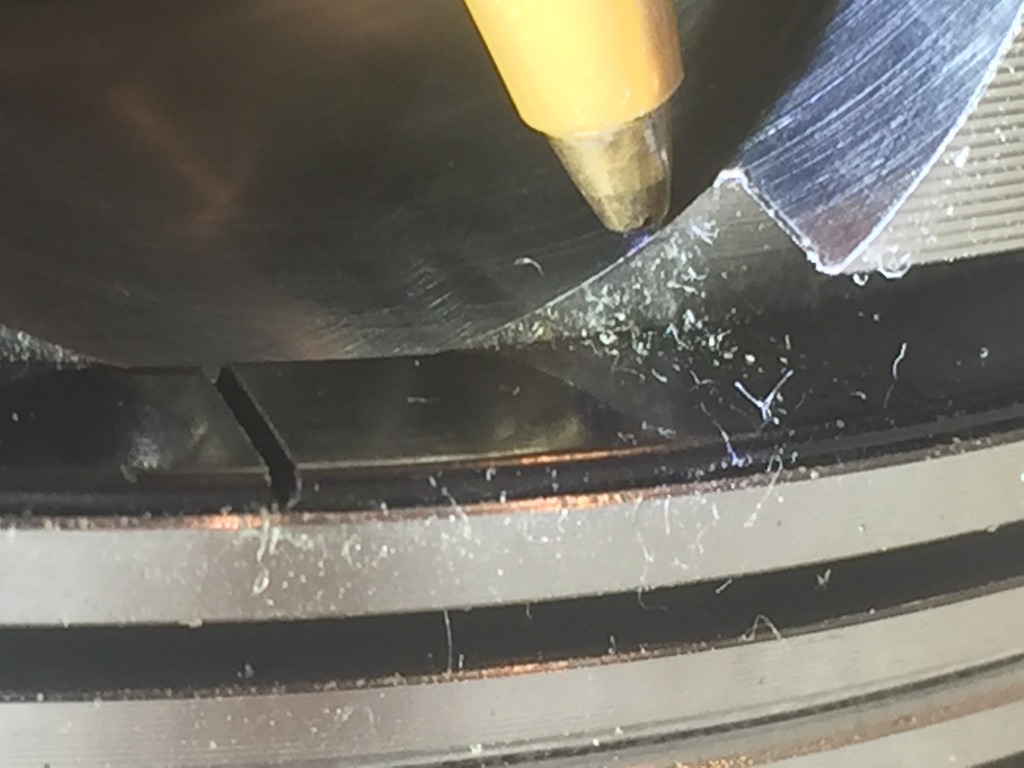
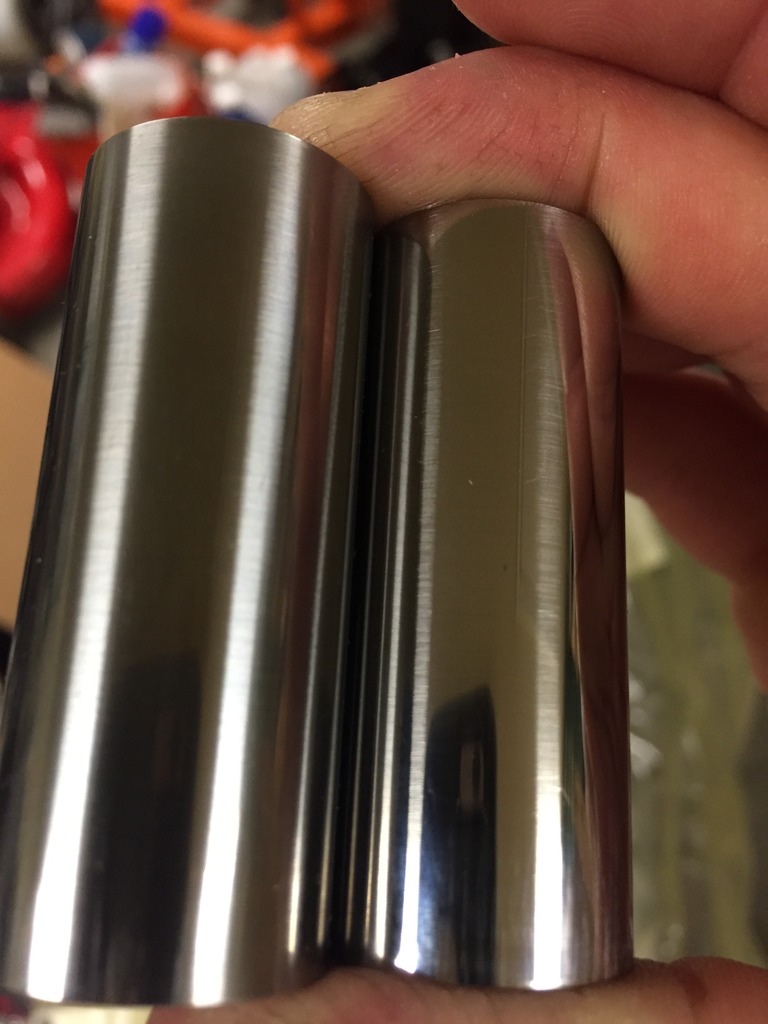
Polished the wrist pins and it revealed marks/scratches that go from side to side that weren't visible before. The scratches are from the burrs left on the oil ring land that dug into the wrist pin as they were inserted. I will be polishing these to a mirror finish and then blasting and coating them.
The one on the right was after just a quick polish probably a total of a 1-2minutes on the buffing wheel. The scratches I mentioned that weren't visible before you could clearly see (not pictured) and catch a fingernail on after the brief polish.They are now smoothed over.
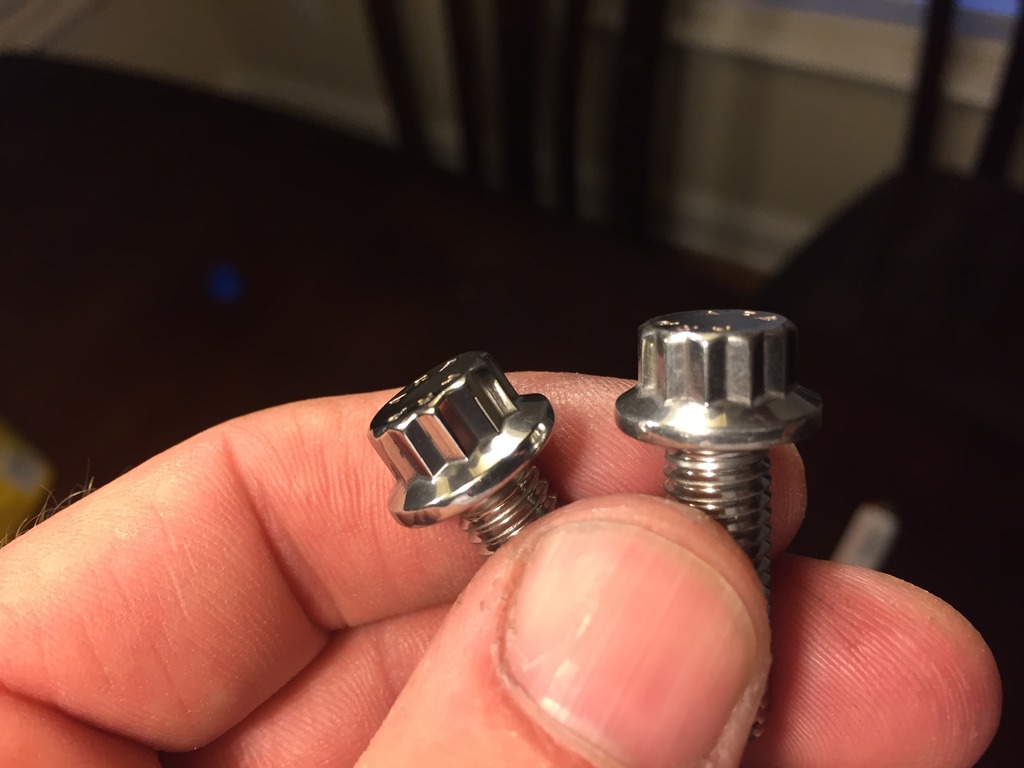
And the stainless ARP hardware for the block will all get polished as well. A quick 10 seconds on each of the two wheels and much better looking. Polishing the tips is just for looks while polishing the threads helps achieve proper torque.
 06-22-2017, 08:49 PM
#37
Messing some more stuff up. You can see radial marks/grooves where the polishing belt media clumped up or caught a piece of metal that didn't get flushed out during the process causing marks. Shining these surfaces up let's you see the imperfections. Belt speed, backing material, backing thickness, type of coolant used etc etc all affect the finished product.
 06-22-2017, 09:17 PM
#38
Race Director

Member Since: May 2004
Location: Raleigh, NC
Posts: 16,664
Received 1,194 Likes
on
1,053 Posts
St. Jude Donor '15

Neat

The following users liked this post:
schpenxel (06-23-2017)
06-24-2017, 04:59 PM
#40
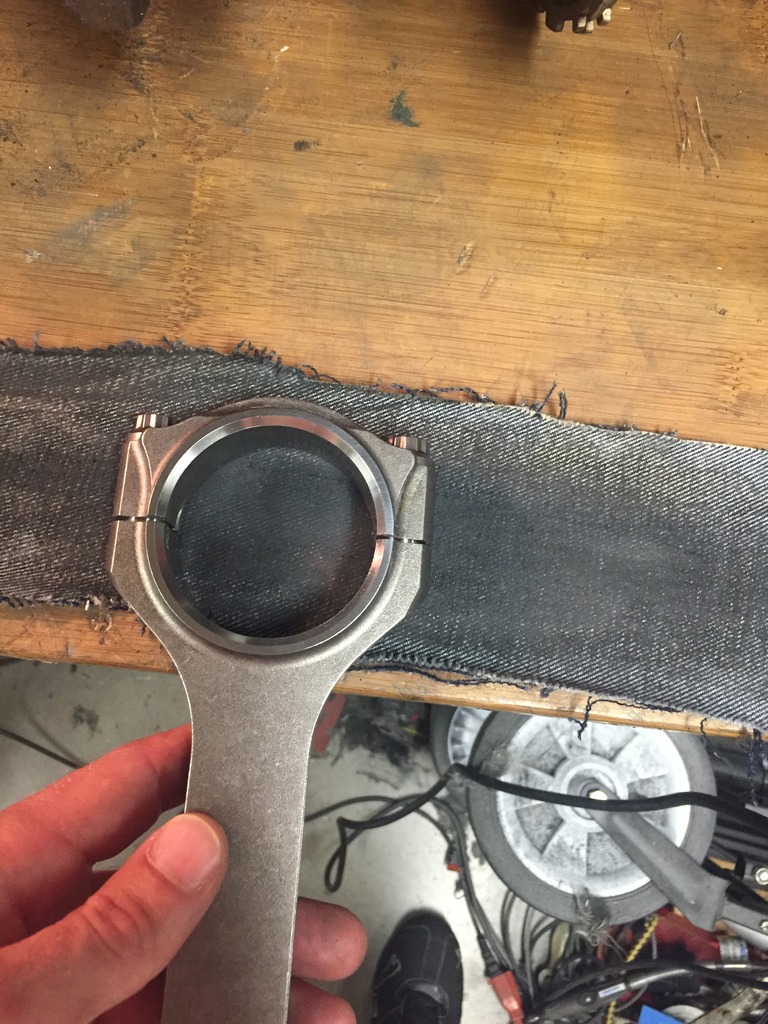
Polishing the thrust faces on the connecting rods with a strip of denim. I was surprised at how many nicks and gouges there were on these. Titanium connecting rod thrust faces are typically coated because of way the metal galls itself. I will be be coating these shortly even though they aren't titanium just because.

Last edited by Petraszewsky; 06-24-2017 at 05:00 PM.