
Hinson transmission mounts installed (with pics)
 10-22-2011, 07:34 PM
#1
Instructor

Thread Starter
About two weeks ago I received my Hinson poly motor and transmission mounts. I finally got around to installing them this weekend, and thought maybe some other DIYers wouldn't mind seeing a writeup before doing the install themselves. Note that I have very little experience working on corvettes, but I have done most of my own car work for the past few years. I did this in my garage with only hand tools, and it took me about 2.5 hours from start to finish (yes I know I'm slow, but I like to take my time and it was my first time doing this).
Here is what I needed:
Jack stands and pucks for the chassis
Jack to hold up transmission
15, 18, and 21mm deep sockets plus ratchet and extensions
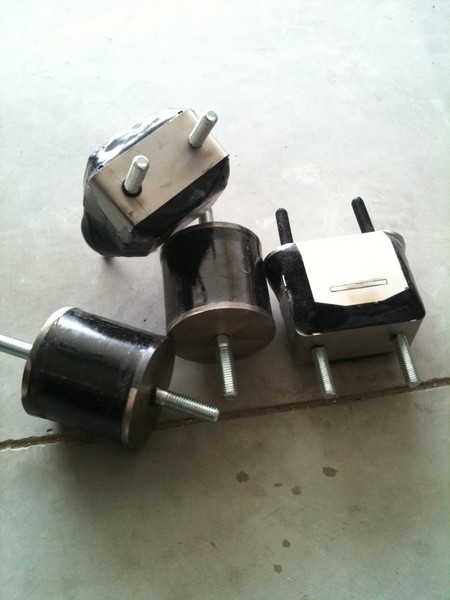
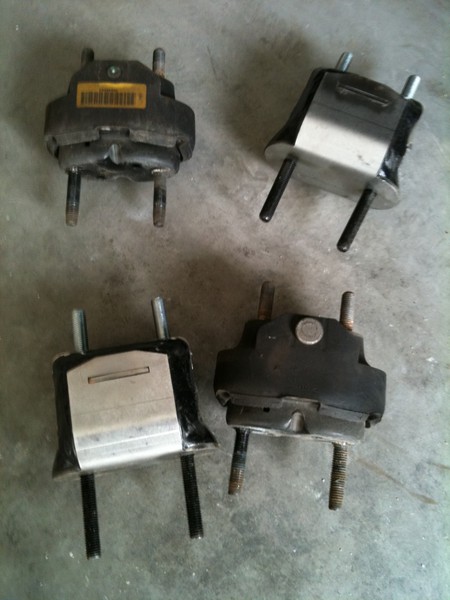
Here are the new mounts, they seem to be quality pieces:
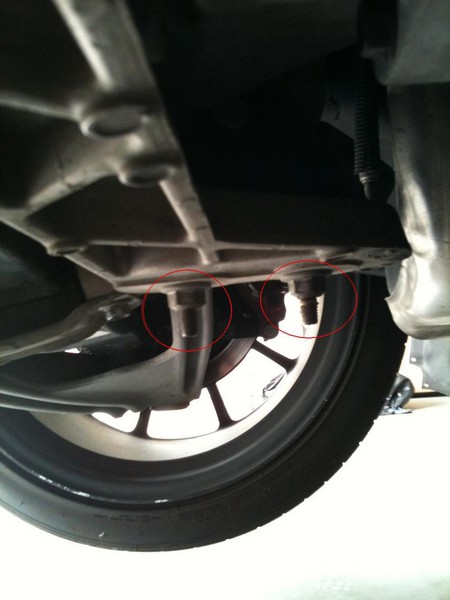
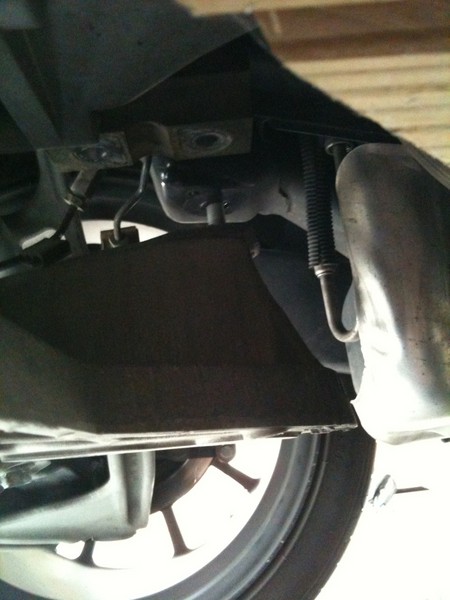
First I had to locate the transmission mounts and where they bolted to the subframe, but it wasn't too difficult since I knew the general shape. I took off the four nuts on each transmission mount, you can see the bottom ones here circled in red, and there are two more on top (which are impossible to access, the install easily took an extra 45 minutes because of those bastards). The lower two are 18mm and the top two are 15mm.
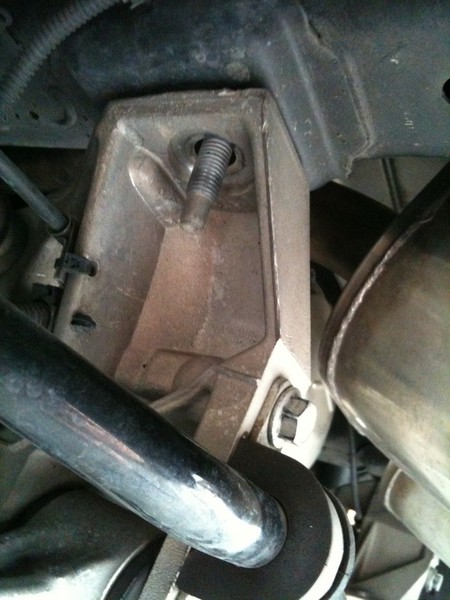
After all the fasteners were off I put a jack under the transmission to hold it in place while I lowered the rear subframe (four 21mm nuts). The back two are above the swaybar.
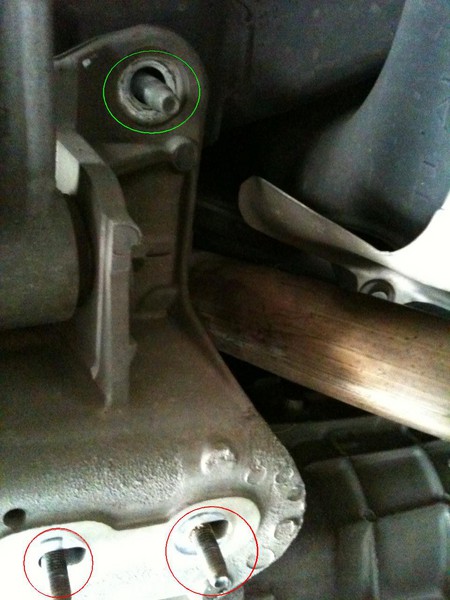
And the front two are above the transmission mounts and outside a bit. The transmission mount is circled in red and the rear subframe bolt is in green:
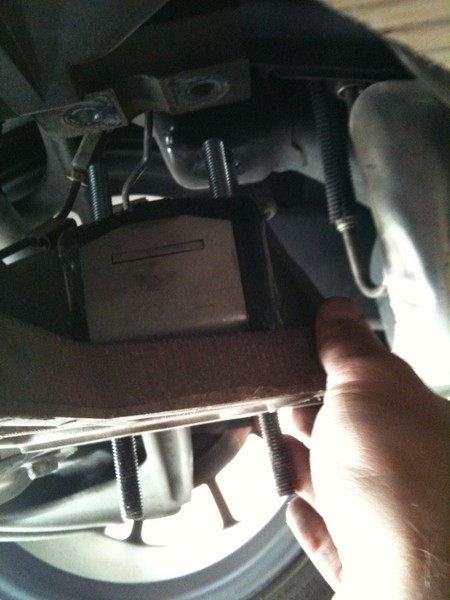
After all four subframe bolts were out it sagged down about an inch or two. I also raised the transmission/diff an inch and it gave me enough clearance to get the mounts out:
The studs on the Hinson transmission mounts are a little longer than stock so it took a little work to get the new ones in, you can see the difference in this pic:
Here is a new mount in before I lowered the transmission:
It took a little work lining up the mounts while lowering the transmission, just had to lower it a bit at a time and everything went into place. Then tightened up the new mounts and that was it. No driving impressions yet, I'm going to start on the motor mounts tonight. After those are installed I'll take it for a drive.
Here is what I needed:
Jack stands and pucks for the chassis
Jack to hold up transmission
15, 18, and 21mm deep sockets plus ratchet and extensions
Here are the new mounts, they seem to be quality pieces:
First I had to locate the transmission mounts and where they bolted to the subframe, but it wasn't too difficult since I knew the general shape. I took off the four nuts on each transmission mount, you can see the bottom ones here circled in red, and there are two more on top (which are impossible to access, the install easily took an extra 45 minutes because of those bastards). The lower two are 18mm and the top two are 15mm.
After all the fasteners were off I put a jack under the transmission to hold it in place while I lowered the rear subframe (four 21mm nuts). The back two are above the swaybar.
And the front two are above the transmission mounts and outside a bit. The transmission mount is circled in red and the rear subframe bolt is in green:
After all four subframe bolts were out it sagged down about an inch or two. I also raised the transmission/diff an inch and it gave me enough clearance to get the mounts out:
The studs on the Hinson transmission mounts are a little longer than stock so it took a little work to get the new ones in, you can see the difference in this pic:
Here is a new mount in before I lowered the transmission:
It took a little work lining up the mounts while lowering the transmission, just had to lower it a bit at a time and everything went into place. Then tightened up the new mounts and that was it. No driving impressions yet, I'm going to start on the motor mounts tonight. After those are installed I'll take it for a drive.


 10-23-2011, 01:37 AM
#4
Instructor
Thread Starter
Got the motor mounts installed, took me three hours. I'm pretty happy with that, because I've heard numbers like 5-6 hours for the install. Again, it was pretty straightforward: unbolt old motor mounts, place jack under oil pan, lower front subframe (had to unbolt the upper control arms on both sides to get it to lower enough), take out old mounts and reverse process to put back together.
The whole reason I ordered this kit was because a couple months ago I saw a bunch of brown liquid sprayed all over the passenger side of the front subframe. I assumed the motor mount had broken, either before I bought it in May or at the road course event I did back in June (same thing happened to my CTS-V last year, and I upgraded to poly mounts then). Anyway, this is what it looked like:
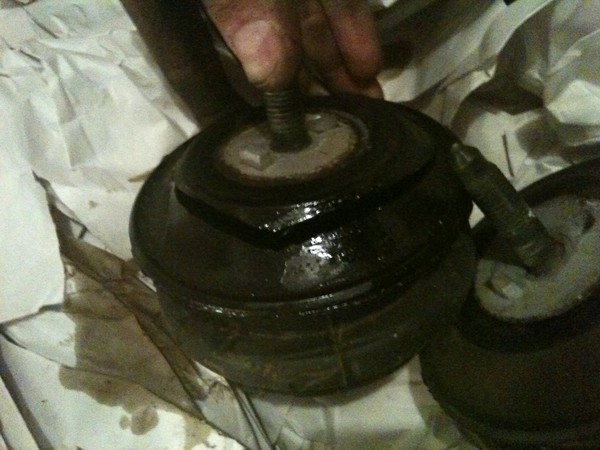
The top part just flops back and forth, it's very broken.
I took the car out for a few mile test drive with a bunch of stop and go, and I absolutely love the new mounts. I should give some background info, I have a 427 LS3 with a pretty big cam and monster stage 4 clutch. The car used to shake a lot at idle (1000rpm), and it sometimes bucks while cruising at low speeds. Also, the clutch would sometimes shake the entire car while starting from a stop if I didn't have the RPMs high enough.
Now, the car doesn't shake side to side nearly as bad at idle, but I do feel more vibration. This isn't really bad, I actually like the feedback. While cruising if it bucks/hesitates I do hear more drivetrain noise, that is really the only complaint I have, which I'm sure I'll get used to in a week or two. While starting from a stop, the car actually behaves a LOT better, no more bucking and shaking the car. I assume all this was because the one motor mount was falling apart and the motor could shake all it wanted. Oh, and the shifter doesn't move around anymore, it's very planted and shifting feel is definitely improved.
Thanks Hinson for a great product at a great price!
The whole reason I ordered this kit was because a couple months ago I saw a bunch of brown liquid sprayed all over the passenger side of the front subframe. I assumed the motor mount had broken, either before I bought it in May or at the road course event I did back in June (same thing happened to my CTS-V last year, and I upgraded to poly mounts then). Anyway, this is what it looked like:
The top part just flops back and forth, it's very broken.
I took the car out for a few mile test drive with a bunch of stop and go, and I absolutely love the new mounts. I should give some background info, I have a 427 LS3 with a pretty big cam and monster stage 4 clutch. The car used to shake a lot at idle (1000rpm), and it sometimes bucks while cruising at low speeds. Also, the clutch would sometimes shake the entire car while starting from a stop if I didn't have the RPMs high enough.
Now, the car doesn't shake side to side nearly as bad at idle, but I do feel more vibration. This isn't really bad, I actually like the feedback. While cruising if it bucks/hesitates I do hear more drivetrain noise, that is really the only complaint I have, which I'm sure I'll get used to in a week or two. While starting from a stop, the car actually behaves a LOT better, no more bucking and shaking the car. I assume all this was because the one motor mount was falling apart and the motor could shake all it wanted. Oh, and the shifter doesn't move around anymore, it's very planted and shifting feel is definitely improved.
Thanks Hinson for a great product at a great price!
Last edited by ashanson; 10-23-2011 at 01:43 AM.
10-24-2011, 10:53 AM
#5
Former Vendor

ASHanson - Thanks for the write up and review. We're glad that you enjoy the mounts. We think it is a great value of performance and a most-do for any corvette either stock or modified.
This is great feedback for other customers on the fence about doing the installation themselves or hiring it out.
Engine & Transmission Mount Combo - Special Pricing
This is great feedback for other customers on the fence about doing the installation themselves or hiring it out.
Engine & Transmission Mount Combo - Special Pricing
Last edited by brianhinson; 10-24-2011 at 10:57 AM.
10-24-2011, 02:51 PM
#6
[QUOTE=brianhinson;1579039913]ASHanson - Thanks for the write up and review. We're glad that you enjoy the mounts. We think it is a great value of performance and a most-do for any corvette either stock or modified.
This is great feedback for other customers on the fence about doing the installation themselves or hiring it out.
[URL="http://hinsonsupercars.com/p-1355-hms-urethane-engine-transmission-mounts-combo-c6z06.aspx"]
Brian, I have two questions:
1. On the second photo by ashanson, stock mount appears to have more than adequate thread protruded pass the nut. Why the extra length on your product?
2. On your trans mount, the bottom studs appear to be black while the top ones are silver, different materials used?
TIA!
10-25-2011, 11:27 AM
#7
Former Vendor
Brian, I have two questions:
1. On the second photo by ashanson, stock mount appears to have more than adequate thread protruded pass the nut. Why the extra length on your product?
2. On your trans mount, the bottom studs appear to be black while the top ones are silver, different materials used?
TIA!
1. On the second photo by ashanson, stock mount appears to have more than adequate thread protruded pass the nut. Why the extra length on your product?
2. On your trans mount, the bottom studs appear to be black while the top ones are silver, different materials used?
TIA!
2) They are bolts from a different supplier. There is no real difference in the two.
Let me know if you have any more questions. Thanks.
10-25-2011, 03:27 PM
#8
Just two more question to clarify question 2:
1. Although they are from different supplier, are the bolts on the transmission mount stainless as with the engine mount?
2. Forum member ashanson had to "took a little work" to get it aligned. If the transmission bolts were the same length as stock, essentially all you have to do is remove the old and replace it with the new?
TIA
10-25-2011, 03:53 PM
#9
Instructor
Thread Starter
Regarding lining up the mounts to the holes in the tranmission, it doesn't matter if the parts are aftermarket or stock. The holes in the subframe are a bit elongated so the mounts are free to move back and forth a little, you just have to get the transmission close to the bolts and then line them up is all. At first I lowered it too much and the bolts touched just to the side of the holes.
 10-26-2011, 04:28 PM
#11
The longer bolts only made it slightly more difficult to get the new mounts in, I just had to raise the trasmission another 1/4" is all. It really is a non-issue, more of an observation is all.
Regarding lining up the mounts to the holes in the tranmission, it doesn't matter if the parts are aftermarket or stock. The holes in the subframe are a bit elongated so the mounts are free to move back and forth a little, you just have to get the transmission close to the bolts and then line them up is all. At first I lowered it too much and the bolts touched just to the side of the holes.
Regarding lining up the mounts to the holes in the tranmission, it doesn't matter if the parts are aftermarket or stock. The holes in the subframe are a bit elongated so the mounts are free to move back and forth a little, you just have to get the transmission close to the bolts and then line them up is all. At first I lowered it too much and the bolts touched just to the side of the holes.
You are saying 1/4" more elevation was needed after the removal, did you actually measure and compare the two mounts or just an estimate?
I am curious because my stock bolts are 9/16" above the nuts and I think that they are already close to the ground, stock! If I was to get the mounts, I will need to shorten it, existing undercarriage clearance is not very much, even the existing stock 9/16" protrusion after final torque is unnecessary imo!
I do appreciate your effort in posting. Thank You for sharing!
10-28-2011, 05:44 PM
#12
Instructor
Thread Starter
1/4" was just an estimate, but it's pretty close. I looked under the car just now and the bolts go down to almost the exact height of the rear spring brackets, maybe a tiny bit higher (further away from ground). So they aren't the lowest part of the car back there, I'm not worried about it.
I guess if you have coilovers then they will be the lowest part, but not any lower than a car with a factory rear spring.
I guess if you have coilovers then they will be the lowest part, but not any lower than a car with a factory rear spring.
02-21-2015, 10:48 AM
#14

I didnt see this mentioned at all, but typically there is enough "slop" in the four bolt mounting assembly for the rear sub-frame that you could have alignment issues once it is lowered / reinstalled..
Can the OP or Hinson comment on this? Has it been proven that an alignment is unnecessary after removing / reinstalling the rear cradle / subframe?
Can the OP or Hinson comment on this? Has it been proven that an alignment is unnecessary after removing / reinstalling the rear cradle / subframe?
02-22-2015, 10:30 AM
#15
Race Director

Member Since: Aug 2005
Location: Hudson WI
Posts: 13,598
Received 181 Likes
on
162 Posts
NCM Sinkhole Donor

I didnt see this mentioned at all, but typically there is enough "slop" in the four bolt mounting assembly for the rear sub-frame that you could have alignment issues once it is lowered / reinstalled..
Can the OP or Hinson comment on this? Has it been proven that an alignment is unnecessary after removing / reinstalling the rear cradle / subframe?
Can the OP or Hinson comment on this? Has it been proven that an alignment is unnecessary after removing / reinstalling the rear cradle / subframe?
05-07-2017, 10:46 PM
#16
7th Gear

Member Since: Apr 2012
Posts: 7
Likes: 0
Received 0 Likes
on
0 Posts

I know this is an old thread, but I wanted to thank the OP. I swapped my Motor and trans mounts this weekend with Hinson mounts and this write up was very helpful.
Also a shout out to Hinson, The bolts on the mount are shorter then the stock and it really helped when putting the new mounts in.
82
Also a shout out to Hinson, The bolts on the mount are shorter then the stock and it really helped when putting the new mounts in.
82
05-08-2017, 08:27 AM
#17

I have a set of these that are long overdue for installation as well, and I was relieved to see that the studs are now significantly shorter than the ones in the pictures posted by the OP, so that should make the install much easier.
05-09-2017, 09:16 PM
#18
Burning Brakes

I just changed back from Poly to the OEM for both transmission and motor mounts... I couldnt tolerate the vibration/feedback. The poly transmission mounts eliminated the wheelhop, but my teeth were vibrating loose
05-09-2017, 11:13 PM
#19


Do you think only installing the engine mounts would be a bit easier on the teeth? Interested in the engine mounts but don't know if i'd bother with the tranny mounts. Just wondering! Thanks
08-25-2021, 08:38 PM
#20

About two weeks ago I received my Hinson poly motor and transmission mounts. I finally got around to installing them this weekend, and thought maybe some other DIYers wouldn't mind seeing a writeup before doing the install themselves. Note that I have very little experience working on corvettes, but I have done most of my own car work for the past few years. I did this in my garage with only hand tools, and it took me about 2.5 hours from start to finish (yes I know I'm slow, but I like to take my time and it was my first time doing this).
Here is what I needed:
Jack stands and pucks for the chassis
Jack to hold up transmission
15, 18, and 21mm deep sockets plus ratchet and extensions
Here are the new mounts, they seem to be quality pieces:
First I had to locate the transmission mounts and where they bolted to the subframe, but it wasn't too difficult since I knew the general shape. I took off the four nuts on each transmission mount, you can see the bottom ones here circled in red, and there are two more on top (which are impossible to access, the install easily took an extra 45 minutes because of those bastards). The lower two are 18mm and the top two are 15mm.
After all the fasteners were off I put a jack under the transmission to hold it in place while I lowered the rear subframe (four 21mm nuts). The back two are above the swaybar.
And the front two are above the transmission mounts and outside a bit. The transmission mount is circled in red and the rear subframe bolt is in green:
After all four subframe bolts were out it sagged down about an inch or two. I also raised the transmission/diff an inch and it gave me enough clearance to get the mounts out:
The studs on the Hinson transmission mounts are a little longer than stock so it took a little work to get the new ones in, you can see the difference in this pic:
Here is a new mount in before I lowered the transmission:
It took a little work lining up the mounts while lowering the transmission, just had to lower it a bit at a time and everything went into place. Then tightened up the new mounts and that was it. No driving impressions yet, I'm going to start on the motor mounts tonight. After those are installed I'll take it for a drive.
How do you access those hidden upper trans mount bolts?