


Headlight Lens Replacement
Thread Starter
Instructor

Joined: Mar 2013
Posts: 166
Likes: 27
From: Albuquerque, NM
Before I decided to do my own headlight lens I read a bunch of write ups saying you had to remove the bumper, fenders, and a combination of loosening the screws. So here is what I did and it took me about 15 mins to get the light out and about an hour and a half to replace the lens.
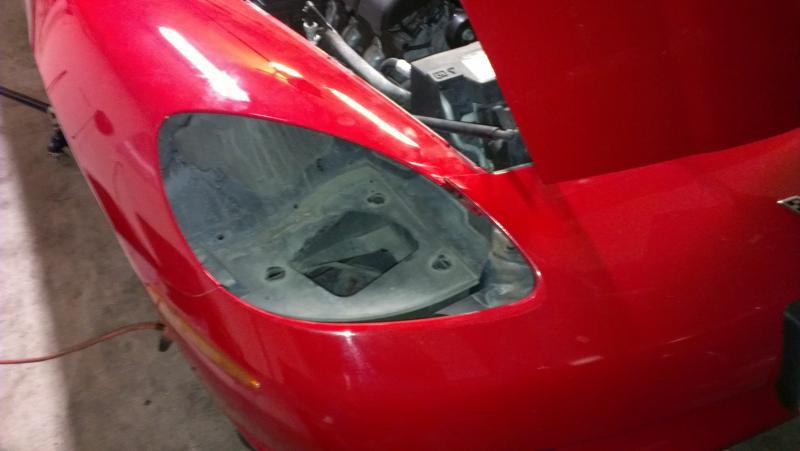
The first thing I did is remove the 7 screws holding the fender on (under the hood). Then I removed the 4 screws holding the front bumper top in.

The next thing was to remove the 6 upper push pins from the inner fender (behind the headlight, in front of the tire.

Last was removing the 3 nuts from the bottom of the headlight and the wire plug. with some light moving pieces around the headlight came right out.
I followed a CF member (Old Yellow) instructions on how to remove the lens and it was spot on:
Be sure that you have removed the three nuts with rubber washers from the bottom of the forward end of the light. If they are not removed you will break something. I'm not sure what will break first, but it doesn't matter because you can't get a replacement part without buying an entire headlight assembly. Except for the clear lens. Those can be had form a couple sources on the forum.
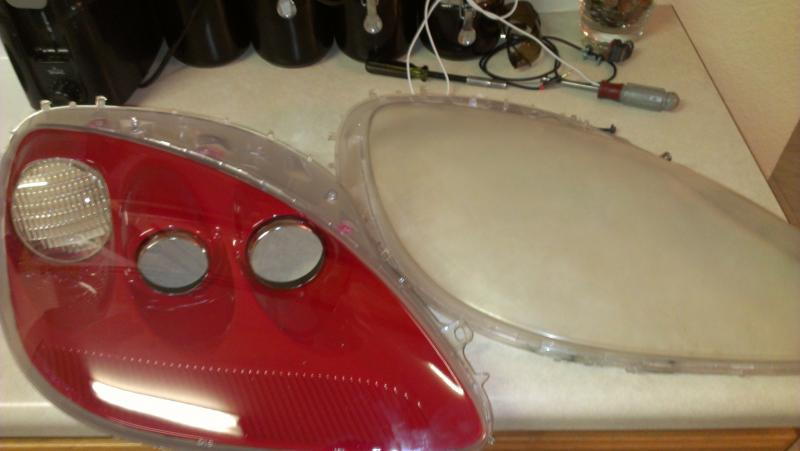
I preheated the oven temp to 235. My wife's electric kitchen oven. Once it was at that temperature I turned the oven off. I placed the headlight light on an aluminum cookie sheet and put it in the oven with the rack near the bottom. closed the door, and let it in there for about 15 min. Took it out of the oven & placed it on a cool cookie sheet to start prying it open. Start at the top of the light at the sharp curve. I just used a medium size common screw driver and a steel body panel clip tool.
The first heat cycle wont give you much progress, but you will see the adhesive start to stretch. Reheat the oven to 235 and go for another 15 minutes. repeat the procedure of prying until you get an opening at the top of the headlight. it will be under a lot of pressure but try to squeeze a flat strip of metal into the opening to hold it open while you put it back in the oven. Same heat cycle again. this time the clear lens will start to separate from the black housing a little easier. Not a lot easier, but a little easier.
Now continue prying it open about 1/2 way down one side using your tools. Place that flat strip of steel in the opening as far down as you can get it. Now start on the other side and work the same distance. All the time using a hair dryer, on high, to keep the clear lens hot. Still using the hair dryer go back to the other side and work down a little further. keep going side to side to open it evenly. Try to keep most of the old adhesive on the black housing. It's easier to get it off of there than it is from the clear lens.
I used a 1500 watt hair dryer to extend the working time. Hair dryer heat on the clear lens near the edge worked best. It seems the adhesive will separate from the clear plastic easier than the black.
If you weren't born with four hands, definitely get a helper to hold the light with a towel and work the hair dryer while you pry. I had the assistance of my wife of forty years, but don't ask a girlfriend. This job could ruin a relationship. She, or he will curse you when you slip and stab their hands with the screwdriver, and you will scream at them for burning your hands with the hair dryer, but remain vigilant to the task at hand. You can always get a new helper for free, (Not a wife. They are very expensive to replace,) but these lights are expensive.
Your helper will now avoid you, and not speak to you for several days, but that's a good thing. You can use that free time to prep and paint the lights. No assistance is needed for reassembly so it is not important how long the helper remains angry with you.
As I said he deserves the credit for that fully!
The first thing I did is remove the 7 screws holding the fender on (under the hood). Then I removed the 4 screws holding the front bumper top in.
The next thing was to remove the 6 upper push pins from the inner fender (behind the headlight, in front of the tire.
Last was removing the 3 nuts from the bottom of the headlight and the wire plug. with some light moving pieces around the headlight came right out.
I followed a CF member (Old Yellow) instructions on how to remove the lens and it was spot on:
Be sure that you have removed the three nuts with rubber washers from the bottom of the forward end of the light. If they are not removed you will break something. I'm not sure what will break first, but it doesn't matter because you can't get a replacement part without buying an entire headlight assembly. Except for the clear lens. Those can be had form a couple sources on the forum.
I preheated the oven temp to 235. My wife's electric kitchen oven. Once it was at that temperature I turned the oven off. I placed the headlight light on an aluminum cookie sheet and put it in the oven with the rack near the bottom. closed the door, and let it in there for about 15 min. Took it out of the oven & placed it on a cool cookie sheet to start prying it open. Start at the top of the light at the sharp curve. I just used a medium size common screw driver and a steel body panel clip tool.
The first heat cycle wont give you much progress, but you will see the adhesive start to stretch. Reheat the oven to 235 and go for another 15 minutes. repeat the procedure of prying until you get an opening at the top of the headlight. it will be under a lot of pressure but try to squeeze a flat strip of metal into the opening to hold it open while you put it back in the oven. Same heat cycle again. this time the clear lens will start to separate from the black housing a little easier. Not a lot easier, but a little easier.
Now continue prying it open about 1/2 way down one side using your tools. Place that flat strip of steel in the opening as far down as you can get it. Now start on the other side and work the same distance. All the time using a hair dryer, on high, to keep the clear lens hot. Still using the hair dryer go back to the other side and work down a little further. keep going side to side to open it evenly. Try to keep most of the old adhesive on the black housing. It's easier to get it off of there than it is from the clear lens.
I used a 1500 watt hair dryer to extend the working time. Hair dryer heat on the clear lens near the edge worked best. It seems the adhesive will separate from the clear plastic easier than the black.
If you weren't born with four hands, definitely get a helper to hold the light with a towel and work the hair dryer while you pry. I had the assistance of my wife of forty years, but don't ask a girlfriend. This job could ruin a relationship. She, or he will curse you when you slip and stab their hands with the screwdriver, and you will scream at them for burning your hands with the hair dryer, but remain vigilant to the task at hand. You can always get a new helper for free, (Not a wife. They are very expensive to replace,) but these lights are expensive.
Your helper will now avoid you, and not speak to you for several days, but that's a good thing. You can use that free time to prep and paint the lights. No assistance is needed for reassembly so it is not important how long the helper remains angry with you.
As I said he deserves the credit for that fully!
Thread Starter
Instructor
Joined: Mar 2013
Posts: 166
Likes: 27
From: Albuquerque, NM
I actually tried to use a CF vender because he had the best price and nothing bad about him but wasnt able to get ahold of him. I definately paid a little more than I could have haha I'll have some patience next time for sure.

3rd Gear
Joined: Feb 2013
Posts: 3
Likes: 0
A few questions. Where did you buy the lens? And, when reassembling the the lens, how did you fasten the parts together, existing glue, new glue? Were you confident that it was water tight when you were finished? Thanks for the thread, you've given me the confidence to give it a try. John
Thread Starter
Instructor
Joined: Mar 2013
Posts: 166
Likes: 27
From: Albuquerque, NM
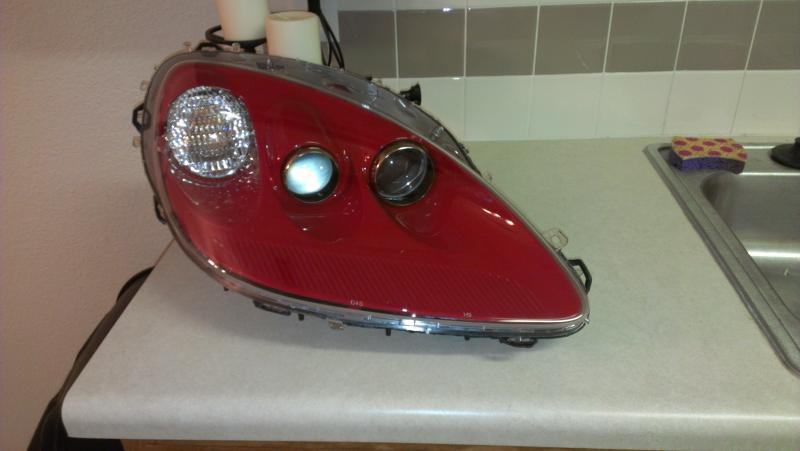
I got my lens from corvettemods. When I put it back together I used clear RTV adhesive. When you take it apart make sure to get all of the old glue out and just fill the "gutter" around the frame where the lens sits into and when it pushes it out smooth it out around it so you know its sealing correctly. Some people have said you HAVE to use specific glue but I used this stuff on a set of BMW lens over a year ago and they are still sealed. And as far as the confidence, Im not a person to say "anyone can do it" but if you have some mechanic skills and can remember your own steps it is completely doable and will save you some money for sure.

Burning Brakes


Joined: Feb 2002
Posts: 1,232
Likes: 10
From: Montrose Colorado
I just bought mine from gmparts.com. They came complete with the rubber gaskets, so no need for silicone. They need your Vin. number to get the color right and the three plug sizes. 1.) marker light 2.) fog light and 3.) headlight. My 2008 Z06 took the small plugs. When you get the front fascia off there are (3) 10mm nuts that attach the headlight to the headlight bucket on each side. You must remove the 10mm nuts, then you must remove the first (4) 7mm nuts from the right and left fender, this enables you to gain clearance to remove the headlight while lifting up the fender about an inch or so. When your ready to align the headlights there will be (2) one inch holes one on each side, inside under the hood up front, if you look in there with a flash light you will see a hex screw. Turning this screw will adjust the headlight up or down, last thing to do after the install is complete. If you need any more help don't hesitate to contact me.
Tech Contributor


Joined: Jul 2002
Posts: 14,950
Likes: 264
From: St. Louis, MO
St. Jude Donor '08
What a great Thread Simman22! Thanks for taking your time to take pictures and do this write up.
And your write up is very well written! LOL I'll make my son help me if I ever need to do this rather than my wife. lol
And your write up is very well written! LOL I'll make my son help me if I ever need to do this rather than my wife. lol
Corvette Stories
The Best of Corvette for Corvette Enthusiasts

Top 10 Most Expensive Corvettes Ever Sold on Bring A Trailer
Brett Foote
10 Things Every Corvette Owner Needs (2026 Edition)
Michael S. Palmer
8 Most "Only Corvette Owners Understand" Quirks and Problems
Pouria Savadkouei
10 Reasons the C6 Z06 is Still A Performance Benchmark After 20 Years
Joe Kucinski
How Much Horsepower Every Corvette Engine "LOST" in 1972
Joe Kucinski
Top 10 DOs and DON'Ts for Protecting Your Convertible Top!
Michael S. Palmer
Top 10 Most Explosive Corvettes Ever Made: Power-to-Weight Ratio Ranked!
Joe Kucinski
150 hp to 1,250 hp: Every Corvette Generation Compared by the Specs That Matter
Joe Kucinski
8 Coolest Corvette Pace Cars (and Replicas) of All Time
Verdad Gallardo


Supporting Vendor

Joined: Sep 2007
Posts: 11,216
Likes: 178
From: Pensacola Florida GO GATORS!!! www.rlsebring.com www.c6c7vette.com
St. Jude Donor '17
There have been many many who didn't know a screw driver from a wrench that completed the job with great results and saving them money.
You can also try Buy-a-Vette in Atlanta as they buy my lens. They may be willing to do the replacement for you.
You can also send me your lights for my lens replacement service. All info on my site. turn around time is usually a few days, not weeks.
Pro


Joined: Nov 2013
Posts: 552
Likes: 58
From: western NC, USA
Drifting


Joined: May 2018
Posts: 1,606
Likes: 243
From: Atlanta GA
Thanks to all who have given input to this task. I heated mine to 250 for 20 min. 2 times for lens. 6 times for glue removal. You don't need a helper. Just a PITA. Going to start on drivers side in the am. Worth every bit of the $500 labor if you don't have time, tools, and beer.