
Running Lights Not working (Tail Lights and Side Markers)
 04-10-2013, 07:14 AM
#1
Pro

Thread Starter

Member Since: Mar 2009
Location: NC
Posts: 525
Likes: 0
Received 0 Likes
on
0 Posts

I don't know how long this has been going on since I rarely walk around the back of my car to see if the running lights are on. Saturday I left early in the morning and noticed the tail lights weren't lit. Here's what works and what doesn't.
What works;
* Brake lights when depressing the brake
* Brake lights when hitting the alarm
* Headlights
* Turn signals (front and rear)
* Backup Lights
What doesn't work;
* Side marker lights
* Brake lights when just acting as running lights at night
Coincidence or not?
A long time ago some of my interior lights stopped working as well. I feel like this is all related. http://forums.corvetteforum.com/c6-c...t-working.html
What doesn't light up inside;
*Buttons surrounding the steering wheel (on the left and right of the gauge area).
*Buttons under the A/C controls
*Buttons surrounding the NAVI
I looked over the fuses and didn't see anything out of the ordinary. Where do I start looking to track down what's going on?
Last edited by m3to335; 04-11-2013 at 06:25 AM.
 04-10-2013, 12:18 PM
#2

Probably not much help, but the fuse for the running lights is a red 10 amp in the underhood fuse panel.
Sounds like a short or a BCM going bad.
Sounds like a short or a BCM going bad.
 04-10-2013, 01:10 PM
#3
Le Mans Master


As has been suggested, verify that fuse #8 is good. If it is, swap the parking lamp relay (#37) and the A/C compressor relay (#35). If the parking lamps work again and the A/C doesn't, you've got a bad relay. Otherwise, verify that the relay coil is being pulled to ground when you turn the light switch by testing the resistance between a good ground and the socket for pin 86 of the parking lamp relay. If it is, your problem is within or downstream of the fusebox. If it isn't, check the harness wiring by performing the same test at the BCM end. That should be enough to get started.
Last edited by torquetube; 04-10-2013 at 01:40 PM. Reason: Correction.
04-11-2013, 06:34 AM
#4
Pro
Thread Starter
Member Since: Mar 2009
Location: NC
Posts: 525
Likes: 0
Received 0 Likes
on
0 Posts
As has been suggested, verify that fuse #8 is good. If it is, swap the parking lamp relay (#37) and the A/C compressor relay (#35). If the parking lamps work again and the A/C doesn't, you've got a bad relay. Otherwise, verify that the relay coil is being pulled to ground when you turn the light switch by testing the resistance between a good ground and the socket for pin 86 of the parking lamp relay. If it is, your problem is within or downstream of the fusebox. If it isn't, check the harness wiring by performing the same test at the BCM end. That should be enough to get started.
Good information, I will do that tonight.
I didn't even know what a BCM was before all this.

1) How do I know where to check the resistance at the BCM end? Perhaps it will be more clear when I actually look at it tonight.
2) If it comes down to it, can this help me at all...
"Check the codes on the car using the DIC. That will give you a lot of information and someplace to start from. Turn the ingition to on and then push and hold the options button followed by pushing the fuel button 4 times. The car will then enter diagnostic mode and you can let loose of the options button. The diagnostics will cycle through each subsystem on the car (including the BCM) and show all codes present in each subsystem. A code is an Alhpa character followed by four numerals and possibly followed by an H or C or both the H and C. Report them back here and somebody can help you then.
Bill "
04-11-2013, 09:53 AM
#5
Check the codes on the car using the DIC. That will give you a lot of information and someplace to start from. Turn the ingition to on and then push and hold the options button followed by pushing the fuel button 4 times. The car will then enter diagnostic mode and you can let loose of the options button. The diagnostics will cycle through each subsystem on the car (including the BCM) and show all codes present in each subsystem. A code is an Alhpa character followed by four numerals and possibly followed by an H or C or both the H and C. Report them back here and somebody can help you then.
Bill "[/I]
Bill "[/I]
You really need the service manuals with the wiring schematics so you can track down the issue.
Last edited by CGZO6; 04-11-2013 at 09:56 AM.
04-11-2013, 11:52 AM
#6
Le Mans Master
A service manual set would be a good thing to have. Also, a decent (Fluke) DMM, if you don't already have one. Good luck.
04-15-2013, 08:10 PM
#7
Pro
Thread Starter
Member Since: Mar 2009
Location: NC
Posts: 525
Likes: 0
Received 0 Likes
on
0 Posts
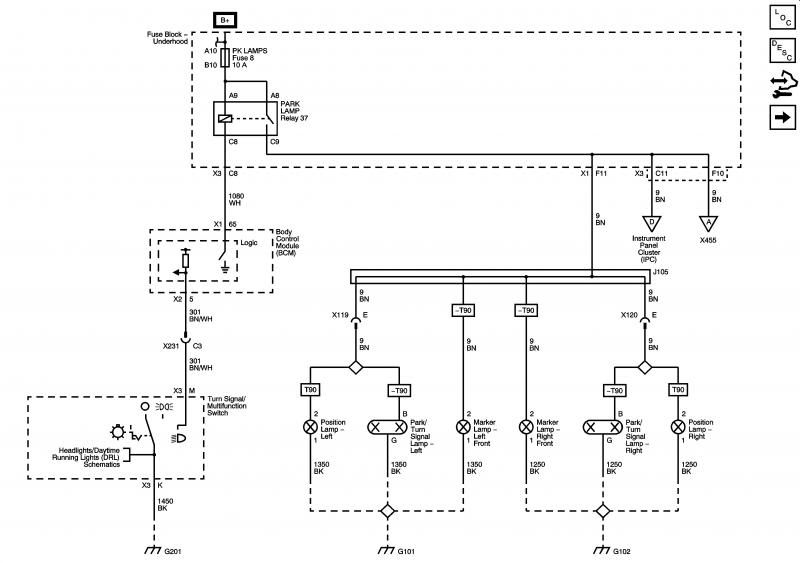
On the top of the BCM is a connector with a blue cover (visible even without pulling back the carpet). If you unlatch the connector and remove the cover, you can get at the wires. The park brake relay circuit (#1080) is the white wire at pin position #65. This should be on the bottom row toward the left. You'll need to back-pin or use an insulation-piercing probe to test the circuit with the plug connected.
A service manual set would be a good thing to have. Also, a decent (Fluke) DMM, if you don't already have one. Good luck.
A service manual set would be a good thing to have. Also, a decent (Fluke) DMM, if you don't already have one. Good luck.
Here's the latest results. Everything was done with the car off and key in on position (fob, whatever you call it).
1) Swapped relays. The swap resulted in the A/C still working. Result - Relays OK.
2) Hooked a multi-meter up to pin 86 on the fuse board.
0 head lights off --> 13.5mΩ, head lights on.
3) Hooked a multi-meter up to the white wire near the BCM.
81Ω head lights off --> 116Ω head lights on
4) Disconnected my trailer light harness to take it out of the equation. No change resulted.
Honestly, I'm a bit more confused then when I started.
04-16-2013, 09:13 AM
#8
Race Director


TorqueTube, thanks for the help thus far!
Here's the latest results. Everything was done with the car off and key in on position (fob, whatever you call it).
1) Swapped relays. The swap resulted in the A/C still working. Result - Relays OK.
2) Hooked a multi-meter up to pin 86 on the fuse board.
0 head lights off --> 13.5mΩ, head lights on.
3) Hooked a multi-meter up to the white wire near the BCM.
81Ω head lights off --> 116Ω head lights on
4) Disconnected my trailer light harness to take it out of the equation. No change resulted.
Honestly, I'm a bit more confused then when I started.
04-16-2013, 11:18 AM
#9
Le Mans Master
04-16-2013, 11:54 AM
#10
Pro
Thread Starter
Member Since: Mar 2009
Location: NC
Posts: 525
Likes: 0
Received 0 Likes
on
0 Posts
Hmm, it's possible I left the relay plugged in for test 3. I honestly cant remember. I can do it again tonight.
I'm not quite sure what value I'm looking for though.
I always thought relays were nothing more than electric switches allowing some signal to pass by. Shouldn't one of the sockets be a hot lead that continues on it's journey to fire up the running lights? I would have thought poking my multimeter into the relay socket would have yeilded 12V somewhere.
Last edited by m3to335; 04-16-2013 at 12:51 PM.
04-16-2013, 12:43 PM
#11
Le Mans Master
Hmm, it's possible I left the relay plugged in for test 3. I honestly cant remember. I can do it again tonight.
I'm not quite sure what value I'm looking for though.
I always thought relays were nothing more than electric switches allowing some signal to pass by. Shouldn't one of the sockets be a hot lead that continues on it's journey to fire up the running lights? I would have though poking my multimeter into the relay socket would have yeilding 12V somewhere.
The contacts in the fusebox are arranged in a grid that's numbered from front to back and lettered from right to left. If you remove the relay, contact A8 and A9 should read ~12V. If not, you've almost certainly got a blown fuse.
04-16-2013, 01:28 PM
#12
Race Director

I pull a trailer to the track as well. I've had that exact same problem twice.
The wiring from my trailer bangs around against the safety chains and has gotten chaffed enough so that bare wires shorted out.
Here's the fuse that blows:
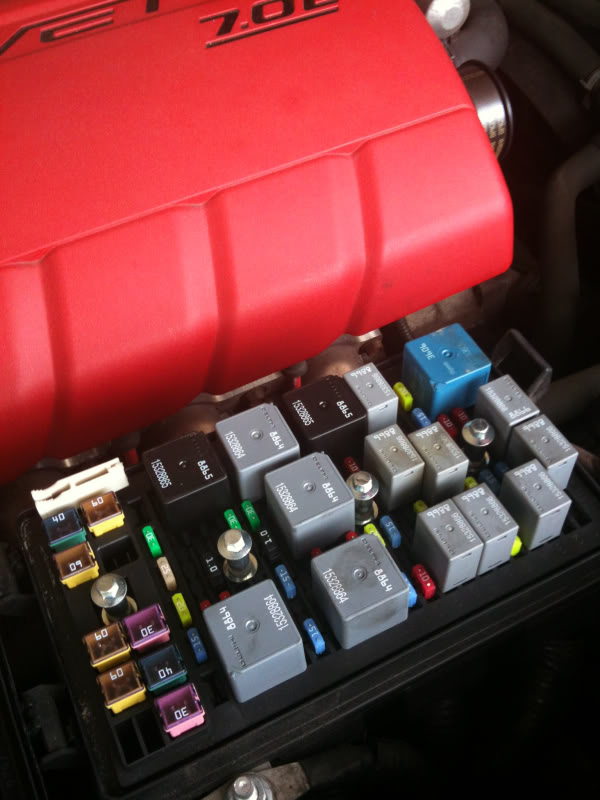
It's the red 10 amp at the bottom right of the picture - right along the right side of the fuse box.
Bob

The following users liked this post:
Konner Machemehl (04-22-2021)
04-16-2013, 01:32 PM
#13
Yes. Fuse #8 supplies 12V to two of the relay pins at all times, car on or car off.
The contacts in the fusebox are arranged in a grid that's numbered from front to back and lettered from right to left. If you remove the relay, contact A8 and A9 should read ~12V. If not, you've almost certainly got a blown fuse.
The contacts in the fusebox are arranged in a grid that's numbered from front to back and lettered from right to left. If you remove the relay, contact A8 and A9 should read ~12V. If not, you've almost certainly got a blown fuse.
04-16-2013, 04:42 PM
#14
Tech Contributor
Member Since: Oct 1999
Location: Charlotte, NC (formerly Endicott, NY)
Posts: 40,096
Received 8,930 Likes
on
5,334 Posts

Yes. Fuse #8 supplies 12V to two of the relay pins at all times, car on or car off.
The contacts in the fusebox are arranged in a grid that's numbered from front to back and lettered from right to left. If you remove the relay, contact A8 and A9 should read ~12V. If not, you've almost certainly got a blown fuse.
The contacts in the fusebox are arranged in a grid that's numbered from front to back and lettered from right to left. If you remove the relay, contact A8 and A9 should read ~12V. If not, you've almost certainly got a blown fuse.
Bill
Last edited by Bill Dearborn; 04-16-2013 at 04:50 PM.
04-16-2013, 06:58 PM
#15
Pro
Thread Starter
Member Since: Mar 2009
Location: NC
Posts: 525
Likes: 0
Received 0 Likes
on
0 Posts
I'm embarrassed to admit, that was the problem. I originally checked that after I hooked up the trailer. It was 5am and pitch black. It "looked" ok at the time. I was obviously mistaken and jumped to step 10 before reconfirming step one. Thanks all!
...stupid trailer!
...stupid trailer!
02-17-2019, 07:41 AM
#16
Intermediate


Member Since: Sep 2015
Location: Los Angeles
Posts: 43
Likes: 0
Received 0 Likes
on
0 Posts
This is happening on my 1993 corvette LT1. The side markers and tail lights at night time would not work when turning the headlight switch on. It was at first working intermediately and then I noticed the dimmer lever on the switch was frozen so I replaced the headlight switch and it worked intermediately again for few times turning the car on and off then the dimmer switch froze again on the headlight switch. Does anyone have a wiring diagram for this car or experienced a similar situation. Where is the relay located? Thanks!
05-06-2019, 08:04 AM
#17
Intermediate
Member Since: Sep 2015
Location: Los Angeles
Posts: 43
Likes: 0
Received 0 Likes
on
0 Posts
I was able to fix the tail lights from disassembling and reassembling the switch for the headlights. Unfortunately I'm getting no lights on the dash when I turn the switch to spark the headlights and running lights. Any help appreciated going to try to tangle this tomorrow! Thanks for the time.
05-19-2020, 07:36 AM
#20

Pull the rear tail light on the right hand side, and reach in to find the tail light connector for the entire back of the car lighting.
Disconnect it, clean both sides with spray electrical cleaner, add some Dielectric grease to the pins, and see if solves the problem.
If not, then double check the ground wire connection points on the rear harness next, after making sure that the bulbs and bulb sockets are still good.
Disconnect it, clean both sides with spray electrical cleaner, add some Dielectric grease to the pins, and see if solves the problem.
If not, then double check the ground wire connection points on the rear harness next, after making sure that the bulbs and bulb sockets are still good.