When you click on links to various merchants on this site and make a purchase, this can result in this site earning a commission. Affiliate programs and affiliations include, but are not limited to, the eBay Partner Network.
I just wanted to share my method for getting the 'vette off the ground. This method uses only the preferred jacking/lifting points.
My method is very similar to that of other forum users, and also that of Bugman. I don't have the links on hand, but a search should yield some relevant results.
I wasn't going to go out and spend $800 on a jack that was long and low enough to really get under the front of the car, so I decided to go with a Harbor Freight 2 ton low profile, long reach for the front, and a HF 3 ton low profile for the rear. I am using harbor freight crossbeam adapters on both jacks; this adapter physically bolts to the jack so it is very secure. The crossbeam will need to be "modified" for the front of the car. It's in quotes because the modification is really just removing the extension bars and placing the rubber pads directly on the main crossbeam.
As far as stands are concerned, I had 2 sets of big red 3 ton jack stands, but the saddles weren't large enough to fit the crossbeams and they didn't fit my jacking pucks (I use the round leave-in pucks from southerncarparts). Because of this, I ordered 2 sets of Esco jack stands. These things are wonderful (and also wonderfully expensive). They are rated at 3 tons EACH (not rated as a set like every other jack stand out there), and they use the pin design as opposed to the ratchet, which I feel is more secure.
Now, I knew that the front of the car would be too low for me to get the jack under it with the crossbeam installed, so I bit the bullet and got a set of RaceRamps TrakJax which raise the front of the vehicle 3"; you could really use a much higher profile jack than I did. These ramps are ridiculously light, and even though they're made of foam they don't compress or move around on the ground at all. Surprisingly enough, the rear also needed a little lift to clear the crossbeam. I wasn't going to order ANOTHER set of ramps just for the 1/2" I needed, so I used some scrap plywood for the job.
This wasn't a cheap setup by any means, but it was definitely a lot less than a lift or similar solutions. Also, I can store everything out of the way, which would have been harder even with a removable 2-post lift.
I got all the harbor freight items in the store:
2 ton 60678:
3 ton 61282:
crossbeam adapters 60762:
The other components I got from ReverseLogic (who I believe is a forum vendor):
RaceRamps TrakJax with stops RR-TJ-S:
ESCO jack stands 10499:
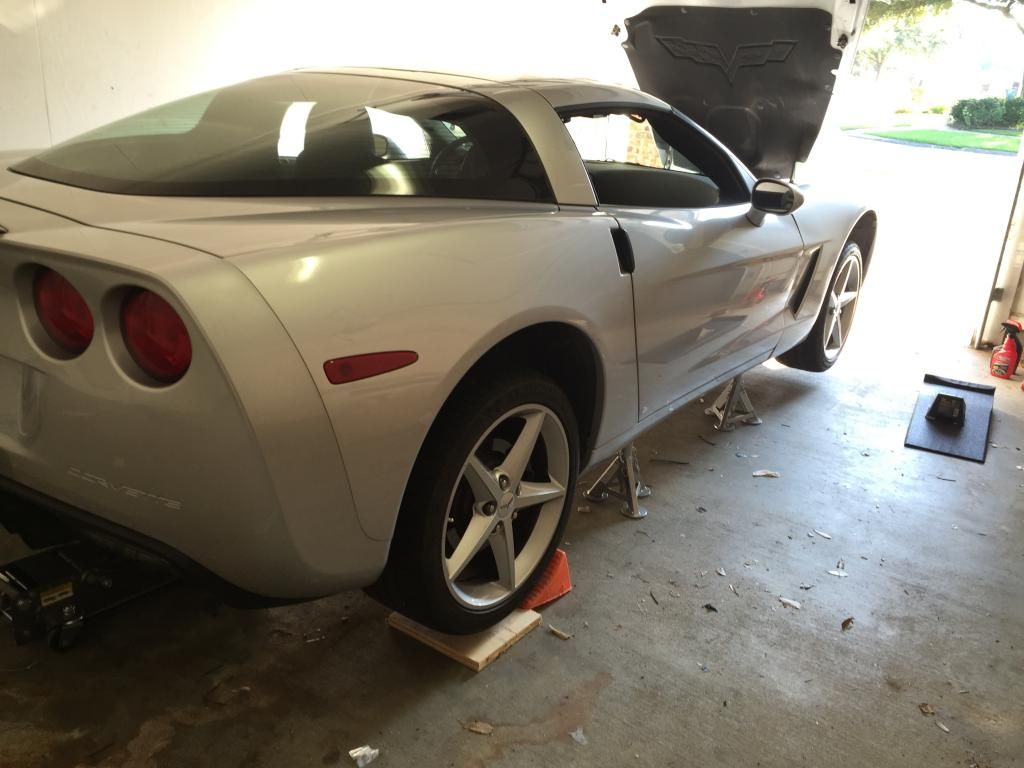
Here's the car set up on the stands with the jacks still in position for safety.
^^ That's just water under the car!
Some others place the stands under the crossbeams; I prefer them under the lifting pucks because of: a. wider stance, and b. none of your body has to go under the vehicle to put them in place.
With this setup, the car is incredibly stable. I tried to move it with a good deal of force once I had it on the stands and it wouldn't budge a millimeter in any direction; it definitely moves less than it does when it's just parked somewhere. I would have absolutely no reservations about getting under the car to perform maintenance.
Let me know what you think of the setup! Sorry I rambled on and didn't really get a good shot of the actual jacking locations but I can try to if y'all would like. Thanks for checking it out!
The crossbeam really isn't necessary. There is no need to lift both left and right sides of the crossmembers at the same time. The cross members are cast aluminum and GM only warns about making sure the front and rear part of the forward part of the crossmember is bridged by the jack pad. In the rear you make sure the front and rear portion of the rearward portion of the crossmember is bridged by the pad. The picture below shows the front crossmember with the portion of the crossmember I am talking about. The jack pad or jackstand has to bridge the two narrow edges circled in the picture.
Bill
Last edited by Bill Dearborn; Nov 10, 2014 at 05:53 PM.
This subject comes up all the time, it is not reinventing the wheel. Can see different ways thru advance search. Some good and others, bad! Matters of opinions!
This is my way, nothing fancy/expensive, with a little imagination, one floor jack and some home made doohickey, first one side, repeat and the whole car is up:
Using these:
Switch position/location to do these:
Depending on the situation, might even use these, if I need to utilize crossmember:
I just wanted to share my method for getting the 'vette off the ground. This method uses only the preferred jacking/lifting points.
My method is very similar to that of other forum users, and also that of Bugman. I don't have the links on hand, but a search should yield some relevant results.
I wasn't going to go out and spend $800 on a jack that was long and low enough to really get under the front of the car, so I decided to go with a Harbor Freight 2 ton low profile, long reach for the front, and a HF 3 ton low profile for the rear. I am using harbor freight crossbeam adapters on both jacks; this adapter physically bolts to the jack so it is very secure. The crossbeam will need to be "modified" for the front of the car. It's in quotes because the modification is really just removing the extension bars and placing the rubber pads directly on the main crossbeam.
As far as stands are concerned, I had 2 sets of big red 3 ton jack stands, but the saddles weren't large enough to fit the crossbeams and they didn't fit my jacking pucks (I use the round leave-in pucks from southerncarparts). Because of this, I ordered 2 sets of Esco jack stands. These things are wonderful (and also wonderfully expensive). They are rated at 3 tons EACH (not rated as a set like every other jack stand out there), and they use the pin design as opposed to the ratchet, which I feel is more secure.
Now, I knew that the front of the car would be too low for me to get the jack under it with the crossbeam installed, so I bit the bullet and got a set of RaceRamps TrakJax which raise the front of the vehicle 3"; you could really use a much higher profile jack than I did. These ramps are ridiculously light, and even though they're made of foam they don't compress or move around on the ground at all. Surprisingly enough, the rear also needed a little lift to clear the crossbeam. I wasn't going to order ANOTHER set of ramps just for the 1/2" I needed, so I used some scrap plywood for the job.
This wasn't a cheap setup by any means, but it was definitely a lot less than a lift or similar solutions. Also, I can store everything out of the way, which would have been harder even with a removable 2-post lift.
I got all the harbor freight items in the store:
2 ton 60678:
3 ton 61282:
crossbeam adapters 60762:
The other components I got from ReverseLogic (who I believe is a forum vendor):
RaceRamps TrakJax with stops RR-TJ-S:
ESCO jack stands 10499:
Here's the car set up on the stands with the jacks still in position for safety.
^^ That's just water under the car!
Some others place the stands under the crossbeams; I prefer them under the lifting pucks because of: a. wider stance, and b. none of your body has to go under the vehicle to put them in place.
With this setup, the car is incredibly stable. I tried to move it with a good deal of force once I had it on the stands and it wouldn't budge a millimeter in any direction; it definitely moves less than it does when it's just parked somewhere. I would have absolutely no reservations about getting under the car to perform maintenance.
Let me know what you think of the setup! Sorry I rambled on and didn't really get a good shot of the actual jacking locations but I can try to if y'all would like. Thanks for checking it out!
Question:
I have the same 2 ton jack. The problem is that it does not have a clear pin location:
I know you mentioned that the adapter bolts to the jack...in what way? Because, if it bolts to the jack are you unable to remove the jack once the car is up, and the jack stands are in place?
Thanks
Last edited by Cor430vette; Oct 11, 2015 at 08:57 AM.
I have the same 2 ton jack. The problem is that it does not have a clear pin location:
I know you mentioned that the adapter bolts to the jack...in what way? Because, if it bolts to the jack are you unable to remove the jack once the car is up, and the jack stands are in place?
Thanks
Mine doesn't either. Notice how the original jack pad attaches to the jack with a very short bolt? The crossbeam adapters have a bolt which engages in the same way and attaches them to the jack securely.
If you were to place the jack stands underneath the crossbeam, you're correct; You would not be able to remove the jack in that situation.
However, if you put the jackstands under the jacking puck locations on the frame, you're free to remove the jacks.
Hope this helps. If you like, I can go and snap some pictures of the crossbeam adapter and how it engages with the jack later this evening.
Makes sense thanks! I just was concerned the pin would be too long and it would not fit but sounds like its a very short threaded pin that screws into the floor jack....
I just wanted to share my method for getting the 'vette off the ground. This method uses only the preferred jacking/lifting points.
My method is very similar to that of other forum users, and also that of Bugman. I don't have the links on hand, but a search should yield some relevant results.
I wasn't going to go out and spend $800 on a jack that was long and low enough to really get under the front of the car, so I decided to go with a Harbor Freight 2 ton low profile, long reach for the front, and a HF 3 ton low profile for the rear. I am using harbor freight crossbeam adapters on both jacks; this adapter physically bolts to the jack so it is very secure. The crossbeam will need to be "modified" for the front of the car. It's in quotes because the modification is really just removing the extension bars and placing the rubber pads directly on the main crossbeam.
As far as stands are concerned, I had 2 sets of big red 3 ton jack stands, but the saddles weren't large enough to fit the crossbeams and they didn't fit my jacking pucks (I use the round leave-in pucks from southerncarparts). Because of this, I ordered 2 sets of Esco jack stands. These things are wonderful (and also wonderfully expensive). They are rated at 3 tons EACH (not rated as a set like every other jack stand out there), and they use the pin design as opposed to the ratchet, which I feel is more secure.
Now, I knew that the front of the car would be too low for me to get the jack under it with the crossbeam installed, so I bit the bullet and got a set of RaceRamps TrakJax which raise the front of the vehicle 3"; you could really use a much higher profile jack than I did. These ramps are ridiculously light, and even though they're made of foam they don't compress or move around on the ground at all. Surprisingly enough, the rear also needed a little lift to clear the crossbeam. I wasn't going to order ANOTHER set of ramps just for the 1/2" I needed, so I used some scrap plywood for the job.
This wasn't a cheap setup by any means, but it was definitely a lot less than a lift or similar solutions. Also, I can store everything out of the way, which would have been harder even with a removable 2-post lift.
Let me know what you think of the setup! Sorry I rambled on and didn't really get a good shot of the actual jacking locations but I can try to if y'all would like. Thanks for checking it out!
This is virtually the same solution I came up with on my own! Same low profile jack, jack stands, race ramps and cross bar. I had an existing floor jack (not Harbor Freight) and cross bar that worked on the rear so I used that setup. Three cheers for a cool solution!
Nice write-up, which reminds everyone of the safety aspects we should observe when working on cars.
I'd like to add one comment that victorf sort of approached. That it's important to know where the weight center is and where it shifts, when removing or re-attaching major components.
Although the car may seem stable when you first put it on jackstands, the center of gravity will move forward a lot if you're dropping the rear cradle and associated components to do something like swapping converters or replacing the torque tube. Of course, the opposite is true when removing the engine. This concern also applies to the lift points when placing the arms on a two-post lift.
Like victorf, I tend to place significant blocks under the wheels whenever possible, since they are much farther from the center than the side jacking points.
Designer Imagines A Corvette That Looks More Like a Corvette Than the Corvette
Slideshow: A Jaguar designer's personal project imagines what a modern front-engined Corvette might look like if Chevrolet revisited the golden age of the Stingray.


 This is virtually the same solution I came up with on my own! Same low profile jack, jack stands, race ramps and cross bar. I had an existing floor jack (not Harbor Freight) and cross bar that worked on the rear so I used that setup. Three cheers for a cool solution!


