


Engine bay fuse box/block
Thread Starter
Pro

Joined: Nov 2016
Posts: 577
Likes: 93
From: North Alabama
I'm having the fuel pump relay contact issue. I think I'm going to have to take the fuse box apart and close the contacts for the relay. I have been able to find threads on guys taking the fuse box apart to fix the low beam lights issue. Question is does the fuse box on my 2011 come apart the same way as the 2005-2007 cars? Having to bend the clips on the bolts up and knock the bolts out? Also does the low beam light issue affect only the 05-07 cars? Thanks for any help/instruction/advise.
Burning Brakes


Joined: Aug 2014
Posts: 1,240
Likes: 258
From: Tampa FL
Recall on low beam lights has been on my 11 GS. I understand through 13 still need this recall.
Was sitting in car in repair shop and while could not see all, they did take top of fuse box off
Was sitting in car in repair shop and while could not see all, they did take top of fuse box off
Last edited by HK770; Nov 8, 2017 at 10:26 PM.
Thread Starter
Pro
Joined: Nov 2016
Posts: 577
Likes: 93
From: North Alabama
I am not having the low beam lights issue YET. I'm going to have to get into my fuse box and hope to find pins for the fuel pump relay need closing some to make better contact. I was just thinking that while I am in there I should do the fix for the low beams also if it affects the 11 model and I now think it does. I was hoping that someone has taken a fuse box on an 11 apart. I found pictures and instructions for the 05-07 cars. I'm guessing that mine is the same. I am planning on tearing into mine Saturday morning.

Racer


Joined: Oct 2010
Posts: 357
Likes: 14
From: Friendswood TX
I wonder if I tinned the relay leads with solder if it would make them a little thicker would work instead of taking the panel apart. I had mine off last night and it don't look fun.
everything I have checked points back to the fuse box. when I installed my supercharger I put a jumper wire across where the relay turns the pump on to make sure the BAP was working and I have been having intermitting problems ever since. I think I spread the leads apart to much with the jumper wire.
everything I have checked points back to the fuse box. when I installed my supercharger I put a jumper wire across where the relay turns the pump on to make sure the BAP was working and I have been having intermitting problems ever since. I think I spread the leads apart to much with the jumper wire.

Race Director


Joined: Dec 2013
Posts: 12,502
Likes: 3,629
Yes on the recall for the low beam lights problem fo all years on the C6.
The GM solution is to solder in a jumper wire below the fuse box at the lower blocks, so they don't have to open or replace the upper fuse block assembly isntead.
Yes on having to straighten/remove the lower flair on the grommets to get the fuse block apart into its three pieces (main block, and top/bottom covers). Once the fuse block is apart, then you can often just clean up and bend the U's back together to solve the bad contact problem. Also, allows you to either replace the wire runs, or at least snap it out if its end clips to tab points that may be needs to be cleaned up instead.
https://www.corvetteforum.com/forums...dlights-5.html
Last edited by Dano523; Nov 9, 2017 at 08:56 AM.
Corvette Stories
The Best of Corvette for Corvette Enthusiasts

150 hp to 1,250 hp: Every Corvette Generation Compared by the Specs That Matter
Joe Kucinski
8 Coolest Corvette Pace Cars (and Replicas) of All Time
Verdad Gallardo
Top 10 Corvette Engines RANKED by Peak Torque (70+ Years of Muscle!)
Joe Kucinski
Corvette ZR1X Will Be Pacing the Indy 500, And Could Probably Race, Too!
Verdad Gallardo
Top 10 Corvettes Coming to Mecum Indy 2026!
Brett Foote
Top 10 C9 Corvette MUST-HAVES to Fix These C8 Generation Flaws!
Michael S. Palmer
10 Revolutionary 'Corvette Firsts' Most People Don't Know
Joe Kucinski
5 Reasons to Upgrade to an LS6-Powered Corvette; 5 Reasons to Stay LT2
Michael S. Palmer
2027 Corvette vs The World: Every C8 vs Its Closest Competitor
Joe Kucinski
Thread Starter
Pro
Joined: Nov 2016
Posts: 577
Likes: 93
From: North Alabama
I was thinking the same thing but if you look at the plastic on top where the pins go in it looks tight. Not sure the pins would go in if added solder and made them wider?
Thread Starter
Pro
Joined: Nov 2016
Posts: 577
Likes: 93
From: North Alabama
Thanks Dano, I have seen the thread that you linked. I think the box pictured was on an 05 car. I was wondering if my 11 was the same and now I believe it is. I was not looking forward to getting inside mine like that. But I don't have a choice. No where that I have found has a new fuse box in stock and even if I replaced the box I suspect the same thing would eventually happen to it.
Race Director
Joined: Dec 2013
Posts: 12,502
Likes: 3,629
Yes on the recall for the low beam lights problem fo all years on the C6.
The GM solution is to solder in a jumper wire below the fuse box at the lower blocks, so they don't have to open or replace the upper fuse block assembly isntead.
Yes on having to straighten/remove the lower flair on the grommets to get the fuse block apart into its three pieces (main block, and top/bottom covers). Once the fuse block is apart, then you can often just clean up and bend the U's back together to solve the bad contact problem. Also, allows you to either replace the wire runs, or at least snap it out if its end clips to tab points that may be needs to be cleaned up instead.
https://www.corvetteforum.com/forums...dlights-5.html
The GM solution is to solder in a jumper wire below the fuse box at the lower blocks, so they don't have to open or replace the upper fuse block assembly isntead.
Yes on having to straighten/remove the lower flair on the grommets to get the fuse block apart into its three pieces (main block, and top/bottom covers). Once the fuse block is apart, then you can often just clean up and bend the U's back together to solve the bad contact problem. Also, allows you to either replace the wire runs, or at least snap it out if its end clips to tab points that may be needs to be cleaned up instead.
https://www.corvetteforum.com/forums...dlights-5.html
Race Director
Joined: Dec 2013
Posts: 12,502
Likes: 3,629
Thanks Dano, I have seen the thread that you linked. I think the box pictured was on an 05 car. I was wondering if my 11 was the same and now I believe it is. I was not looking forward to getting inside mine like that. But I don't have a choice. No where that I have found has a new fuse box in stock and even if I replaced the box I suspect the same thing would eventually happen to it.
And as pointed out, your really don't need to rebend the bottom flairs back out, since the fuse block bolts will hold it in place. Hence just take a dremil with grinding stone to make short work of removing the grommet bottom faired sections, and when you go to reinstall the fuse box again with only the tops of the grommit'ss flared flat, the fuse box bolt will hold it all together in the car.
If down the road you want to install need grommets, can walk you throw the way I made new ones on the lathe; including a draw through bolt and nut type tool that will first flair the bottoms of the new grommet sleeves once installed in the block, then peen them flat in the end (top flairs are done in the lathe before hand ,hence live end to start the flair, then my centering bearing tool that is just driving into the fared ends to make them flat against the chuck).
Race Director
Joined: Dec 2013
Posts: 12,502
Likes: 3,629
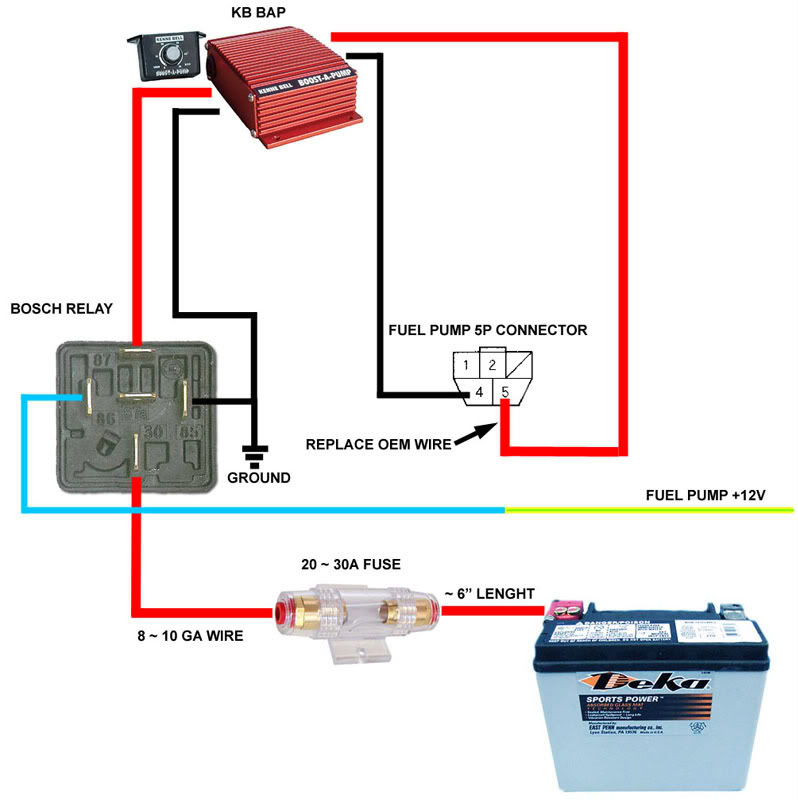
Just a trigger for the BAP's own spst relay, correct????
If so, then the fuse box relay should only be seeing about 450ma, and should not be the problem of why the fuse box terminals for the relay are heating up to begin with.
Also, don't use the light gauge fuel pump wires in the fuse box to try to drive current down them from the BAP to the pump. Make sure that you have the fuel pump wired from the BAP thick gauge wires as close as you can to the fuel tank, taking the OEM fuel pump light gauge wires from the fuse box to the fuel tank out of play.
Last edited by Dano523; Nov 10, 2017 at 05:52 AM.
Racer
Joined: Oct 2010
Posts: 357
Likes: 14
From: Friendswood TX
yes. the gray wire is triggering the 2nd relay.
My relay never got "hot". when I say hot I meant car got to temperature. Hot under the hood.
I have my hot wire ran from the alternator to the rear fender well where the BAP is mounted with the 2nd relay. Basically the gray wire stops at the 2nd relay.
Last night I tinned the legs of the relay and its fitting nice and snug so we will see. the reason I think its a bad connection in the fuse box is when it's not getting power I can put a jumper wire in place of the relay and it gets power fine. starts good and everything. Remove the jumper and no power with a relay installed. Swap out several relays and magically just starts working with any relay.
Thread Starter
Pro
Joined: Nov 2016
Posts: 577
Likes: 93
From: North Alabama
Racer
Joined: Oct 2010
Posts: 357
Likes: 14
From: Friendswood TX
yes. I tinned them like you do wire. yes it fits snug and it fired right up! The only problem I see with that is it probably spread the forks out even more. In my case that relay is just a trigger wire now so it should last forever.
Race Director
Joined: Dec 2013
Posts: 12,502
Likes: 3,629
Tim to slip the Fuse box.
Your problem is not the U part of the clip, but the connection point of the wire runs in the box to the side clip point of the prongs instead.
Forget the circled area, but instead look up right to the U prong and its side wire clip point isntead.

Hence when you tinned the relay and installed it, it forced the side prong over to increase the tension of the lower side wire clip wedge point over enough to semi solve the loose/corrode/burnt wire to lower side clip point; but don't hold your breath for it to last long.
Hence if the wire is not burnt through and need to be replaced itself, then may just have to pull the wire up from the side clip point, clean the side clip point connector point (and maybe the wire point as well were is going to reclip back in), re-install the wire back in the clip, and use a set of needle nose to tighten up the side point clip to wire, as well as any other U prong tabs that may to too far spread apart.
Also, a light coat of dielectric grease does wonders on the not only the wires/prongs/wire clip points after they have been spray cleaned, but future problems too. Not only does is slow down any corrosion of the wires and prongs, but helps to display heat as it trying to build up at the contact points too.
Your problem is not the U part of the clip, but the connection point of the wire runs in the box to the side clip point of the prongs instead.
Forget the circled area, but instead look up right to the U prong and its side wire clip point isntead.
Hence when you tinned the relay and installed it, it forced the side prong over to increase the tension of the lower side wire clip wedge point over enough to semi solve the loose/corrode/burnt wire to lower side clip point; but don't hold your breath for it to last long.
Hence if the wire is not burnt through and need to be replaced itself, then may just have to pull the wire up from the side clip point, clean the side clip point connector point (and maybe the wire point as well were is going to reclip back in), re-install the wire back in the clip, and use a set of needle nose to tighten up the side point clip to wire, as well as any other U prong tabs that may to too far spread apart.
Also, a light coat of dielectric grease does wonders on the not only the wires/prongs/wire clip points after they have been spray cleaned, but future problems too. Not only does is slow down any corrosion of the wires and prongs, but helps to display heat as it trying to build up at the contact points too.
Last edited by Dano523; Nov 10, 2017 at 04:44 PM.