
ECS DIY Supercharger Kit Unboxing / Install Log
 03-04-2014, 10:04 PM
#1
Tech Contributor
Thread Starter
Member Since: Jan 2006
Location: Saint Louis MO
Posts: 4,761
Likes: 0
Received 219 Likes
on
110 Posts
St. Jude Donor '14-'15
Rather than clutter up any of the other threads, I thought I would be the first to show off the new toys that arrived yesterday and today from ECS. I believe I'm one of the first to receive a DIY kit this week (I think there's like 10 of us), so I thought I'd put some pics up. 
There has been some recent confusion -- This is not an official ECS thread, nor is this an endorsement of the ECS kit. This is a DIY account (not even a guide) of my receipt and installation of the kit.
Off the bat, I have to say that their boxing and packaging is pure overkill (obviously in the best way). The box was rigid (and heavy as hell), no damage, triple tamper-taped, bradded everywhere... Apparently ECS and ARH got together to see how many brads they could put in a box before the customer just started laughing. They're there for a reason obviously, but I still had to laugh around the sixteenth one.

Digging in, I was greeted by a front air dam strip (which my car didn't have since it was a August production car), and the custom/replacement lower air dam panel. Below that, several layers of injection foam, leading to a whole heap of boxes. I grabbed for the big long one first, because that's what you do on Christmas... go for the biggest one first.


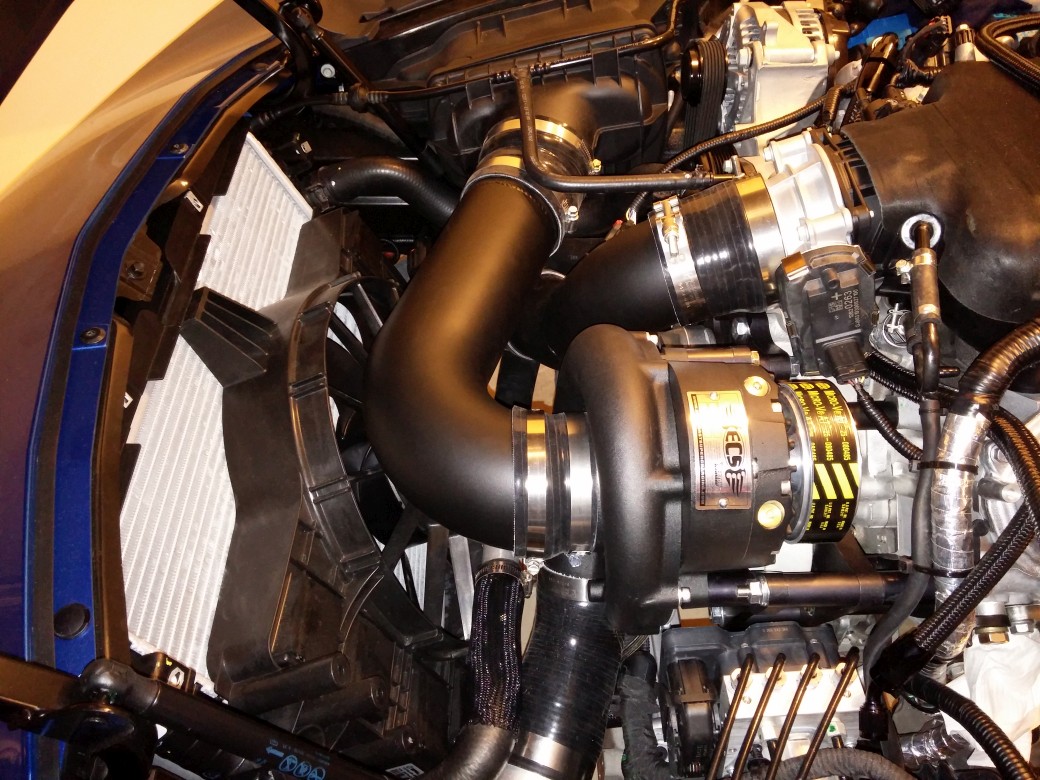
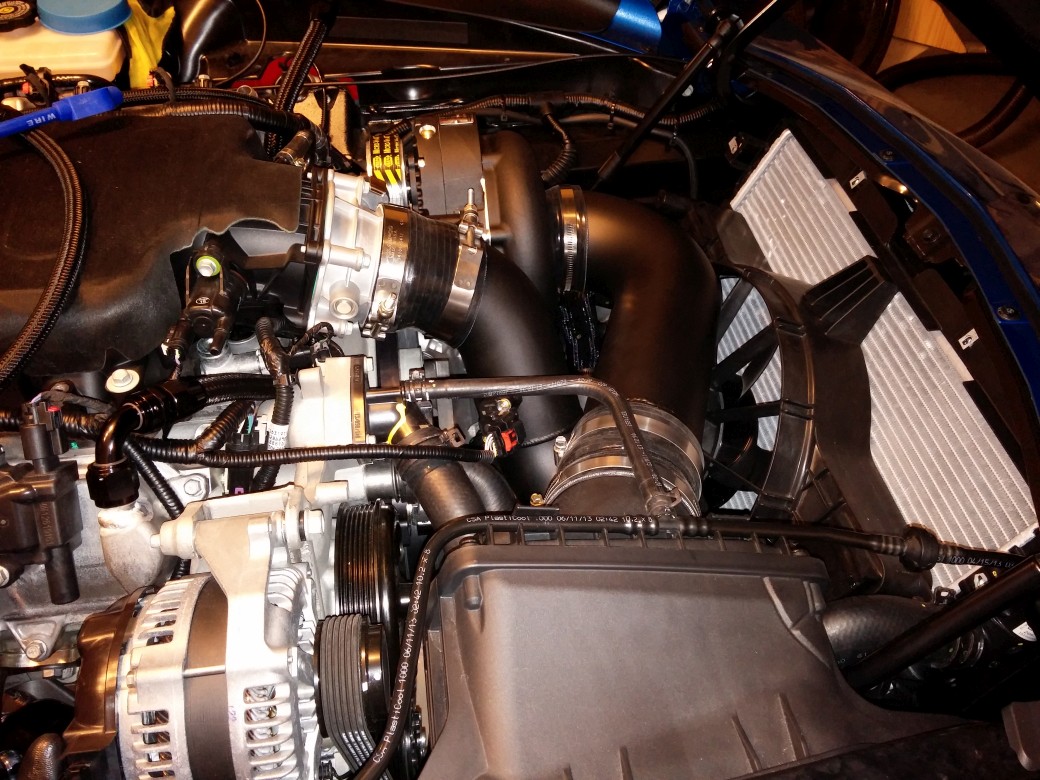
The intercooler is a very nicely made, solid unit. It's certainly not a crappy premade with a few bends welded on - it's the real deal. It was freezing to the touch, so I didn't play much with it - just got some pics for you guys.

Next up, the Tial BOV and BOV pipe. I've not seen a Tial valve before, because I'm used to many of the other foreign-made units. This is a nice piece - looks to be billet aluminum. Nicely polished, seems solid. Great reviews, so I don't really need to talk more about that - took a few pics anyway though.


The BOV pipe is, well, a pipe. But hehold! This pipe has a flange! Okay, I'm losing it...

Next up, a small heavy box... hmm... Those are the intriguing Christmas presents... Small yet heavy - what could you be?


Ah, the balancer! Here are some detailed shots of this big boy. Kinda heavy, very cold. I brought it inside and showed my wife, thinking I'd get some sort of response... I was told to take the cold, heavy 'wheel' outside... I guess I could see it being a wheel.


That's where I stopped for tonight. I know, I know... I've disappointed you.
I didn't go past here because it's seriously cold outside, and shivering still hurts from being cut open (tiny violin, I know... don't make me play the cancer card). I'll turn on my garage heat tomorrow and start the full install (and add more pics to this thread). I'll reserve the second post for adding pictures. Until tomorrow, then! 
There has been some recent confusion -- This is not an official ECS thread, nor is this an endorsement of the ECS kit. This is a DIY account (not even a guide) of my receipt and installation of the kit.
Off the bat, I have to say that their boxing and packaging is pure overkill (obviously in the best way). The box was rigid (and heavy as hell), no damage, triple tamper-taped, bradded everywhere... Apparently ECS and ARH got together to see how many brads they could put in a box before the customer just started laughing. They're there for a reason obviously, but I still had to laugh around the sixteenth one.
Digging in, I was greeted by a front air dam strip (which my car didn't have since it was a August production car), and the custom/replacement lower air dam panel. Below that, several layers of injection foam, leading to a whole heap of boxes. I grabbed for the big long one first, because that's what you do on Christmas... go for the biggest one first.
The intercooler is a very nicely made, solid unit. It's certainly not a crappy premade with a few bends welded on - it's the real deal. It was freezing to the touch, so I didn't play much with it - just got some pics for you guys.
Next up, the Tial BOV and BOV pipe. I've not seen a Tial valve before, because I'm used to many of the other foreign-made units. This is a nice piece - looks to be billet aluminum. Nicely polished, seems solid. Great reviews, so I don't really need to talk more about that - took a few pics anyway though.
The BOV pipe is, well, a pipe. But hehold! This pipe has a flange! Okay, I'm losing it...
Next up, a small heavy box... hmm... Those are the intriguing Christmas presents... Small yet heavy - what could you be?
Ah, the balancer! Here are some detailed shots of this big boy. Kinda heavy, very cold. I brought it inside and showed my wife, thinking I'd get some sort of response... I was told to take the cold, heavy 'wheel' outside... I guess I could see it being a wheel.
That's where I stopped for tonight. I know, I know... I've disappointed you.
I didn't go past here because it's seriously cold outside, and shivering still hurts from being cut open (tiny violin, I know... don't make me play the cancer card
). I'll turn on my garage heat tomorrow and start the full install (and add more pics to this thread). I'll reserve the second post for adding pictures. Until tomorrow, then!
Last edited by Theta; 04-03-2014 at 03:33 PM.

 03-04-2014, 11:51 PM
#3

Tease!!!
03-05-2014, 12:03 AM
#4
Tech Contributor
Thread Starter
Member Since: Jan 2006
Location: Saint Louis MO
Posts: 4,761
Likes: 0
Received 219 Likes
on
110 Posts
St. Jude Donor '14-'15
I know, right?
It really wasn't on purpose - had a ton of work to catch up on yet tonight, and when the big heaters aren't going... yikes. Rest of it for sure tomorrow, though.
It really wasn't on purpose - had a ton of work to catch up on yet tonight, and when the big heaters aren't going... yikes. Rest of it for sure tomorrow, though.


 03-05-2014, 01:49 PM
#8
Premium Supporting Vendor
Member Since: Oct 2004
Location: Providing the most proven supercharger kits for your C5/6/7 609-752-0321
Posts: 23,324
Received 1,091 Likes
on
659 Posts

We supply a hub that easily installs over the stock balancer with the base kit. That way there is no need to remove the balancer, taking a chance on leaking seals etc, and most people do not own the tools it takes to press of a balancer.
We do also offer an upgrade for an SFI Innovators west balancer for those looking to make big power, or if we are starting with our ten rib YSI/2200R kit.
Good luck on the install Sean, any questions and you know where to get me!
03-05-2014, 02:51 PM
#9
Team Owner


Stop wasting time with the photos. Get to work installing that sucker. I'll be in St. Louis Saturday and expect to get a ride to see how the supercharged LT1 performs.
 03-05-2014, 04:45 PM
#12
Drifting

EXTREMELY excited to see your thoughts on ease/or complexity of this DIY job!!!!
Are you using a hand held tuner that ECS provided or tuning yourself.... or someone tuning for you???
I will be pulling trigger on SC in April. I was going with ECS system, but I just don't know if I will be doing it myself or letting Doug do the install.
Do you have to take the nose off the car for this kit????
Thanks for any info!!!
You should make a DIY video! then post on the sticky
Thanks for the pics so far!
Andrew
Last edited by zo6 08; 03-05-2014 at 04:49 PM.
03-05-2014, 04:54 PM
#13
Team Owner
Unfinished? Looks just like a lot of pipes made for c5/c6 in a lot of other kits. Stop trying to stir up junk or bash on vendors. There is nothing wrong with that pipe. Well the only thing wrong I can see with it is I don't have one waiting to go on yet. The "prettiness" of a weld on a part no one ever sees once it is isn't shouldn't be a concern for anyone.
03-05-2014, 05:10 PM
#14
Tech Contributor
Thread Starter
Member Since: Jan 2006
Location: Saint Louis MO
Posts: 4,761
Likes: 0
Received 219 Likes
on
110 Posts
St. Jude Donor '14-'15
I've been tasked with getting a 7-minute loop ready from scratch and edited in post for final cut on Saturday morning.
On top of that, we're launching three new international sites by Friday.
This could not have happened at a worse time, trust me!

I'm turning the heaters on tonight, though. Fear not.
EXTREMELY excited to see your thoughts on ease/or complexity of this DIY job!!!!
Are you using a hand held tuner that ECS provided or tuning yourself.... or someone tuning for you???
I will be pulling trigger on SC in April. I was going with ECS system, but I just don't know if I will be doing it myself or letting Doug do the install.
Do you have to take the nose off the car for this kit????
Thanks for any info!!!
You should make a DIY video! then post on the sticky
Thanks for the pics so far!
Andrew
Are you using a hand held tuner that ECS provided or tuning yourself.... or someone tuning for you???
I will be pulling trigger on SC in April. I was going with ECS system, but I just don't know if I will be doing it myself or letting Doug do the install.
Do you have to take the nose off the car for this kit????
Thanks for any info!!!
You should make a DIY video! then post on the sticky
Thanks for the pics so far!
Andrew
Doug and I (pretty much all Doug) will be tuning this using HPTuners and using a majority of road logging to do so. Should be fun!
The nose stays on, so that's a plus.

DIY video? I'm far too ugly for that - they'd have to blur my face!
Last edited by Steve Garrett; 03-05-2014 at 07:05 PM. Reason: Merged Posts
03-05-2014, 05:16 PM
#15
Team Owner
How a weld looks and how it performs are a lot of times vastly different things. Pretty welds are just that, pretty. It has nothing to do with how well a weld is. ECS has been welding pipes for a long time and I would be surprised if they have ever had a single failure, ever.
If you talk to Chris tell him to hurry up on the kits going to AZ.
If you talk to Chris tell him to hurry up on the kits going to AZ.
03-05-2014, 05:19 PM
#16
Premium Supporting Vendor
Member Since: Oct 2004
Location: Providing the most proven supercharger kits for your C5/6/7 609-752-0321
Posts: 23,324
Received 1,091 Likes
on
659 Posts
EXTREMELY excited to see your thoughts on ease/or complexity of this DIY job!!!!
Are you using a hand held tuner that ECS provided or tuning yourself.... or someone tuning for you???
I will be pulling trigger on SC in April. I was going with ECS system, but I just don't know if I will be doing it myself or letting Doug do the install.
Do you have to take the nose off the car for this kit????
Thanks for any info!!!
You should make a DIY video! then post on the sticky
Thanks for the pics so far!
Andrew
Are you using a hand held tuner that ECS provided or tuning yourself.... or someone tuning for you???
I will be pulling trigger on SC in April. I was going with ECS system, but I just don't know if I will be doing it myself or letting Doug do the install.
Do you have to take the nose off the car for this kit????
Thanks for any info!!!
You should make a DIY video! then post on the sticky
Thanks for the pics so far!
Andrew
I will be helping Sean with the tuning, and you do not have to take the nose off the car for the install.
It really is very easy for a DIY'r to complete this job since there isn't much of any specialty tools needed like for pulling a balancer, or potential of scratching body panels from removing anything.
Better then my response though, is Sean's personally opinion as the home installer, so I'll look forward to that along with any constructive criticism we can build on!
03-05-2014, 05:20 PM
#17
Premium Supporting Vendor
Member Since: Oct 2004
Location: Providing the most proven supercharger kits for your C5/6/7 609-752-0321
Posts: 23,324
Received 1,091 Likes
on
659 Posts
How a weld looks and how it performs are a lot of times vastly different things. Pretty welds are just that, pretty. It has nothing to do with how well a weld is. ECS has been welding pipes for a long time and I would be surprised if they have ever had a single failure, ever.
If you talk to Chris tell him to hurry up on the kits going to AZ.
If you talk to Chris tell him to hurry up on the kits going to AZ.
To my knowledge we have never had a failure.
We have dozens of kits in the works!!!
03-05-2014, 06:32 PM
#20
Tech Contributor
Thread Starter
Member Since: Jan 2006
Location: Saint Louis MO
Posts: 4,761
Likes: 0
Received 219 Likes
on
110 Posts
St. Jude Donor '14-'15
Plan for the evening:
1) Leave work.
2) Pick up Panera.
3) Turn garage heaters on.
4) Eat with wife.
5) Put baby to sleep.
6) Continue pics.
Figure on... 2 hours?
1) Leave work.
2) Pick up Panera.
3) Turn garage heaters on.
4) Eat with wife.
5) Put baby to sleep.
6) Continue pics.
Figure on... 2 hours?