
C7 Z06 LT4 Supercharger Upper Pulley Replacement
 11-08-2016, 09:01 AM
#1
Tech Contributor
Thread Starter
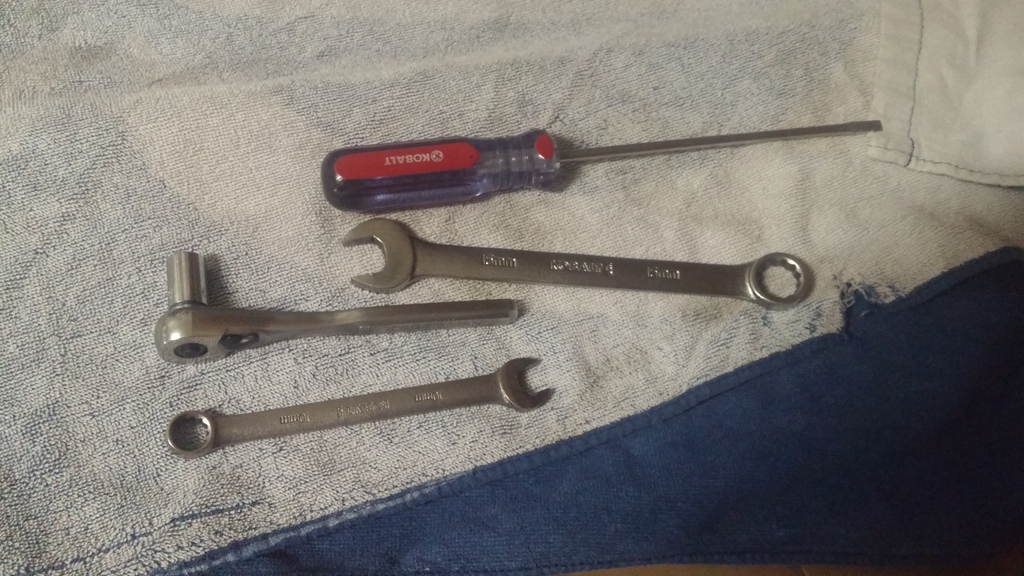
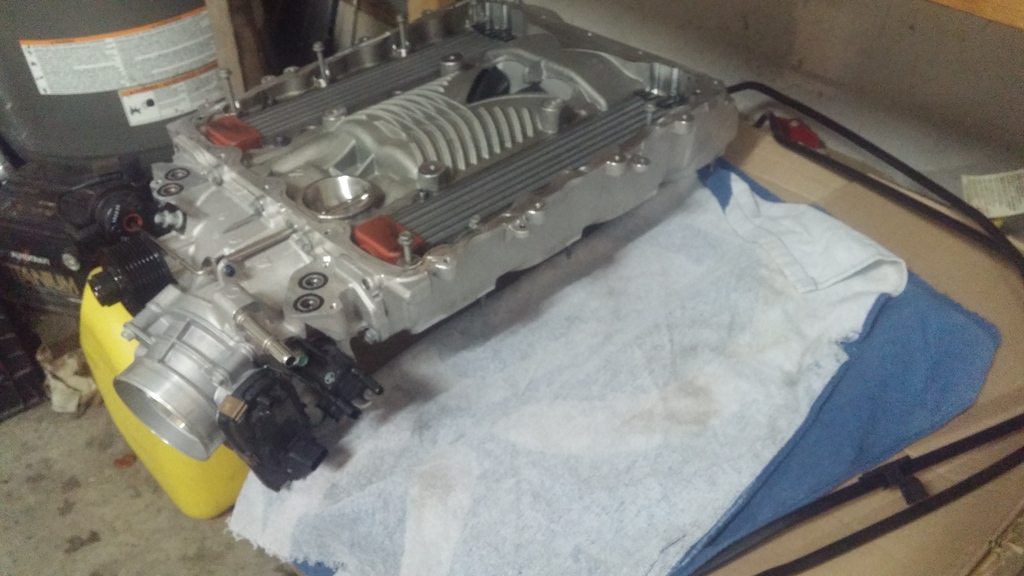
Prior to swapping an LT4 upper pulley last week, I wasn't able to find much information online to detail the job. I took a few pictures and hopefully I can remember enough details to put together a decent job description. This job does require some special tools like a press and pulley puller. But most of us at least have a friend with the tools needed. Removing the supercharge itself is actually quite easy and only requires the most basic tools:
1. Start the job by removing crankcase evacuation tubing that connects to the valve covers and intake snout. Basically anything that will be in the way when pulling the supercharger. Be ready for a little oil draining out of these lines.
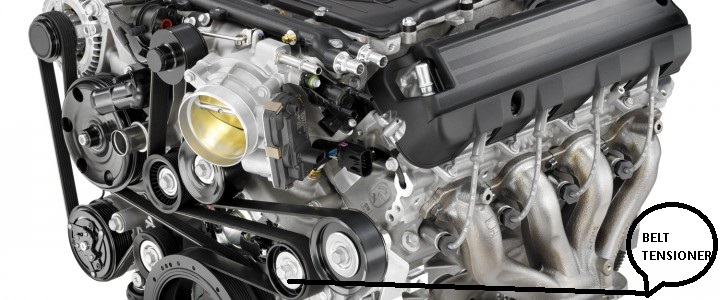
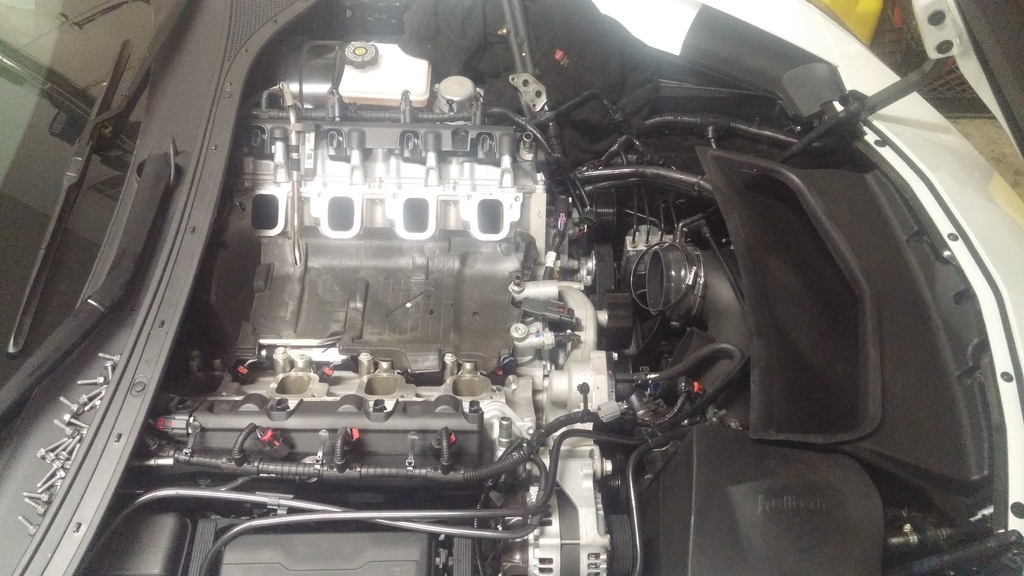
2. Use a 15mm socket or wrench to release the blower belt, and remove the belt from the car. Tensioner is on the driver's side. Here is a file picture for reference to re-install the blower belt:
3. Disconnect the electrical connections on both sides of the supercharger (throttle body, MAP, boost controller)
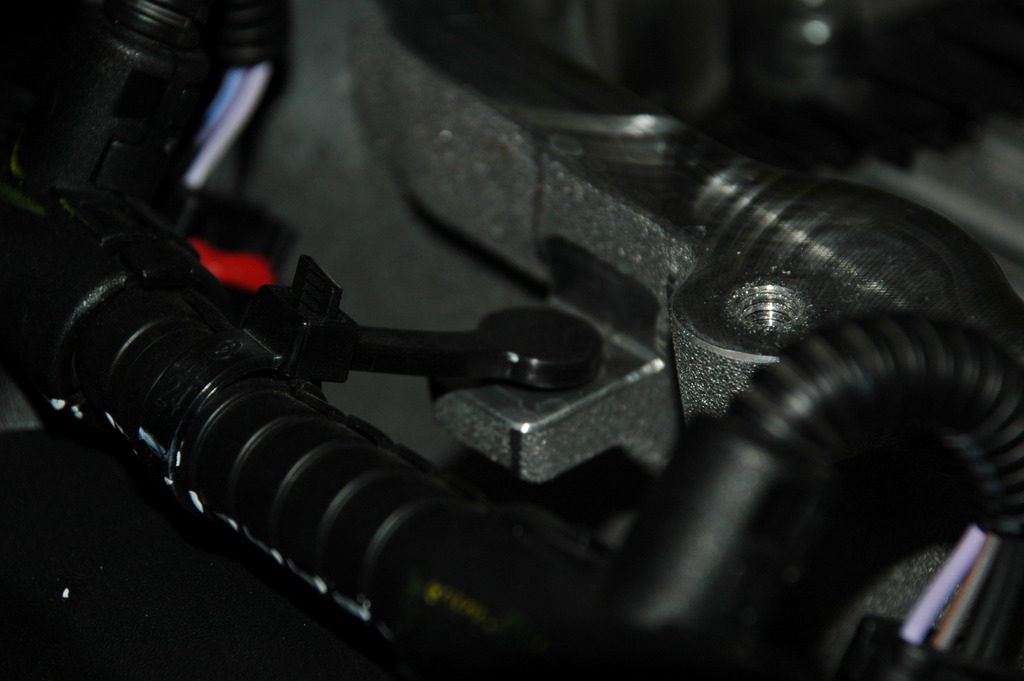
4. Remove the plastic "pins" that anchor the injector harness to the supercharger. Be easy with them & try not to break.
5. Remove the four (4) 10mm bolts holding down the intercooler manifold. There will be just a small amount of coolant lost as you roll the coolant manifold off to the side.
6. Remove the twenty (20) 10mm bolts holding the supercharger lid down. You can access the rear bolts with a socket & extension by lifting up on the cowl plastic. It's OK to use a cordless tool (impact) to remove these bolts.
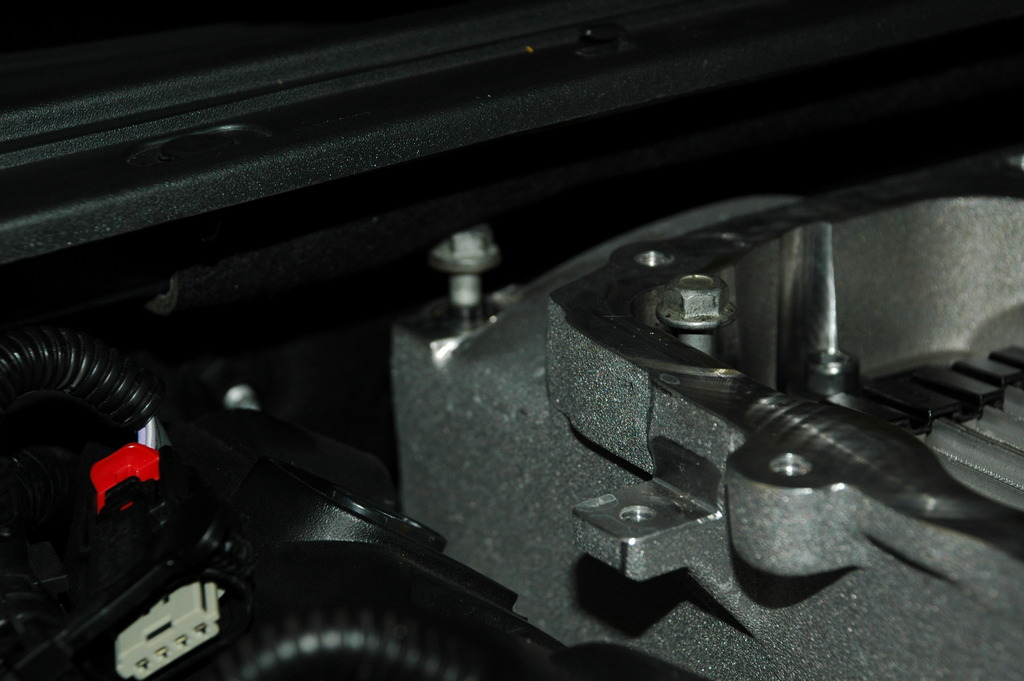
7. Unbolt the ten (10) 10mm bolts holding the supercharger down to the heads (5 per side). The rear bolt on the passenger side will take some time with a wrench. This is called "quality time". Remember, you're wrenching on an LT4 so enjoy the moment.
8. Once you have verified all tubing, wiring & bolting has been disconnected, then slide the supercharger forward enough to access the MAP sensor plug on the rear of the supercharger.

9. With the rear MAP disconnected, you are ready to lift the supercharger out. It's heavy, so be sure you have adequate manpower. I was able to remove it myself, but it is heavy and awkward to lift.
10. Probably a good idea to cover the intake runners to keep curious objects out of your engine while you are doing the pulley swap.
11. Turning your attention to the supercharger - you need to remove the boost control diaphragm by unbolting the two 10mm bolts. Then rotate the controller nearly 180� so you can slide the rod out of the linkage for the bypass valve.
12. Remove the four (4) 10mm bolts for the throttle body.
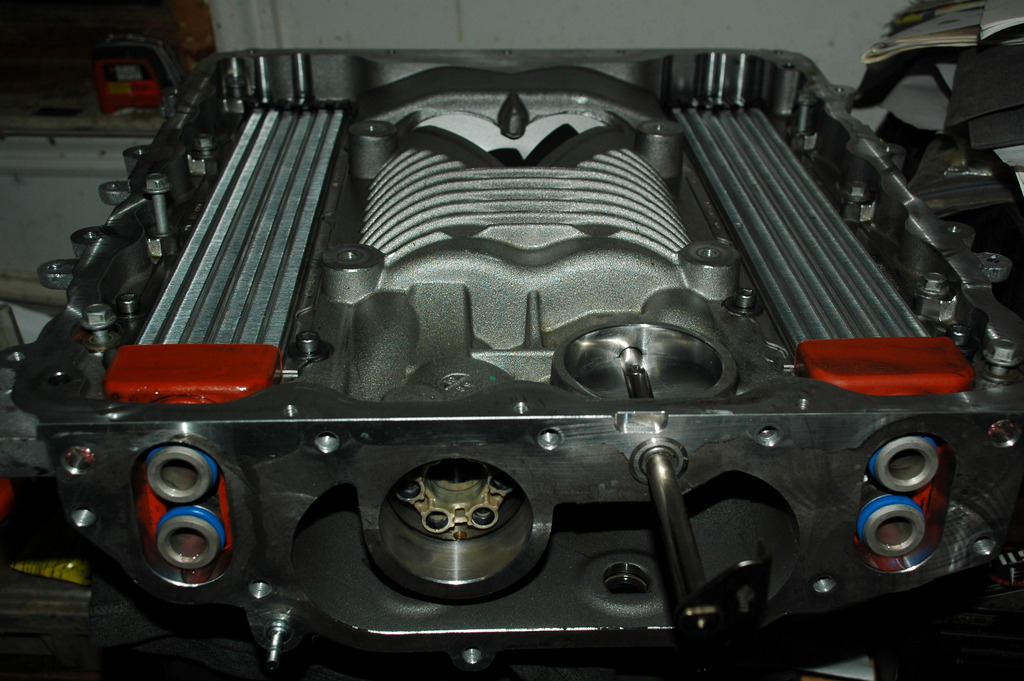
13. Remove the nine (9) 10mm bolts for the front snout. Don't miss the one behind the throttle body. Use a rubber or plastic dead blow to free the blower snout from the blower. This is a time for the gentle touch. You will have some more intercooler fluid drain so have a drip pan ready. Here is what you will face when the snout comes off:
14. I didn't document the pulley replacement with pictures. I used a 3-jaw puller to remove the stock pulley and it ended up damaging the stock pulley. I will get a puller from Lingenfelter (or similar) for the next time. Then you will press the new pulley (or hub) back on the shaft. Use some shim stock under the back side of the shaft so you are pressing down on the shaft on not on the 3 drive pins. Be sure you press it on straight. I continued until the CPR hub was ~ .020" from the shaft bearing.
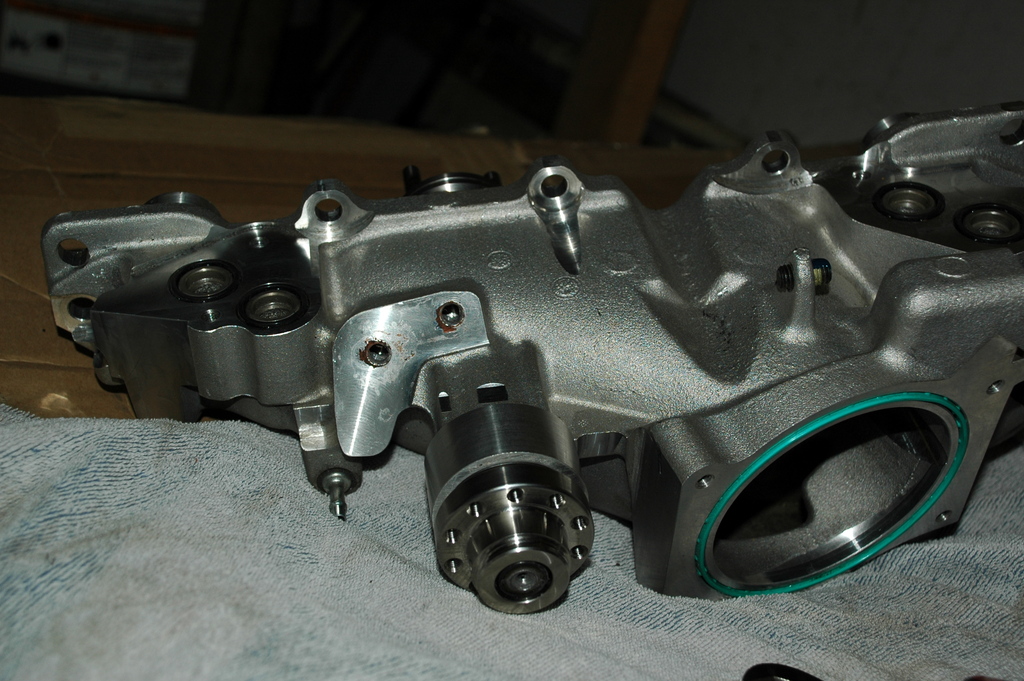
15. After cleaning the intercooler and front snout mating surfaces, apply a thin layer of sealant. I also applied some o-ring lube in the holes for the intercooler coolant ports. Be careful the align the 3 drive pins in the mating holes on the blower shaft.
16. Get busy reassembling the 47 bolts that you previously removed. I will come back later and add torque values. By the way, did you remember to connect the rear MAP sensor plug? I didn't. But by removing the blower lid I was able to access the rear MAP and get it plugged in.
17. If you are using the Cordes Performance Racing pulley (a very nicely machined piece I must say), now is the time to install it with the 10 titanium screws. You will need some blue locktite and a 27 toque bit.
18. Install you new, shorter belt. Then go back and verify tightness on the 10 bolts holding the pulley to the hub.
19. Bleed the intercooler coolant. I'll leave it up to you to decide how best to fill / bleed your system. I used a 1" ID clear hose over the fill port and then used compressed air (holding my hand over the 1" hose so no measurable pressure) to displace air pockets with fresh Redline Water Wetter.
20. On the 2016 Z06 that I worked on, I recorded a 2 psi increase in manifold pressure after swapping the upper pulley. From a street pull on Tuesday it made 10.9 psi peak and with the 2.31" CPR pulley 4 days later it made 12.8 psi peak.
1. Start the job by removing crankcase evacuation tubing that connects to the valve covers and intake snout. Basically anything that will be in the way when pulling the supercharger. Be ready for a little oil draining out of these lines.
2. Use a 15mm socket or wrench to release the blower belt, and remove the belt from the car. Tensioner is on the driver's side. Here is a file picture for reference to re-install the blower belt:
3. Disconnect the electrical connections on both sides of the supercharger (throttle body, MAP, boost controller)
4. Remove the plastic "pins" that anchor the injector harness to the supercharger. Be easy with them & try not to break.
5. Remove the four (4) 10mm bolts holding down the intercooler manifold. There will be just a small amount of coolant lost as you roll the coolant manifold off to the side.
6. Remove the twenty (20) 10mm bolts holding the supercharger lid down. You can access the rear bolts with a socket & extension by lifting up on the cowl plastic. It's OK to use a cordless tool (impact) to remove these bolts.
7. Unbolt the ten (10) 10mm bolts holding the supercharger down to the heads (5 per side). The rear bolt on the passenger side will take some time with a wrench. This is called "quality time". Remember, you're wrenching on an LT4 so enjoy the moment.
8. Once you have verified all tubing, wiring & bolting has been disconnected, then slide the supercharger forward enough to access the MAP sensor plug on the rear of the supercharger.
9. With the rear MAP disconnected, you are ready to lift the supercharger out. It's heavy, so be sure you have adequate manpower. I was able to remove it myself, but it is heavy and awkward to lift.
10. Probably a good idea to cover the intake runners to keep curious objects out of your engine while you are doing the pulley swap.
11. Turning your attention to the supercharger - you need to remove the boost control diaphragm by unbolting the two 10mm bolts. Then rotate the controller nearly 180� so you can slide the rod out of the linkage for the bypass valve.
12. Remove the four (4) 10mm bolts for the throttle body.
13. Remove the nine (9) 10mm bolts for the front snout. Don't miss the one behind the throttle body. Use a rubber or plastic dead blow to free the blower snout from the blower. This is a time for the gentle touch. You will have some more intercooler fluid drain so have a drip pan ready. Here is what you will face when the snout comes off:
14. I didn't document the pulley replacement with pictures. I used a 3-jaw puller to remove the stock pulley and it ended up damaging the stock pulley. I will get a puller from Lingenfelter (or similar) for the next time. Then you will press the new pulley (or hub) back on the shaft. Use some shim stock under the back side of the shaft so you are pressing down on the shaft on not on the 3 drive pins. Be sure you press it on straight. I continued until the CPR hub was ~ .020" from the shaft bearing.
15. After cleaning the intercooler and front snout mating surfaces, apply a thin layer of sealant. I also applied some o-ring lube in the holes for the intercooler coolant ports. Be careful the align the 3 drive pins in the mating holes on the blower shaft.
16. Get busy reassembling the 47 bolts that you previously removed. I will come back later and add torque values. By the way, did you remember to connect the rear MAP sensor plug? I didn't. But by removing the blower lid I was able to access the rear MAP and get it plugged in.
17. If you are using the Cordes Performance Racing pulley (a very nicely machined piece I must say), now is the time to install it with the 10 titanium screws. You will need some blue locktite and a 27 toque bit.
18. Install you new, shorter belt. Then go back and verify tightness on the 10 bolts holding the pulley to the hub.
19. Bleed the intercooler coolant. I'll leave it up to you to decide how best to fill / bleed your system. I used a 1" ID clear hose over the fill port and then used compressed air (holding my hand over the 1" hose so no measurable pressure) to displace air pockets with fresh Redline Water Wetter.
20. On the 2016 Z06 that I worked on, I recorded a 2 psi increase in manifold pressure after swapping the upper pulley. From a street pull on Tuesday it made 10.9 psi peak and with the 2.31" CPR pulley 4 days later it made 12.8 psi peak.

The following 3 users liked this post by chevy406:
 11-08-2016, 11:15 AM
#3
Supporting Vendor
Very nice! Thank you for the kind words on our product 
__________________
Cordes Performance Racing aka "CPR"
Owner of AZ's premier LSX/LTX motorsports shop
http://cordesperformanceracing.com/
www.facebook.com/cordesperformanceracing.com
joe@cordesperformanceracing.com
480-359-5914
Cordes Performance Racing aka "CPR"
Owner of AZ's premier LSX/LTX motorsports shop
http://cordesperformanceracing.com/
www.facebook.com/cordesperformanceracing.com
joe@cordesperformanceracing.com
480-359-5914

 11-09-2016, 07:44 AM
#5
Tech Contributor
Thread Starter
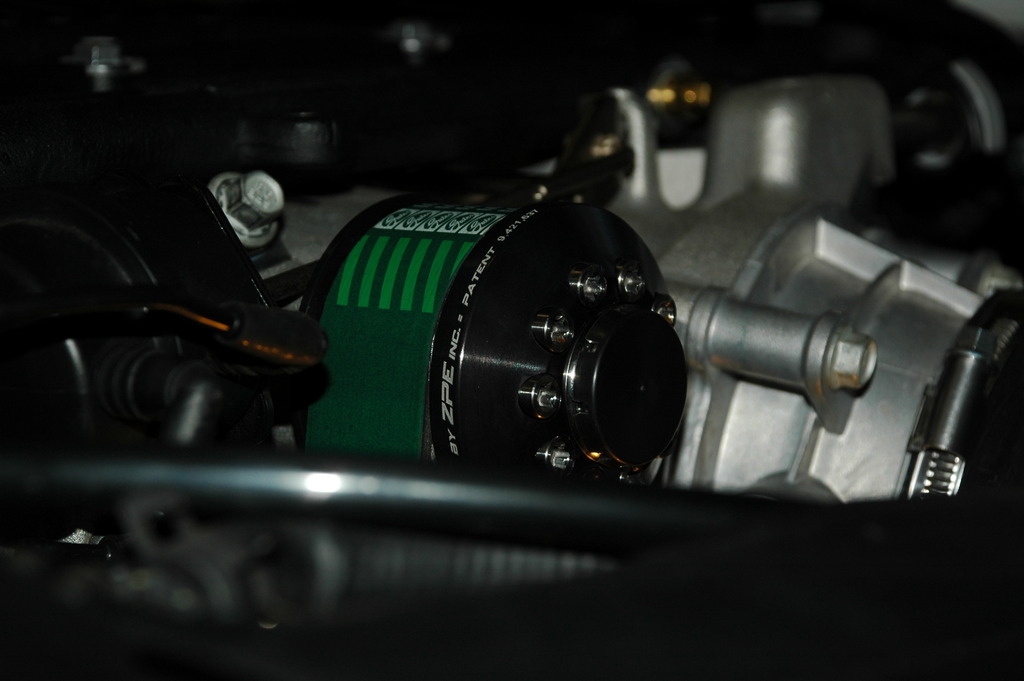
The machining and finish on the the Cordes Performance Racing pulley is top notch. You can feel it in the thread engagement as you tighten up all the of the 10 screws by hand. I held the new pulley while I tightened up the screws with a wrench and the Grip Tech surface just about took the skin off my hand. 
Last edited by chevy406; 11-09-2016 at 07:45 AM.
11-25-2016, 01:17 PM
#7
Former Vendor


Nice write up. Does anyone have the part number of the belt required for the 2.3" pulley" They wrote 25-08085HD on the pulley box but nothing shows up online under that part. I just want to order the belt via amazon or whatever.

 11-25-2016, 06:31 PM
#9
Supporting Vendor
it's a gates part number, go to napa and they will carry it.
The following users liked this post:
c6lova (10-10-2017)
 09-15-2018, 10:44 AM
#13
Former Vendor

Member Since: Mar 2003
Location: Tampa FL
Posts: 18,673
Received 393 Likes
on
286 Posts
St. Jude Donor '07-'08-'09-'10-'11-'12'-'13-'14-'15

1.5-2 psi boost increase
Edgyvette now offering the following package
EV ported LT5 TB with ICT bolt pattern adapter
EV 95mm port matched LT4 SC snout
Gates HD 8 rib belt
Griptech 2.30 upper pulley installed on snout
$999 SHIPPED. Customer responsible for shipping to EV porting shop in FL
Edgyvette now offering the following package
EV ported LT5 TB with ICT bolt pattern adapter
EV 95mm port matched LT4 SC snout
Gates HD 8 rib belt
Griptech 2.30 upper pulley installed on snout
$999 SHIPPED. Customer responsible for shipping to EV porting shop in FL
The following users liked this post:
Luke C7 (05-16-2019)
09-15-2018, 11:32 AM
#14
Former Vendor
Member Since: Mar 2003
Location: Tampa FL
Posts: 18,673
Received 393 Likes
on
286 Posts
St. Jude Donor '07-'08-'09-'10-'11-'12'-'13-'14-'15
1.5-2 psi boost increase
Edgyvette now offering the following package
EV ported LT5 TB with ICT bolt pattern adapter
EV 95mm port matched LT4 SC snout
Gates HD 8 rib belt
Griptech 2.30 upper pulley installed on snout
$999 SHIPPED. Customer responsible for shipping to EV porting shop in FL
Edgyvette now offering the following package
EV ported LT5 TB with ICT bolt pattern adapter
EV 95mm port matched LT4 SC snout
Gates HD 8 rib belt
Griptech 2.30 upper pulley installed on snout
$999 SHIPPED. Customer responsible for shipping to EV porting shop in FL
10-13-2018, 11:01 PM
#15
2nd Gear


Member Since: Sep 2018
Posts: 2
Likes: 0
Received 0 Likes
on
0 Posts
Is it necessary to remove the supercharger to change over to the 2.31 pulley? I ordered one and planned on changing over sometime next week when it comes in. Didn�t think it was going to be that much of a job to accomplish. Also will any pulley puller do the job or is there one that is better than the others?
10-28-2018, 09:40 AM
#16
Prior to swapping an LT4 upper pulley last week, I wasn't able to find much information online to detail the job. I took a few pictures and hopefully I can remember enough details to put together a decent job description. This job does require some special tools like a press and pulley puller. But most of us at least have a friend with the tools needed. Removing the supercharge itself is actually quite easy and only requires the most basic tools:
Attachment 48192070
1. Start the job by removing crankcase evacuation tubing that connects to the valve covers and intake snout. Basically anything that will be in the way when pulling the supercharger. Be ready for a little oil draining out of these lines.
2. Use a 15mm socket or wrench to release the blower belt, and remove the belt from the car. Tensioner is on the driver's side. Here is a file picture for reference to re-install the blower belt:
Attachment 48192071
3. Disconnect the electrical connections on both sides of the supercharger (throttle body, MAP, boost controller)
4. Remove the plastic "pins" that anchor the injector harness to the supercharger. Be easy with them & try not to break.
Attachment 48192072
5. Remove the four (4) 10mm bolts holding down the intercooler manifold. There will be just a small amount of coolant lost as you roll the coolant manifold off to the side.
6. Remove the twenty (20) 10mm bolts holding the supercharger lid down. You can access the rear bolts with a socket & extension by lifting up on the cowl plastic. It's OK to use a cordless tool (impact) to remove these bolts.
7. Unbolt the ten (10) 10mm bolts holding the supercharger down to the heads (5 per side). The rear bolt on the passenger side will take some time with a wrench. This is called "quality time". Remember, you're wrenching on an LT4 so enjoy the moment.
Attachment 48192073
8. Once you have verified all tubing, wiring & bolting has been disconnected, then slide the supercharger forward enough to access the MAP sensor plug on the rear of the supercharger.
Attachment 48192074
9. With the rear MAP disconnected, you are ready to lift the supercharger out. It's heavy, so be sure you have adequate manpower. I was able to remove it myself, but it is heavy and awkward to lift.
Attachment 48192075
10. Probably a good idea to cover the intake runners to keep curious objects out of your engine while you are doing the pulley swap.
Attachment 48192076
11. Turning your attention to the supercharger - you need to remove the boost control diaphragm by unbolting the two 10mm bolts. Then rotate the controller nearly 180� so you can slide the rod out of the linkage for the bypass valve.
12. Remove the four (4) 10mm bolts for the throttle body.
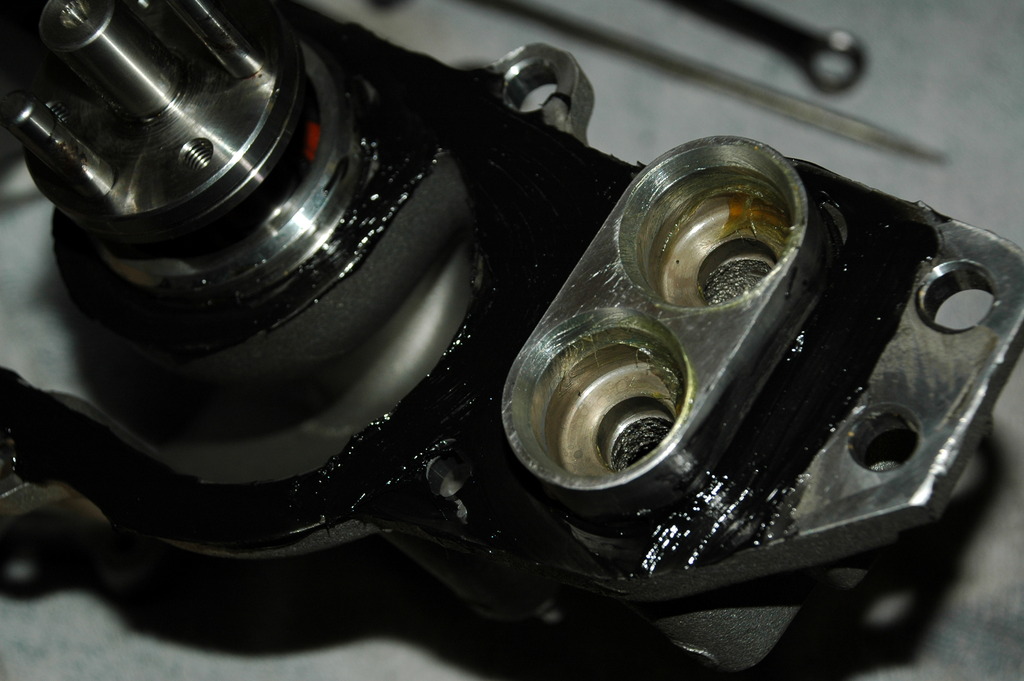
13. Remove the nine (9) 10mm bolts for the front snout. Don't miss the one behind the throttle body. Use a rubber or plastic dead blow to free the blower snout from the blower. This is a time for the gentle touch. You will have some more intercooler fluid drain so have a drip pan ready. Here is what you will face when the snout comes off:
Attachment 48192077
14. I didn't document the pulley replacement with pictures. I used a 3-jaw puller to remove the stock pulley and it ended up damaging the stock pulley. I will get a puller from Lingenfelter (or similar) for the next time. Then you will press the new pulley (or hub) back on the shaft. Use some shim stock under the back side of the shaft so you are pressing down on the shaft on not on the 3 drive pins. Be sure you press it on straight. I continued until the CPR hub was ~ .020" from the shaft bearing.
Attachment 48192078
15. After cleaning the intercooler and front snout mating surfaces, apply a thin layer of sealant. I also applied some o-ring lube in the holes for the intercooler coolant ports. Be careful the align the 3 drive pins in the mating holes on the blower shaft.
Attachment 48192079
16. Get busy reassembling the 47 bolts that you previously removed. I will come back later and add torque values. By the way, did you remember to connect the rear MAP sensor plug? I didn't. But by removing the blower lid I was able to access the rear MAP and get it plugged in.
17. If you are using the Cordes Performance Racing pulley (a very nicely machined piece I must say), now is the time to install it with the 10 titanium screws. You will need some blue locktite and a 27 toque bit.
Attachment 48192080
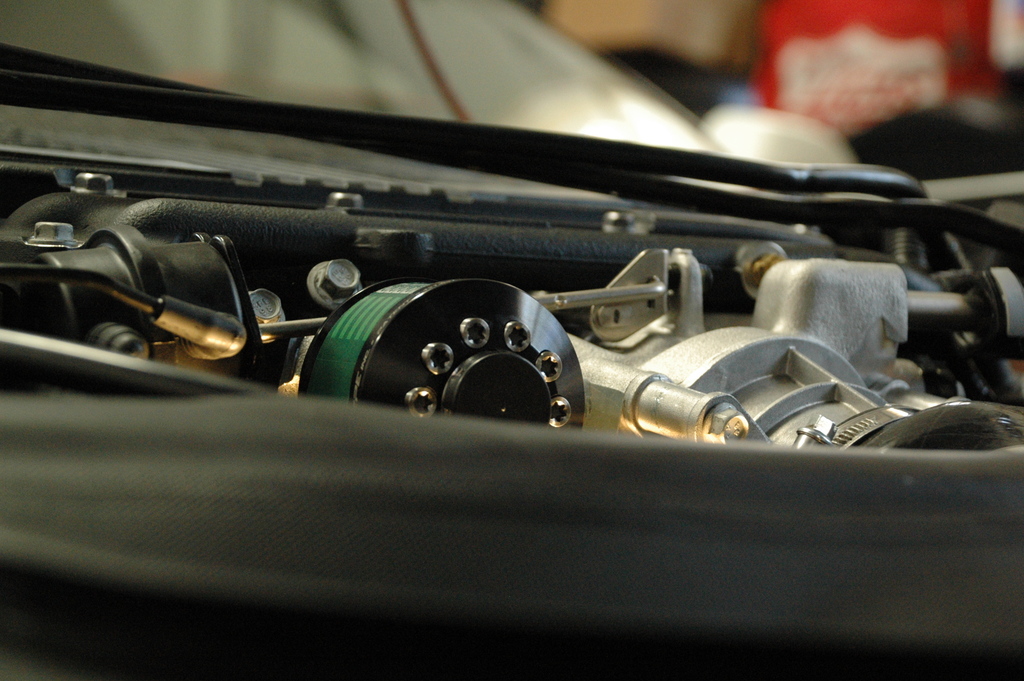
18. Install you new, shorter belt. Then go back and verify tightness on the 10 bolts holding the pulley to the hub.
19. Bleed the intercooler coolant. I'll leave it up to you to decide how best to fill / bleed your system. I used a 1" ID clear hose over the fill port and then used compressed air (holding my hand over the 1" hose so no measurable pressure) to displace air pockets with fresh Redline Water Wetter.
Attachment 48192081
20. On the 2016 Z06 that I worked on, I recorded a 2 psi increase in manifold pressure after swapping the upper pulley. From a street pull on Tuesday it made 10.9 psi peak and with the 2.31" CPR pulley 4 days later it made 12.8 psi peak.
Attachment 48192082
Attachment 48192070
1. Start the job by removing crankcase evacuation tubing that connects to the valve covers and intake snout. Basically anything that will be in the way when pulling the supercharger. Be ready for a little oil draining out of these lines.
2. Use a 15mm socket or wrench to release the blower belt, and remove the belt from the car. Tensioner is on the driver's side. Here is a file picture for reference to re-install the blower belt:
Attachment 48192071
3. Disconnect the electrical connections on both sides of the supercharger (throttle body, MAP, boost controller)
4. Remove the plastic "pins" that anchor the injector harness to the supercharger. Be easy with them & try not to break.
Attachment 48192072
5. Remove the four (4) 10mm bolts holding down the intercooler manifold. There will be just a small amount of coolant lost as you roll the coolant manifold off to the side.
6. Remove the twenty (20) 10mm bolts holding the supercharger lid down. You can access the rear bolts with a socket & extension by lifting up on the cowl plastic. It's OK to use a cordless tool (impact) to remove these bolts.
7. Unbolt the ten (10) 10mm bolts holding the supercharger down to the heads (5 per side). The rear bolt on the passenger side will take some time with a wrench. This is called "quality time". Remember, you're wrenching on an LT4 so enjoy the moment.
Attachment 48192073
8. Once you have verified all tubing, wiring & bolting has been disconnected, then slide the supercharger forward enough to access the MAP sensor plug on the rear of the supercharger.
Attachment 48192074
9. With the rear MAP disconnected, you are ready to lift the supercharger out. It's heavy, so be sure you have adequate manpower. I was able to remove it myself, but it is heavy and awkward to lift.
Attachment 48192075
10. Probably a good idea to cover the intake runners to keep curious objects out of your engine while you are doing the pulley swap.
Attachment 48192076
11. Turning your attention to the supercharger - you need to remove the boost control diaphragm by unbolting the two 10mm bolts. Then rotate the controller nearly 180� so you can slide the rod out of the linkage for the bypass valve.
12. Remove the four (4) 10mm bolts for the throttle body.
13. Remove the nine (9) 10mm bolts for the front snout. Don't miss the one behind the throttle body. Use a rubber or plastic dead blow to free the blower snout from the blower. This is a time for the gentle touch. You will have some more intercooler fluid drain so have a drip pan ready. Here is what you will face when the snout comes off:
Attachment 48192077
14. I didn't document the pulley replacement with pictures. I used a 3-jaw puller to remove the stock pulley and it ended up damaging the stock pulley. I will get a puller from Lingenfelter (or similar) for the next time. Then you will press the new pulley (or hub) back on the shaft. Use some shim stock under the back side of the shaft so you are pressing down on the shaft on not on the 3 drive pins. Be sure you press it on straight. I continued until the CPR hub was ~ .020" from the shaft bearing.
Attachment 48192078
15. After cleaning the intercooler and front snout mating surfaces, apply a thin layer of sealant. I also applied some o-ring lube in the holes for the intercooler coolant ports. Be careful the align the 3 drive pins in the mating holes on the blower shaft.
Attachment 48192079
16. Get busy reassembling the 47 bolts that you previously removed. I will come back later and add torque values. By the way, did you remember to connect the rear MAP sensor plug? I didn't. But by removing the blower lid I was able to access the rear MAP and get it plugged in.
17. If you are using the Cordes Performance Racing pulley (a very nicely machined piece I must say), now is the time to install it with the 10 titanium screws. You will need some blue locktite and a 27 toque bit.
Attachment 48192080
18. Install you new, shorter belt. Then go back and verify tightness on the 10 bolts holding the pulley to the hub.
19. Bleed the intercooler coolant. I'll leave it up to you to decide how best to fill / bleed your system. I used a 1" ID clear hose over the fill port and then used compressed air (holding my hand over the 1" hose so no measurable pressure) to displace air pockets with fresh Redline Water Wetter.
Attachment 48192081
20. On the 2016 Z06 that I worked on, I recorded a 2 psi increase in manifold pressure after swapping the upper pulley. From a street pull on Tuesday it made 10.9 psi peak and with the 2.31" CPR pulley 4 days later it made 12.8 psi peak.
Attachment 48192082
09-03-2022, 07:30 PM
#17
Pro


Very good directions. However, this is way more work than it’s worth. I thought you could just loosen the tensioner, and pull it off with correct tool. Then bolt the other back on and go. Vengeance Racing say no need to remove supercharger, but who knows.
I reviewed the directions to replace my entire supercharger with Maggie 2650 and you pretty much did the same work.
I reviewed the directions to replace my entire supercharger with Maggie 2650 and you pretty much did the same work.