


HELP!! What balancer install tool?
Burning Brakes


Joined: Oct 2012
Posts: 873
Likes: 86
From: Katy Texas
use the old bolt first like the manual states, then proper torque for new bolt
Crankshaft Balancer Bolt – Installation Pass with Used Bolt – to Ensure the Balancer is Completely Installed
330 Y
243 lb ft
Crankshaft Balancer Bolt New Bolt with Flanged Head (1)
•First Pass
150 Y
111 lb ft
•Second Pass
Loosen 360 degrees
•Third Pass
80 Y
59 lb ft
•Final Step
125 degrees
or
Crankshaft Balancer Bolt New Bolt with Retained Rotating Washer (1)
•First Pass
150 Y
111 lb ft
•Second Pass
Loosen 360 degrees
•Third Pass
80 Y
59 lb ft
•Final Step
200 degrees
Thread Starter
Melting Slicks

Joined: Oct 2009
Posts: 2,004
Likes: 392
From: Long Island New York
Thanks for the reply but I have that information. I'm looking for the part number of the balancer install tool. A universal balancer install tool won't work because the threads are to deep in the crank to catch.
Burning Brakes
Joined: Oct 2012
Posts: 873
Likes: 86
From: Katy Texas
Crankshaft Balancer Replacement
Special Tools
•J 41478 Crankshaft Front Oil Seal Installer
•J 41665 Crankshaft Balancer and Sprocket Installer
•J 41816 Crankshaft Balancer Remover
•J 41816-2 Crankshaft End Protector
•J 42386-A Flywheel Holding Tool
•J 45059 Angle Meter
Special Tools
•J 41478 Crankshaft Front Oil Seal Installer
•J 41665 Crankshaft Balancer and Sprocket Installer
•J 41816 Crankshaft Balancer Remover
•J 41816-2 Crankshaft End Protector
•J 42386-A Flywheel Holding Tool
•J 45059 Angle Meter
Burning Brakes
Joined: Oct 2012
Posts: 873
Likes: 86
From: Katy Texas
Use the J 41665 crankshaft balancer and sprocket installer (2) and the J 41478 crankshaft front oil seal installer (1) in order to install the balancer.
4.1. Assemble the J 41478 crankshaft front oil seal installer (1), nut, washer and the J 41665 crankshaft balancer and sprocket installer (2).
Insert the smaller end of the J 41665 crankshaft balancer and sprocket installer into the front of the balancer.
4.2. Use a wrench and hold the hex end of the J 41478 crankshaft front oil seal installer.
4.3. Use a second wrench and rotate the installation tool nut clockwise until the balancer is started onto the crankshaft.
4.4. Remove the J 41665 crankshaft balancer and sprocket installer and reverse the installation tool.
Position the larger end of the J 41665 crankshaft balancer and sprocket installer against the front of the balancer.
4.5. Use a wrench and hold the end of the J 41478 crankshaft front oil seal installer.
4.6. Use a second wrench and rotate the installation tool nut clockwise until the balancer is installed onto the crankshaft.
4.7. Remove the balancer installation tool.
Burning Brakes
Joined: Oct 2012
Posts: 873
Likes: 86
From: Katy Texas
Then
5. Install the used crankshaft balancer bolt (1) and tighten to 330 Y (240 lb ft).
6. Remove the used crankshaft balancer bolt.
Note: The nose of the crankshaft should be recessed 2.4–4.48 mm (0.094–0.176 in) into the balancer bore.
7. Measure for a correctly installed balancer.
If the balancer is not installed to the proper dimensions, install the J 41665 crankshaft balancer and sprocket installer and repeat the installation procedure.
8. Install the NEW crankshaft balancer bolt (1).
8.1. Tighten the crankshaft balancer bolt to 120 Y (89 lb ft).
8.2. Loosen the crankshaft balancer bolt 360 degrees.
8.3. Tighten the crankshaft balancer bolt to 80 Y (59 lb ft).
8.4. Balancer bolt with flanged head, tighten the crankshaft balancer bolt a final pass to 125 degrees using the J 45059 angle meter.
8.5. Balancer bolt with retained rotating washer, tighten the crankshaft balancer bolt a final pass to 200 degrees using the J 45059 angle meter.
9. Remove the J 42386-A flywheel holding tool.
10. Install the starter motor. Refer to Starter Replacement.
11. Install the front cradle assembly. Refer to Front Cradle Replacement.
12. Install the accessory drive belt. Refer to Drive Belt Replacement - Accessory
Last edited by sycraft; Dec 5, 2016 at 08:24 AM.
Burning Brakes
Joined: Oct 2012
Posts: 873
Likes: 86
From: Katy Texas
J-41665-A Crankshaft Balancer and Sprocket Installer
This tool is used with the draw bolt and nut from tool J-41478. If you want to buy just the bolt and nut, the part numbers are 280055 and 90592A034
This tool is used with the draw bolt and nut from tool J-41478. If you want to buy just the bolt and nut, the part numbers are 280055 and 90592A034
Corvette Stories
The Best of Corvette for Corvette Enthusiasts

Top 10 Most Explosive Corvettes Ever Made: Power-to-Weight Ratio Ranked!
Joe Kucinski
150 hp to 1,250 hp: Every Corvette Generation Compared by the Specs That Matter
Joe Kucinski
8 Coolest Corvette Pace Cars (and Replicas) of All Time
Verdad Gallardo
Top 10 Corvette Engines RANKED by Peak Torque (70+ Years of Muscle!)
Joe Kucinski
Corvette ZR1X Will Be Pacing the Indy 500, And Could Probably Race, Too!
Verdad Gallardo
Top 10 Corvettes Coming to Mecum Indy 2026!
Brett Foote
Top 10 C9 Corvette MUST-HAVES to Fix These C8 Generation Flaws!
Michael S. Palmer
10 Revolutionary 'Corvette Firsts' Most People Don't Know
Joe Kucinski
5 Reasons to Upgrade to an LS6-Powered Corvette; 5 Reasons to Stay LT2
Michael S. Palmer
Burning Brakes
Joined: Dec 2015
Posts: 1,096
Likes: 322
From: Denver Colorado
My kit came with a washer and bolt of correct thread and length, it was used to start the pulley on, and then I used the old crank bolt to finish pulling it on, then I torqued the new crank bolt appropriately.
Thread Starter
Melting Slicks
Joined: Oct 2009
Posts: 2,004
Likes: 392
From: Long Island New York
I'll Google that bolt/nut parts numbers to see what I find.
I was also thinking this might work
http://www.coloradospeed.com/tools-e...7-p-18291.html
I was also thinking this might work
http://www.coloradospeed.com/tools-e...7-p-18291.html
Burning Brakes
Joined: Dec 2015
Posts: 1,096
Likes: 322
From: Denver Colorado
I took some measurements of my installer if you just wanted to go the bolt-and-washer route. It's an M16 bolt with 2mm thread pitch with a fender washer.
It's just under 7" long with 2" worth of thread:
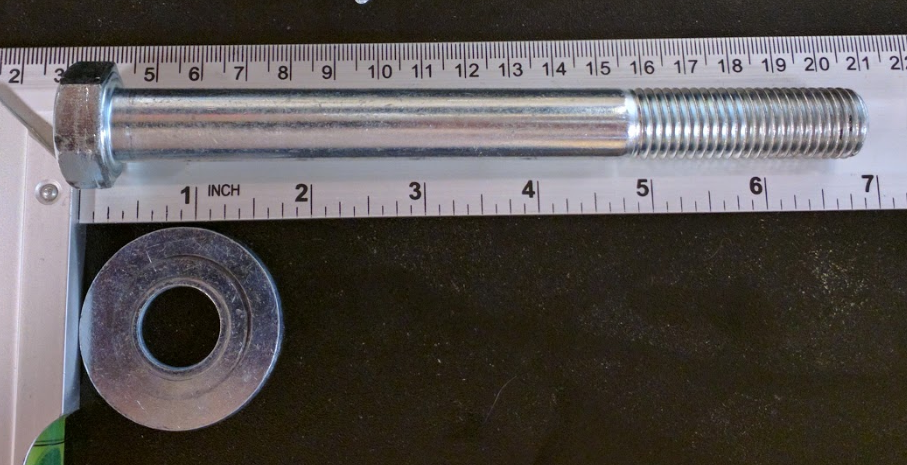
It's just under 7" long with 2" worth of thread: