


Cleaning your Engine?
Thread Starter
Instructor

Joined: Sep 2009
Posts: 148
Likes: 0
From: Chicago Illinois
Whats the best and and safest way to clean the engine compartment? I have heard of hosing it down but that sounds a little scary with all the electronics and hand wiping it doesn't really help in the tight areas, so what do you guys do to keep your engine looking great? Thanks
Former Vendor
Joined: Apr 2005
Posts: 14,104
Likes: 244
From: South Florida
Hosing it down is not all that fashionable with modern electronics and all those items under the hood that might not like to be wet. I prefer:
1. Wipe down all painted areas with a damp towel with diluted APC (Optimum Powerclean, P21S Total Wash) to remove grime and dirt. Rewiping with a clean damp towel and drying towel as needed afterwards. (I use a soft paint brush in cracks/crevices as needed)
2. I use a small can of compressed air or vaccuum to pull loose sand/dirt in corners that dont easily come up at wash. (you could do this step first)
3. I then use Klasse AIO (chemical cleaner and protectant) on all painted parts to protect including area under the hood where water spots accumulate
4. I dress all vacuum lines with a water based dressing (303 Protectant)
5. I dress/protect the weatherstripping with Einszett Rubber Stick
This is often done monthly or every other month. I then use a quick detailer spray and MF towel to wipe down everything at the end of each wash weekly. I suggest staying away from dressings with silicones that might attract more dirt and I use Klasse also do to its design as an acrylic base (synthetic) versus wax which oils might attract dirt quicker.
I have seen others using paint pens to touch up scratches on shock towers and front braces. I have also seen metal polish used on chrome aftermarket parts. You could really spend alot of time under there as desired.
Last edited by Killrwheels@Autogeek; Apr 24, 2010 at 04:50 PM.

Former Vendor
Joined: Nov 2009
Posts: 1,167
Likes: 0
From: Tampa Bay Florida
Here you go, a complete job done by our own Master Detailer Todd:
Detailing your engine bay and keeping it clean not only makes working on your engine easier but it shows a sense of pride of ownership. Modern engines are fairly easy to clean and detail, but keep in mind that you will using liquids and water around electrical equipment. Modern cars are sealed very well from the factory, but you should protect equipment such as the ECU or the Alternator. If you don't know what these are or what they look like, then you shouldn't detail your engine.
Products Needed.
-A quality degreaser such as Eimann Fabrik's VOC Engine Degreaser or Meguiars Super Degreaser
-A couple of brushes (I use old paint brushes)
-Running water
-Towels
-Your favorite dressing such as Meguiars Natural Shine, Meguiars Hyperdressing, or 1Z's Vinyl-Rubber Care and Protectant
1) The engine can be warm or cool to the touch, although warmer temperatures will help break down grease and grime. However you do NOTwant to spray cool water on a hot engine!
2) Use aluminum foil and wrap it around sensitive electrical equipment such as alternator or the ECU. Do NOT use aluminum foil on the battery as you could bridge the terminals.
3) Where gloves and eye protection to protect against any caustic chemicals. You do NOT want engine degreaser ending up in your eye's!
4) Spray a liberal amount of engine degreaser on all areas that need to be cleaned and allow to dwell for 30 seconds.
5) Agitate the degreaser into a lather using a soft brush to help facilitate the removal of stubborn grease and grit.
6) Rinse throughly using flowing water. Avoid spraying water with pressure on to sensitive equipment, but rather work around them. Rinse all solution off the engine, fire wall, and inner fenders.
7) Dry the engine as much as possible. If you have a high speed electric leaf blower use it remove as much standing water as possible from all the various nooks and crannies. If you have a wet vac you can use this to such water out of tight areas. If you have neither use a towel to soak up as much as possible.
8) Close engine bay and start engine. Allow to run up to normal operating temperature for at least 5 minutes.
9) After engine dries, apply your favorite dressing to the hoses and plastics, and enjoy!
In pictures:
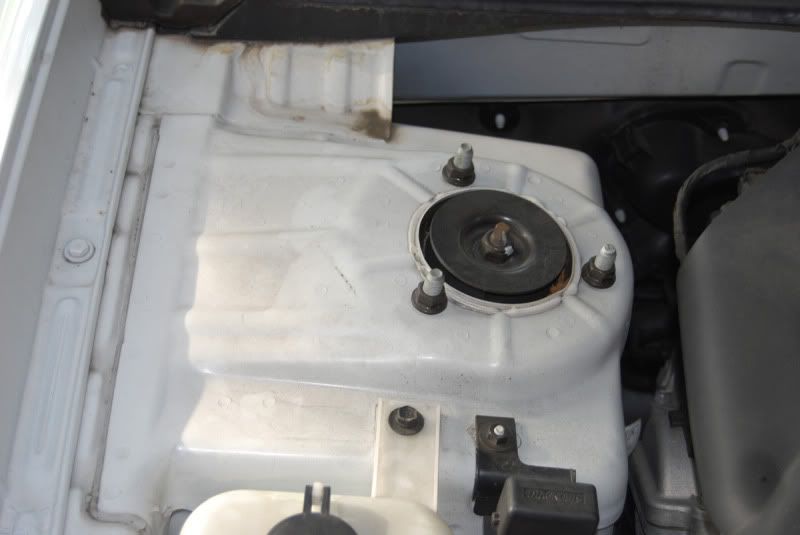
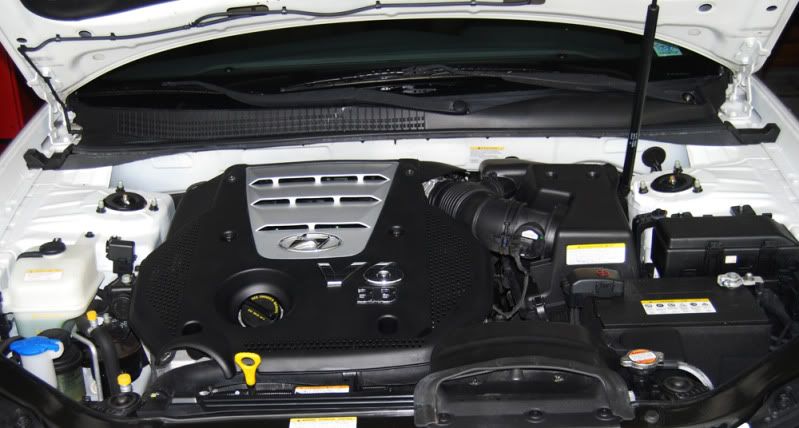
My mother's Hyundai was in desperate need of having its engine detailed. A perfect demo car in need of some love!

I sprayed the engine compartment down with a liberal coat of Eimann Fabrik's VOC Engine Degreaser. The degreaser immediately began to loosen the grease and grime.
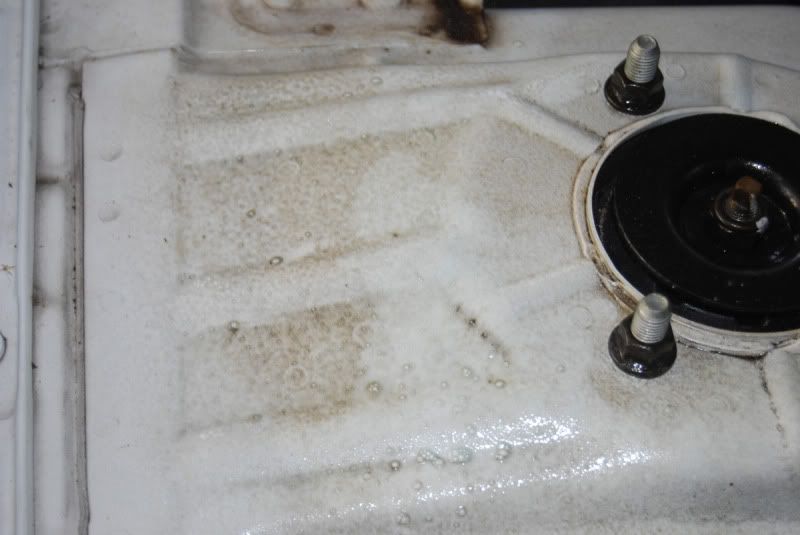
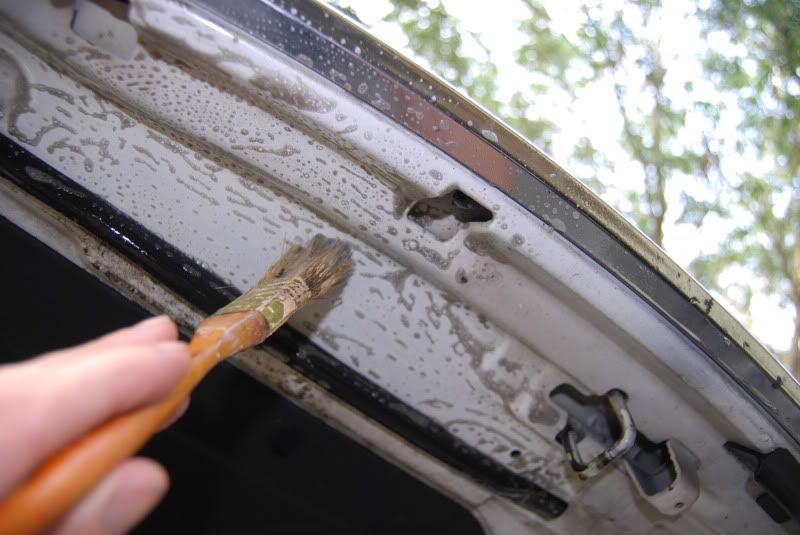
Very dirty areas require agitation with a soft brush.
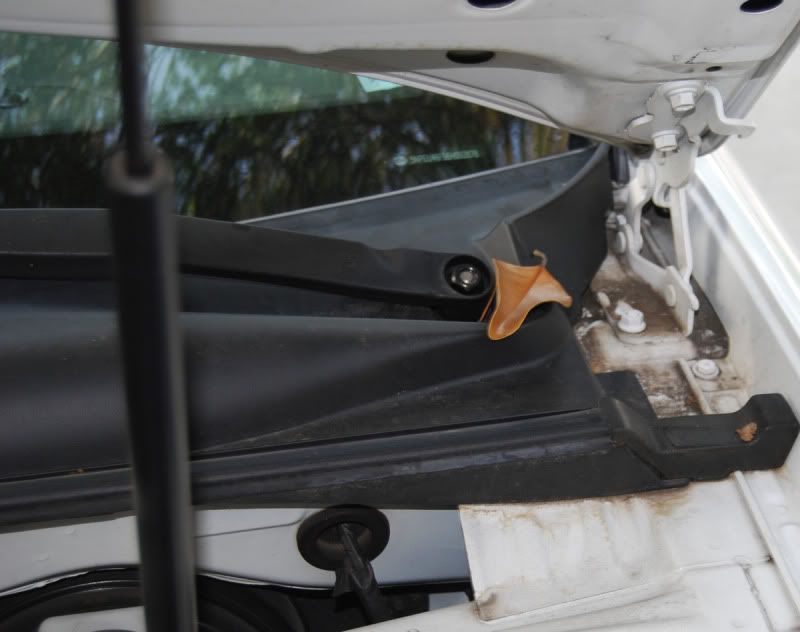
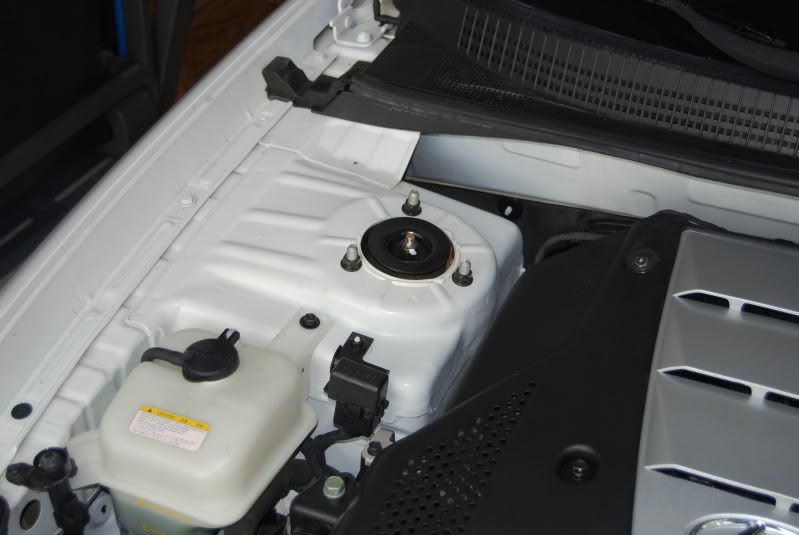
The underside of the hood was very dirty as well, and in need of a little cleaning.
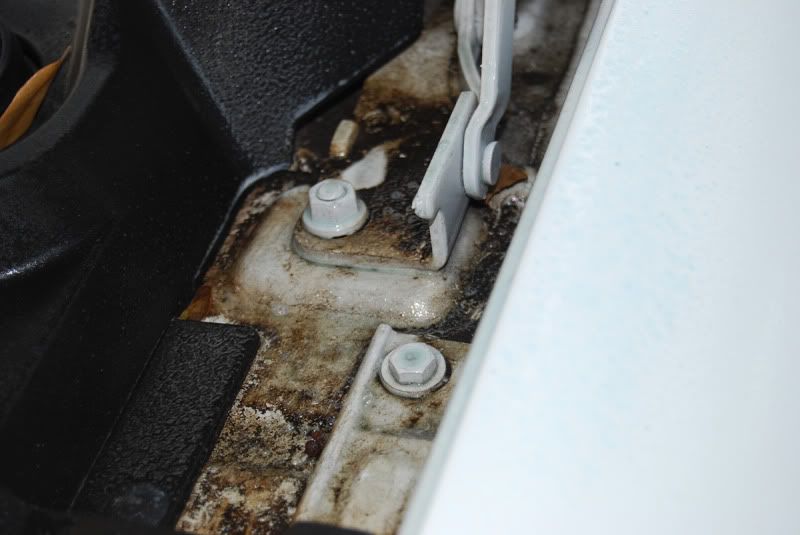
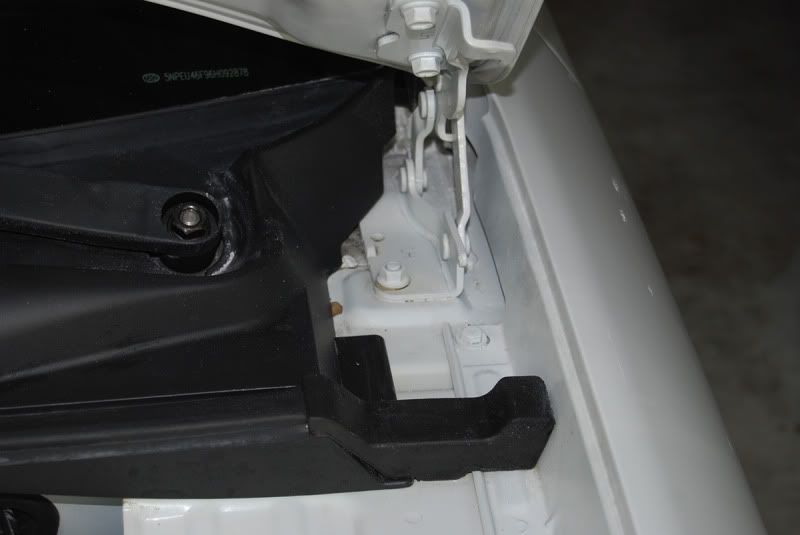
After flushing the engine bay throughly with water, little areas of grime might remain. This is a perfect time, if you desire, to get out a q-tip and clean any spots up.
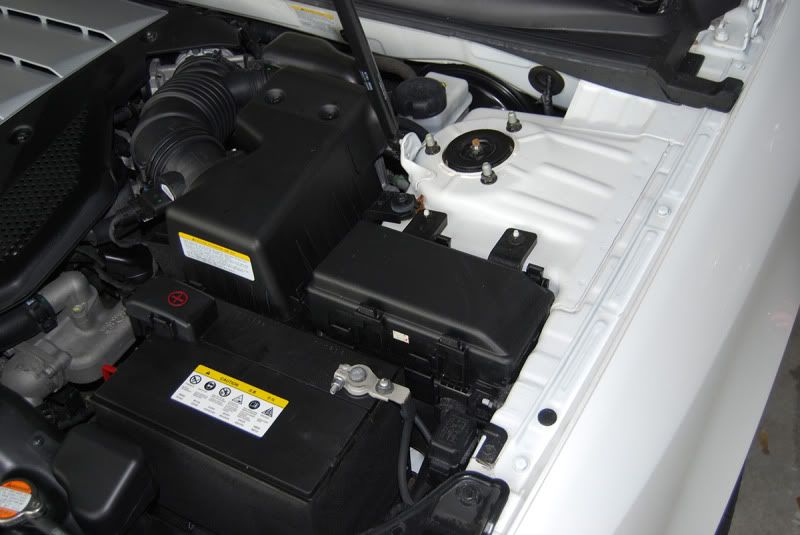
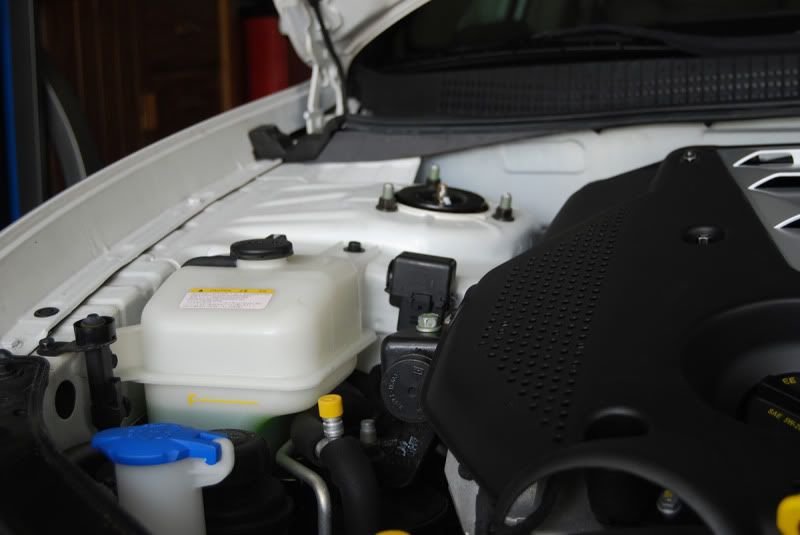
Remove as much standing water as possible, then close the engine and allow it to run up to operation temperature to facilitate drying. After it cools down, apply your favorite dressing and enjoy! I used 1Z Rubber-Vinyl Care 'Tienfienpfleger'

 [/FONT][/COLOR]

Angelo
www.ProperAutoCare.com
800-628-7596
Detailing your engine bay and keeping it clean not only makes working on your engine easier but it shows a sense of pride of ownership. Modern engines are fairly easy to clean and detail, but keep in mind that you will using liquids and water around electrical equipment. Modern cars are sealed very well from the factory, but you should protect equipment such as the ECU or the Alternator. If you don't know what these are or what they look like, then you shouldn't detail your engine.
Products Needed.
-A quality degreaser such as Eimann Fabrik's VOC Engine Degreaser or Meguiars Super Degreaser
-A couple of brushes (I use old paint brushes)
-Running water
-Towels
-Your favorite dressing such as Meguiars Natural Shine, Meguiars Hyperdressing, or 1Z's Vinyl-Rubber Care and Protectant
1) The engine can be warm or cool to the touch, although warmer temperatures will help break down grease and grime. However you do NOTwant to spray cool water on a hot engine!
2) Use aluminum foil and wrap it around sensitive electrical equipment such as alternator or the ECU. Do NOT use aluminum foil on the battery as you could bridge the terminals.
3) Where gloves and eye protection to protect against any caustic chemicals. You do NOT want engine degreaser ending up in your eye's!
4) Spray a liberal amount of engine degreaser on all areas that need to be cleaned and allow to dwell for 30 seconds.
5) Agitate the degreaser into a lather using a soft brush to help facilitate the removal of stubborn grease and grit.
6) Rinse throughly using flowing water. Avoid spraying water with pressure on to sensitive equipment, but rather work around them. Rinse all solution off the engine, fire wall, and inner fenders.
7) Dry the engine as much as possible. If you have a high speed electric leaf blower use it remove as much standing water as possible from all the various nooks and crannies. If you have a wet vac you can use this to such water out of tight areas. If you have neither use a towel to soak up as much as possible.
8) Close engine bay and start engine. Allow to run up to normal operating temperature for at least 5 minutes.
9) After engine dries, apply your favorite dressing to the hoses and plastics, and enjoy!
In pictures:
My mother's Hyundai was in desperate need of having its engine detailed. A perfect demo car in need of some love!
I sprayed the engine compartment down with a liberal coat of Eimann Fabrik's VOC Engine Degreaser. The degreaser immediately began to loosen the grease and grime.
Very dirty areas require agitation with a soft brush.
The underside of the hood was very dirty as well, and in need of a little cleaning.
After flushing the engine bay throughly with water, little areas of grime might remain. This is a perfect time, if you desire, to get out a q-tip and clean any spots up.
Remove as much standing water as possible, then close the engine and allow it to run up to operation temperature to facilitate drying. After it cools down, apply your favorite dressing and enjoy! I used 1Z Rubber-Vinyl Care 'Tienfienpfleger'
[/FONT][/COLOR]Angelo
www.ProperAutoCare.com
800-628-7596

Instructor
Joined: Sep 2009
Posts: 120
Likes: 0
From: PA
Originally Posted by zoomzoom [email
mazda5@properautocare.com[/email];1573876536]Here you go, a complete job done by our own Master Detailer Todd:
Detailing your engine bay and keeping it clean not only makes working on your engine easier but it shows a sense of pride of ownership. Modern engines are fairly easy to clean and detail, but keep in mind that you will using liquids and water around electrical equipment. Modern cars are sealed very well from the factory, but you should protect equipment such as the ECU or the Alternator. If you don't know what these are or what they look like, then you shouldn't detail your engine.
Products Needed.
-A quality degreaser such as Eimann Fabrik's VOC Engine Degreaser or Meguiars Super Degreaser
-A couple of brushes (I use old paint brushes)
-Running water
-Towels
-Your favorite dressing such as Meguiars Natural Shine, Meguiars Hyperdressing, or 1Z's Vinyl-Rubber Care and Protectant
1) The engine can be warm or cool to the touch, although warmer temperatures will help break down grease and grime. However you do NOTwant to spray cool water on a hot engine!
2) Use aluminum foil and wrap it around sensitive electrical equipment such as alternator or the ECU. Do NOT use aluminum foil on the battery as you could bridge the terminals.
3) Where gloves and eye protection to protect against any caustic chemicals. You do NOT want engine degreaser ending up in your eye's!
4) Spray a liberal amount of engine degreaser on all areas that need to be cleaned and allow to dwell for 30 seconds.
5) Agitate the degreaser into a lather using a soft brush to help facilitate the removal of stubborn grease and grit.
6) Rinse throughly using flowing water. Avoid spraying water with pressure on to sensitive equipment, but rather work around them. Rinse all solution off the engine, fire wall, and inner fenders.
7) Dry the engine as much as possible. If you have a high speed electric leaf blower use it remove as much standing water as possible from all the various nooks and crannies. If you have a wet vac you can use this to such water out of tight areas. If you have neither use a towel to soak up as much as possible.
8) Close engine bay and start engine. Allow to run up to normal operating temperature for at least 5 minutes.
9) After engine dries, apply your favorite dressing to the hoses and plastics, and enjoy!
In pictures:
My mother's Hyundai was in desperate need of having its engine detailed. A perfect demo car in need of some love!
I sprayed the engine compartment down with a liberal coat of Eimann Fabrik's VOC Engine Degreaser. The degreaser immediately began to loosen the grease and grime.
Very dirty areas require agitation with a soft brush.
The underside of the hood was very dirty as well, and in need of a little cleaning.
After flushing the engine bay throughly with water, little areas of grime might remain. This is a perfect time, if you desire, to get out a q-tip and clean any spots up.
Remove as much standing water as possible, then close the engine and allow it to run up to operation temperature to facilitate drying. After it cools down, apply your favorite dressing and enjoy! I used 1Z Rubber-Vinyl Care 'Tienfienpfleger'
[/FONT][/COLOR]
Angelo
www.ProperAutoCare.com
800-628-7596
Detailing your engine bay and keeping it clean not only makes working on your engine easier but it shows a sense of pride of ownership. Modern engines are fairly easy to clean and detail, but keep in mind that you will using liquids and water around electrical equipment. Modern cars are sealed very well from the factory, but you should protect equipment such as the ECU or the Alternator. If you don't know what these are or what they look like, then you shouldn't detail your engine.
Products Needed.
-A quality degreaser such as Eimann Fabrik's VOC Engine Degreaser or Meguiars Super Degreaser
-A couple of brushes (I use old paint brushes)
-Running water
-Towels
-Your favorite dressing such as Meguiars Natural Shine, Meguiars Hyperdressing, or 1Z's Vinyl-Rubber Care and Protectant
1) The engine can be warm or cool to the touch, although warmer temperatures will help break down grease and grime. However you do NOTwant to spray cool water on a hot engine!
2) Use aluminum foil and wrap it around sensitive electrical equipment such as alternator or the ECU. Do NOT use aluminum foil on the battery as you could bridge the terminals.
3) Where gloves and eye protection to protect against any caustic chemicals. You do NOT want engine degreaser ending up in your eye's!
4) Spray a liberal amount of engine degreaser on all areas that need to be cleaned and allow to dwell for 30 seconds.
5) Agitate the degreaser into a lather using a soft brush to help facilitate the removal of stubborn grease and grit.
6) Rinse throughly using flowing water. Avoid spraying water with pressure on to sensitive equipment, but rather work around them. Rinse all solution off the engine, fire wall, and inner fenders.
7) Dry the engine as much as possible. If you have a high speed electric leaf blower use it remove as much standing water as possible from all the various nooks and crannies. If you have a wet vac you can use this to such water out of tight areas. If you have neither use a towel to soak up as much as possible.
8) Close engine bay and start engine. Allow to run up to normal operating temperature for at least 5 minutes.
9) After engine dries, apply your favorite dressing to the hoses and plastics, and enjoy!
In pictures:
My mother's Hyundai was in desperate need of having its engine detailed. A perfect demo car in need of some love!
I sprayed the engine compartment down with a liberal coat of Eimann Fabrik's VOC Engine Degreaser. The degreaser immediately began to loosen the grease and grime.
Very dirty areas require agitation with a soft brush.
The underside of the hood was very dirty as well, and in need of a little cleaning.
After flushing the engine bay throughly with water, little areas of grime might remain. This is a perfect time, if you desire, to get out a q-tip and clean any spots up.
Remove as much standing water as possible, then close the engine and allow it to run up to operation temperature to facilitate drying. After it cools down, apply your favorite dressing and enjoy! I used 1Z Rubber-Vinyl Care 'Tienfienpfleger'
[/FONT][/COLOR]Angelo
www.ProperAutoCare.com
800-628-7596

Last edited by Compaq; May 5, 2010 at 02:57 AM.
Melting Slicks

Joined: Jan 2004
Posts: 2,909
Likes: 4
From: Ponte Vedra Beach / London State: Dazed and confused
Protection of Electrical Components
The most important electrical components are sealed �water resistant�, that is to say against low pressure, water splashing encountered in the course of daily driving conditions. As long as you avoid directing a strong stream of water (or a pressure washer at close range) directly into these components, you will be fine.
You need to cover various parts prior to using any cleaning products, sprays (water deterrent, formula 40(WD-40)) or water.
� Alternator
� Alarm Housing
� Intercooler
� Battery terminals (if not covered already)
� Induction kit cone (if you have one)
� Coil packs
� Electronic control units (ECU)
� On-Board Diagnostics (OBD) port
� Air intake systems (exposed air filters) can be covered with plastic wrap and a rubber band
Notes:
1. This is not an exhaustive list, nor is it marque specific, if in doubt use a water repellent (WD-40) and exercise common sense
2. Use cling-film and then tin foil for the alternator, alarm housing etc as the foil is easier to mould and has greater protection properties. I suggest you use a plastic bag for the induction kit and just wrap it tight over the end to stop any water ingress.
3. For the intercooler the best way to cover is to get a flat sheet of cardboard and just cut it to size so it fits and covers the fins. Cardboard will normally protect the fins for the duration of the washing. It will get soaked so discard after the wash.
4. If you are uncertain of how to proceed I'd talk with somebody who has marque /model /year specific knowledge.
Belts
Using a belt dressing to stop it �squealing� means you are putting off replacing the belt or its tensioner. It's squealing for a reason, if you use a belt dressing to �shine� the material it may well cause belt slippage/wear. If any of this type of products gets into the air intake it will harm/render useless any sensors. Just stick to 303� Aerospace Protectant and proper maintenance on your vehicle.
Replacement belts-Gatorback swallows up irritating chirps, squeaks and squeals due to its Helicog� tooth design. Unlike the straight cogs on standard v-ribbed belts, the diagonal Helicog� teeth on Gatorback actually cancel the noise of pulley contact from one offset cog to another. The result is a reduction in operating noise by as much as 15 dB
Plastic and Vinyl Parts
When everything is dry apply a vinyl/rubber protection to hoses, shields and wires, and wipe engine parts with Autoglym Vinyl & Rubber Care or 303� Aerospace Protectant
Clean hard plastic and protect with 1z Plastik Reiniger
Aluminum
Un-coated aluminium wheels are an aftermarket product (not OEM) Uncoated (to test apply a mild polish, if the applicator turns black (a chemical reaction between nickel and the polish) then there is no clear coat on the paint finish. if Uncoated aluminium is always in a state of tarnish.
Coated finish; P21s Polishing Soap � formulated with polishing clay and soap flakes, so it is simple, gentle, and effective, it will return metal to an OEM finish and it will remove most of the tarnish, as well as any other contaminants. It also works on any lightly tarnished aluminium in your engine bay, exhaust tips, or any other metals that are tarnished.
P21s Finish Restorer - this is a polishing product to refine a cleaned finish as opposed to cleaning, it�s formulated to polish metals and refine their finish. Used after the surface has been cleaned with the polishing soap or as a finish restorer on metal that is only lightly tarnished.
Caution- avoid metal polishing products that contain anhydrous ammonia, solvents or acids, zinc, which is often present in aluminium in large quantities and is dissolved readily by the related anhydrous
Chrome
Decorative chrome plating is sometimes called nickel-chrome plating because bright chrome plating always involves plating nickel before plating the chrome. The nickel provides the reflectivity and most of the corrosion resistance. The chrome plating is exceptionally thin, measured in millionths of an inch rather than in thousandths. Chrome plating Chrome Masters, Nashville, TN
Cleaning Methodology
� Thoroughly rinse surface to remove any loose surface dirt or dust.
� Wash the surface with a d-Limonene-based (citrus) APC cleaner (P21S Total Auto Wash)
� Use a cleaner (Simichrome or Klasse All-In-One) to remove any surface blemishes
� Use a mild polish (P21S Multi-Surface Finish Restorer) to prevent re-oxidation and provide a water-resistant coating and restore lustre to the chrome
� To restore chrome that is pitted or has rust spots, remove with #0000 synthetic bronze wool and /or a metal polish (Auto Wenol Blue, or use Red for chrome restoration)
� Finally apply a polymer sealant (Zoopseal) to provide lasting protection
Due to the softness of the metallic plating it is very easy to induce a swirl marks to the finish so use straight-line motions only. Use a soft brush to remove any dried polish from seams or folds. For both chrome and highly polished aluminum, use a mildly abrasive metal polish (Iz� Einszett Metal Polish or Groit's Chrome Polish).
Deep Chrome was designed to completely clean chrome surfaces without ever scratching. This product can be aggressively worked into a chrome surface, producing an amazing, almost-blue chrome finish. Easily removes water spots, most chemical stains, small boot marks, and the haze created by wax based chrome polishes and their protective coatings
An extract from � Engine Bay Detailing �, one of a series of 120 unbiased technical papers �The Science of Detailing�, a library of educational materials that has become the #1 reference for car care on the Internet
Chances are you'll learn something about detailing if you read any of these; although these articles will not improve your detailing skills, lead to a successful business or change your life. Applying what you learn from it, however, will. That's where your commitment comes in - you need to make a commitment to yourself right now that you will take action on what you learn.
TOGWT � Ltd (Established 1980) � Copyright 2002-2010, all rights reserved
Former Vendor
Joined: Apr 2005
Posts: 14,104
Likes: 244
From: South Florida
You want a cool engine (block), you want use as little water as needed, and you want to cover anything electrical as possible. While cars are designed to handle water and dirt in the engine bay, the manufacturers warranty takes none to kindly to water damage done intentionally. Always tread carefully ...
Melting Slicks
Joined: Jan 2004
Posts: 2,909
Likes: 4
From: Ponte Vedra Beach / London State: Dazed and confused
You want a cool engine (block), you want use as little water as needed, and you want to cover anything electrical as possible. While cars are designed to handle water and dirt in the engine bay, the manufacturers warranty takes none to kindly to water damage done intentionally. Always tread carefully ...
Corvette Stories
The Best of Corvette for Corvette Enthusiasts

Top 10 Most Expensive Corvettes Ever Sold on Bring A Trailer
Brett Foote
10 Things Every Corvette Owner Needs (2026 Edition)
Michael S. Palmer
8 Most "Only Corvette Owners Understand" Quirks and Problems
Pouria Savadkouei
10 Reasons the C6 Z06 is Still A Performance Benchmark After 20 Years
Joe Kucinski
How Much Horsepower Every Corvette Engine "LOST" in 1972
Joe Kucinski
Top 10 DOs and DON'Ts for Protecting Your Convertible Top!
Michael S. Palmer
Top 10 Most Explosive Corvettes Ever Made: Power-to-Weight Ratio Ranked!
Joe Kucinski
150 hp to 1,250 hp: Every Corvette Generation Compared by the Specs That Matter
Joe Kucinski
8 Coolest Corvette Pace Cars (and Replicas) of All Time
Verdad Gallardo
Instructor
Joined: Sep 2009
Posts: 120
Likes: 0
From: PA
After reading for a while last night, heres what I came up with. Your thoughts please.
Engine should be cold.
1. Cover the alternator and any air-intakes. Problem is I cant find the alternator OR the air-intakes. My C6 is never driven in th rain so its clean. Its the 335i's engine which is filthy.
2. Use electric leaf blower to remove loose particles.
3. Spray any exposed wires with WD40 (careful not to get on belts) to prevent water and chemical penetration.
4. Spray P21S Total Wash on the engine area. Let stand for about 2 minutes.
5. Use water from spray bottle to remove P21S.
6. Use leaf blower to remove water.
7. Close hood, pray car will start and run for at-least 5 minutes.
8. Apply 303 fabric guard on hoses (is this simply for aesthetics?).
Former Vendor
Joined: Apr 2005
Posts: 14,104
Likes: 244
From: South Florida
Remember to agitate with a small soft brush (paint brushes work well) after allowing P21S to sit for just a minute or two.
Also remember if dressing the hoses to use 303 "Protectant" not "Fabric Guard" -- one is designed to protect fabrics the other for vinyl/rubber/paint/plastics. I dont believe the formula is the exact same, but could be wrong. It is done primarily to look nice as the UV protectants in product likely would not get used under a closed hood. You could indeed skip if desired.
Also remember if dressing the hoses to use 303 "Protectant" not "Fabric Guard" -- one is designed to protect fabrics the other for vinyl/rubber/paint/plastics. I dont believe the formula is the exact same, but could be wrong. It is done primarily to look nice as the UV protectants in product likely would not get used under a closed hood. You could indeed skip if desired.
Drifting


Joined: Jun 2002
Posts: 1,303
Likes: 151
From: Las Vegas Nevada
All of the above suggestions are great.
I have to admit that I just spray the engine bay with P21S, tire cleaner, or simple green - let soak (usually on a warm engine) - spray off with a hose (avoiding the alternator and coil packs).
I've never covered electrical parts with foil or plastic.
I'm not saying it is a bad idea to cover things, but I clean and detail the engine bay on my Z06, VW Tourag, truck almost every time I wash them and have never had a problem.
303 is the best for anything rubbery. (303 Aerospace Protectant - not fabric guard)
YMMV.
Cheers - Jim
Last edited by Carnac; May 5, 2010 at 11:55 PM.
Drifting
Joined: Jun 2002
Posts: 1,303
Likes: 151
From: Las Vegas Nevada
Just spray from the bottle - I don't usually need very much, plus I pre-wet things by spraying with water first. I use a hose nozzle that lets me spray a pretty fine mist of water.
Then the fun part starts - trying to get a rag into all the little nooks and crevasses.
The posts by ZoomZoom and TOGWT are great - just follow their lead. Don't make it harder than it is.
Cheers - Jim
Then the fun part starts - trying to get a rag into all the little nooks and crevasses.
The posts by ZoomZoom and TOGWT are great - just follow their lead. Don't make it harder than it is.
Cheers - Jim
Last edited by Carnac; May 5, 2010 at 11:56 PM.

Le Mans Master


Joined: Jul 2006
Posts: 5,894
Likes: 1
From: Farmingdale NY
St. Jude Donor '06
I'm not a Detailer, just a hobbyist.
But, here's what I do:
I spray it down with a cleaner/degreaser. Agitate grimey areas with an old paint brush, Then rinse with a garden hose.
Leave the nozzle off of the hose, and don't go out of your way to overly soak any electrical/electonic parts, apply common sense here, and you'll be fine.
No need for the nozzle to rinse. Besides the electrical/electronic parts, you don't want to chance the nozzle pushing any of that engine grime on your finish.
Blow dry it with a leaf blower (I'd love to own a master blaster, but can't justify the expense as a hobbyist).
Start the engine when you're done, and let it run for a few minutes.
I've never had a problem doing it this way.
Melting Slicks
Joined: Jan 2004
Posts: 2,909
Likes: 4
From: Ponte Vedra Beach / London State: Dazed and confused