
Output shaft install?


Thread Starter
Burning Brakes


Joined: Aug 2006
Posts: 901
Likes: 1
From: Oxford PA
I am sure some of you over here may have installed your own left output shaft. Can anyone give me any kind of pointers or information regarding replaceing the left output shaft? Thanks for any help...
Melting Slicks

Joined: Jul 2008
Posts: 2,151
Likes: 6
From: Oceanside Ca/ Tampa FL
I just did mine about 4 months ago. Here is all the info i used to complete mine, a great photobucket slide show and some schematics for ya, its really easy and i did it without a hesistation, good luck!!! Jay
Heres the Great Write up with Pics bud,
http://s154.photobucket.com/albums/s...view=slideshow
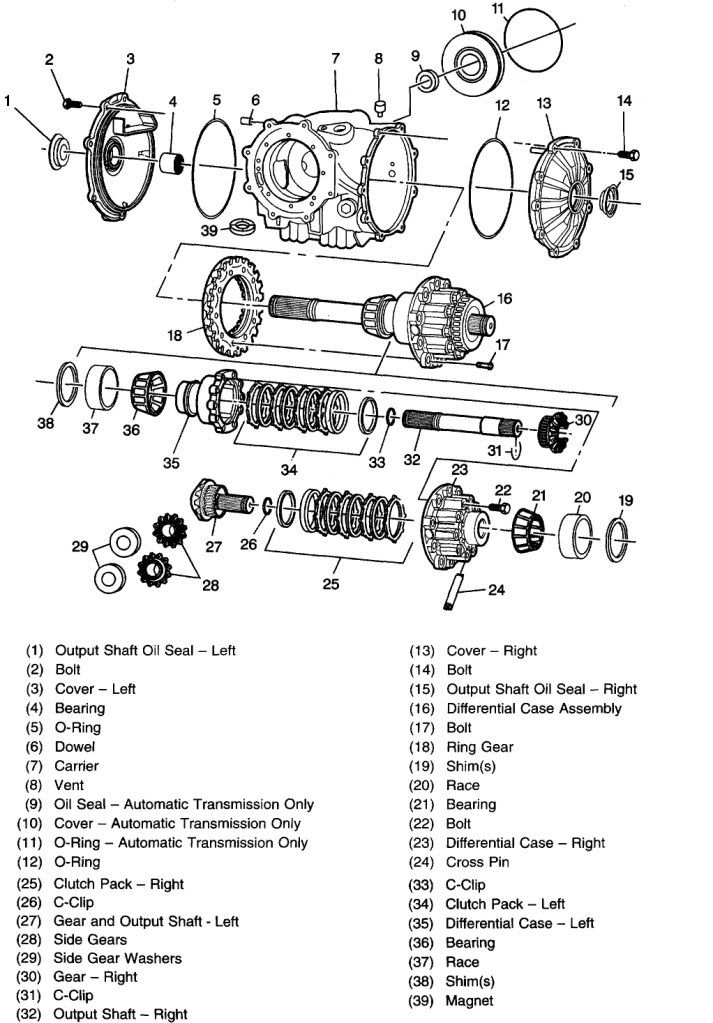
Remove the diff - there are a couple threads and articles regarding this. Starts with removing the rear cradle and then lowering the torque tube/tranny/diff low enough to unbolt the diff from the tranny.
Take apart the diff - remove the passenger side cover, the guts will be pretty free floating except the mounting stud in the case prevents the carrier from coming out. You have to double nut the stud to remove it from the mounting boss and then remove the mounting boss via two allen screws. Then the carrier assembly comes right out (thanks Phil).
Take apart the carrier - There are ~12 bolts holding the carrier halves together. Take them out and the halves will separate. Then you can see that the long shaft that you want to replace is easily accessible. Be sure to keep things nice and clean from this point on. Take the shaft/gear out of the carrier half and remove the clips on both sides and the gear and transfer to the hardened shaft. If you're not installing a new short/right side shaft skip to the next step. If you are replacing the short shaft you need to press on the short shaft gear with something that will fit around the spider gear shaft. I used a pickle fork and a floor jack, basically put the ring gear side of the carier on my floor jack and put the pickle fork on top of the gear and jacked up with the othe side of the pickle fork pressing against the rear shock mount of the vette. This compresses the belleville washer that puts pressure on the posi clutch pack. Very shade tree but it worked really well. While under pressure the spider shaft will slide right out and the spider gears will too. The output shaft can be removed and replaced (with another stocker or the new DTE hardened short shaft and gear) and to get the spiders in again you need to press on the short gear to put the shaft back in. You could inspect the posi disks for abnormal wear while you have things apart but remember to put them in exactly as they came out as they develop wear patterns with each other. Also inspect the carrier surface where the last disk meets the carrier if you have snapped a shaft. I had some metal bits in that area from my mishap.
Reassemble the carrier halves - Put the halves back together and torque the ~12 bolts to 41' #'s in a criss-cross pattern. It will take a while because you are compressing the belleville washers when the halves come together.
This is where I'm at now. I'm going to replace the output shaft seals which just tap out from behind and tap in from outside and clean up the case and then finish buttoning it up.
Reassemble the diff - Put the cover(s) back on and tighten to 13' #'s I think. Then slap it back onto the tranny and put everything back together.
If you're only replacing the long shaft it's pretty straight forward. Things that got me were how to get the stud/boss out to be able to get the carrier out (thanks Phil) and how to get the spider assembly apart which I found in the service manual. Also beware of the **** raping your local Chevy dealer will try and pull on you for the two quarts of synthetic diff fliud (~$32 each). Either get the GM fluid and posi additive from a vendor like Fred Beans or Ken Fitchner or if you need it real fast just get some redline for $8 a quart.
HTH, let me know if you have any more questions.
This help any?
Heres the Great Write up with Pics bud,
http://s154.photobucket.com/albums/s...view=slideshow
Remove the diff - there are a couple threads and articles regarding this. Starts with removing the rear cradle and then lowering the torque tube/tranny/diff low enough to unbolt the diff from the tranny.
Take apart the diff - remove the passenger side cover, the guts will be pretty free floating except the mounting stud in the case prevents the carrier from coming out. You have to double nut the stud to remove it from the mounting boss and then remove the mounting boss via two allen screws. Then the carrier assembly comes right out (thanks Phil).
Take apart the carrier - There are ~12 bolts holding the carrier halves together. Take them out and the halves will separate. Then you can see that the long shaft that you want to replace is easily accessible. Be sure to keep things nice and clean from this point on. Take the shaft/gear out of the carrier half and remove the clips on both sides and the gear and transfer to the hardened shaft. If you're not installing a new short/right side shaft skip to the next step. If you are replacing the short shaft you need to press on the short shaft gear with something that will fit around the spider gear shaft. I used a pickle fork and a floor jack, basically put the ring gear side of the carier on my floor jack and put the pickle fork on top of the gear and jacked up with the othe side of the pickle fork pressing against the rear shock mount of the vette. This compresses the belleville washer that puts pressure on the posi clutch pack. Very shade tree but it worked really well. While under pressure the spider shaft will slide right out and the spider gears will too. The output shaft can be removed and replaced (with another stocker or the new DTE hardened short shaft and gear) and to get the spiders in again you need to press on the short gear to put the shaft back in. You could inspect the posi disks for abnormal wear while you have things apart but remember to put them in exactly as they came out as they develop wear patterns with each other. Also inspect the carrier surface where the last disk meets the carrier if you have snapped a shaft. I had some metal bits in that area from my mishap.
Reassemble the carrier halves - Put the halves back together and torque the ~12 bolts to 41' #'s in a criss-cross pattern. It will take a while because you are compressing the belleville washers when the halves come together.
This is where I'm at now. I'm going to replace the output shaft seals which just tap out from behind and tap in from outside and clean up the case and then finish buttoning it up.
Reassemble the diff - Put the cover(s) back on and tighten to 13' #'s I think. Then slap it back onto the tranny and put everything back together.
If you're only replacing the long shaft it's pretty straight forward. Things that got me were how to get the stud/boss out to be able to get the carrier out (thanks Phil) and how to get the spider assembly apart which I found in the service manual. Also beware of the **** raping your local Chevy dealer will try and pull on you for the two quarts of synthetic diff fliud (~$32 each). Either get the GM fluid and posi additive from a vendor like Fred Beans or Ken Fitchner or if you need it real fast just get some redline for $8 a quart.
HTH, let me know if you have any more questions.
This help any?
Last edited by 96mogt; Sep 27, 2009 at 10:47 PM.


Melting Slicks
Joined: Jul 2008
Posts: 2,151
Likes: 6
From: Oceanside Ca/ Tampa FL


