


Turn Signal/DRL burnouts
Thread Starter
Race Director


Joined: Jul 2002
Posts: 11,522
Likes: 0
From: Sterling VA
I'm certain that something must have been posted about this. My left (driver) side turn signal/DRL has burned out twice in the past year. It gets so hot that it melts the socket. What's up with this?

Banned Scam/Spammer
Joined: Feb 2007
Posts: 50,093
Likes: 267
From: Oklahoma City
St. Jude Donor '09-'10-'11-'12-'13-'14-'15-'16-'17,'19,'22
You probably have a hole in your corner lamp as well.
What I suggest is pulling it, sealing the hole (or replace), replace your DRLS with leds (we offer several), and install a hyperflash harness. It will never happen again. The leds don't get near as hot as stock bulbs.
What I suggest is pulling it, sealing the hole (or replace), replace your DRLS with leds (we offer several), and install a hyperflash harness. It will never happen again. The leds don't get near as hot as stock bulbs.
Team Owner


Joined: Dec 1999
Posts: 174,312
Likes: 1,217
From: Here
Pilot of Beer Force 1
Tampa Regional Coordinator
CI 4-5-6-7-8 Veteran
Organizer St. Jude Fundraiser
I believe in the Beer Fairy
You probably have a hole in your corner lamp as well.
What I suggest is pulling it, sealing the hole (or replace), replace your DRLS with leds (we offer several), and install a hyperflash harness. It will never happen again. The leds don't get near as hot as stock bulbs.
What I suggest is pulling it, sealing the hole (or replace), replace your DRLS with leds (we offer several), and install a hyperflash harness. It will never happen again. The leds don't get near as hot as stock bulbs.

thats my plan...looking at doing switchbacks...tired of the bulbs exploding

Tech Contributor

Joined: Dec 2003
Posts: 19,384
Likes: 87
From: Horncastle Lincolnshire, England
2023 C5 of the Year Finalist - Unmodified
The DRLs melt the housing
Pull the unit and you'll probably find a hole that's letting water into the bulb socket.
I inhibited my DRLs in 2003. I'm still on my first set of bulbs.
Pull the unit and you'll probably find a hole that's letting water into the bulb socket.
I inhibited my DRLs in 2003. I'm still on my first set of bulbs.
Tech Contributor
Joined: Dec 2003
Posts: 19,384
Likes: 87
From: Horncastle Lincolnshire, England
2023 C5 of the Year Finalist - Unmodified
Document ID# 655625
2002 Chevrolet Corvette
________________________________________
Park/Turn Signal/Side Marker Lamp Replacement
Removal Procedure
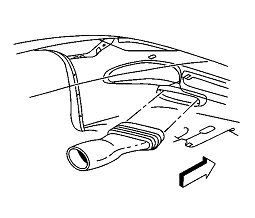
1. Raise and support the vehicle. Refer to Lifting and Jacking the Vehicle in General Information.
2. Remove the front fascia lower closeout panel.

3. Release the brake caliper cooling duct from the front fascia, and position the duct aside.
4. Remove the front turn signal lamp bracket retaining spring from the lamp bracket.
5. Remove the lamp bracket retaining spring from the front fascia.
6. Remove the front turn signal lamp bracket retaining screws.
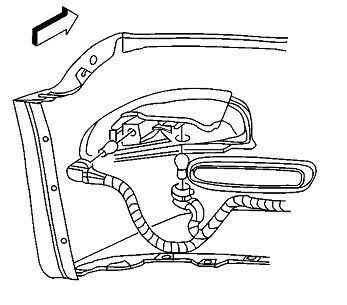
7. Disconnect the sockets from the lamp.
8. Remove the lamp, with the bracket, from the vehicle.
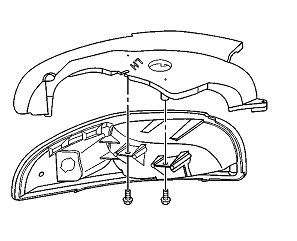
9. Remove the lamp to bracket retaining screws.
10. Remove the lamp from the bracket.
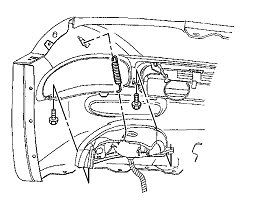
Installation Procedure
1. Install the front park/turn signal and sidemarker lamp into position on the front turn signal lamp bracket.
Notice
Use the correct fastener in the correct location. Replacement fasteners must be the correct part number for that application. Fasteners requiring replacement or fasteners requiring the use of thread locking compound or sealant are identified in the service procedure. Do not use paints, lubricants, or corrosion inhibitors on fasteners or fastener joint surfaces unless specified. These coatings affect fastener torque and joint clamping force and may damage the fastener. Use the correct tightening sequence and specifications when installing fasteners in order to avoid damage to parts and systems.
2. Install the front park/turn signal and sidemarker lamp to bracket retaining screws.
Tighten
Tighten the front park/turn signal and sidemarker lamp to bracket retaining screws to 2 N�m (18 lb in).
3. Install the sockets to the lamp.
4. Install the lamp, with the bracket, to the front fascia.
5. Align the lamp to the opening in the front fascia and hold the lamp firmly in place against the fascia, while installing the front turn signal lamp bracket retaining screws.
Tighten
Tighten the front turn signal lamp bracket retaining screws to 3 N�m (27 lb in).
6. Install the lamp bracket retaining spring to the front fascia.
7. Install the front turn signal lamp bracket retaining spring to the lamp bracket.
8. Position the brake caliper cooling duct to the front fascia and press the duct toward the fascia to secure.
9. Install the front fascia lower closeout panel. Refer to Close Out Panel - Front Bumper Fascia Lower in Bumpers.
2002 Chevrolet Corvette
________________________________________
Park/Turn Signal/Side Marker Lamp Replacement
Removal Procedure
1. Raise and support the vehicle. Refer to Lifting and Jacking the Vehicle in General Information.
2. Remove the front fascia lower closeout panel.
3. Release the brake caliper cooling duct from the front fascia, and position the duct aside.
4. Remove the front turn signal lamp bracket retaining spring from the lamp bracket.
5. Remove the lamp bracket retaining spring from the front fascia.
6. Remove the front turn signal lamp bracket retaining screws.
7. Disconnect the sockets from the lamp.
8. Remove the lamp, with the bracket, from the vehicle.
9. Remove the lamp to bracket retaining screws.
10. Remove the lamp from the bracket.
Installation Procedure
1. Install the front park/turn signal and sidemarker lamp into position on the front turn signal lamp bracket.
Notice
Use the correct fastener in the correct location. Replacement fasteners must be the correct part number for that application. Fasteners requiring replacement or fasteners requiring the use of thread locking compound or sealant are identified in the service procedure. Do not use paints, lubricants, or corrosion inhibitors on fasteners or fastener joint surfaces unless specified. These coatings affect fastener torque and joint clamping force and may damage the fastener. Use the correct tightening sequence and specifications when installing fasteners in order to avoid damage to parts and systems.
2. Install the front park/turn signal and sidemarker lamp to bracket retaining screws.
Tighten
Tighten the front park/turn signal and sidemarker lamp to bracket retaining screws to 2 N�m (18 lb in).
3. Install the sockets to the lamp.
4. Install the lamp, with the bracket, to the front fascia.
5. Align the lamp to the opening in the front fascia and hold the lamp firmly in place against the fascia, while installing the front turn signal lamp bracket retaining screws.
Tighten
Tighten the front turn signal lamp bracket retaining screws to 3 N�m (27 lb in).
6. Install the lamp bracket retaining spring to the front fascia.
7. Install the front turn signal lamp bracket retaining spring to the lamp bracket.
8. Position the brake caliper cooling duct to the front fascia and press the duct toward the fascia to secure.
9. Install the front fascia lower closeout panel. Refer to Close Out Panel - Front Bumper Fascia Lower in Bumpers.
Tech Contributor
Joined: Dec 2003
Posts: 19,384
Likes: 87
From: Horncastle Lincolnshire, England
2023 C5 of the Year Finalist - Unmodified
Corvette Stories
The Best of Corvette for Corvette Enthusiasts

Top 10 Most Expensive Corvettes Ever Sold on Bring A Trailer
Brett Foote
10 Things Every Corvette Owner Needs (2026 Edition)
Michael S. Palmer
8 Most "Only Corvette Owners Understand" Quirks and Problems
Pouria Savadkouei
10 Reasons the C6 Z06 is Still A Performance Benchmark After 20 Years
Joe Kucinski
How Much Horsepower Every Corvette Engine "LOST" in 1972
Joe Kucinski
Top 10 DOs and DON'Ts for Protecting Your Convertible Top!
Michael S. Palmer
Top 10 Most Explosive Corvettes Ever Made: Power-to-Weight Ratio Ranked!
Joe Kucinski
150 hp to 1,250 hp: Every Corvette Generation Compared by the Specs That Matter
Joe Kucinski
8 Coolest Corvette Pace Cars (and Replicas) of All Time
Verdad GallardoSafety Car


Joined: Jun 2009
Posts: 4,430
Likes: 155
From: Rain Festival Headquarters, Upstate NY
Symptom of impending doom: visible moisture condensation on inside of the DRL/turn signal lens.
Last edited by Czarvette; May 15, 2012 at 05:27 PM.
Instructor


Joined: Mar 2011
Posts: 208
Likes: 0
From: Hershey PA

Tech Contributor
Joined: Dec 2003
Posts: 19,384
Likes: 87
From: Horncastle Lincolnshire, England
2023 C5 of the Year Finalist - Unmodified
Either pull the A2 fuse but you'll lose the approach lights or do the relay mod:
http://forums.corvetteforum.com/c5-t...e-the-drl.html
http://forums.corvetteforum.com/c5-t...e-the-drl.html

Team Owner
Joined: May 2001
Posts: 36,836
Likes: 244
From: Dear Karma, I have a list of people you missed.
St. Jude Donor '08-'09-'10-'11-'12-'13-'14-'15-'16
Pull the 2 DRL relays and insert an insulator between the contacts in each one and reinstall. No more DRLs, no codes, no heat-damaged housing (since DRLs are not always on and generating constant heat), no corroded sockets from water intrusion due to burned/cracked housing.
Note: If you already have a heat damaged housing (cracked/split), repair it to prevent future water intrusion, or replace it/them. If you have heat/water damaged bulb sockets, replace it/them; there are a number of sources including Summit Racing which sells Pico Wiring brand. Part #5447PT for $6.95ea. I have used them, they work fine and have blue/brown/black wires instead of all three white like some others.
For folks that want to keep the DRL function, see post #3. JW can fix you up with the LED conversion.

Burning Brakes

Joined: Apr 2009
Posts: 1,163
Likes: 4
From: Concord California
Thanks again, this help me replace my front left turn signal bulb.. I then replaced all the front turn and parking light bulbs, figure if one goes out, the other is just days away from doing the same.. (I think that is logical, one goes the other goes soon due to total hours of burn time, does anybody else buy into that)..