
Help with upper windshield reveal and header trim
 02-11-2015, 10:02 AM
#1
Instructor

Thread Starter
1975 convertible-
I am having a problem getting my new header trim to fit tightly against the stainless steel upper windshield reveal and windshield frame. I have the AIM, but i can not find a picture of a convertible windshield assembly. When I put the header trim on there is a small gap where you can see the screws holding the s/s reveal to the windshield frame.
I would appreciate any pictures that would help guide me to getting this corrected.
 02-11-2015, 01:54 PM
#2
Team Owner

Member Since: Sep 2006
Location: Westminster Maryland
Posts: 30,173
Likes: 0
Received 2,878 Likes
on
2,515 Posts

Hi LRB,
I'm not sure where the gap is that you're asking about?
Is it between the long thin piece of ss trim that fits snug against the windshield and also snug against the larger ss trim piece on the windshield header itself?
Regards,
Alan
This gap?
I'm not sure where the gap is that you're asking about?
Is it between the long thin piece of ss trim that fits snug against the windshield and also snug against the larger ss trim piece on the windshield header itself?
Regards,
Alan
This gap?
02-11-2015, 02:51 PM
#3
Instructor
Thread Starter
If is can not figure out tomorrow I will post pictures.
Thanks for your help.
02-12-2015, 05:03 PM
#4
Former Vendor
Member Since: Aug 2006
Location: Jeffersonville Indiana 812-288-7103
Posts: 76,656
Received 1,813 Likes
on
1,458 Posts
St. Jude Donor '08-'09-'10-'11-'12-'13-'14-'15


 02-12-2015, 06:53 PM
#5
Instructor
Thread Starter
[IMG]https://cimg7.ibsrv.net/gimg/www.corvetteforum.com-
vbulletin/960x542/80-10940984_10154125846457925_8285230213856 599704_n_62f81ee97e5c388623bccdb51f34a4b 9002285ea.jpg[/IMG]
[IMG]https://cimg0.ibsrv.net/gimg/www.corvetteforum.com-vbulletin/543x960/80-
10636455_10154125845857925_6934672301403 767278_o_c1607f85196265e19e30746b585a378 1d23ccb39.jpg[/IMG]
Perfect..thanks again for all your support.
 02-13-2015, 12:15 PM
#7
Instructor
Thread Starter
Alan and Willcox
Thanks for the pictures, those are just what I needed. I got a chance yesterday to look at a 73 convertible and between the pictures and seeing the real thing up close I now know my issues.
I pulled off the outside upper molding and I am missing several clips in addition to my upper real panel had the inside flanges bent to go on the outside of the windshield frame, while they should go on the inside.
I will pick up some more reveal clips and new chrome corner pieces and sealant and I should be set.
Don't think I can get mine to look as good as the pictures due to my top s/s reveal part being scratched up. I will try some polishing and see how it comes out.

Thanks again for your help.
Thanks for the pictures, those are just what I needed. I got a chance yesterday to look at a 73 convertible and between the pictures and seeing the real thing up close I now know my issues.
I pulled off the outside upper molding and I am missing several clips in addition to my upper real panel had the inside flanges bent to go on the outside of the windshield frame, while they should go on the inside.
I will pick up some more reveal clips and new chrome corner pieces and sealant and I should be set.
Don't think I can get mine to look as good as the pictures due to my top s/s reveal part being scratched up. I will try some polishing and see how it comes out.
Thanks again for your help.
02-13-2015, 02:01 PM
#8
Team Owner
Member Since: Sep 2006
Location: Westminster Maryland
Posts: 30,173
Likes: 0
Received 2,878 Likes
on
2,515 Posts
Hi LRB,
I didn't realize you were asking about the header soft trim.
I should have caught that.
On my original soft header trim when looking at the back-side it was obvious that trimming a little of the expanded foam that's used to form the part could be trimmed from the metal part of the header piece and allow it to fit a little more snuggly against the ss trim.
Good Luck!
Regards,
Alan
04-20-2017, 08:11 AM
#9
Instructor

how did you treat the gap between the ss windshield molding and the ss T-trim. My fear of rotting birdcage wants me to put a sealant under the molding and into the gap but I read somewhere I should not seal it underneath.
 04-20-2017, 09:01 AM
#10
Team Owner
Member Since: Sep 2006
Location: Westminster Maryland
Posts: 30,173
Likes: 0
Received 2,878 Likes
on
2,515 Posts
Hi V,
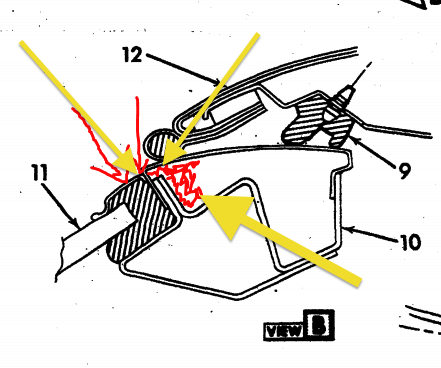
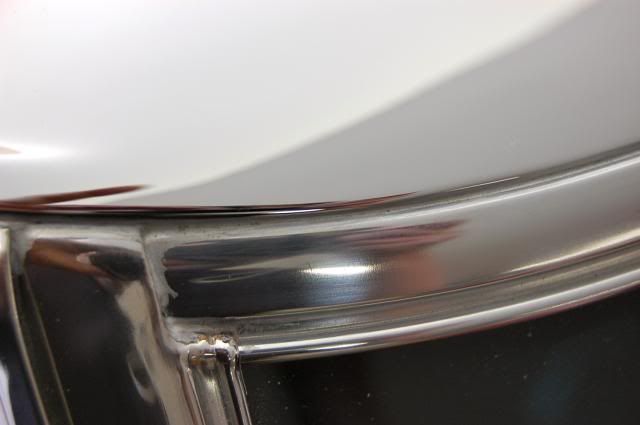
I don't see that 'filling' the gutter that the windshield header forms does much if any good. (Area of large arrow.)
Any attempt to seal the ss header trim to the steel header should occur where the 2 seat together. (Upper right arrow).
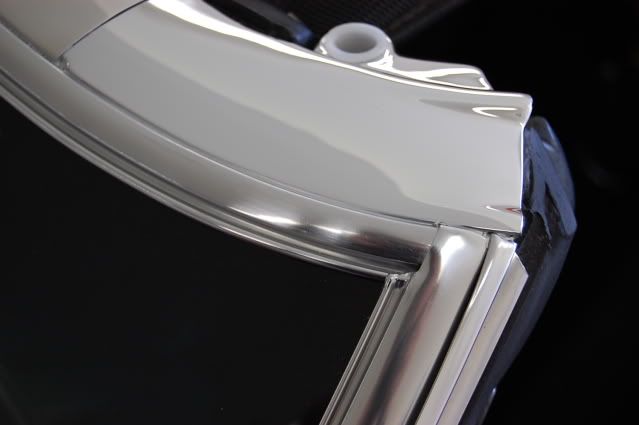
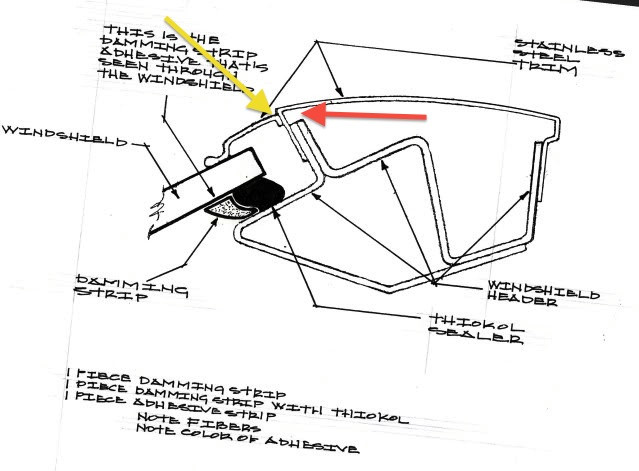
Originally the joint between the header ss trim and the windshield reveal trim was filled with a silver/gray material. I'm unsure if it's intent was cosmetic or was to actually seal the gap? Perhaps it's purpose was both.
Very few cars still have this sealer in place. (Upper left arrow)
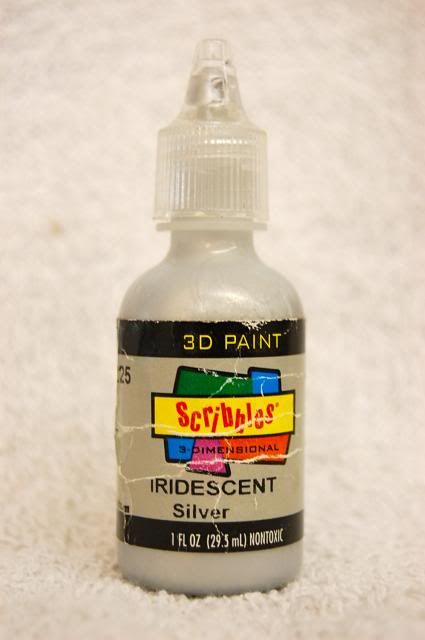
I was mainly interested in duplicating the appearance of the sealer and found something at the crafts store that has seemed to work.
Regards,
Alan
This is what I used in the long seam between the windshield reveal molding and the ss header trim and header end castings.
I don't see that 'filling' the gutter that the windshield header forms does much if any good. (Area of large arrow.)
Any attempt to seal the ss header trim to the steel header should occur where the 2 seat together. (Upper right arrow).
Originally the joint between the header ss trim and the windshield reveal trim was filled with a silver/gray material. I'm unsure if it's intent was cosmetic or was to actually seal the gap? Perhaps it's purpose was both.
Very few cars still have this sealer in place. (Upper left arrow)
I was mainly interested in duplicating the appearance of the sealer and found something at the crafts store that has seemed to work.
Regards,
Alan
This is what I used in the long seam between the windshield reveal molding and the ss header trim and header end castings.
 04-27-2017, 12:29 PM
#12


Hi V,
I don't see that 'filling' the gutter that the windshield header forms does much if any good. (Area of large arrow.)
Any attempt to seal the ss header trim to the steel header should occur where the 2 seat together. (Upper right arrow).
Originally the joint between the header ss trim and the windshield reveal trim was filled with a silver/gray material. I'm unsure if it's intent was cosmetic or was to actually seal the gap? Perhaps it's purpose was both.
Very few cars still have this sealer in place. (Upper left arrow)
I was mainly interested in duplicating the appearance of the sealer and found something at the crafts store that has seemed to work.
Regards,
Alan
This is what I used in the long seam between the windshield reveal molding and the ss header trim and header end castings.
Alan (& everyone),
The Scribbles Paint: Is that filling the gaps by itself? Or is it painted over the sealant that you used?
I am in this same area of installation now and want to make the effort to seal up these pieces as best I can.
Does the 3M strip caulk take the place of the grey factory sealant?
Would 'dum-dum' body shop type putty be appropriate?
Also, was anything used to seal the reveal clip screw piercings when they were installed?
And finally what about using a modern silcone(?) type sealant in this area or on these trim pieces?
Thanks for any help.
Mark
04-27-2017, 01:27 PM
#13
Team Owner
Member Since: Sep 2006
Location: Westminster Maryland
Posts: 30,173
Likes: 0
Received 2,878 Likes
on
2,515 Posts
Hi Mark,
On my car the Scribbles is the only thing in the gap between the long thin piece of trim at the windshield and the ss header trim and the corner chrome plated casings.
I consider it purely cosmetic.
The water penetration sealing all takes place under the trim.
The scribbles is thick bodied �. almost like toothpaste. It MAY HELP with a seal, but that's not why I put it there.
Regards,
Alan
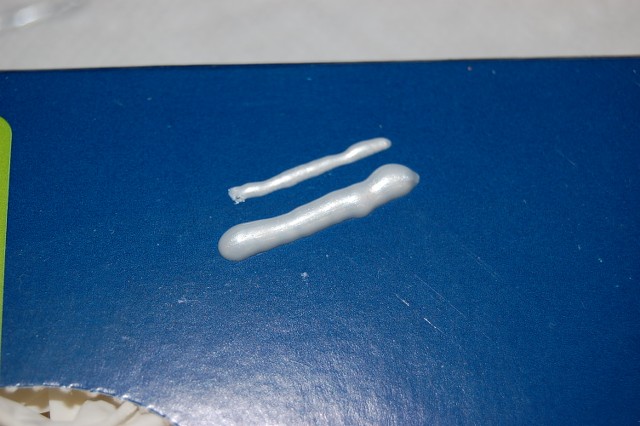
This is how it comes out of the nozzle when you squeeze the container.
A 1/16"x 1/16" bead and a 1/8"x1/8" bead. It flattens/shrinks a little when it dries. So do some 'tests' first.
On my car the Scribbles is the only thing in the gap between the long thin piece of trim at the windshield and the ss header trim and the corner chrome plated casings.
I consider it purely cosmetic.
The water penetration sealing all takes place under the trim.
The scribbles is thick bodied �. almost like toothpaste. It MAY HELP with a seal, but that's not why I put it there.
Regards,
Alan
This is how it comes out of the nozzle when you squeeze the container.
A 1/16"x 1/16" bead and a 1/8"x1/8" bead. It flattens/shrinks a little when it dries. So do some 'tests' first.
04-27-2017, 09:45 PM
#14
Alan,
1) Just so I am clear, when i apply this (since it is a paint) I don't spread it with my finger and wipe off the excess like I would a caulk sealer? Guessing the excess paint would be hard to remove?
2) If you have the time could you give me more details on what you used to seal the trim from inside the top of the birdcage/windshield trough.
Any help is (of course) appreciated.
Mark