
test dixon fair


Thread Starter
Instructor


Joined: Nov 2003
Posts: 197
Likes: 0
From: Sacramento Area California
Looks like a nice trip. And nice car. I especially like #1, 11, and 15.
As far as tips:
1. Always get the sun behind you or the light overpowers the settings and blows out the detail of the car. With pic 1, it would be easy, just face the car the other way and and take the pic from the other side of the gravel road. That way the car and the background would look good. With most pics that face into the sun, the background is usually ok, but the car isn't. One or the other is sacrificed. As car detail, pic 1.
2. Try using the smallest light metering mode you can. Usually you get a choice of entire screen(100%), center weighted and spot (mine is 9%). Especially if shooting into the sun and you can't avoid it as at Sac raceway in the late afternoon and evening. The camera reads the light from a small area, as the front of your car, and will expose for that and not the bright background.
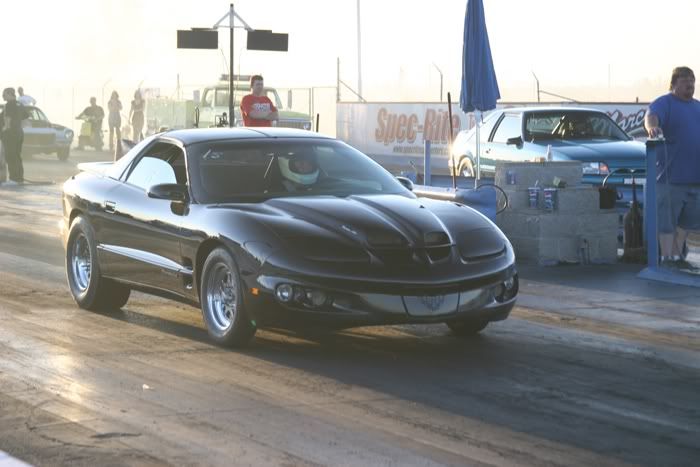
Here's a pic from sac raceway looking into the sun. By using the spot meter and putting the center of the camera on the front of the car and pushing the button half way, the camera sets the light level from the car and not the background. With the button half way down, you can reframe the pic. Also it helps to move in so only the car shows, or zoom in on the car to set the light exposure then back out to frame what you want.
The light at the raceway was low, looking into the camera, where yours is still fairly high based on the shadow your car is throwing, yet by using spot metering of light, I could get quite a bit of detail considering how low the sun was. Compare the car lights, hood scoops etc compared you your cars front end. (Only difference is spot metering and only on the object that is your main subject). See how the sky was blown out in mine, especially the two girls and scooter in the background, yet the car, pepsi containers etc show a fair amount of detail.
3. Also get in the habit of looking at the histogram. I'm sure your rebel has one and can be brought up by itself or with the pic on the viewing screen. You want the dark area centered with just a little bit of space on with side. Here is your histogram, from I think the first photo. The right is the light area and you can see there is a big gap of white area on the right, meaning way too light, and not correctable.
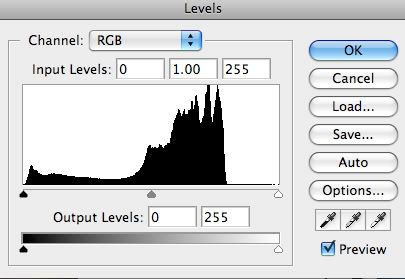
If there was a small gap on the right or left, you can make an adjustment in the exposure compensation meter (it's like pre lightening or darkening the camera). It looks like this. Moving the line to the - or + will darken or lighten the pic. Then take another pic and check the histogram again. Just for important pics.
4. Get in the habit of running you eyes around the edge of the frame before you take a pic and look for distracting crap in the background that takes away from your pic. Your pics 1 & 2 have part of a pole that is detracting from the flow of the eye through the pic. That's nitpicking, but really noticeable in pic 3 with a pole growing out the top of the car. I like pic 4, but the poles on the left distract the car and background for my eye.
This changes the pic subtilely, but noticeable for me.

Also fill the frame with what you want to see. I like the framing of your pic 9, it show your car set in an orchard. Emphasis on the car. Pic 10 shows an orchard with a car in it.
Hope this helps. Nice trip!!! I should have done something like that.
As far as tips:
1. Always get the sun behind you or the light overpowers the settings and blows out the detail of the car. With pic 1, it would be easy, just face the car the other way and and take the pic from the other side of the gravel road. That way the car and the background would look good. With most pics that face into the sun, the background is usually ok, but the car isn't. One or the other is sacrificed. As car detail, pic 1.
2. Try using the smallest light metering mode you can. Usually you get a choice of entire screen(100%), center weighted and spot (mine is 9%). Especially if shooting into the sun and you can't avoid it as at Sac raceway in the late afternoon and evening. The camera reads the light from a small area, as the front of your car, and will expose for that and not the bright background.
Here's a pic from sac raceway looking into the sun. By using the spot meter and putting the center of the camera on the front of the car and pushing the button half way, the camera sets the light level from the car and not the background. With the button half way down, you can reframe the pic. Also it helps to move in so only the car shows, or zoom in on the car to set the light exposure then back out to frame what you want.
The light at the raceway was low, looking into the camera, where yours is still fairly high based on the shadow your car is throwing, yet by using spot metering of light, I could get quite a bit of detail considering how low the sun was. Compare the car lights, hood scoops etc compared you your cars front end. (Only difference is spot metering and only on the object that is your main subject). See how the sky was blown out in mine, especially the two girls and scooter in the background, yet the car, pepsi containers etc show a fair amount of detail.
3. Also get in the habit of looking at the histogram. I'm sure your rebel has one and can be brought up by itself or with the pic on the viewing screen. You want the dark area centered with just a little bit of space on with side. Here is your histogram, from I think the first photo. The right is the light area and you can see there is a big gap of white area on the right, meaning way too light, and not correctable.
If there was a small gap on the right or left, you can make an adjustment in the exposure compensation meter (it's like pre lightening or darkening the camera). It looks like this. Moving the line to the - or + will darken or lighten the pic. Then take another pic and check the histogram again. Just for important pics.
4. Get in the habit of running you eyes around the edge of the frame before you take a pic and look for distracting crap in the background that takes away from your pic. Your pics 1 & 2 have part of a pole that is detracting from the flow of the eye through the pic. That's nitpicking, but really noticeable in pic 3 with a pole growing out the top of the car. I like pic 4, but the poles on the left distract the car and background for my eye.
This changes the pic subtilely, but noticeable for me.
Also fill the frame with what you want to see. I like the framing of your pic 9, it show your car set in an orchard. Emphasis on the car. Pic 10 shows an orchard with a car in it.
Hope this helps. Nice trip!!! I should have done something like that.


