
1974 headlights
 11-21-2016, 04:10 PM
#21
Advanced

Thread Starter
John,
I can talk you through a series of vacuum tests if you desire. I would need to know if you have the proper test equipment first. Do you have, or have access to a hand vacuum pump (Mityvac or equivalent), or a vacuum gauge? It's best to start from the beginning that way we know what we are dealing with.
I can talk you through a series of vacuum tests if you desire. I would need to know if you have the proper test equipment first. Do you have, or have access to a hand vacuum pump (Mityvac or equivalent), or a vacuum gauge? It's best to start from the beginning that way we know what we are dealing with.
 11-21-2016, 05:00 PM
#22
Le Mans Master


Here is the Willcox headlight troubleshooting video.
http://repairs.willcoxcorvette.com/1...gnostics-help/
http://repairs.willcoxcorvette.com/1...gnostics-help/
Last edited by '75; 11-21-2016 at 05:01 PM.
11-21-2016, 05:23 PM
#23
Burning Brakes

I do not have a hand vacuum pump or gauge but I will get what I need to check the system. I would love some help on this,like I said its new to me. When I asked DUB How I should check for vacuum he thought I was kidding. I was not clear the way I worded it I meant do I need a tool to check. I made myself look dumb,now I will try to be more accurate in my wording. This week is shot for me could we pick this up after Thanksgiving? Thanks again Sportster. TO ALL HAPPY THANKSGIVING>
We're all in this together, no worries. If you're willing to follow along with some simple instructions, I am willing to ship you one of my extra vacuum pumps for you to borrow. If you agree, simply PM me your address, and we can get started whenever you're ready.
Dave
 11-21-2016, 06:33 PM
#24
Race Director


Dub I have a lot of skill working on cars I have for along time. This is the first with vacuum control headlights I have ever owned or worked on. I just have no Idea how this system works. I did not mean to offend you in any way. I just turn to the forum when I need a little help. No hard feelings on this end I hope none on yours. Respectfully Sportster

If you look at the Willcox link...all of your answers should be answered....but I can say that needing to have a hand vacuum pump is NOT required. You can use your car vacuum when the engine is running and some tricks I have that you only need your thumb to block off hoses...and a hose to verify a vacuum leak that you can put to your ear.
Once you understand how this system works...you can find a problem really fast. 99.99% of the time I can diagnose a system in under 2 minutes. And all I need is my stethoscope to listen and my thumb. It is a quite simple system.
DUB
12-06-2016, 02:30 PM
#25
Advanced
Thread Starter
John,
We're all in this together, no worries. If you're willing to follow along with some simple instructions, I am willing to ship you one of my extra vacuum pumps for you to borrow. If you agree, simply PM me your address, and we can get started whenever you're ready.
Dave
We're all in this together, no worries. If you're willing to follow along with some simple instructions, I am willing to ship you one of my extra vacuum pumps for you to borrow. If you agree, simply PM me your address, and we can get started whenever you're ready.
Dave
12-06-2016, 11:22 PM
#26
Burning Brakes
Hey Sportster, Welcome back.
I read back through your previous posts, and I am still somewhat confused as to what has been done, and what does not work and why. Why don't we start at the beginning, just like I would when I diagnose someone's car, and we will know where we are at.
First things first, lets test the headlight actuators.
1 - Pull the front and rear vacuum hoses off the actuators. Make sure the headlights are DOWN. Connect the Mityvac to the rear curved vacuum ports, and pump them up, one at a time. Observe the vacuum reading, and make note if the actuators hold the vacuum once you stop pumping. They should hold vacuum. This test will tell us if the actuators can be used or will need to be replaced.
2 - Hopefully the actuators held vacuum on the rear ports, and we can test the front vacuum ports. Raise the headlights manually. Connect the Mityvac to the front port, and again pump 'em up one at a time. Observe the vacuum reading, and make note if the actuators hold the vacuum once you stop pumping. They should hold vacuum. If they do not hold vacuum, do not panic, they can be repaired. The front rubber seal simply needs to be replaced, very common issue.
3 - By following the actuator hoses to the next component, you will come to the relays. The center port is the vacuum source port, and the top and bottom are the lowering and raising ports respectively. The easy way to test the relay is to connect the Mityvac to the middle port, and block the lower port with your finger or a short section of blocked hose. Pump up the relay, and it should hold vacuum. If not, they are easily replaced, or in some instances, rebuilt.
Perform these simple tests, and report back. There's a few more things we can check, but this will give us a base line to work off of. Help is on the way
12-07-2016, 12:53 PM
#27
Melting Slicks


but, you don't always need tools to test things, like Dub said, holding you finger over the hose will let you know if there is vacuum or not(it does't give a reading or anything). then you can go further with the tests. to own a corvette means if you can't afford to have someone else work on it, you will have to buy some tools, depending on what work you are willing to do. And, no, I would not change over to electric powered headlights, mine work great, and if there is ever a problem, I will fix that, why cobble up something GM had for several years, and the only problem is when people won't buy some new parts to replace broken or worn out parts. If you can't afford a corvette(or any vehicle) then sell it and buy one you can afford.
12-08-2016, 05:37 PM
#28
Advanced
Thread Starter
Hey Sportster, Welcome back.
I read back through your previous posts, and I am still somewhat confused as to what has been done, and what does not work and why. Why don't we start at the beginning, just like I would when I diagnose someone's car, and we will know where we are at.
First things first, lets test the headlight actuators.
1 - Pull the front and rear vacuum hoses off the actuators. Make sure the headlights are DOWN. Connect the Mityvac to the rear curved vacuum ports, and pump them up, one at a time. Observe the vacuum reading, and make note if the actuators hold the vacuum once you stop pumping. They should hold vacuum. This test will tell us if the actuators can be used or will need to be replaced.
2 - Hopefully the actuators held vacuum on the rear ports, and we can test the front vacuum ports. Raise the headlights manually. Connect the Mityvac to the front port, and again pump 'em up one at a time. Observe the vacuum reading, and make note if the actuators hold the vacuum once you stop pumping. They should hold vacuum. If they do not hold vacuum, do not panic, they can be repaired. The front rubber seal simply needs to be replaced, very common issue.
3 - By following the actuator hoses to the next component, you will come to the relays. The center port is the vacuum source port, and the top and bottom are the lowering and raising ports respectively. The easy way to test the relay is to connect the Mityvac to the middle port, and block the lower port with your finger or a short section of blocked hose. Pump up the relay, and it should hold vacuum. If not, they are easily replaced, or in some instances, rebuilt.
Perform these simple tests, and report back. There's a few more things we can check, but this will give us a base line to work off of. Help is on the way
I read back through your previous posts, and I am still somewhat confused as to what has been done, and what does not work and why. Why don't we start at the beginning, just like I would when I diagnose someone's car, and we will know where we are at.
First things first, lets test the headlight actuators.
1 - Pull the front and rear vacuum hoses off the actuators. Make sure the headlights are DOWN. Connect the Mityvac to the rear curved vacuum ports, and pump them up, one at a time. Observe the vacuum reading, and make note if the actuators hold the vacuum once you stop pumping. They should hold vacuum. This test will tell us if the actuators can be used or will need to be replaced.
2 - Hopefully the actuators held vacuum on the rear ports, and we can test the front vacuum ports. Raise the headlights manually. Connect the Mityvac to the front port, and again pump 'em up one at a time. Observe the vacuum reading, and make note if the actuators hold the vacuum once you stop pumping. They should hold vacuum. If they do not hold vacuum, do not panic, they can be repaired. The front rubber seal simply needs to be replaced, very common issue.
3 - By following the actuator hoses to the next component, you will come to the relays. The center port is the vacuum source port, and the top and bottom are the lowering and raising ports respectively. The easy way to test the relay is to connect the Mityvac to the middle port, and block the lower port with your finger or a short section of blocked hose. Pump up the relay, and it should hold vacuum. If not, they are easily replaced, or in some instances, rebuilt.
Perform these simple tests, and report back. There's a few more things we can check, but this will give us a base line to work off of. Help is on the way
12-08-2016, 05:48 PM
#29
Advanced
Thread Starter
but, you don't always need tools to test things, like Dub said, holding you finger over the hose will let you know if there is vacuum or not(it does't give a reading or anything). then you can go further with the tests. to own a corvette means if you can't afford to have someone else work on it, you will have to buy some tools, depending on what work you are willing to do. And, no, I would not change over to electric powered headlights, mine work great, and if there is ever a problem, I will fix that, why cobble up something GM had for several years, and the only problem is when people won't buy some new parts to replace broken or worn out parts. If you can't afford a corvette(or any vehicle) then sell it and buy one you can afford.
12-08-2016, 11:16 PM
#30
Burning Brakes
Hey Sportster,
Just what I thought all along. Relays. Ok, your next step is to remove the relays, and tell me if they have AC SPARK PLUG DIV (see below) molded into the black plastic body just under the metal cap that the small control hose connects to. If they don't, they need to be replaced. If they DO, you are in luck. I rebuild original GM relays. If you want, send them to me and I will rebuild yours for free. Why? You're willing to follow instructions and seem like a good guy.
Let me know & I will PM you my address.
(I do not even bother rebuilding the import relays, WAY too many issues.)
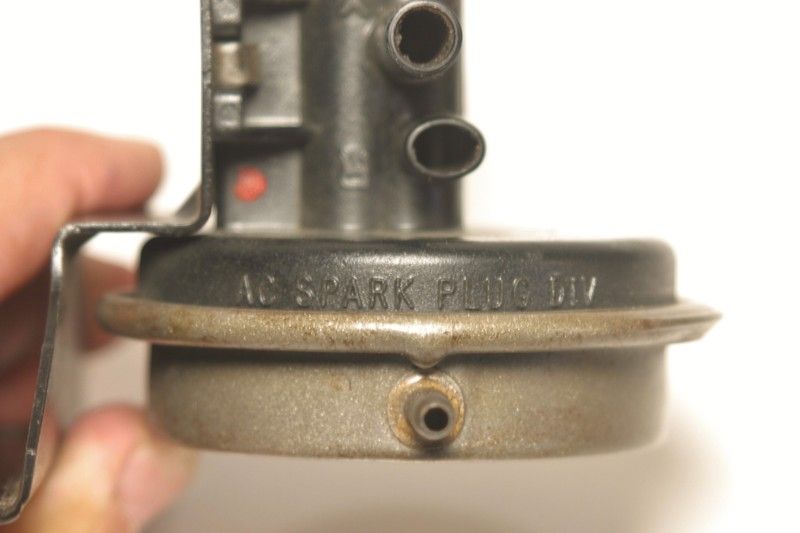

The following users liked this post:
Metalhead140 (12-08-2016)
12-09-2016, 05:01 PM
#31
Advanced
Thread Starter
Hey Sportster,
Just what I thought all along. Relays. Ok, your next step is to remove the relays, and tell me if they have AC SPARK PLUG DIV (see below) molded into the black plastic body just under the metal cap that the small control hose connects to. If they don't, they need to be replaced. If they DO, you are in luck. I rebuild original GM relays. If you want, send them to me and I will rebuild yours for free. Why? You're willing to follow instructions and seem like a good guy.
Let me know & I will PM you my address.
(I do not even bother rebuilding the import relays, WAY too many issues.)
 12-09-2016, 05:23 PM
#32
Burning Brakes
Cool! If you want, pop off the metal brackets that the relay body is attached to, (just bend the 2 tabs on one side & pull off) and soak in cider vinegar for a couple of days. This will knock off the surface rust, and you can shoot them with clear or however you want to coat. I just need the relays, not the brackets. Should turn them around in a couple of days. PM sent..........
12-20-2016, 12:55 PM
#34
Burning Brakes
Hey Sportster;
Yes, I got them. Already rebuilt and undergoing my final vacuum test. I hope to get them out to you later today, or tomorrow morning.
Yes, I got them. Already rebuilt and undergoing my final vacuum test. I hope to get them out to you later today, or tomorrow morning.
The following users liked this post:
sportster89 (12-20-2016)
12-20-2016, 10:10 PM
#35
Burning Brakes
Sportster;
Your relays went out this evening usps. I thought I would share what I found in one of them. Apparently a bird strike or feather ingestion put it in a bad way. I found a bird feather wrapped around the bottom of the internal piston, and it welded itself to it. Needless to say, the vacuum seal was long gone.
Everything is good now
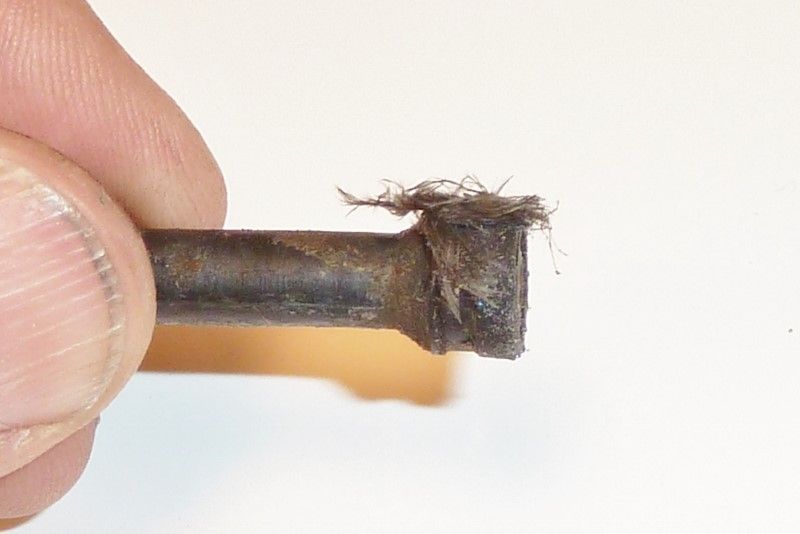
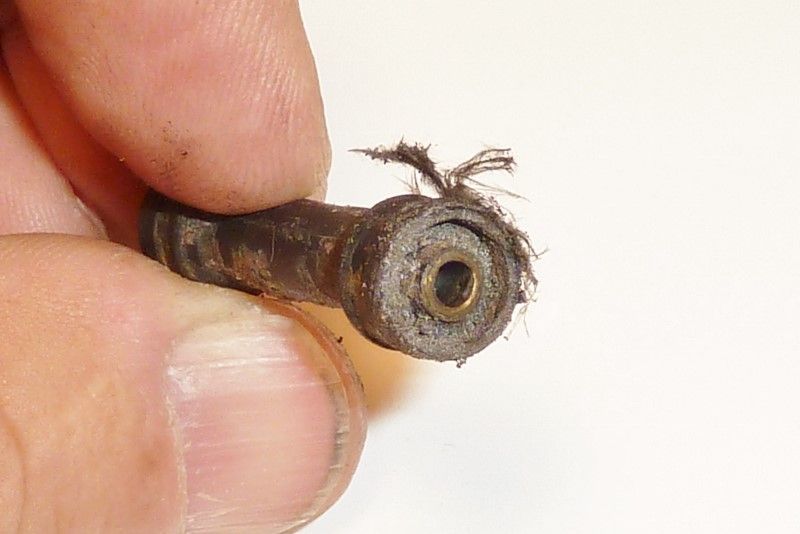

 12-21-2016, 10:06 PM
#36
Advanced
Thread Starter
Dave Let me know what I owe you and I will mail it to you. I will try to keep an eye out for low flying birds. MERRY CHRISTMAS & Thanks again. Sportster89
12-21-2016, 10:55 PM
#37
Le Mans Master

Sportster;
Your relays went out this evening usps. I thought I would share what I found in one of them. Apparently a bird strike or feather ingestion put it in a bad way. I found a bird feather wrapped around the bottom of the internal piston, and it welded itself to it. Needless to say, the vacuum seal was long gone.
Everything is good now
 12-26-2016, 01:38 PM
#38
Advanced
Thread Starter
Sportster;
Your relays went out this evening usps. I thought I would share what I found in one of them. Apparently a bird strike or feather ingestion put it in a bad way. I found a bird feather wrapped around the bottom of the internal piston, and it welded itself to it. Needless to say, the vacuum seal was long gone.
Everything is good now
Your relays went out this evening usps. I thought I would share what I found in one of them. Apparently a bird strike or feather ingestion put it in a bad way. I found a bird feather wrapped around the bottom of the internal piston, and it welded itself to it. Needless to say, the vacuum seal was long gone.
Everything is good now
 Thanks Sportster.
12-26-2016, 01:47 PM
Thanks Sportster.
12-26-2016, 01:47 PM
#39
Advanced
Thread Starter

The following users liked this post:
sportster89 (12-31-2016)