When you click on links to various merchants on this site and make a purchase, this can result in this site earning a commission. Affiliate programs and affiliations include, but are not limited to, the eBay Partner Network.
could someone confirm for me exactly how should the choke work on a 68 327 with the divorced choke.
Heres how i THINK it should work:
get in car pump gas a few times to set the choke
turn key to start
car should start and move to high idle
tap the gas to take the car off fast idle.
High idle- around 1200 rpm. Normal idle around 650.
Here is what my car actually does(just did on cold start sitting in garage since yesterday)
pump gas 3 times.
Turn key to start. Car stumbles and dies
pump gas again restart
car starts on 2nd or 3rd attempt. Will idle but does not go to high idle. Just hangs around normal idle.
Someone please confirm that what im thinking should be happening is what actually should be?
Yesterday I tried the same starting procedure above and when it was idling low I adjusted the high idle screw to get a 1200 rpm idle. But today it did not go back there.
I think Lars has a procedure to adjusting the high idle? I'm on my phone now will search for it tonight.
When you do a cold start, you need to set the choke- that's what giving the pedal a couple of pumps does. Also gives the intake a shot of gas. When you start cranking, and the engine fires and begins to run, it immediately needs more air (remember the choke plate is fully closed), so the choke pull off opens the choke plate a little bit to allow more air.
Checking the pull off is pretty easy- pull the vacuum line off, push the plunger on the pull off all the way in and put your finger over the vacuum port. If it stays in, pull off is good. No stay, no good.
With the engine cold, remove the air cleaner so you can see what's going on. Give the pedal a stroke. The choke valve should close and the fast idle cam should rotate because of the choke thermostat commanding it to the on position. Easy to tell, the throttle arm will stop slightly off the base idle screw on the left side of the carb.
thanks. I think based on what I saw(and yes I had the air cleaner off) that I need to look at the fast idle cam. Maybe that needs adjusted or is installed incorrectly
Send an e-mail request to Lars Grimsrud at V8FastCars@msn.com . There are some unique aspects on the '68 C3 choke for some engines. He knows "all" and can give good advice. But you have to ASK for it via e-mail.
There is something you need to check and verify on the '68 big block Q-Jet choke:
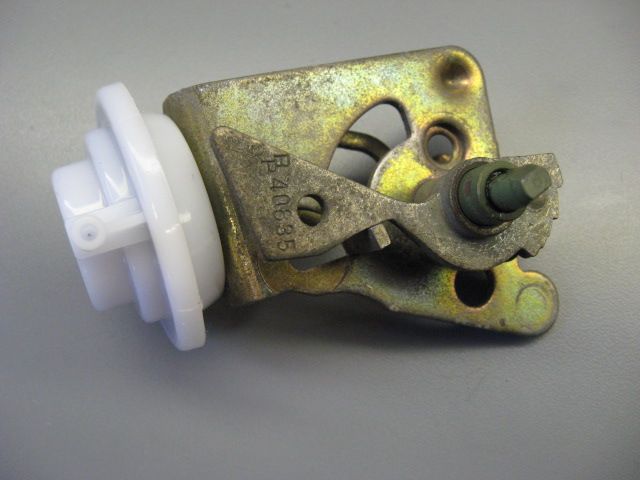
If the carb is correct, is will have the "duckbill" choke as shown here. It has an odd counterweight hanging off the rear, and the choke rod attach point is forward of the pivot point. This is opposite of all other Chevy Q-Jets ever made:
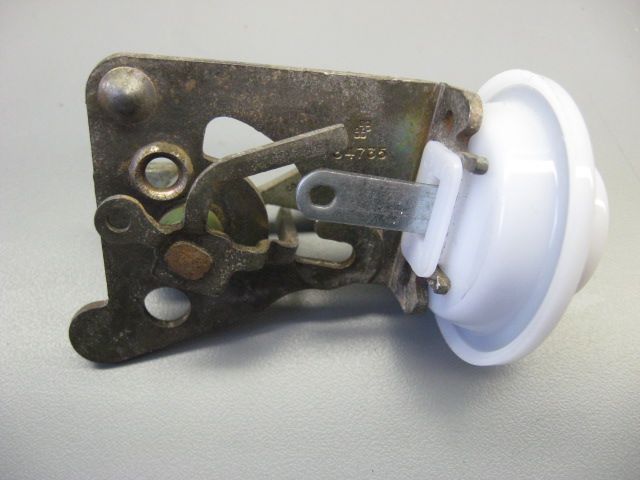
Here the the choke that is typical on all other Q-Jets. Note that the choke rod attach point is to the rear of the pivot point, unlike as shown on the BB carb above:
So here is what can happen: If you have the incorrect, "standard" choke system on your carb, and you have the correct '68 BB choke coil on your manifold, the coil will force the choke wide open upon cold start, and it will gradually close the choke as the engine warms up. Likewise, if your carb is correct, but you have replaced the choke coil on the manifold, chances are good that the coil is set up to operate the wrong way for the carb, thus forcing the choke wide open when cold.
So make sure you have the correct carb choke linkage with the correct manifold-mounted choke coil. Visually verify that the choke blade snaps fully closed when you crack the throttle open on a cold engine. If the blade snaps fully closed, the fast idle speed screw should ride on the fast idle cam, and you should be able to set the fast idle to any desired speed. With the choke fully closed, the choke pulloff should crack the choke open 1/4" upon engine start. If any of these things are not happening, you need to identify the problem (which could be the unique '68 choke parts being missing or mis-matched as noted) and set the carb up with parts that are correctly matched.
thanks. I think based on what I saw(and yes I had the air cleaner off) that I need to look at the fast idle cam. Maybe that needs adjusted or is installed incorrectly
Here is what the parts should look like:
Here is the fast idle cam correctly installed on the inside of the mounting plate in the raised position:
Here it's rotated down into the hot idle position:
Here is what it should look like installed from the outside of the carb. Fast idle cam is visible in the choke-open position:
Here, it's raised into the fast idle position:
The photos show an actual 68 BB carb - compare this to what you have and verify you really have a 68 BB carb on your engine...
I was emailing you back a few weeks about my engine dieseling (you probably got sick of my questions)
its actually a 327 small block, so Im going to compare what my fast idle looks like to your pics. i rebuilt the carb and put it back together like it was, but i'm almost positive someone was in the carb before me, so no telling if they put it in correct or not
You should be able to crack the throttle open slightly and then push down lightly on the lever where the hole is for the choke coil rod. This should make the choke fully close. The action should be smooth and easy. When the engine is cold, your choke coil should be pulling the choke rod downwards firmly, thus fully snapping the choke closed when the throttle is cracked open. This photo shows the choke in the full open (hot - "up") position:
You're a funny guy, Mark... Several people have been wondering why I've been taking all these pictures and why I have all these carbs and parts in my inventory...
One more. In the second pic above I held the choke in the fully closed position.
Here is fully open
This am with the car cold I pumped the gas and tried to start car. Choke closed fully and popped open. But the fast idle cam did not catch. I forced it to "lock" and the car idled high like it should.
Two things I noticed. One the spring at the bottom was not installed correctly (one ear was not hooked) I fixed that. 2- seems like my fast idle cam doesn't catch on 3 steps. It's basically on or off.
Sounds like your choke pulloff is pulling the choke open too far upon startup. When the engine starts, the pulloff should crack the choke open only 1/4" as measured from the lower, forward edge of the choke blade to the airhorn casting. This should allow the fast idle screw to ride on the second notch of the fast idle cam and maintain engine fast idle speed of about 1250 - 1350 rpm. The amount the choke is cracked open at startup is determined by bending the long, curved tang that contacts the airvalve rod upon pulloff retraction.
I also see that your secondary airvalve rod is not bent correctly - it has been bent at a sharp angle near the pulloff, and this will shorten the rod making the choke open more dramatically - repair or replace that rod, since it is not working correctly based on what I see in your photos. Compare the rod against the photos I posted above and you'll see the difference.
played with it a little today. It's tough because I really only get one shot at a true cold start
i corrected my rod first before I did anything. Then it seemed like my choke flap actually wasn't opened enough. I measured using a 1/4" drillbit and I couldn't get it down. Once I forced the bit down opening the flat the idle started picking up.
Bent it a lil but now car is too warm to test. Will likely have to wait till tomorrow
You can set it up without starting the engine or having the engine cold. Just attach a long vacuum hose to the choke pulloff and stick the other end in your mouth. Crack the throttle open and push down lightly on the choke lever to simulate the choke coil rod pulling downwards when cold. This should fully close the choke. Now suck on the hose to retract the pulloff. Maintaining downward finger pressure on the choke lever, use your other hand to push lightly against the forward lower edge of the choke blade to simulate the air flow pushing on it. This will place the choke plate in the running position. Adjust by bending the choke linkage where the curved lever touches the secondary airvalve rod to achieve a gap of 1/4" at the choke as measure with a drill bit (as you're doing).
Drink a good Scotch to get rid of the rubber hose taste.
The next time you start it up cold, the choke will be correctly set, so all you have to do is adjust your fast idle speed screw upon startup to achieve a 1250 - 1350 idle speed.
Here is the full and complete procedure:
Technical Procedure #3: How to Set Up a Q-Jet Choke
by Lars Grimsrud
The procedure outlined here differs from other I have seen, and is based on my years of experience doing this work in the quickest, least painful, most economical way. It is recognized that other people will have different methods of doing things, and may disagree with specific methods and procedures that I use.
Overview
The Rochester QuadraJet uses an automatic choke system that is actually very good, if properly set up and adjusted. But before starting on the choke setup, it�s important to remember a few other tuning parameters.
The Q-Jet choke setup assumes that other engine parameters are correctly set up and tuned. Most importantly is proper ignition timing. Before doing any carb tuning, it is imperative that the initial timing, total timing, timing curve, and vacuum advance systems be correctly set up and functioning. You cannot correct tuning issues related to timing by tweaking the carb. See my papers on setting up timing and vacuum advance before you start playing with carb adjustments.
Also, the choke setup assumes that your carb is correctly jetted and set up. If your carb is running either rich or lean, the choke will not function properly, even when adjusted to specification. Make sure your carb has the correct jets, rods and float level adjustment before trying to set up the choke. These carbs are old, and most of them have seen some �creative� jetting over the years.
Procedure
There are two styles of Q-Jets, and the setup procedure differs between the two.
The early style carbs utilize a �divorced choke� system. These carbs, used from 1966�1974, rely on a choke coil bolted down to the intake manifold inside a little metal box. There is a rod that connects the carb choke linkage to the coil on the manifold. As the manifold crossover gets hot, the coil expands, and pushes the rod up to open the choke.
The second style uses an �integral choke,� and was used from 1975�1981 (except truck � Heavy Duty truck carbs used after 1975 still used divorced choke systems). 1975�1979 uses a �hot air� choke whereby clean air is pulled from a nipple at the back of the carb airhorn, through a steel tube, through a heat exchanger in the manifold crossover, and back up a steel tube into the front of the choke housing on the carb. There is a vacuum bleed hole between the carb choke housing and manifold vacuum, causing the air to be pulled through the tube from the airhorn. As the engine gets hot, the air in the tube gets hot, and the coil expands to open the choke. This choke will not function at all if the entire hot air tube system is not hooked up and functional. From 1980-1981 an integral electric choke was used in place of the hot air system. There is a single wire that connects to the choke housing cover. The cover contains an electrical heating element that heats up the coil and opens the choke.
As a note, the 1980 electric choke cover can be used to convert a 1975-1979 hot air choke to an electric choke. The only thing to remember is to remove the hot air choke gasket: If you do not remove the cover gasket when using the electric choke cover, the electric choke will not have a ground, and it will not function. I also recommend that you install a rubber cap on the hot air inlet port on the choke housing to avoid sucking dirty air into the housing. There is no need to plug the vacuum bleed hole in the housing since this vacuum bleed is insignificant to engine operation. The electric choke covers typically do not have the �dots and lines� for rotational alignment: Rather, they have a notched indent on the outer diameter, and this notch aligns with the forward upper retaining clip (there are 3 retaining clips) � the forward upper clip on an electric choke carb has a nipple sticking out of it, and this nipple goes into the notch in the choke cover. DO NOT use the ignition HOT wire (coil �+� or HEI RED wire) as the power source for your choke. Use a separate wire from the fusebox �IGN� terminal, or hook the wire up to your windshield wiper motor.
Here is my recommended sequence and procedure for doing a basic Q-Jet choke set-up:
1. Divorced Choke Systems (1967-1974)
Disconnect the divorced choke rod from the lever on the passenger side of the carb. Leave it attached to the choke coil box on the manifold.
Open the throttle slightly and fully close the choke by pushing on the lever arm that the disconnected rod normally attaches to.
Push the choke rod all the way down into the choke coil until it hits the stop. If the engine is dead cold, it may already be bottomed out.
At this position, the top of the choke rod should be level with the bottom edge of the choke rod hole in the lever on the carb.
Bend the rod to obtain this relationship.
Once complete, hook the rod back up to the lever.
With the rod hooked up, push the choke rod back down to the seated position once again. This should fully close the choke blade. If the choke blade is not fully closed in this position, bend the choke intermediate rod that comes up through the body of the carb and attaches to the choke blade lever. Bend the rod so that the choke blade is fully closed.
Remove the short piece of vacuum hose attaching the choke pulloff to the vacuum nipple on the carb. Attach a long (about 2�) vacuum hose to the pulloff.
Crack the throttle slightly and push down on the divorced choke rod to close the choke fully. Release the throttle. Keep light finger pressure on the choke rod to maintain light closing pressure on the choke.
Suck on the vacuum hose to retract the choke pulloff. If the pulloff does not retract, it must be replaced.
With the pulloff fully retracted and light finger pressure on the choke rod, use your other hand to lightly push down on the forward lower edge of the choke blade to simulate to force of the air across the blade. This will open the choke slightly. At this point, measure the distance between the forward lower edge of the choke blade and the forward wall of the airhorn. This distance should be ��. You can use a �� drill bit as a simple gauge to check it. To adjust, bend the tang on the choke linkage where it contacts the choke pulloff rod.
Re-attach the vacuum hose to the pulloff and the carb.
This completes choke adjustment for a divorced choke carb.
2. Integral Choke Systems (1975-1981)
Remove the three screws holding the black choke cover to the choke housing and remove the cover. If rivets are used, drill out the rivets.
Crack the throttle slightly open and push up on the choke coil lever inside the choke housing until the choke is closed.
Notice that there is a small 1/8� hole recess inside the choke housing which will appear right below the lower edge of the choke coil lever when you push the lever up. Insert a 1/8� drill bit in this recess and allow the lever to rest on the drill bit.
In this position, your choke blade should be fully closed. If not, bend the choke intermediate rod that comes up through the body of the carb and attaches to the choke blade lever. Bend the rod so that the choke blade is fully closed.
Now, remove the drill bit, crack the throttle slightly and rotate the fast idle cam (the steel counterweight that rotates on the choke housing shaft between the choke housing and the carb body) so that the fast idle cam follower is positioned on the second step of the cam, right up against the edge of the highest step.
In this position, apply light finger pressure on the choke coil lever inside the choke housing to close the choke (lift up on the lever).
The choke should be cracked open 5/16� as measured between the rear upper edge of the choke blade and the rear airhorn wall. Use a drill bit to check this.
To adjust, notice that there is a small sheet metal tang attached to the lower side of the fast idle cam. This tang determines the travel range of the choke. Bend the tang to adjust.
Now, install the choke housing cover to the choke housing. If you�re using an electric choke, DO NOT use a gasket between the cover and the housing. Be sure that the choke coil tang in the cover correctly mates with and engages to the choke coil lever inside the housing.
With the cover attach screws loose, rotate the cover so that the indicator scribe line points straight up. This should fully close the choke. If there is no scribe line (electric chokes do not have lines), rotate the cover counter clockwise until the choke blade is fully closed. Lightly snug the cover attach screws to keep the cover in this position. You may need to crack the throttle open to get the choke to snap closed.
Remove the short piece of vacuum hose attaching the choke pulloff to the vacuum nipple on the carb. Attach a long (about 2�) vacuum hose to the pulloff.
Suck on the vacuum hose to retract the choke pulloff. If the pulloff does not retract, it must be replaced.
With the pulloff fully retracted, use your other hand to lightly push down on the forward lower edge of the choke blade to simulate to force of the air across the blade. This will open the choke slightly. At this point, measure the distance between the forward lower edge of the choke blade and the forward wall of the airhorn. This distance should be ��. You can use a �� drill bit as a simple gauge to check it. To adjust, turn the screw on the end of the choke pulloff lever. After each adjustment, you must release the vacuum on the hose and suck on it again to re-seat the pulloff, each time apply the light finger pressure to the forward lower edge of the choke blade.
Once completed, loosen the choke coil cover attach screws and rotate the cover clockwise. On hot air choke systems, the cover scribe mark should be aligned with the second dot clockwise of the center dot on the choke housing marks. On electric chokes, the indentation in the outer edge of the cover should be aligned with the screw & clip location towards the forward side of the choke housing. Snug the screws down or re-install new rivets. (NOTE: On riveted applications, the rivet holes can be tapped for #10 screws.)
Re-attach the vacuum hose to the pulloff and the carb.
This completes choke adjustment for an integral choke carb.
Tuning note on Integral Choke Carbs:
When doing custom tuning adjustments on the integral choke carbs, keep the adjustments limited to 2 parameters: Setting the position of the choke cover (rotating the cover) and adjusting the choke pulloff screw. When doing these adjustments, keep the following relationship in mind:
The cover adjustment (rotating the cover) determines how LONG (duration) the choke is applied before fully opening. Turning the cover clockwise shortens the duration. Turning the cover counter clockwise increases choke duration. It only takes a very small rotational adjustment to change this (1 or 2 mark lines on the cover). Contrary to popular misunderstanding, turning the cover does NOT change how rich or lean the carb runs with the choke applied.
The choke pulloff screw determines how RICH or LEAN the carb will initially run when started cold. If your carb runs rich when initially started, turn the screw to open the choke a little more. Likewise, if your car starts lean and wants to die, turn the screw to open the choke blade a little less.
In summary:
Rotate the cover to change the amount of TIME the choke is applied.
Adjust the screw to change how rich/lean the choke is upon initial startup.
3. Fast Idle Bench Setup
The fast idle screw is located on the passenger side of the carb, on the primary throttle shaft just below the choke linkage. An initial fast idle setting can be done as follows:
Back out the idle speed screw on the driver�s side of the carb 3 full turns.
Crack the throttle open and rotate the fast idle cam so that the cam follower is on the top (fastest) part of the cam (simply lift the cam all the way up).
Hold the throttle blades firmly closed and back the fast idle screw out until the cam follower just barely looses contact with the fast idle cam. Find the adjustment point where the follower just barely touches the cam with the throttles fully closed. From this point, turn the fast idle screw in 2-1/2 turns.
Re-establish your driver�s side idle speed screw by turning it back in 3 turns to the original setting.
Start the engine cold and fine-adjust your fast idle screw to the fast idle speed of your preference. A good fast idle speed is 1250 rpm.
I did follow the procedure Sunday night to adjust the choke.
let the car sit until yesterday when I got home from work. pumped the gas and verified the fast idle cam set correctly. started the car and it idled correctly!
woohoo small victories!
the only "issue" I noticed is the car didn't pop right up to fast idle. it sort of gradually made its way from 550-600 rpm up to 1200.
ok guys Im resurrecting this thread from the dead 2 years later.
I just pulled my car off the lift from winter storage and my choke is still doing the same thing its done since 2017- everything is physically set correctly with fast idle cam, choke pull off, etc. BUT when you start the car it does not immediately fast idle. it starts, runs at a lower rpm, around 600 and then slowly climbs to 1200.

 03-23-2017, 05:35 PM