
what do you have to do to pin the crank for a supercharger install??
 09-12-2009, 06:14 AM
#1
Pro

Thread Starter
Ive got a vortech kit coming in very soon. Ive been reading up on the system and it says something about having to pin the crank to it doesnt spin. What is involved with this procsess and is it hard to do??
 09-12-2009, 09:59 AM
#2
Tech Contributor
If I had to pick a single task that was more of a pain than others during my vortech install, it would have to be the rack. I didn't have any struggles in particular, just thought it was a pain. I did everything on jackstands, which added to the limited work area. I purchased my kit from A&A, and the pinning kit came with it. It's a very simple jig. No offense, but if you have to ask, your probably going to struggle with the rest of the install. Best to get some help.
09-12-2009, 10:14 AM
#3
Team Owner


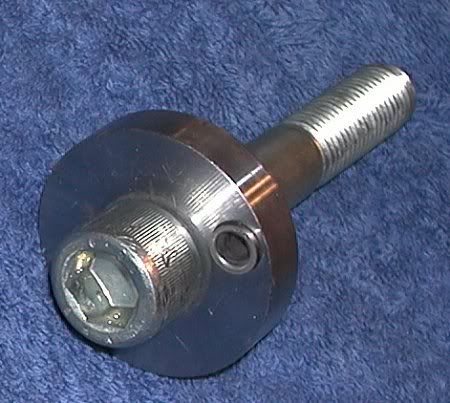
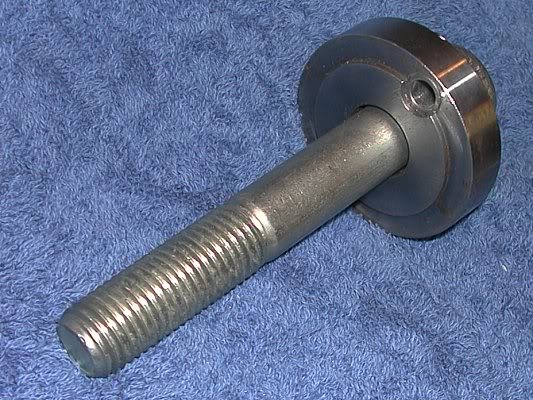
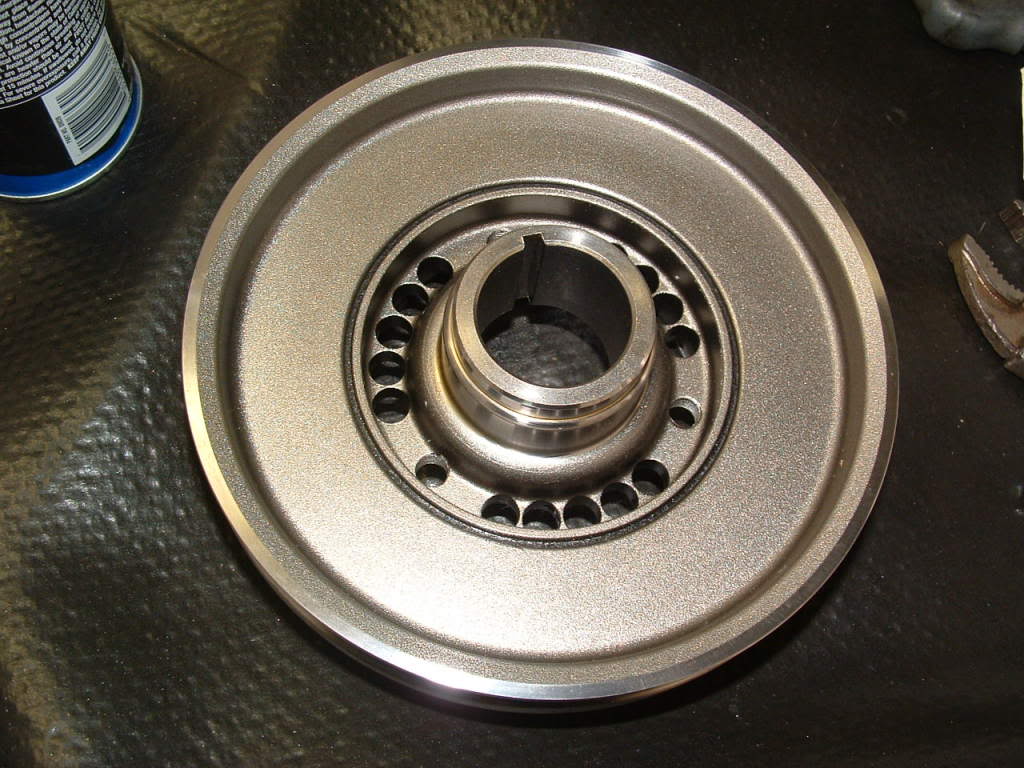
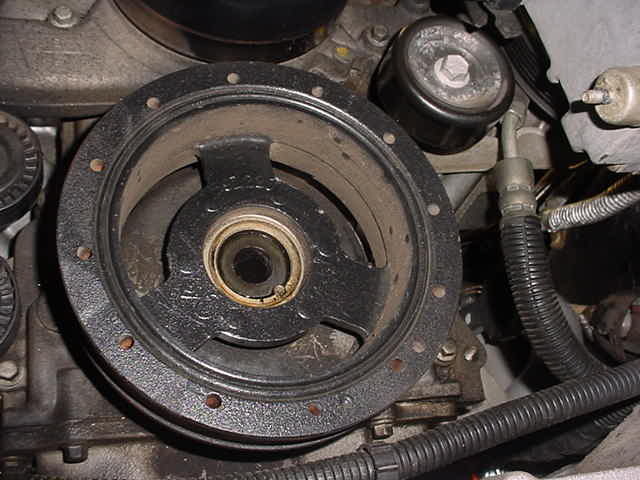
Probably the easiest part of the install. Two different types of pinning that are done are parallel to the crank centerline and orthogonal (90 deg.) to it. Simply put, you match drill the crank pulley and crank and push a dowel in to pin them together which keeps the pulley from spinning relative to the crank snout. An unpinned pulley is sure to spin since it's pressed onto instead of keyed to the crank.
Here's a shot of my buddy's pinned pulley we did on his Vortech install. Note the dowel pin spanning the pulley and crank snout at about 12 o'clock.

Couple of shots of the pinning tool. This is screwed into the crank snout where the pulley bolt normally goes and then you drill through using the 1/4" drill bushing as the drill guide. The tool is removed and a 1/4" dowel is slid into the hole. The pulley bolt is installed over the dowel, holding it in place.
Good luck on the install.
Here's a shot of my buddy's pinned pulley we did on his Vortech install. Note the dowel pin spanning the pulley and crank snout at about 12 o'clock.
Couple of shots of the pinning tool. This is screwed into the crank snout where the pulley bolt normally goes and then you drill through using the 1/4" drill bushing as the drill guide. The tool is removed and a 1/4" dowel is slid into the hole. The pulley bolt is installed over the dowel, holding it in place.
Good luck on the install.
09-12-2009, 10:16 AM
#4
Tech Contributor


Member Since: Dec 1999
Location: Anthony TX
Posts: 32,736
Received 2,180 Likes
on
1,583 Posts
CI 6,7,8,9,11 Vet
St. Jude Donor '08

 It sounds very difficult but, it is very simple. You need to determine what type of pin you need or desire. I used a side pin kit because my power bond pulley has a machined grove for a pin
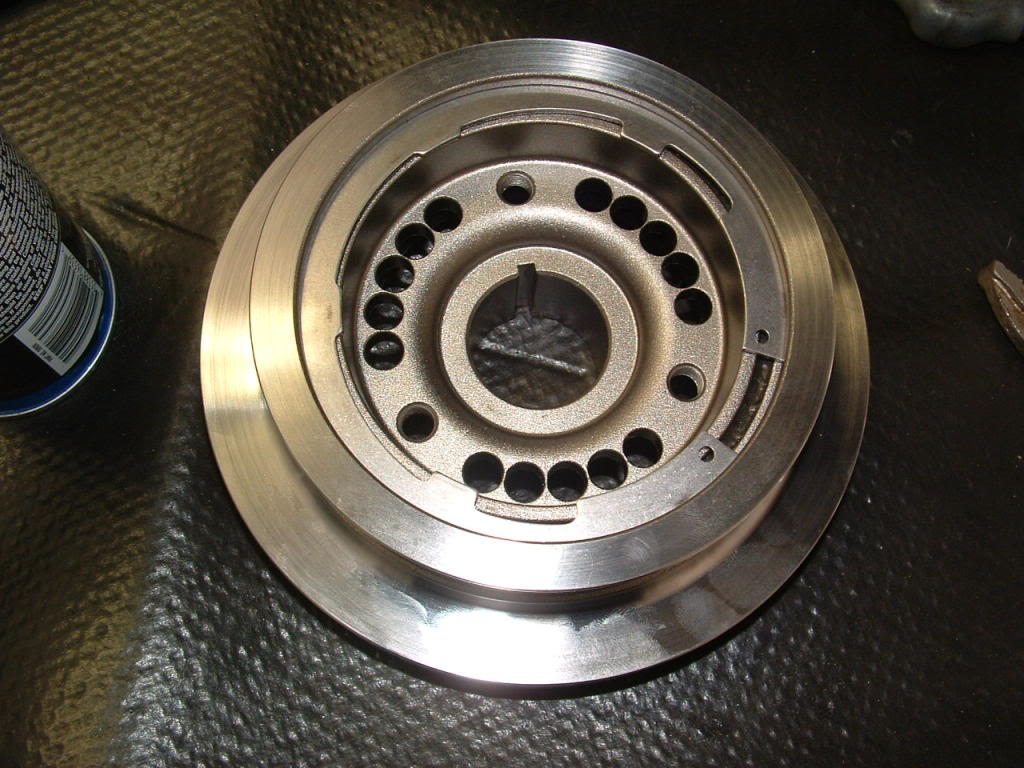
. I can never remember who sells the kit. I believe it APS. I borrowed mine form a friend. The side pin kit comes with a sleeve jig that mounts on to the end of the crank. The sleeve has two precision guides. One for a drill bit and one for a ream.
You drill thru the crank, change the guide, ream the hole and then insert the pin. It will be an interference fit so you will need to tap it in with a small hammer to the required height.
The other pin kit is an end pin kit.
It too uses a fixture that bolts on the end of the crank/pulley. When you use this kit, you do not need to remove the pulley OR you have to install the pulley if it is off the engine. the fixture centers a drill guide hole over the center of the area where the pulley fits onto the crank. You simply drill a hole between the two and pound in a steel pin.
Figure out what type of pin you want or need to install and beg/borrow or purchase the kit.
BC
09-12-2009, 11:24 AM
#5
Racer


Member Since: Jan 2006
Location: Ithaca Michigan
Posts: 273
Likes: 0
Received 0 Likes
on
0 Posts

My balancer was pinned when my car had a Procharger on it, I bought it without the charger when I had the crank out it looked like they used alot of red locktight on the pin and under the balancer bolthead. I put it back together the same way. Have a friend handy when tightening that bolt, its like 37 footpounds then 140 degrees. The last 100 degrees or so are a bear.
Good luck on that, Tom
when I had the crank out it looked like they used alot of red locktight on the pin and under the balancer bolthead. I put it back together the same way. Have a friend handy when tightening that bolt, its like 37 footpounds then 140 degrees. The last 100 degrees or so are a bear.Good luck on that, Tom
09-12-2009, 11:42 AM
#6
Tech Contributor
Member Since: Dec 1999
Location: Anthony TX
Posts: 32,736
Received 2,180 Likes
on
1,583 Posts
CI 6,7,8,9,11 Vet
St. Jude Donor '08
I do the bolt tightening and damper holding all my self. Its a ONE PERSON JOB if,,,,,,you use this strap wrench!
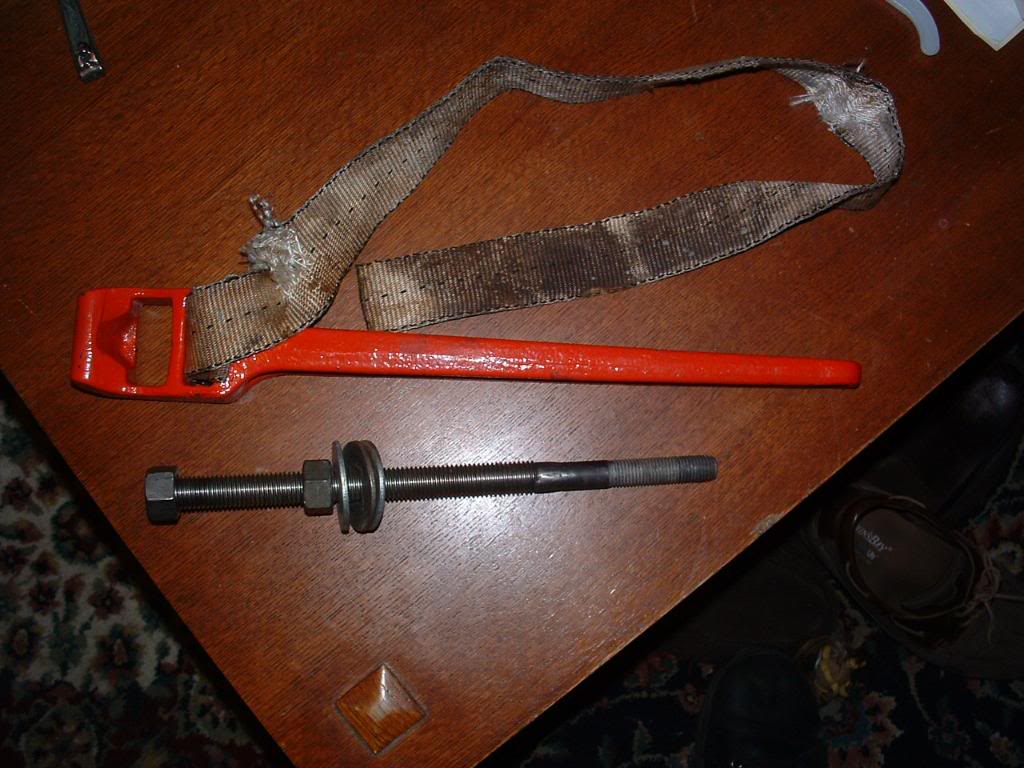
The other thing is my home made damper install tool.
BC
The other thing is my home made damper install tool.
BC
09-12-2009, 11:55 AM
#7
Racer
Member Since: Jan 2006
Location: Ithaca Michigan
Posts: 273
Likes: 0
Received 0 Likes
on
0 Posts
[QUOTE=Bill Curlee;1571469402]I do the bolt tightening and damper holding all my self. Its a ONE PERSON JOB if,,,,,,you use this strap wrench!
Your arms must be as big around as my waist, I'll bet nobody messes with you I had a door bar out of an f body as my cheater pipe on the handle of my 1/2 inch breaker bar, I still didnt think I was going to get it tight without my engine stand breaking in half. Prolly doing it in the car would have been easier...too bad my memory wouldnt allow me to do that...
Your arms must be as big around as my waist, I'll bet nobody messes with you
I had a door bar out of an f body as my cheater pipe on the handle of my 1/2 inch breaker bar, I still didnt think I was going to get it tight without my engine stand breaking in half. Prolly doing it in the car would have been easier...too bad my memory wouldnt allow me to do that...
09-14-2009, 08:26 AM
#8
Burning Brakes


Make sure you block your rear wheels front and back and if a manual put it in 6th gear! You can walk the car of jack stands when loosening and tightening the bolt! I chained my balancer to the lower front cross member to stop it from rotating using a small chain. I threaded it through the balancer and around the aluminum cross member just in front of the balancer. Worked great.
I strongly suggest that you get a new bolt and DO NOT USE LOCKTIGHT ON THE THREADS!. The factory doesn't and the bolt has some on the back of the bolt head. I have seen horror stories of people stripping the threads on their crank due to previous use of locktight on the threads. If the crank is pinned the bolt won't come out!.
Also, don't drill to deep! You can ruin your front crank seal if you do!
09-14-2009, 12:10 PM
#9
Tech Contributor
I strongly suggest that you get a new bolt and DO NOT USE LOCKTIGHT ON THE THREADS!. The factory doesn't and the bolt has some on the back of the bolt head. I have seen horror stories of people stripping the threads on their crank due to previous use of locktight on the threads.
http://www.atiracing.com/products/da...structions.htm
 09-14-2009, 01:45 PM
#11
Instructor


Member Since: Nov 2004
Location: Pittsburgh Pennsylvania
Posts: 190
Received 0 Likes
on
0 Posts

I guess I missed something or they have some new piece of equipment that lets you do the pinning without removing the steering components......I dont think so.
Go to the Magnuson site and check under technical help for the installation and see what you have to do(I think it starts on page 4...lot of good pictures too). There is no room to get any drill or angled drill into do the pinning.....you must remove/or move the steering that is in front of the harmonic balancer to do the drilling.
This is definately do able but is usually the most time consuming and difficult part of any supercharger installation.
I can only speak for a manual transmission....but block the car and put it in 4th gear (if you use 1st ...as I initially did...it may roll off your jack stands)....if I remember right you need a 23mm socket ....breaker bar...and in my case a 4 foot section of pipe (to fit over the breaker bar)...then just slowly apply pressure.
You can definately do this yourself if that is the intent...but look at the Magnuson write up, Good luck
Last edited by aquachuck1; 09-14-2009 at 01:51 PM.
09-14-2009, 09:18 PM
#12
Team Owner
I didn't see any post where anyone suggested the steering rack does not need to be moved for axial pinning. If you're referring to the pic I posted, you'll notice the steering rack has been dismounted and moved to the side - it need not be completely removed to access the pulley to pin it. That was a Procharger install I did with a buddy on his '01. You can, in fact pull the crank pulley without completely removing the rack from the engine bay - I've done it as have many others.
10-30-2019, 02:08 AM
#13
Instructor

Probably the easiest part of the install. Two different types of pinning that are done are parallel to the crank centerline and orthogonal (90 deg.) to it. Simply put, you match drill the crank pulley and crank and push a dowel in to pin them together which keeps the pulley from spinning relative to the crank snout. An unpinned pulley is sure to spin since it's pressed onto instead of keyed to the crank.
Here's a shot of my buddy's pinned pulley we did on his Vortech install. Note the dowel pin spanning the pulley and crank snout at about 12 o'clock.
Couple of shots of the pinning tool. This is screwed into the crank snout where the pulley bolt normally goes and then you drill through using the 1/4" drill bushing as the drill guide. The tool is removed and a 1/4" dowel is slid into the hole. The pulley bolt is installed over the dowel, holding it in place.
Attachment 48158240
Good luck on the install.
Did you have to drop the engine cradle bolts and lower it?
I'm guessing you had to disconnect the steering shaft and both tie rod ends on the driver and passenger side door this movement right?
c6, carnk, corvette, crank, fit, instal, installation, instructions, kit, magnusson, pin, pinning, procharger, supercharger, tight, vortech