When you click on links to various merchants on this site and make a purchase, this can result in this site earning a commission. Affiliate programs and affiliations include, but are not limited to, the eBay Partner Network.
I am getting the car ready to spray with epoxy primer and ran a long board sander across the rear deck to find all the nicked areas I put on it during paint removal. In the process a strip showed up all the way across the deck, this is the area where the deck is bonded to the inner tub. What are people doing about this area? Leave it be and just move on? I really don't want to smear VPA all over the rear deck to smooth this out if it is not going to help much.
Knowing you do not want to read it. That is precisely what I do. I apply VPA (Vette Panel Adhesive) across the entire deck and block my A$$ off. IT IS one of the BIGGEST pains in my backside...but when I am done that panel is flat ( or at least you are not feeling the 'hump') and it actually is much stronger and no so flexible when you press on it with your finger and mild pressure.
On some Corvettes (pre-SMC)...I remove the fuel tank and actually laminate sheet of mat to the underside of this panel to give it a bit more strength due to it being so weak...in my opinion. THEN do the VPA process.
My mentality on this as follows. If I am getting the car straight and looking good....why would I paint on urethane bumper covers that have buckles/warps in them...WELL...I would not....SO...why would I do all of the other things I do to the body to get it RIGHT and leave this area.
For some reason, I knew that was going to be the answer.
I guess I will get another can of VPA headed my way. It will probably not be that big of a deal, as you can see I left plenty of nicks that need to be filled anyway.
Another question: I guess the possibility of the VPA cracking or popping loose from the rear deck flexing is not an issue to be worried about?
[QUOTE=Texas70;1587910292
Another question: I guess the possibility of the VPA cracking or popping loose from the rear deck flexing is not an issue to be worried about?[/QUOTE]
YES...because I am NOT THERE to see how you PREP the area. That was a 'trick question' wasn't it????
I do not know how you mix, apply the VPA....if you allow air bubbles to be in it due to not correctly mixing it....IF you try to apply a super thick layer at one time or not.
I can easily get the VPA to a 1/4" and not have any worries.
AND...think about it. IF the VPA were to crack.....in order to make it crack...don't you think that the original fiberglass would not have also cracked under the same scenario WITHOUT any VPA on it????
I myself have no worries...and in numerous cases where I use VPA and do some of my 'tricks'...the VPA actually saved the area due to being so stout. Yes it cracked....but TRUST ME...without it...it would have been obliterated. AND In some cases...nothing happened at all...but WOULD HAVE if it had no VPA in that 'trick' spot.
Here is a tip....but you have to think a bout it. When you go to apply the VPA to achieve a good flat spread. Think about what you would SEE when workers perform that final finish a concrete driveway. Think about it.
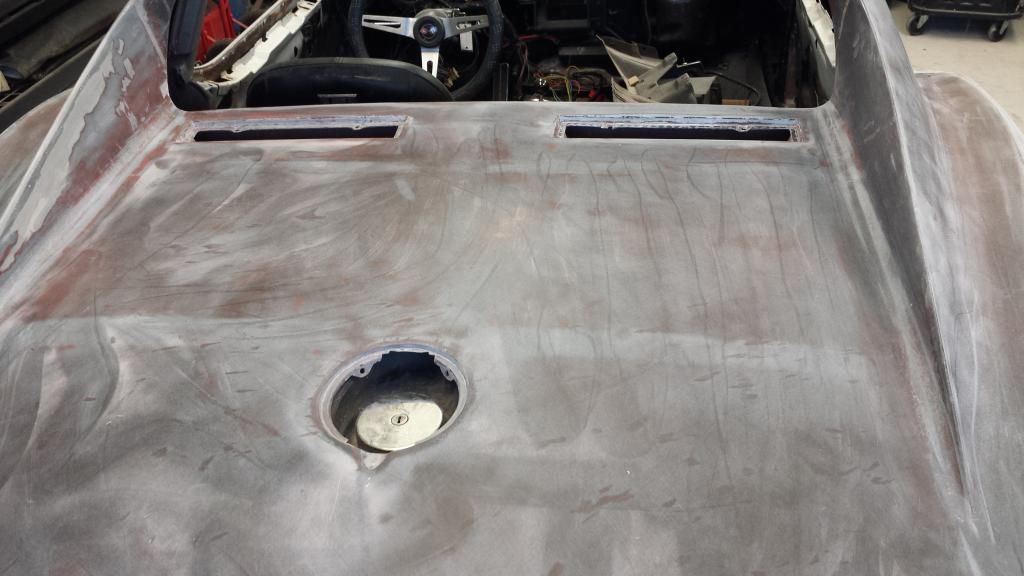
I have the same issue with my back deck. Is this common, and if left alone would probably look pretty noticeable with new paint? I do recall taking a lot of filler/primer off this area. It is almost like my gas cap door area is on a island slopping all around and down to the spoiler.
Before, you can see a line running in the middle from the gas cap to spoiler:
PO "fix" that I removed:
Now:
I guess I'll need to VPA the whole area? Still deciding on whether to drop the tank. With the in tank fuel pump and regulator I don't need any issue that were already tackled showing up again.
Any further advice. Thanks.
Last edited by DEEPSEA70; 11-19-2014 at 03:45 PM.
Reason: Pics
I have dropped the fuel tank...prepped and laminated fiberglass mat and resin to the underside of this panel....then filled the top surface with VPA....which I can tell you...is NO EASY TASK!!!!! This ares with VPA is a serious undertaking....NOT for those who quit things when the going gets rough....because....seriously....this is no FUN.
The one blessing is that when the panel gets some rigidity to it...it makes the blocking a bit easier...but that in itself to still a lot of work. I have done about a half dozen or so.....and DREAD having to do it if one comes in all screwed up and this panels is buckled/warped.
DUB
Thanks DUB,
Is this panel supposed to be completely flat, or slope after the gas cap?
Is this panel supposed to be completely flat, or slope after the gas cap?
I can only imagine that it was 'supposed to be' flat...and it sunk over time.
I am sure that when you run your hand across it from rear to the front...that you can feel the hump...and this hump is where the inner 'tub' for the interior is bonded. AND when you lightly press on the fiberglass to the left or right of the fuel door opening...and half way to the 'spoiler'...it moves very easily.
DUB
That is correct. It also had a lot of boxes and crap stacked on it over the years from the PO. As you can see in the blue and white PO photo, it did not take a ton of filler to make it 'flat', so I think that it would be somewhat minimal to VPA the surface around the fuel door, and block it smooth until I can get a straight edge to lay flat all over. Sound reasonable?
That is correct. It also had a lot of boxes and crap stacked on it over the years from the PO. As you can see in the blue and white PO photo, it did not take a ton of filler to make it 'flat', so I think that it would be somewhat minimal to VPA the surface around the fuel door, and block it smooth until I can get a straight edge to lay flat all over. Sound reasonable?
Also, maybe drop the tank. Thanks.
It will depend if when you are blocking if the panel flexes. If it does....then it will take a long time to blocking because you will not correctly block it flat if the panel moves....which is why I have laminated fiberglass and resin on the underside of many that I encounter.
Knowing you do not want to read it. That is precisely what I do. I apply VPA (Vette Panel Adhesive) across the entire deck and block my A$$ off. IT IS one of the BIGGEST pains in my backside...but when I am done that panel is flat ( or at least you are not feeling the 'hump') and it actually is much stronger and no so flexible when you press on it with your finger and mild pressure.
On some Corvettes (pre-SMC)...I remove the fuel tank and actually laminate sheet of mat to the underside of this panel to give it a bit more strength due to it being so weak...in my opinion. THEN do the VPA process.
My mentality on this as follows. If I am getting the car straight and looking good....why would I paint on urethane bumper covers that have buckles/warps in them...WELL...I would not....SO...why would I do all of the other things I do to the body to get it RIGHT and leave this area.
YES...Made by EVERCOAT....part number 870 (quart)...880 (gallon)
IF you go to buy some...CONTACT Evercoat and get their method of date coding their product.....so when you go to buy some...you are not buying a gallon that is ten years old and then write that the stuff is crap. Some forum members have PM'd me letting me know that is what would have happened....and got the paint supply shop to get fresh product in.
Originally Posted by zwede
The vertical line starting in the middle of the rear window, going over the gas cap, and ending at the spoiler is supposed to be there.
YES...there is a very slight raised ridge..so to speak in the middle of the fuel door area....BUT not a sunken area to the left and right of the fuel door.
YES...Made by EVERCOAT....part number 870 (quart)...880 (gallon)
IF you go to buy some...CONTACT Evercoat and get their method of date coding their product.....so when you go to buy some...you are not buying a gallon that is ten years old and then write that the stuff is crap. Some forum members have PM'd me letting me know that is what would have happened....and got the paint supply shop to get fresh product in.
YES...there is a very slight raised ridge..so to speak in the middle of the fuel door area....BUT not a sunken area to the left and right of the fuel door.
Also...if you have never used it...PM me and I will give you my shop phone number so I can give you some tips on using it...so you do not wear yourself out.
The side to side 'check' you did with the level is correct. But I still fix that somewhat...and still have the center 'high' peak line...so-to speak.
BUT...the front to rear one with the angle iron is the one that I 'fix'. I do not like running my hand up from the 'spoiler' area...and when I get to right past the fuel door opening...I feel a bad hump or low spot. That is where I fix it.
But that is just me. This area can be filled and still give the 'look'...and also makes this panel stronger and not so weak when pressed on. That is open to personal interpretation...and for me....I do not like weak panels that are easy to move.
I hope this isn't a hijack but I found this interesting because I'm getting ready to bond my rear deck in place. I'm not really sure how much adhesive to install under the rear deck bonding strip to minimize the amount of filler (if any) needed above the rear deck bonding strip.
My plan at this point is to dry fit the rear deck, note the distance between the underside of the deck and bonding strip and then write note at different stations on the bonding strip to tell me how much adhesive to build up.
Personally, I don't think I am going to do a large skim on the deck area. It probably didn't have it from the factory but I do understand owners doing resto mods trying to get this area better.
Kevin
I took this one step further because my deck was very flimsy. I VPA'd a couple of strips of wood slightly thicker then a paint stir near the spoiler and up by the gas door (now have a Woody Corvette) on the underside. Then I glassed it in-between and over the top on the underside a couple of laminates thick. Much happier with how sturdy the deck is; and can now block on top. I believe my lines are normal on the upper; so I will leave it, fill the holes and my spider crack. Now it will be ready for a Super Model to sit on. Not likely.
Sorry, don't have a pic of the glass. I put undercoating on it, so you couldn't see it anyway. Upside down glass is a PITA.
I hope this isn't a hijack but I found this interesting because I'm getting ready to bond my rear deck in place. I'm not really sure how much adhesive to install under the rear deck bonding strip to minimize the amount of filler (if any) needed above the rear deck bonding strip.
My plan at this point is to dry fit the rear deck, note the distance between the underside of the deck and bonding strip and then write note at different stations on the bonding strip to tell me how much adhesive to build up.
I usually try to achieve at LEAST the thickness of a paper matchstick of adhesive between the bonding strip and any panel. Depending on the material being bonded. If it is polyester fiberglass I use the EVERCOAT Vette Panel Adhesive (pat number 870 quart and part number 880 gallon)....if I am bonding SMC.....I use the SMC panel Adhesive (part number 994). You can use the 994 on polyester parts...but being such a small area...using the VPA for me is fine because I can apply and secure the strip quickly and let it cure.
Originally Posted by DEEPSEA70
Sorry, don't have a pic of the glass. I put undercoating on it, so you couldn't see it anyway. Upside down glass is a PITA.
There is a trick to laminating upside down and the main thing is not to apply too much material or it will fall off as soon as you walk away...or you need to employ another step to make sure it will not fall down.
 09-24-2014, 09:15 PM


 There is a trick to laminating upside down and the main thing is not to apply too much material or it will fall off as soon as you walk away...or you need to employ another step to make sure it will not fall down.