When you click on links to various merchants on this site and make a purchase, this can result in this site earning a commission. Affiliate programs and affiliations include, but are not limited to, the eBay Partner Network.
2020 Corvette of the Year Finalist (performance mods)
2019 C3 of Year Winner (performance mods)
2016 C3 of Year Finalist
Check Wilcoxs site for the trouble shooting guide. There was also an addendum in the aim for troubleshooting. I would guess its the switch, the line from the wiper switch to the solenoid or the solenoid. Theres not much to check on the electric side of the wiper door system
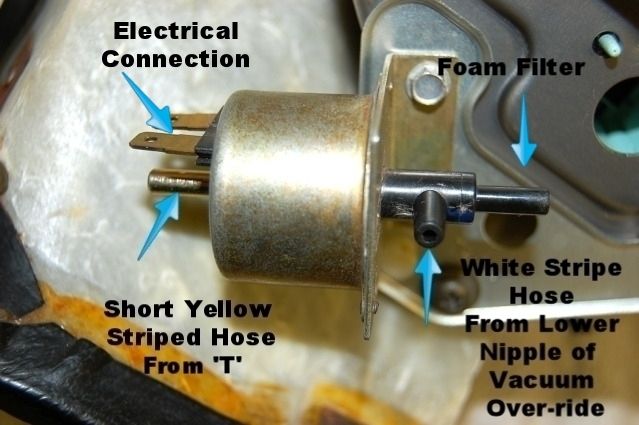
Since you said the wiper door will open when you use the over-ride switch I'd take a look at the solenoid on the back of the tach. If it works with the over-ride then everything is functioning in the vacuum system as it should be, your just missing what blocks the vacuum when the wipers are turned on and that would be the that solenoid.
So if you can pull off the connector with the wiper switch and key turned on you should have 12 volts on the brown wire in the connector.
Ok, looks like Bubba has been in my car even more.
It appears that they removed the solenoid and have a wire running directly to a toggle switch that sits under the steering column. When the toggle is in the on position, it drains my battery. So, must be some wiper power kill switch.
It is a black wire and I'm assuming it controls the power to the wiper solenoid. Then attached to the large center screw under the steering column it appears to have a ground.
Ok, now the questions!
Is it safe to say that I can splice the black cable going to the toggle switch onto the solenoid, then there is another connector on the solenoid. Is that ground? If so, I can wire that up in the same large nut under the console.
Then, I will need four more pieces of rubber tubing and a two t-bar connectors.
Is the path to the override switch inside or outside the cycle of the solenoid? i.e. does the solenoid need to be in the path of the override switch or are they on their own path.
I think they might need to be on their own path i.e. intake pressure splits between first tubing going from the solenoid to the in for the override switch. I think I need a t-bar and branch the incoming vacuum goes to the override switch and the solenoid. Then, the coming back to complete the cycle, I will need to do the same.
Does this all make sense?
Also, does anyone know where I can get the tubing without having to buy a whole kit?
2020 Corvette of the Year Finalist (performance mods)
2019 C3 of Year Winner (performance mods)
2016 C3 of Year Finalist
That wire under the steering column is probably for the wiper over ride. 1 position the wipers work, secong position they stop so you can work on them. If left in the off position it will drain the battery. Originally its a rotary switch. The wiper solenoid is under your center console in front of the ash tray just below the radio.
I would determine what is original and what is bubba before changing what you think is bubba. 68 wiper system is unique where it has constant power and is looking for a ground. If you have to pull the door overide to get the door to work it might be set up backwards
Last edited by Rescue Rogers; 09-25-2016 at 04:26 PM.
Since Bubba did the work, there is no way to know WHY he did what he did....nor what he buggered up to make the switch work.
You really have to scope out exactly how the original set up should have been done and compare that with what you have left. Assuming that Bubba used the wire to the tach/solenoid-switch to hook up that toggle switch is something I would never do. Just sayin'....
Ok, see what is going on. Looks like the rubber tubes are missing on the solenoid. Also, the solenoid is located in the top right part of the Tachometer cluster. Looking at pictures online I thought it was at the bottom of the Tachometer cluster.
So, bubba must have either forgotten to put the tubes back in or the solenoid doesn't work so they disabled it.
Probably a case of having extra parts when you disassemble something and not knowing where they go.
At least I don't have to rewire anything and might just need t-connectors and tubes.
Good luck, looks like it should be working correctly soon.
Ok, I thought it was going to be too easy!
Looks like one of the previous bubba's broke the end off the solenoid. Probably when they were putting the dash back together because there is a thick set of wires that are tied together right where it would go.
So, instead of fixing it, they routed the tubes to the override switch and called it done!
Now, I spent the better part of an hour trying to get to the nuts so I can remove the old one. I have miror and everything. I can't seem to get a grip on the nut. I've disconnected the cables so it gives me more room.
So, if you have done this before or have ideas, how can I get these loosened without really taking the dash apart.
Does anyone know the size of the nut on there? I tried several sizes and it seems like 1/4''.
Thanks a lot everyone. I don't know what I would do without this forum and the great knowledge!
It is a 1/4" nut. You might do better with a nut-driver (screwdriver handle with the socket on the end. But, it depends on the amount of room you have. I also have a 1/4" combination wrench (open end & box end) that is very short and would fit in them pretty well. All you should need to do is get the screw broken loose; it should be easy to remove after that.
You can test the switch/solenoid by putting 12vdc to the terminals and blowing thru the fitting[s]. I believe that it should block airflow with no power to it and pass airflow when a 12 volt signal is applied. If it works as expected, you might be able to reuse it. If not, you can replace it for not much money. When you install it back on the tach, you may want to choose a lower screw on which to mount it.
2020 Corvette of the Year Finalist (performance mods)
2019 C3 of Year Winner (performance mods)
2016 C3 of Year Finalist
If you do take your dash off, the wiring harness starts low on the drivers side and crosses at the steering column and then goes to the top. Most after the early 68 are all on the bottom or all across the top. After someone told me that it went together easy. Taking the dash out isnt as big a hassle as you think if you remove the steering wheel, drop the steering column, unplug the lamps, disconnect the tach and speedo and when you pull the dash ,just slide it out so you can get behind it. AND take pictures of every step so you know how it should go back together.
If bubba tried to jam your wiring harness in there, I see how he would break stuff.
I had to pull mine to fix the harness, bulbs, remove a BUBBA'd ignition switch, bad headlight switch, attach all the grounds, vacuum leaks, wiper relay issue, radio, oil pressure line, turn signal switch, fix the courtesy switch wiring and a few other things, so it can be time well spent
It is a 1/4" nut. You might do better with a nut-driver (screwdriver handle with the socket on the end. But, it depends on the amount of room you have. I also have a 1/4" combination wrench (open end & box end) that is very short and would fit in them pretty well. All you should need to do is get the screw broken loose; it should be easy to remove after that.
You can test the switch/solenoid by putting 12vdc to the terminals and blowing thru the fitting[s]. I believe that it should block airflow with no power to it and pass airflow when a 12 volt signal is applied. If it works as expected, you might be able to reuse it. If not, you can replace it for not much money. When you install it back on the tach, you may want to choose a lower screw on which to mount it.
Success! Thanks 7T1Vette! I didn't think of a nut-driver. Got it off. Took me 10 minutes at most.
I suspected that the solenoid was bad so I already got a new one. Since the plastic end was broken off with the filter and connector it wouldn't have ever worked anyway.
I'll assemble this tomorrow. Aftermarket solenoids aren't plug and play so I need to mess with the wires a bit.
If you do take your dash off, the wiring harness starts low on the drivers side and crosses at the steering column and then goes to the top. Most after the early 68 are all on the bottom or all across the top. After someone told me that it went together easy. Taking the dash out isnt as big a hassle as you think if you remove the steering wheel, drop the steering column, unplug the lamps, disconnect the tach and speedo and when you pull the dash ,just slide it out so you can get behind it. AND take pictures of every step so you know how it should go back together.
If bubba tried to jam your wiring harness in there, I see how he would break stuff.
I had to pull mine to fix the harness, bulbs, remove a BUBBA'd ignition switch, bad headlight switch, attach all the grounds, vacuum leaks, wiper relay issue, radio, oil pressure line, turn signal switch, fix the courtesy switch wiring and a few other things, so it can be time well spent
I feel for you about Bubba! I keep fixing his problems because he took short cuts instead of doing it the correct way(I have other threads about other bubba problems). But, it sounds worse for you, sorry!
Thanks, I was able to get removed, finally. So, when I put the dash back in, should the wiring harness go above or below the tach wire?
In the AIM for 1971, the detail on tach solenoid/switch is shown on UPC 12, sheet B9 in the section on "Electrical". The wiring & connector to the switch comes from the wiper switch above the gauge cluster, so it is just a direct feed to the solenoid/switch. The vacuum hoses have a particular routing shown in the AIM. It also shows how the override switches are plumbed.
Hi s,
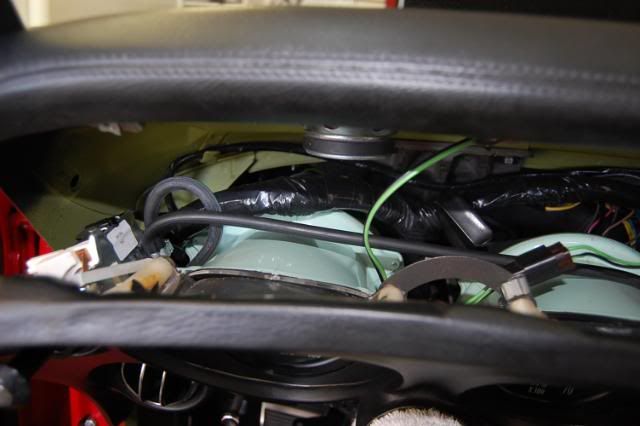
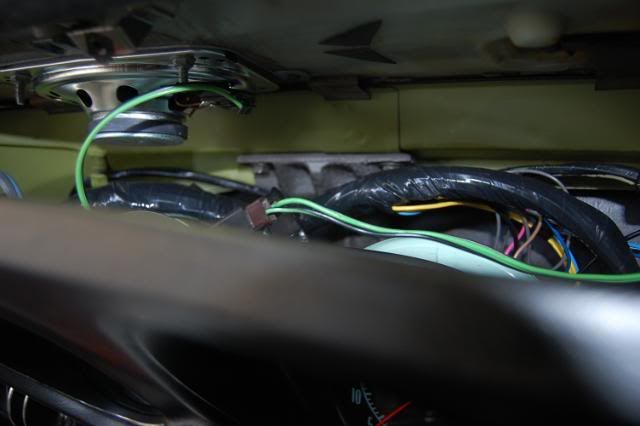
I believe you'll find that on 68 cars the dash harness was originally routed under the speedometer and tachometer housings.
In later years it was routed above the speedometer and tachometer.
Regards,
Alan
Here's an example of the harness running over the speedometer and tachometer housings.

 08-28-2016, 06:58 PM