


Attaching Deck lid Problem

Thread Starter
Instructor


Joined: Oct 2014
Posts: 198
Likes: 17
From: Raleigh, NC
 Attaching Deck lid Problem
I have a 65 convertible. I removed the spring assembly that holds the deck lid to the car so that I could sand blast and paint the assembly and remove the rug adhesive and other messy stuff from the back area of the interior. The right side spring assembly came out fine. The left side is another matter. When I unscrewed the two bolts that hold the spring assembly to the car (I can not find the name of the metal piece that it screws into) the bolts that are inside the metal bar (???) broke off and now there is nothing to bolt the spring assembly to. I need to get the metal piece that goes across the car off so that I can weld the bolts back on. I can see that the metal piece (I wish I could find the name of it) has some kind of rivets holding it to the fiberglass but if I grind them off to get the metal piece off how do I reattach it to the car. I apologize for this description but I have look all through the assembly manual and the vendor parts manuals but am unable to find the actual name for that metal piece that the spring assembly bolts to.
If anyone can figure out what I am describing I would greatly appreciate assistance on how to get the deck lid spring assembly bolted back on.
Thank you for your assistance.
Mark
If anyone can figure out what I am describing I would greatly appreciate assistance on how to get the deck lid spring assembly bolted back on.
Thank you for your assistance.
Mark

Race Director


Joined: Apr 2009
Posts: 19,294
Likes: 2,753
From: Charlotte NC
I have a 65 convertible. I removed the spring assembly that holds the deck lid to the car so that I could sand blast and paint the assembly and remove the rug adhesive and other messy stuff from the back area of the interior. The right side spring assembly came out fine. The left side is another matter. When I unscrewed the two bolts that hold the spring assembly to the car (I can not find the name of the metal piece that it screws into) the bolts that are inside the metal bar (???) broke off and now there is nothing to bolt the spring assembly to. I need to get the metal piece that goes across the car off so that I can weld the bolts back on. I can see that the metal piece (I wish I could find the name of it) has some kind of rivets holding it to the fiberglass but if I grind them off to get the metal piece off how do I reattach it to the car. I apologize for this description but I have look all through the assembly manual and the vendor parts manuals but am unable to find the actual name for that metal piece that the spring assembly bolts to.
If anyone can figure out what I am describing I would greatly appreciate assistance on how to get the deck lid spring assembly bolted back on.
Thank you for your assistance.
Mark
If anyone can figure out what I am describing I would greatly appreciate assistance on how to get the deck lid spring assembly bolted back on.
Thank you for your assistance.
Mark
I have had this happen to me on a 1964...and the metal plate is riveted tot eh fiberglass part that goes across the rear....so your rear deck panel can bond to it. The threads of these screws are in the rain gutter area...so water can get to them....and knowing that GM sued some type of adhesive with these bolts that have spinning washers on them with teeth on the washer sis a real JOY to get out and every time I have to remove one I HATE IT. Because these bolts can break.
I have photos of this piece of steel you are referring to and if I can find it I will post them.
THIS IS NOT going to be easy or fun...because if the steel plates comes off on the inside...you are really screwed and the upper rear body panel will have to be cut to access it.
DUB
Thread Starter
Instructor
Joined: Oct 2014
Posts: 198
Likes: 17
From: Raleigh, NC
Mr D/Dub, thank you for your replies.
I do not need an easy out since all the bolts are out but on the left side the nuts are no longer attached to that piece of steel that runs across the body. Looks lie the steel plate did come unattached so I need to find a way so the bolts can attach. I was thinking about rivnuts but need to fins some that are large enough. Absent that. looks like I may have to cut the steel on both sides of where the nuts need to attach, bend the steel out , weld new nuts, bend it back, weld it back together....hopefully the fiberglass wont catch fire. Or, I can drill a hole all the way through where the steel plate attaches to the fiberglass and put a long bolt through it. Not exactly stock, but there is o way I am going to cut the upper rear body panels off. I have to find another way.
Mark
I do not need an easy out since all the bolts are out but on the left side the nuts are no longer attached to that piece of steel that runs across the body. Looks lie the steel plate did come unattached so I need to find a way so the bolts can attach. I was thinking about rivnuts but need to fins some that are large enough. Absent that. looks like I may have to cut the steel on both sides of where the nuts need to attach, bend the steel out , weld new nuts, bend it back, weld it back together....hopefully the fiberglass wont catch fire. Or, I can drill a hole all the way through where the steel plate attaches to the fiberglass and put a long bolt through it. Not exactly stock, but there is o way I am going to cut the upper rear body panels off. I have to find another way.
Mark

Team Owner


Joined: Mar 2002
Posts: 44,653
Likes: 1,827
From: Huntsville AL
Not sure if there is a welded nut behind that metal channel or is the channel itself threaded? I'm assuming the bolt head swisted off and the remaing bolt shank and nut remained? Or fell into the channel?
A through bolt would be the easy fix if this is doable.
Another option is to cut a slot big enough to get a wrench in there with a nut tape to it and install bolt. Tight area but I have got wrenches into places that one would think no way.
As for covering the hole up that is easy, sheet metal and pop rivet, blind rivet or Jo-bolt. Done everyday in the aviation community.
A through bolt would be the easy fix if this is doable.
Another option is to cut a slot big enough to get a wrench in there with a nut tape to it and install bolt. Tight area but I have got wrenches into places that one would think no way.
As for covering the hole up that is easy, sheet metal and pop rivet, blind rivet or Jo-bolt. Done everyday in the aviation community.
Thread Starter
Instructor
Joined: Oct 2014
Posts: 198
Likes: 17
From: Raleigh, NC
Mr D. Tomorrow I am going to see if a through bolt will solve this problem. If not, cutting a big slot and inserting the bolts in the slot from underneath is a great idea. I did not think of that since I was trying to think of a hard way to do it. Thank you for your idea. Mark

Safety Car

Joined: Dec 2009
Posts: 4,171
Likes: 335
From: Homewood Alabama
See my thread at the link below to get a visual on what you are dealing with. Unless you remove the rear deck, you won't be accessing the nut plates.
Hopefully a 90 degree drill attachment will work for you.
https://www.corvetteforum.com/forums...reation-4.html
Hopefully a 90 degree drill attachment will work for you.
https://www.corvetteforum.com/forums...reation-4.html
Thread Starter
Instructor
Joined: Oct 2014
Posts: 198
Likes: 17
From: Raleigh, NC
65silververt - Thank you for putting a name to the part I was describing and attaching the prior thread that shows exactly what I am dealing with . Looks like I am not going to be able to fish that nutplate out to reattach it. Since it appears that what I thought were some kind of rivits are really bonding material that squished through the holes in the bottom of the crossmember that holds it to the fiberglass panel. I don't want to basically disassemble the fiberglass panels from the back of the car to get to the nutplate. Now that I know what it looks like in there I just had a thought of of another way to get in there. If it works I will let everyone know.
Thank you again for providing visuals of what my problem is.
Mark
Thank you again for providing visuals of what my problem is.
Mark
Corvette Stories
The Best of Corvette for Corvette Enthusiasts

10 Reasons the C6 Z06 is Still A Performance Benchmark After 20 Years
Joe Kucinski
How Much Horsepower Every Corvette Engine "LOST" in 1972
Joe Kucinski
Top 10 DOs and DON'Ts for Protecting Your Convertible Top!
Michael S. Palmer
Top 10 Most Explosive Corvettes Ever Made: Power-to-Weight Ratio Ranked!
Joe Kucinski
150 hp to 1,250 hp: Every Corvette Generation Compared by the Specs That Matter
Joe Kucinski
8 Coolest Corvette Pace Cars (and Replicas) of All Time
Verdad Gallardo
Top 10 Corvette Engines RANKED by Peak Torque (70+ Years of Muscle!)
Joe Kucinski
Corvette ZR1X Will Be Pacing the Indy 500, And Could Probably Race, Too!
Verdad Gallardo
Top 10 Corvettes Coming to Mecum Indy 2026!
Brett Foote
Safety Car
Joined: Dec 2009
Posts: 4,171
Likes: 335
From: Homewood Alabama
If you can drill the holes out large enough, you can always install a nutsert. Of course, this is assuming you can find enough fighting room to maneuver all of the tools in place to do the repair.
Race Director
Joined: Apr 2009
Posts: 19,294
Likes: 2,753
From: Charlotte NC
Just be aware that in the photos showing the nut plate and where it is riveted to the fiberglass....the panel that is is riveted to is the rain gutter panel...so just be aware that water gets into this panel
I would not want to be in your position right now....this is a bad spot.
DUB
I would not want to be in your position right now....this is a bad spot.
DUB

Racer


Joined: Sep 2005
Posts: 293
Likes: 0
From: Woodland Hills CA
Just be aware that in the photos showing the nut plate and where it is riveted to the fiberglass....the panel that is is riveted to is the rain gutter panel...so just be aware that water gets into this panel
I would not want to be in your position right now....this is a bad spot.
DUB
I would not want to be in your position right now....this is a bad spot.
DUB
Good luck!!!

Thread Starter
Instructor
Joined: Oct 2014
Posts: 198
Likes: 17
From: Raleigh, NC
65silvert-DUB-PierreOlivier
I was thinking about nutserts since I do have 2 empty holes as it appears that the nut plate became unattached from the fiberglass when I unscrewed the bolts holding the spring assembly. I do not have any broken/stuck bolts in there to get out, just two holes with nothing on the other side to bolt to . The nutsert tool may be a problem though. I have a rivnut tool that I used when I had an airplane but I am not aware of rivnuts big enough since I think the bolts that hold the assembly are 3/8. I did not pick up on the fact that the nut plate was attached to the fiberglass rain gutter and not the metal crossmember.
I am beginning to think that the easiest way may be to put a drill bit through the holes in the crossmember and drill straight across the rain gutter through the fiberglass on the other side. Make a long metal plate to go on the outside of the fiberglass rain gutter where the new holes are with holes in the metal plate that match the holes in the fiberglass. Put bolts through the spring assembly holes and through the crossmember and rain gutter, put nuts on the bolts and that should do it. Not pretty, not original (but since there is not much original on the car anyway it doesn't matter), but it may be a fix. I will have to go take a close look at it in a couple of days to see if this is feasible. I will let you know if this works.
Thank you for your input. Mark
I was thinking about nutserts since I do have 2 empty holes as it appears that the nut plate became unattached from the fiberglass when I unscrewed the bolts holding the spring assembly. I do not have any broken/stuck bolts in there to get out, just two holes with nothing on the other side to bolt to . The nutsert tool may be a problem though. I have a rivnut tool that I used when I had an airplane but I am not aware of rivnuts big enough since I think the bolts that hold the assembly are 3/8. I did not pick up on the fact that the nut plate was attached to the fiberglass rain gutter and not the metal crossmember.
I am beginning to think that the easiest way may be to put a drill bit through the holes in the crossmember and drill straight across the rain gutter through the fiberglass on the other side. Make a long metal plate to go on the outside of the fiberglass rain gutter where the new holes are with holes in the metal plate that match the holes in the fiberglass. Put bolts through the spring assembly holes and through the crossmember and rain gutter, put nuts on the bolts and that should do it. Not pretty, not original (but since there is not much original on the car anyway it doesn't matter), but it may be a fix. I will have to go take a close look at it in a couple of days to see if this is feasible. I will let you know if this works.
Thank you for your input. Mark

Team Owner

Joined: May 2006
Posts: 37,663
Likes: 1,112
From: CA
Instead of drilling all the way through the "Gutter"...
What about 'slicing' a slot from the bottom just behind the gutter and slipping in a 'nut plate'...
Make the plate fit first, trial and error, drill the holes in it the width and diameter to fit spring/hinge pocket and put in self taping bolts...
What about 'slicing' a slot from the bottom just behind the gutter and slipping in a 'nut plate'...
Make the plate fit first, trial and error, drill the holes in it the width and diameter to fit spring/hinge pocket and put in self taping bolts...
Thread Starter
Instructor
Joined: Oct 2014
Posts: 198
Likes: 17
From: Raleigh, NC
66jack, I was originally thinking about doing something like that but, if I understand you correctly, I would need to cut a slot in the bottom of the metal reinforcement crossmember then through the fiberglass rain gutter in order to slide a nut plate up to where the original one use to be. I could not think of a way to fasten it permanently so I would not have to reattach the spring right away.
The wonderful idea I had last night at 11PM will not work. Just went out and took several pictures from different angles of the reinforcement crossmember area where the spring assembly bolts to. Can’t simply drill all the day through the rain gutter and put a through bolt in. The fiberglass on the other side is not flat so that idea is out.
Does anyone know how difficult it is to remove the metal reinforcement crossmember from the rain gutter? 65silvert’s pictures and notations indicate that the crossmember is bonded to the rain gutter. If I can get that off without destroying the car I can blast and paint the crossmember (it really needs it) then perhaps enlarge the holes in the rain gutter where the nut plate was (right now it is just laying in the bottom of the rain gutter) weld some nuts to the inside of the crossmember, re-bond the crossmember to the rain gutter with the welded nuts inside the rain gutter where the nut plate use to be and it will be fixed. Another great idea….just need to get the reinforcement crossmember off.
Mark
The wonderful idea I had last night at 11PM will not work. Just went out and took several pictures from different angles of the reinforcement crossmember area where the spring assembly bolts to. Can’t simply drill all the day through the rain gutter and put a through bolt in. The fiberglass on the other side is not flat so that idea is out.
Does anyone know how difficult it is to remove the metal reinforcement crossmember from the rain gutter? 65silvert’s pictures and notations indicate that the crossmember is bonded to the rain gutter. If I can get that off without destroying the car I can blast and paint the crossmember (it really needs it) then perhaps enlarge the holes in the rain gutter where the nut plate was (right now it is just laying in the bottom of the rain gutter) weld some nuts to the inside of the crossmember, re-bond the crossmember to the rain gutter with the welded nuts inside the rain gutter where the nut plate use to be and it will be fixed. Another great idea….just need to get the reinforcement crossmember off.
Mark
Team Owner
Joined: May 2006
Posts: 37,663
Likes: 1,112
From: CA
66jack, I was originally thinking about doing something like that but, if I understand you correctly, I would need to cut a slot in the bottom of the metal reinforcement crossmember then through the fiberglass rain gutter in order to slide a nut plate up to where the original one use to be. I could not think of a way to fasten it permanently so I would not have to reattach the spring right away.
The wonderful idea I had last night at 11PM will not work. Just went out and took several pictures from different angles of the reinforcement crossmember area where the spring assembly bolts to. Can’t simply drill all the day through the rain gutter and put a through bolt in. The fiberglass on the other side is not flat so that idea is out.
Does anyone know how difficult it is to remove the metal reinforcement crossmember from the rain gutter? 65silvert’s pictures and notations indicate that the crossmember is bonded to the rain gutter. If I can get that off without destroying the car I can blast and paint the crossmember (it really needs it) then perhaps enlarge the holes in the rain gutter where the nut plate was (right now it is just laying in the bottom of the rain gutter) weld some nuts to the inside of the crossmember, re-bond the crossmember to the rain gutter with the welded nuts inside the rain gutter where the nut plate use to be and it will be fixed. Another great idea….just need to get the reinforcement crossmember off.
Mark
The wonderful idea I had last night at 11PM will not work. Just went out and took several pictures from different angles of the reinforcement crossmember area where the spring assembly bolts to. Can’t simply drill all the day through the rain gutter and put a through bolt in. The fiberglass on the other side is not flat so that idea is out.
Does anyone know how difficult it is to remove the metal reinforcement crossmember from the rain gutter? 65silvert’s pictures and notations indicate that the crossmember is bonded to the rain gutter. If I can get that off without destroying the car I can blast and paint the crossmember (it really needs it) then perhaps enlarge the holes in the rain gutter where the nut plate was (right now it is just laying in the bottom of the rain gutter) weld some nuts to the inside of the crossmember, re-bond the crossmember to the rain gutter with the welded nuts inside the rain gutter where the nut plate use to be and it will be fixed. Another great idea….just need to get the reinforcement crossmember off.
Mark
So, instead, why not grind off the bottom area where the nut plate is and take/pry, it off/out and redo it that way..
Safety Car
Joined: Dec 2009
Posts: 4,171
Likes: 335
From: Homewood Alabama
There is an L shaped piece of metal that runs the length of the backside of the fiberglass channel, which is obviously meant to reinforce the entire channel. Probably not the best idea to cut through it. I think cutting out a rectangular section on the front side is your best bet. You can bond it back in place later with 3m panel bond. My nut plates were really rusty and considering how bad off the rest of the convertible was, i am surprised the bolts came out of mine without breaking. That was not the case with the lower bolt that runs through the body mount reinforcement. I had to cut one of those off and replace the mount plate. I cleaned my nut plates up, then coated them with 3m panel bond and ran a bead of panel bond around the entire nut plate so that they would never again rust or bust loose. 
Safety Car
Joined: Dec 2009
Posts: 4,171
Likes: 335
From: Homewood Alabama
Now I wish I had taken better photos of the channel and metal support.
I know it is hard to see in the photo due to the metal being so rusty, but the metal reinforcement runs the entire backside of the fiberglass and is L shaped. It is attached with aluminum rivets. I probably should have removed the entire thing and blasted it, but at that point, i was not interested in doing any extra work, so i just sanded it, then sealed it with epoxy primer.

Im going to go ahead and post the other photos so that if anybody needs to review this thread in the future they will have easier access to them.
Topside of fiberglass channel. Water drains from slots in the rear deck into the channel and then the water flows out to the sides and exits through two fiberglass pieces inside of the wheel wells.

Nut plates, one on each side with two holes. This is what fastens the upper portion of the hinge/spring assembly in place. You can see that mine look to have been exposed to water containing a lot of salt.
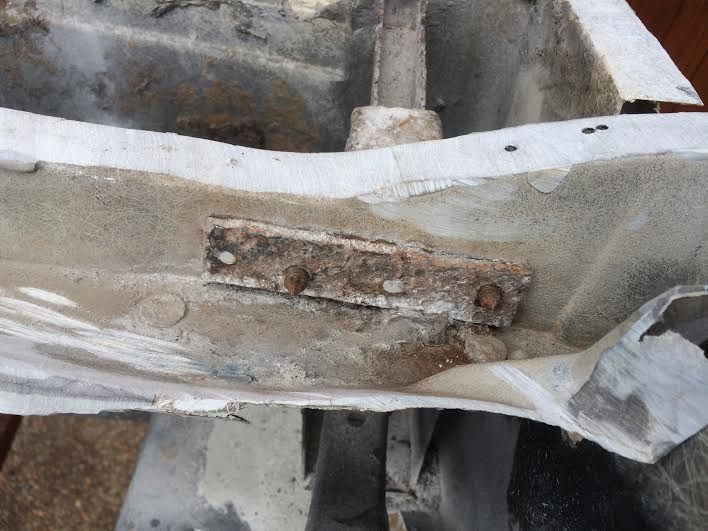
I know it is hard to see in the photo due to the metal being so rusty, but the metal reinforcement runs the entire backside of the fiberglass and is L shaped. It is attached with aluminum rivets. I probably should have removed the entire thing and blasted it, but at that point, i was not interested in doing any extra work, so i just sanded it, then sealed it with epoxy primer.

Im going to go ahead and post the other photos so that if anybody needs to review this thread in the future they will have easier access to them.
Topside of fiberglass channel. Water drains from slots in the rear deck into the channel and then the water flows out to the sides and exits through two fiberglass pieces inside of the wheel wells.

Nut plates, one on each side with two holes. This is what fastens the upper portion of the hinge/spring assembly in place. You can see that mine look to have been exposed to water containing a lot of salt.

Team Owner
Joined: Mar 2002
Posts: 44,653
Likes: 1,827
From: Huntsville AL
Race Director
Joined: Apr 2009
Posts: 19,294
Likes: 2,753
From: Charlotte NC
I have WICKED IDEA after thinking about this. Like I wrote...This is NO EASY FIX. BUT...what I am thinking is NOT WORRYING about trying to rivet this nut plate back in when it is removed. AND the steel reinforcement plate does not have to be messed with at all.
CAREFULLY LOOK the the SECOND PHOTO in POST #17. YES...I understand that the quarter panels are NOT on...but look where the water drains out of the gutter panel. It drains out IN the wheel housing area. I would cut the end off the drain area where the water is already in the wheel housing area..it can be re-attached later....then I would use one of the DREMEL tool fiber cut off wheels and make and attachment that would allow me to go in and grind away and the backside of the aluminum rivets so the nut plate will fall down. I HONESTLY can not remember if the nut plate was riveted on BEFORE the steel reinforcement plate was riveted on...or after. THIS DYNAMIC makes a BIG DIFFERENCE. IF the rivets that hold the nut plate on are seen or felt from the backside...then you can grind or cut them off and remove the nut plate with a magnet. Make a new one out of stainless steel or whatever.
I can finish this 'idea' up once I know if the rivets that hold the nut plate on are on top of the steel plate or hidden by it.....SO...'ph31mwl'...let me know.
DUB
CAREFULLY LOOK the the SECOND PHOTO in POST #17. YES...I understand that the quarter panels are NOT on...but look where the water drains out of the gutter panel. It drains out IN the wheel housing area. I would cut the end off the drain area where the water is already in the wheel housing area..it can be re-attached later....then I would use one of the DREMEL tool fiber cut off wheels and make and attachment that would allow me to go in and grind away and the backside of the aluminum rivets so the nut plate will fall down. I HONESTLY can not remember if the nut plate was riveted on BEFORE the steel reinforcement plate was riveted on...or after. THIS DYNAMIC makes a BIG DIFFERENCE. IF the rivets that hold the nut plate on are seen or felt from the backside...then you can grind or cut them off and remove the nut plate with a magnet. Make a new one out of stainless steel or whatever.
I can finish this 'idea' up once I know if the rivets that hold the nut plate on are on top of the steel plate or hidden by it.....SO...'ph31mwl'...let me know.
DUB
Thread Starter
Instructor
Joined: Oct 2014
Posts: 198
Likes: 17
From: Raleigh, NC
That is a good idea DUB. I think the nut plate is not attached to the gutter panel anymore. I may have stressed the rivets when trying to get the bolts out. Anyway, I looked in the holes with a little LED flashlight and nothing there. When I look in the holes on the right side I can see the nut place threads. Sunday I will have time to go out and determine if the nut plate is riveted from the outside of the steel crossmember. Since the body of off the frame it will be no problem doing what you suggest. I will let you know what I find on Sunday.
Thanks so much for your continued interest in trying to solve this problem.
Mark
Thanks so much for your continued interest in trying to solve this problem.
Mark