C2 Wiper Arm Post Seal Installation Question?
 12-28-2015, 02:14 AM
#1
Burning Brakes


Thread Starter

I'm getting ready to replace the old, leaking wiper arm post seals...
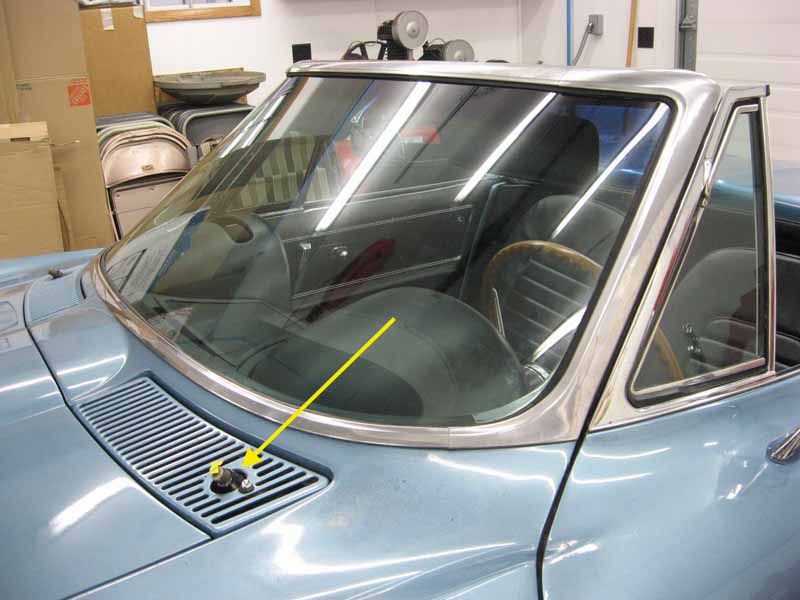
...on my '66 convertible.
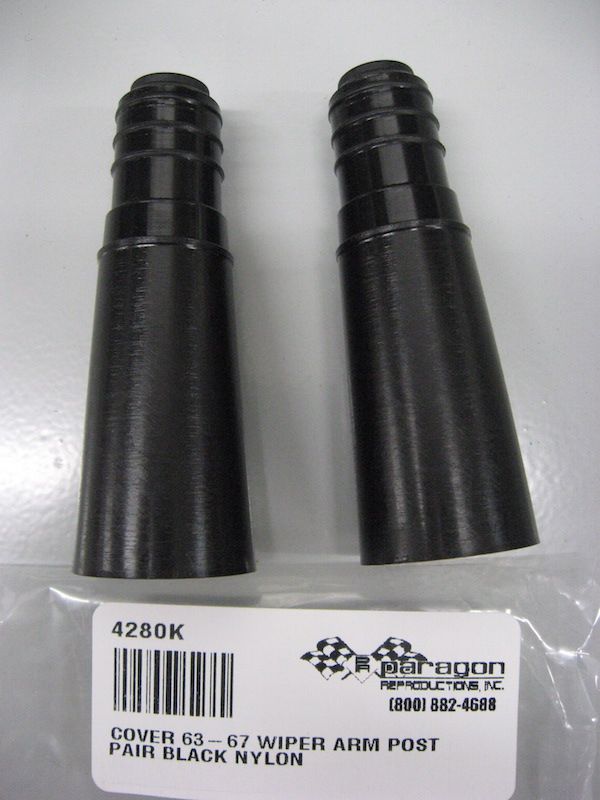
I got replacements from Paragon. My search of the archives shows John Z's suggestion to soften them up in hot water before installation and to use a hair dryer to keep low heat on them while installing them. Do they just slip over the posts and then that's it, or is there anything else I should know for the installation? Perhaps a small bead of silicon somewhere? The AIM is unclear on the matter.
Thank you in advance for any and all help in this.
Thomas
 12-28-2015, 05:59 AM
#2


I installed these on my 63 coupe then realized they are not used on the 63.
My memory tells me I slipped them over the stalk and pushed/turned and they went right on. It's probably a good idea to soften the top with hot water etc.
My memory tells me I slipped them over the stalk and pushed/turned and they went right on. It's probably a good idea to soften the top with hot water etc.
12-28-2015, 09:58 AM
#3
Melting Slicks

I would be surprised if these covers have much to do with any leaks. If you have water leaking in the cowl area, it is probably leaking were the post mounts to the body. There are 3 bolts on each one, and the driver side will be difficult to get to with the dash cluster in place.
12-28-2015, 11:17 AM
#4
Team Owner


I would be surprised if these covers have much to do with any leaks. If you have water leaking in the cowl area, it is probably leaking were the post mounts to the body. There are 3 bolts on each one, and the driver side will be difficult to get to with the dash cluster in place.

Heat them up with your wife's hair dryer that way you can do it right at/on the car...
As far as the leaks go....if its leaking where 'jrm' says it is, it's best to disassemble and do it right....if you dont have time and want to do it later....take some 3m black sealant and apply a good 'bubba glob' to post then put on sleeve....
 12-28-2015, 11:39 AM
#5
Burning Brakes
Thread Starter
From the above suggestions I take it these covers are more for cosmetic reasons rather than to actually seal the wiper arm post. That's helpful information. I haven't removed the old covers yet and who knows what was done to them over the years to seal that area. I'll let you know what I find out.
Thank you gentlemen.
Thomas
Thank you gentlemen.
Thomas
12-28-2015, 12:49 PM
#6
Team Owner
Member Since: Feb 2003
Location: Sitting in his Nowhere land Hanover Pa
Posts: 49,124
Received 6,997 Likes
on
4,813 Posts
2015 C2 of Year Finalist

From the above suggestions I take it these covers are more for cosmetic reasons rather than to actually seal the wiper arm post. That's helpful information. I haven't removed the old covers yet and who knows what was done to them over the years to seal that area. I'll let you know what I find out.
Thank you gentlemen.
Thomas
Thank you gentlemen.
Thomas
 12-29-2015, 01:54 AM
#7
Burning Brakes
Thread Starter
 12-30-2015, 01:29 AM
#9
Burning Brakes
Thread Starter

When I opened it up today, it appears that an undercoating type of material was applied all over the plenum area on both the passenger and drivers sides. From the looks of it, I'm fairly certain those drains were covered as well so I need to know where to initially look for them to open them up.
Many thanks to all; your help in invaluable! The Corvette Brotherhood in action

Thomas
12-30-2015, 02:53 PM
#10
Team Owner


Member Since: Oct 2000
Location: Washington Michigan
Posts: 38,899
Received 1,859 Likes
on
1,102 Posts
12-30-2015, 03:27 PM
#11
Le Mans Master

You can do a decent cleaning of the plenum areas on each side with a long mini shop vac hose followed by some flushing with a hose and checking the bottom drain hole periodically. If you have reason to remove the kick panels, you will find a bunch more junk to shop vac up again. 
12-30-2015, 07:34 PM
#12
Burning Brakes
Thread Starter
There are no "drain tubes" for the wiper plenums - each side has a huge drainage area on the outboard side of the "saddlebag" opening on each side, and that area drains through about a 1" diameter hole at the bottom. From below, that drain hole on each side is about 1-1/2" aft of the #1 body bolt, and is usually obstructed by leaves, twigs, and other debris.
You can do a decent cleaning of the plenum areas on each side with a long mini shop vac hose followed by some flushing with a hose and checking the bottom drain hole periodically. If you have reason to remove the kick panels, you will find a bunch more junk to shop vac up again.
Installing the new post covers wasn't as hard as installing a radio but I still found it to be a chore. There's nothing much to get a hold of to install them. I soaked them in near boiling water for a few minutes to soften them prior to installing them which was helpful but it's still a mighty tight fit.

I found it helpful to slide and stretch them over a large taper punch and onto the post. Then using a deep socket that was just larger than the arm post, helped catch the cover lip end and push them on.

I used the end of a tooth brush, which wouldn't cut the plastic lip of the cover, to push them into the notch just below the knurled end.

With the plenum covers...

...and the wiper arms back on, you can't see those post covers very much but it does finish that area off.

Installing the drivers side wiper first, the shop manual calls for that blade to be 1/2"-5/8" above the windshield molding. The passenger blade is installed 3/4"- 1" above the drivers blade.

To adjust the blades parallel and keep them from hitting the trim, use this blade adjusting screw, found on the wiper arm.

Looking on the underside of the wiper arm, this is how that adjusting screw works to pivot the arm. A very simple, clever and effective design.

The convertible is now all set with new wiper post covers. Many, many thanks again to everyone for your suggestions and help with this project.
Thomas
The following users liked this post:
gjhinc (11-22-2020)