




[C2] Diff carrier mounting bracket replacement....

Thread Starter
Le Mans Master


Joined: Sep 2002
Posts: 6,569
Likes: 2,402
From: Redacted
 Diff carrier mounting bracket replacement....
Are there any issues (or techniques) to replacing the diff carrier mounting bracket with the rest of the rear end/suspension assembled? My '64 has the "clunk" and elongated holes addressed in TSB 1069....my plan is to replace it with a reinforced unit from Van Steel. Additionally, rubber or poly pinion bushing while I'm in there?
Thanks
Thanks

Team Owner

Joined: Aug 2007
Posts: 58,061
Likes: 7,145
Army
Are there any issues (or techniques) to replacing the diff carrier mounting bracket with the rest of the rear end/suspension assembled? My '64 has the "clunk" and elongated holes addressed in TSB 1069....my plan is to replace it with a reinforced unit from Van Steel. Additionally, rubber or poly pinion bushing while I'm in there?
Thanks
Thanks
Thread Starter
Le Mans Master
Joined: Sep 2002
Posts: 6,569
Likes: 2,402
From: Redacted
It doesn't....looks relatively straight forward....It looks like the hard part is going to be getting a wrench on the bolt that goes through the snubber....need to brake out the manual tomorrow and take a look at what it says.

Advanced

Joined: Feb 2017
Posts: 51
Likes: 11
From: Roseville CA
Thank you for this timely post I was planning to reinstall my rear differential tomorrow and was wondering why someone would tack weld washers to this bracket,
They did a really poor job as two of them have broken loose I am tired of waiting on parts so I think I will give them a more thorough welding and carry on,
They did a really poor job as two of them have broken loose I am tired of waiting on parts so I think I will give them a more thorough welding and carry on,
Thread Starter
Le Mans Master
Joined: Sep 2002
Posts: 6,569
Likes: 2,402
From: Redacted
I just ordered one from Van Steel along with the new rubber snubber and all of the associated hardware. I think it was right around 90 bucks for everything. Hopefully there isn't much of a load on that bracket while stationary and it comes apart relatively easily.... well see.
Tech Contributor

Joined: Aug 1999
Posts: 15,156
Likes: 3,965
From: Connecticut, USA
Good timing, I just did a repair to a housing most likely from a loose bracket in the past. As mentioned the front holes took most of the abuse, the 63-4's has tapped front holes and used short 7/16-14 bolts and that didn't work out too good. In 65 they went with a through hole but the brackets were still cheesy, until 69 when a 1/4 plate was welded on and that took care of the issue for the most part. So what will happen at times is the hole in the housing enlongates not fully supporting it. It will work but can be repaired by boring and sleeving. The end result is a steel sleeve that is very strong and will last the life of the car. The bore has to be small enough that it doesn't cut through the casting into the oil passage under the front seal. So this shouldn't be done with a hand drill although I suppose that can be done. This one is now back to the original configuration. Just something to check when replacing a bracket or rebuilding a diff.
Hope this helps someone out .
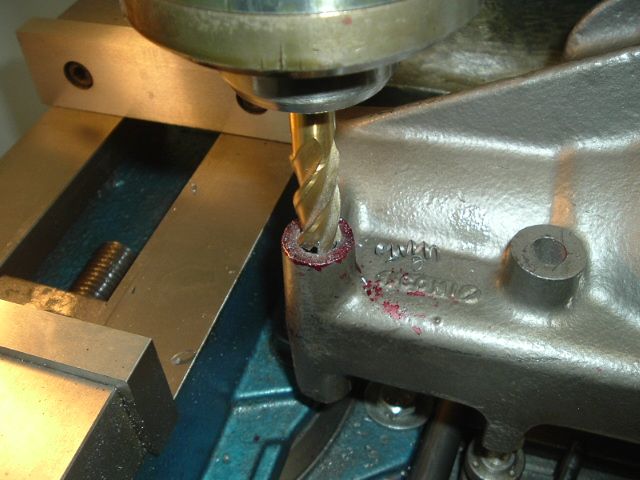
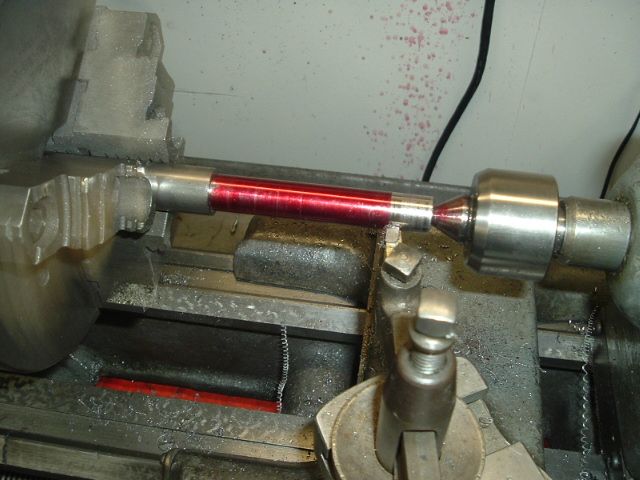
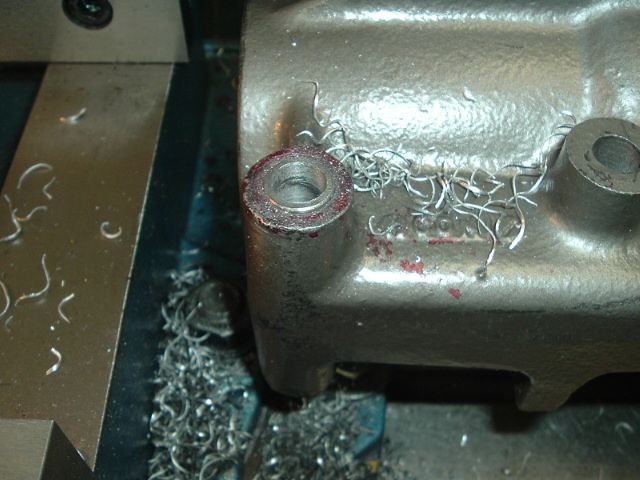

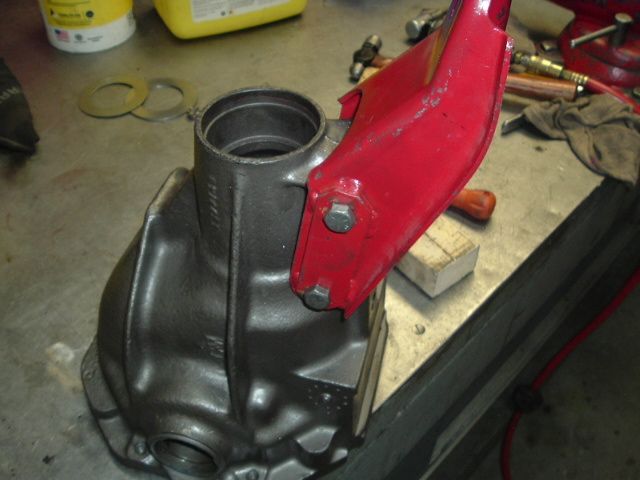
Hope this helps someone out .
Last edited by GTR1999; Nov 11, 2018 at 08:52 AM.
Thread Starter
Le Mans Master
Joined: Sep 2002
Posts: 6,569
Likes: 2,402
From: Redacted
Much appreciated! My car had less than 500 miles on it post restoration in the 80s, so I'm hoping there is no damage to the housing itself. If my experience on with this car holds true, its simply that the original bolts were not properly torqued when it was put back together. Either way, Im going to install the reinforced bracket and new snubber in the hopes to not have to address it again.
Corvette Stories
The Best of Corvette for Corvette Enthusiasts

Top 10 Most Explosive Corvettes Ever Made: Power-to-Weight Ratio Ranked!
Joe Kucinski
150 hp to 1,250 hp: Every Corvette Generation Compared by the Specs That Matter
Joe Kucinski
8 Coolest Corvette Pace Cars (and Replicas) of All Time
Verdad Gallardo
Top 10 Corvette Engines RANKED by Peak Torque (70+ Years of Muscle!)
Joe Kucinski
Corvette ZR1X Will Be Pacing the Indy 500, And Could Probably Race, Too!
Verdad Gallardo
Top 10 Corvettes Coming to Mecum Indy 2026!
Brett Foote
Top 10 C9 Corvette MUST-HAVES to Fix These C8 Generation Flaws!
Michael S. Palmer
10 Revolutionary 'Corvette Firsts' Most People Don't Know
Joe Kucinski
5 Reasons to Upgrade to an LS6-Powered Corvette; 5 Reasons to Stay LT2
Michael S. Palmer
Thread Starter
Le Mans Master
Joined: Sep 2002
Posts: 6,569
Likes: 2,402
From: Redacted
Soooooo.....has anyone done this repair with the body on the frame? Based on the length of the bolts, I don't think you can remove them in order to change the brackets with the body on....they'll hit the tub on either side of the driveshaft tunnel....

Team Owner


Joined: Nov 2005
Posts: 28,180
Likes: 2,872
From: Beach & High Desert Southern California
The pinion snubber bolt is more easily wrenched with the driveshaft removed.
Thread Starter
Le Mans Master
Joined: Sep 2002
Posts: 6,569
Likes: 2,402
From: Redacted
I see what you're saying, the problem will then become, installing the new 65 and later, reinforced bracket with the two long through bolts as there will be no way (as far as I can tell) to get the forward through bolt installed once the bracket is swung back up into position.
Thread Starter
Le Mans Master
Joined: Sep 2002
Posts: 6,569
Likes: 2,402
From: Redacted
hmmmm....I hadn't, but in rereading the responses above, it has become apparent that I was/am not fully grasping the solution to the problem here.
So in the original 63-64 bracket arrangement, is it typically the bracket, or the holes in the differential itself that get elongated, causing the clunk?
Am I correct in understanding that the only complete fix to this issue is to remove the differential, drill the through holes, install the steel sleeve, and then install the two through bolts?
I appreciate the help in sorting this out!
Thread Starter
Le Mans Master
Joined: Sep 2002
Posts: 6,569
Likes: 2,402
From: Redacted
That makes sense....I imagine you need slightly longer bolts to compensate for the additional thickness of the reinforced bracket (assuming the threads in the diff are good)?
Last edited by FLYNAVY30; Nov 18, 2018 at 09:51 PM.
Team Owner
Joined: Nov 2005
Posts: 28,180
Likes: 2,872
From: Beach & High Desert Southern California
hmmmm....I hadn't, but in rereading the responses above, it has become apparent that I was/am not fully grasping the solution to the problem here.
So in the original 63-64 bracket arrangement, is it typically the bracket, or the holes in the differential itself that get elongated, causing the clunk?
Am I correct in understanding that the only complete fix to this issue is to remove the differential, drill the through holes, install the steel sleeve, and then install the two through bolts?
I appreciate the help in sorting this out!
So in the original 63-64 bracket arrangement, is it typically the bracket, or the holes in the differential itself that get elongated, causing the clunk?
Am I correct in understanding that the only complete fix to this issue is to remove the differential, drill the through holes, install the steel sleeve, and then install the two through bolts?
I appreciate the help in sorting this out!
The thread damage motivated the through hole bolt change for 65'.
The same clunk and bracket damage can happen with the later through bolt, if it comes loose, but without threaded bolt holes the pumpkin damage is through hole wear.
Eventually GM reinforced the bracket, in the C3 era.
Tight bolts and brackets do not wear or crack.
Thread Starter
Le Mans Master
Joined: Sep 2002
Posts: 6,569
Likes: 2,402
From: Redacted
If the 63-64 forward bolts come loose, the bracket can move (making the clunk) and eventually wear and crack the holes in the bracket. The loose bolts being rocked by the bracket shear will also damage the threads in the pumpkin (the more critical damage). The solution is to keep the bolts tight, and the potential for thread and bracket damage is minimal. Tight bolts and brackets do not wear or crack.
The thread damage motivated the through hole bolt change for 65'.
The same clunk and bracket damage can happen with the later through bolt, if it comes loose, but without threaded bolt holes the pumpkin damage is through hole wear.
Eventually GM reinforced the bracket, in the C3 era.
Tight bolts and brackets do not wear or crack.
The thread damage motivated the through hole bolt change for 65'.
The same clunk and bracket damage can happen with the later through bolt, if it comes loose, but without threaded bolt holes the pumpkin damage is through hole wear.
Eventually GM reinforced the bracket, in the C3 era.
Tight bolts and brackets do not wear or crack.
Understood, thanks for the clarification!