




Headlight Relay Installation....pics needed
Thread Starter
East bound and down...


Joined: Dec 2004
Posts: 987
Likes: 3
From: Jonesboro Arkansas
 Headlight Relay Installation....pics needed
Well I ordered a new wirng harness the other day from the Last Detail as suggested. It looks just like the original. Thanks for help on finding that one. Now that it has arrived I have decided to wire up some relays for my lights. Can you guys provide me with some pics of where you placed the relays?
Also any other tips and tricks that you may have on this subject are greatly appreciated.

Also any other tips and tricks that you may have on this subject are greatly appreciated.
Burning Brakes

Joined: Jun 2004
Posts: 872
Likes: 3
From: Cortlandt Manor New York
What type of relays are you going to install?
The headlight system operates on vaccum not electric. If you are going to install modified electrical system the wiring harness that you have will be of little use. You are going to have to explain further what you are doing, what year car, and what componants you are modifying.
The headlight system operates on vaccum not electric. If you are going to install modified electrical system the wiring harness that you have will be of little use. You are going to have to explain further what you are doing, what year car, and what componants you are modifying.

The ORIGINAL and bestest

Joined: Oct 2000
Posts: 10,009
Likes: 240
From: Toronto Ontario
Toronto Events Coordinator
cutting into the wiring harness right next to the alternator is a handy spot because you can get to all the headlight wiring, and also the alternator and/or horn relay is there for picking up your new feed for the lights; this also puts the relays under the hood out of the elements. I have gotten as far as mounting the relays to the inner fender there, but not wired them up yet.
Last edited by 7t2vette; Aug 4, 2006 at 05:00 PM.

Le Mans Master

Joined: Jun 2002
Posts: 8,339
Likes: 24
From: I can walk to MA
He intends to put relays at the headlights, with a low
resistance feed. This provides more power at the
bulbs and puts less strain on the headlight and highbeam switches.
Take a look in Speeddirect.com (supporting vendor).
They carry a wiring harness to add the relays in.
http://www.speeddirect.com/index.aspx?nodeID=128
It isn't cheap - but the workmanship is impeccable.
Also, it allows you to confidently add the relays without
molesting your original system - AT ALL. It all plugs in.
This is built by a forum member here. He does a great job.
I have one, but have not installed ... until after I finish sanding the body.
What a mess I'm making of my nice new chassis.

resistance feed. This provides more power at the
bulbs and puts less strain on the headlight and highbeam switches.
Take a look in Speeddirect.com (supporting vendor).
They carry a wiring harness to add the relays in.
http://www.speeddirect.com/index.aspx?nodeID=128
It isn't cheap - but the workmanship is impeccable.
Also, it allows you to confidently add the relays without
molesting your original system - AT ALL. It all plugs in.
This is built by a forum member here. He does a great job.
I have one, but have not installed ... until after I finish sanding the body.
What a mess I'm making of my nice new chassis.
Last edited by NHvette; Aug 4, 2006 at 05:04 PM.
The ORIGINAL and bestest
Joined: Oct 2000
Posts: 10,009
Likes: 240
From: Toronto Ontario
Toronto Events Coordinator
Originally Posted by Red70vette
What type of relays are you going to install?
The headlight system operates on vaccum not electric. If you are going to install modified electrical system the wiring harness that you have will be of little use. You are going to have to explain further what you are doing, what year car, and what componants you are modifying.
The headlight system operates on vaccum not electric. If you are going to install modified electrical system the wiring harness that you have will be of little use. You are going to have to explain further what you are doing, what year car, and what componants you are modifying.
http://www.madelectrical.com/electri...adlights.shtml
Thread Starter
East bound and down...
Joined: Dec 2004
Posts: 987
Likes: 3
From: Jonesboro Arkansas
Originally Posted by NHvette
He intends to put relays at the headlights, with a low
resistance feed. This provides more power at the
bulbs and puts less strain on the headlight and highbeam switches.
Take a look in Speeddirect.com (supporting vendor).
They carry a wiring harness to add the relays in.
http://www.speeddirect.com/index.aspx?nodeID=128
It isn't cheap - but the workmanship is impeccable.
Also, it allows you to confidently add the relays without
molesting your original system - AT ALL. It all plugs in.
This is built by a forum member here. He does a great job.
I have one, but have not installed ... until after I finish sanding the body.
What a mess I'm making of my nice new chassis.
resistance feed. This provides more power at the
bulbs and puts less strain on the headlight and highbeam switches.
Take a look in Speeddirect.com (supporting vendor).
They carry a wiring harness to add the relays in.
http://www.speeddirect.com/index.aspx?nodeID=128
It isn't cheap - but the workmanship is impeccable.
Also, it allows you to confidently add the relays without
molesting your original system - AT ALL. It all plugs in.
This is built by a forum member here. He does a great job.
I have one, but have not installed ... until after I finish sanding the body.
What a mess I'm making of my nice new chassis.
Thread Starter
East bound and down...
Joined: Dec 2004
Posts: 987
Likes: 3
From: Jonesboro Arkansas
Originally Posted by 7t2vette
cutting into the wiring harness right next to the alternator is a handy spot because you can get to all the headlight wiring, and also the alternator and/or horn relay is there for picking up your new feed for the lights; this also puts the relays under the hood out of the elements. I have gotten as far as mounting the relays to the inner fender there, but not wired them up yet.

The ORIGINAL and bestest
Joined: Oct 2000
Posts: 10,009
Likes: 240
From: Toronto Ontario
Toronto Events Coordinator
Originally Posted by LS-Five
Ok, thanks for the info. Sounds like we are thinking alike.

They are a terrible thing to waste!

Corvette Stories
The Best of Corvette for Corvette Enthusiasts

Top 10 Most Explosive Corvettes Ever Made: Power-to-Weight Ratio Ranked!
Joe Kucinski
150 hp to 1,250 hp: Every Corvette Generation Compared by the Specs That Matter
Joe Kucinski
8 Coolest Corvette Pace Cars (and Replicas) of All Time
Verdad Gallardo
Top 10 Corvette Engines RANKED by Peak Torque (70+ Years of Muscle!)
Joe Kucinski
Corvette ZR1X Will Be Pacing the Indy 500, And Could Probably Race, Too!
Verdad Gallardo
Top 10 Corvettes Coming to Mecum Indy 2026!
Brett Foote
Top 10 C9 Corvette MUST-HAVES to Fix These C8 Generation Flaws!
Michael S. Palmer
10 Revolutionary 'Corvette Firsts' Most People Don't Know
Joe Kucinski
5 Reasons to Upgrade to an LS6-Powered Corvette; 5 Reasons to Stay LT2
Michael S. Palmer
Thread Starter
East bound and down...
Joined: Dec 2004
Posts: 987
Likes: 3
From: Jonesboro Arkansas
To those of you who have already wired up your relays and have had a chance to drive your car after dark, was the difference readily apparent?
Was it like a night and day difference?
Was it like a night and day difference?
Pro

Joined: Nov 2000
Posts: 594
Likes: 0
From: Tucson AZ
Thanks for the kind words Dave . I'm glad you like it .
For those that can do this modification yourselves, I would suggest making sure that you mount the relays as close to the headlights as possible .
.
Here are some better shots of the harness NHvette is referring to:
This is the main harness which is completely plug-n-play. NO modifications are needed to install this harness - it all plugs in.

These sub-harnesses plug into the main using weatherproof connectors. They can be replaced to provide compatability with other bulb configurations.

This male H4 on the main harness plugs into the original harness to supply switching for the relays.

Bosch 40 amp relays that are included in the main harness.

This 40amp MAXI-FUSE protects the 8 awg feed that runs from the alternator to feed the relays.

Craig
. I'm glad you like it .For those that can do this modification yourselves, I would suggest making sure that you mount the relays as close to the headlights as possible
. Here are some better shots of the harness NHvette is referring to:
This is the main harness which is completely plug-n-play. NO modifications are needed to install this harness - it all plugs in.
These sub-harnesses plug into the main using weatherproof connectors. They can be replaced to provide compatability with other bulb configurations.
This male H4 on the main harness plugs into the original harness to supply switching for the relays.
Bosch 40 amp relays that are included in the main harness.
This 40amp MAXI-FUSE protects the 8 awg feed that runs from the alternator to feed the relays.
Craig
Pro
Joined: Nov 2000
Posts: 594
Likes: 0
From: Tucson AZ
Originally Posted by LS-Five
To those of you who have already wired up your relays and have had a chance to drive your car after dark, was the difference readily apparent?
Was it like a night and day difference?
Was it like a night and day difference?
Craig
Safety Car


Joined: Nov 2005
Posts: 3,961
Likes: 573
From: Lompoc, CA. Santa Barbara County
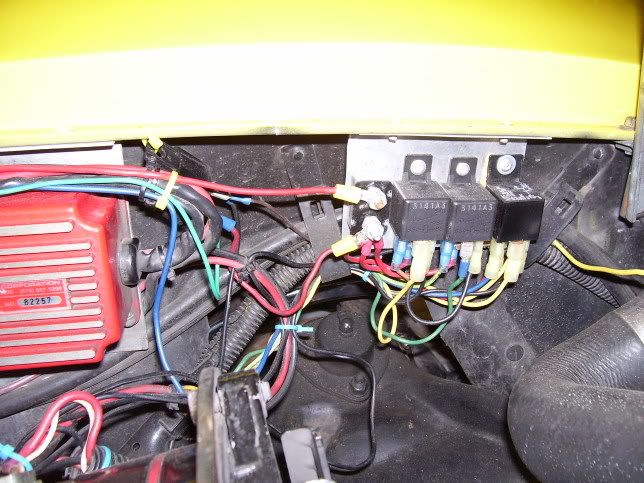
I have four relays. One for hi beam, one for low beam, one for the fans, and one for my daytime running/parking lights. Only three mounted now, I need to build another plate to hold all four. I went with H2/H4 100watt bulbs. Makes a huge difference in night time vis.

Le Mans Master

Joined: Jan 2006
Posts: 9,192
Likes: 27
From: Boca Raton Florida
Use a diagram like this, install the relays on the fenderwell by the alternator.
not my drawing, I "aquired it somewhere" but its the one I am going to use

Nice Job BeeJay, exactly what I was talking about
not my drawing, I "aquired it somewhere" but its the one I am going to use
Nice Job BeeJay, exactly what I was talking about
Thread Starter
East bound and down...
Joined: Dec 2004
Posts: 987
Likes: 3
From: Jonesboro Arkansas
Thanks for the pictures and the diagrams! That was the kind of stuff I was looking for. The harness with the pre-wired relays looks very nice. I have already ordered a relay kit so I guess I go the "do-it yourself" route.
One question for vettenut though, how critcial is it that the relays be close to the lights? I was planning on mounting the relays to the inner fender near the horn relay bus block, but it sounds as if I need to have them closer to the lights.
One question for vettenut though, how critcial is it that the relays be close to the lights? I was planning on mounting the relays to the inner fender near the horn relay bus block, but it sounds as if I need to have them closer to the lights.
Pro
Joined: Nov 2000
Posts: 594
Likes: 0
From: Tucson AZ
Originally Posted by LS-Five
One question for vettenut though, how critcial is it that the relays be close to the lights? I was planning on mounting the relays to the inner fender near the horn relay bus block, but it sounds as if I need to have them closer to the lights.
2 feet 8awg buss to the relays drops .052 volts
6 feet 12awg to the lamps drops .392 volts
----------
.444 volt drop
6 feet 8awg buss to relays drops .155 volts
2 feet 12awg to the lamps drops .131 volts
----------
.286 volt drop
In this example, you can see the difference placing the relays close to the lamps.
Craig
Thread Starter
East bound and down...
Joined: Dec 2004
Posts: 987
Likes: 3
From: Jonesboro Arkansas
Ok guys, I started wiring up my relays today. I never have messed with wiring much so forgive my ignorance. When I opened up the harness I noticed that the low beams only had one wire (tan in color) to feed the low beams. That was simple enough. But, it appears that the high beams utilize two light green wires to feed both pairs of lights. Can I simply wire those two light green wires together to feed into and then out of the same relay? My first guess would be yes, but I just wanted to get a second opinion before I wired it up and called it good.
Also, for the ground can I just wire the black ground wire from relay to the black ground wire in the harness or is it best to ground the relays seperately?
Also, for the ground can I just wire the black ground wire from relay to the black ground wire in the harness or is it best to ground the relays seperately?
Last edited by LS-Five; Aug 20, 2006 at 12:18 AM.

Burning Brakes
Joined: Mar 2002
Posts: 839
Likes: 0
From: Lewiston, Maine
I'm redoing all of the wiring in my car. In fact, about 60% of my old cut-out wiring is sitting on the floor next to my bed right now.
"File --> Save with images as" This will surely help me out in the near future when I purchase new wiring harnesses I also like the idea of getting brighter headlights. I've heard about using aircraft landing lights as your highbeam bulbs. I believe 'Ironcross' turned me onto that. The relay idea is another good one. Thank you all for the help.
"File --> Save with images as" This will surely help me out in the near future when I purchase new wiring harnesses
I also like the idea of getting brighter headlights. I've heard about using aircraft landing lights as your highbeam bulbs. I believe 'Ironcross' turned me onto that. The relay idea is another good one. Thank you all for the help.
Thread Starter
East bound and down...
Joined: Dec 2004
Posts: 987
Likes: 3
From: Jonesboro Arkansas
Originally Posted by LS-Five
Ok guys, I started wiring up my relays today. I never have messed with wiring much so forgive my ignorance. When I opened up the harness I noticed that the low beams only had one wire (tan in color) to feed the low beams. That was simple enough. But, it appears that the high beams utilize two light green wires to feed both pairs of lights. Can I simply wire those two light green wires together to feed into and then out of the same relay? My first guess would be yes, but I just wanted to get a second opinion before I wired it up and called it good.
Also, for the ground can I just wire the black ground wire from relay to the black ground wire in the harness or is it best to ground the relays seperately?
Also, for the ground can I just wire the black ground wire from relay to the black ground wire in the harness or is it best to ground the relays seperately?
Anyone have any answers for me here?