








step 1: remove diff from car

Thread Starter
Racer


Joined: Aug 2005
Posts: 431
Likes: 0
From: Oita, Japan
 step 1: remove diff from car
check

I'm doing a complete rebuild of the rear end of my car. I will post pictures as I go along and maybe you guys can tell me what I'm doing wrong and steer me in the right direction. gtr1999 has already been helping behind the scenes.
Here is what I found when I opened it up. Something missing???

I know this is a positraction rearend because there is a tag on the diff cover warning me to only use positraction lubricant.
I'm doing a complete rebuild of the rear end of my car. I will post pictures as I go along and maybe you guys can tell me what I'm doing wrong and steer me in the right direction. gtr1999 has already been helping behind the scenes.
Here is what I found when I opened it up. Something missing???
I know this is a positraction rearend because there is a tag on the diff cover warning me to only use positraction lubricant.
Thread Starter
Racer
Joined: Aug 2005
Posts: 431
Likes: 0
From: Oita, Japan
Well, Gary has set me straight again and showed me that this is a positraction rearend. It looks like someone has tried to set it up as he does without the posi springs and plates but there is evidence that it wasn't him. The stress risers have not been removed and the original cast carrier spacers are still in there. So, on with the rebuild.
This picture shows the center pin removed with the bolt that retains it. I've heard that those bolts are prone to breaking which makes removing the center pin very difficult. Mine didn't break so after removing it, I could push the pin out with no problem. The center pin will be replaced by a heavy duty one from Gary.

I had roughly .125" end play in the left side side yoke and 0.030" in the right side. This was enough wear to mushroom out the end of the side yokes which made them difficult to remove. With some effort and patience I got them out. Someone had been in here before and "marked" the right bearing cap with a center punch. This is to insure it goes back on the correct side. If you look closely, you can see the mark in this picture.

To remove the carrier, I put a box end wrench on a ring gear bolt and used the pinion gear to push it out. Make sure you rotate the pinion the correct way or it will actually try to pull the carrier on more. You can see I used a pry bar in this picture but it really didn't take too much effort.

I believe this is what is referred to as a "snowflake" posi clutch.

Here is the case, all cleaned up and painted.

And, while I'm at it, I droped the tank and found the build sheet! Or at least most of it.

This picture shows the center pin removed with the bolt that retains it. I've heard that those bolts are prone to breaking which makes removing the center pin very difficult. Mine didn't break so after removing it, I could push the pin out with no problem. The center pin will be replaced by a heavy duty one from Gary.
I had roughly .125" end play in the left side side yoke and 0.030" in the right side. This was enough wear to mushroom out the end of the side yokes which made them difficult to remove. With some effort and patience I got them out. Someone had been in here before and "marked" the right bearing cap with a center punch. This is to insure it goes back on the correct side. If you look closely, you can see the mark in this picture.
To remove the carrier, I put a box end wrench on a ring gear bolt and used the pinion gear to push it out. Make sure you rotate the pinion the correct way or it will actually try to pull the carrier on more. You can see I used a pry bar in this picture but it really didn't take too much effort.
I believe this is what is referred to as a "snowflake" posi clutch.
Here is the case, all cleaned up and painted.
And, while I'm at it, I droped the tank and found the build sheet! Or at least most of it.
Tech Contributor


Joined: Aug 1999
Posts: 15,195
Likes: 4,021
From: Connecticut, USA
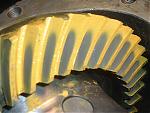
Ah, I see the job has begun- good! That is a posi and no it isn't one of mine, nor that of Tom's from what I can see.
Those cast shims are junk but write down the dimensions on your setup sheet. When you remove the pinion then you're going to have to remove the large bearing to get to the shim. The shims are going to be your starting or reference point to work from.
I'm doing a 72 diff now and same as you going from 308 to 336 using the same gears. I got to the point of the first pattern, using the 032 shim that was in there. It is too thick, the pattern is longer in the root then the crown. I'm going to go to .025 and compare the pattern.
What I do on every job is to take pictures of all the patterns so you can see the movement in relation to the shim size.
You can use a long rod or punch to remove the races in the housing. I have one of those aluminum bearing drivers sold every where. The is a size for the small pin race but not for the large one. I have a plate I use to drive it in. I have to machine a aluminum driver for that one to complete my set.
When you are all done with the posi setup, the last thing I do is loctite the bolt in place. I tighen it by hand by there is a torque spec. I never liked the leverage issue torquing that bolt, that's why I use a small wrench on it. Be sure to spray it with brake cleaner before using loctite, and I use their primer too.
Looks good so far, take your time, read my paper and take more pictures for us. Your parts should be there by wednesday.
Here is what those clutches usually look like after 35 years
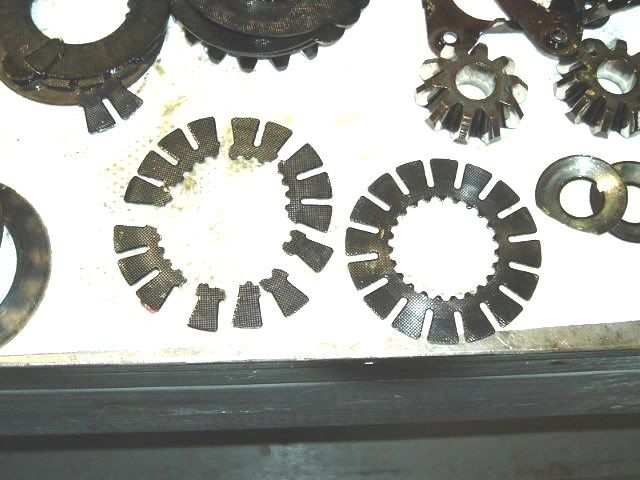
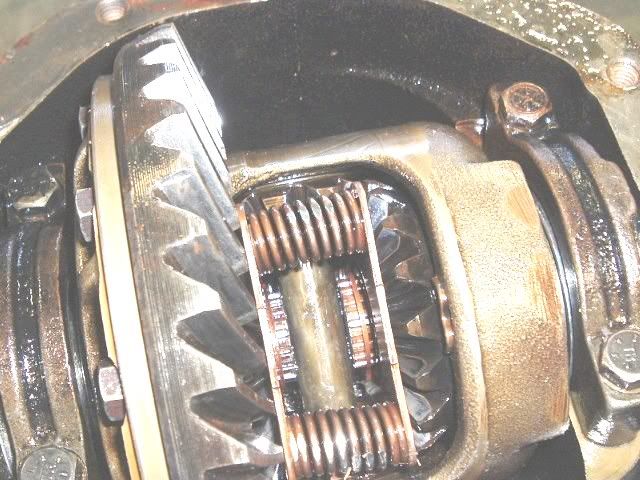
Here is what the stock setup would have looked like, you're on the right track now you just have to tune it.
I see you're doing this on the bench, that's ok but it is much easier though to use an engine stand.

Soon you will be in the '06 graduating class with Gyopp!!!
Those cast shims are junk but write down the dimensions on your setup sheet. When you remove the pinion then you're going to have to remove the large bearing to get to the shim. The shims are going to be your starting or reference point to work from.
I'm doing a 72 diff now and same as you going from 308 to 336 using the same gears. I got to the point of the first pattern, using the 032 shim that was in there. It is too thick, the pattern is longer in the root then the crown. I'm going to go to .025 and compare the pattern.
What I do on every job is to take pictures of all the patterns so you can see the movement in relation to the shim size.
You can use a long rod or punch to remove the races in the housing. I have one of those aluminum bearing drivers sold every where. The is a size for the small pin race but not for the large one. I have a plate I use to drive it in. I have to machine a aluminum driver for that one to complete my set.
When you are all done with the posi setup, the last thing I do is loctite the bolt in place. I tighen it by hand by there is a torque spec. I never liked the leverage issue torquing that bolt, that's why I use a small wrench on it. Be sure to spray it with brake cleaner before using loctite, and I use their primer too.
Looks good so far, take your time, read my paper and take more pictures for us. Your parts should be there by wednesday.
Here is what those clutches usually look like after 35 years
Here is what the stock setup would have looked like, you're on the right track now you just have to tune it.
I see you're doing this on the bench, that's ok but it is much easier though to use an engine stand.
Soon you will be in the '06 graduating class with Gyopp!!!
Last edited by gtr1999; Nov 19, 2006 at 11:03 AM.
Thread Starter
Racer
Joined: Aug 2005
Posts: 431
Likes: 0
From: Oita, Japan
I was able to remove the pinion seal & races as well as the side yoke bearings and seals. I removed the seals and races with a hammer and punch. I found that a 1-1/4" socket fit the side bearings perfectly so I used that to push them out with a hammer.  Here is a picture showing a cutout in the case to give a punch access to the large pinion race. There is also one directly opposite.

Here is the case, all races, seals, and bearings removed. Its even on a stand (c-clamped to my bench.....)

I also did a little work on the gas tank today. You can see the new and old side by side. The new one did not come with a filler neck and my old filler neck is pretty rusty so I guess I'll be getting a new one before putting this into the vette. The second picture shows the infamous vapor separator. I transfered it from the old tank for now but its really just holding hoses at this point. I have a new on on the way.


Here is a picture showing a cutout in the case to give a punch access to the large pinion race. There is also one directly opposite.Here is the case, all races, seals, and bearings removed. Its even on a stand (c-clamped to my bench.....)
I also did a little work on the gas tank today. You can see the new and old side by side. The new one did not come with a filler neck and my old filler neck is pretty rusty so I guess I'll be getting a new one before putting this into the vette. The second picture shows the infamous vapor separator. I transfered it from the old tank for now but its really just holding hoses at this point. I have a new on on the way.
Tech Contributor
Joined: Aug 1999
Posts: 15,195
Likes: 4,021
From: Connecticut, USA
I like the clamp on the bench, nice job. Watch the plastic gas tank separator mine just fell apart in my hands. It was about a strong as a Ritz cracker! I had another one here luckily, as they are not avail as far as I know.
I just checked the parts and they are in Dallas now! I know what you'll be doing after Thanksgiving!
I just checked the parts and they are in Dallas now! I know what you'll be doing after Thanksgiving!
Corvette Stories
The Best of Corvette for Corvette Enthusiasts

5 Best & 5 Worst Corvette Daily Drivers
Joe Kucinski
The Headlights of Every Corvette Generation Explained
Joe Kucinski
5 Best & 5 Most Overrated Corvette Track Packages of All Time!
Joe Kucinski
Every 2027 Corvette Engine Explained
Joe Kucinski
Designer Imagines A Corvette That Looks More Like a Corvette Than the Corvette
Verdad Gallardo
10 Ugly Corvettes That We Still Kinda Love
Joe Kucinski
Top 10 Most Expensive Corvettes Ever Sold on Bring A Trailer
Brett Foote
10 Things Every Corvette Owner Needs (2026 Edition)
Michael S. Palmer
8 Most "Only Corvette Owners Understand" Quirks and Problems
Pouria Savadkouei
Thread Starter
Racer
Joined: Aug 2005
Posts: 431
Likes: 0
From: Oita, Japan
Fugawi -- I'll try to post new pics daily until this is done as long as there is interest. I know Gary is interested to see how his new student does. I plan on doing the trailing arms as well.
Gary -- My dad left that "stand" in my garage about 15 years ago and I've been dragging it around ever since because it is too good of a piece of metal to throw out. I think it is part of an engine stand -- maybe for a diesel engine. Honestly, I've never really known quite what to do with it until today. And my wife wonders why I never throw anything out....
One question I have is with the pinion gear setup. It looks like you start with the same spacers as the old one and let the pattern be your guide to raise or lower it. Other people have told me that there should be a number on the end of the new pinion gear and that number is the distance the pinion should be from the machined surfaces that the bearing caps go on and you should add or remove shims to get that distance. Any reason you don't do that?
Gary -- My dad left that "stand" in my garage about 15 years ago and I've been dragging it around ever since because it is too good of a piece of metal to throw out. I think it is part of an engine stand -- maybe for a diesel engine. Honestly, I've never really known quite what to do with it until today. And my wife wonders why I never throw anything out....
One question I have is with the pinion gear setup. It looks like you start with the same spacers as the old one and let the pattern be your guide to raise or lower it. Other people have told me that there should be a number on the end of the new pinion gear and that number is the distance the pinion should be from the machined surfaces that the bearing caps go on and you should add or remove shims to get that distance. Any reason you don't do that?
Tech Contributor
Joined: Aug 1999
Posts: 15,195
Likes: 4,021
From: Connecticut, USA
You are correct, the gears will have the checking distance on them. That is the distance from hte pinion face to the ring gear center line. The problem is the tool needed for this is not easy to find and the ones I looked at would not work with the vette diff.
The bearing cap pad may not be true ring gear center. I've seen this procedure referenced in corvette magazines in the past and played around at the time to see if there was a difference in housings and there was.
All the builders I spoke to years ago used the pattern method as the way they build them, that is how I do them too.
I would be interested in hearing from others out there on how they are setting the depth. I was going to machine up a tool but never did.
Gary
The bearing cap pad may not be true ring gear center. I've seen this procedure referenced in corvette magazines in the past and played around at the time to see if there was a difference in housings and there was.
All the builders I spoke to years ago used the pattern method as the way they build them, that is how I do them too.
I would be interested in hearing from others out there on how they are setting the depth. I was going to machine up a tool but never did.
Gary

Safety Car

Joined: Oct 2005
Posts: 3,570
Likes: 1
From: Algonac Michigan
Yukon,
By all means keep the pics coming. I think you are giving lots of guys here the ambition to at least consider attacking their gear. And I will agree that you have the best teacher around...as the younger guys say GARY ROCKS!!!! And so do you.
By all means keep the pics coming. I think you are giving lots of guys here the ambition to at least consider attacking their gear. And I will agree that you have the best teacher around...as the younger guys say GARY ROCKS!!!! And so do you.
Thread Starter
Racer
Joined: Aug 2005
Posts: 431
Likes: 0
From: Oita, Japan
I got the pinion bearing removed from the old pinion tonight. It popped off without too much persuasion.

Once off, I started honing inside of the bearing with a brake hone. The idea is to make it slip onto the new pinion and use it to set up the new gears. Unfortunately, my hone wore out before the bearing would slip on to the pinion so I guess I will be getting another hone tomorrow.

With that roadblock, I turned to the carrier to finish dismantling it. I removed the ring gear bolts with an impact wrench and removed the ring gear with a rubber mallet. The 3.08s are officially removed. I'll be replacing them with 3.36 gears. This is a '72 350 base motor with a TH400 tranny. A previous owner rebuilt the motor using LT-1 parts -- heads, cam, intake, etc.

The next step would be to pull the bearings off the carrier. The side yokes go through the carrier in the middle of the bearings. All of the pullers I have are designed to push in the center of whatever they are pulling but in this case, there is nothing there to push against. I need something smaller than the bearing but big enough to lay across the boss to push on. Something else to pick up tomorrow....

So, I have the differential disassembled as far as I can go without a trip to the store so the final thing I did tonight on it was to mic the spacers.

I also spent a fair amount of time cleaning and painting the frame under the car but the pictures didn't turn out too good. I'll try to post a pic of that tomorrow.
Once off, I started honing inside of the bearing with a brake hone. The idea is to make it slip onto the new pinion and use it to set up the new gears. Unfortunately, my hone wore out before the bearing would slip on to the pinion so I guess I will be getting another hone tomorrow.
With that roadblock, I turned to the carrier to finish dismantling it. I removed the ring gear bolts with an impact wrench and removed the ring gear with a rubber mallet. The 3.08s are officially removed. I'll be replacing them with 3.36 gears. This is a '72 350 base motor with a TH400 tranny. A previous owner rebuilt the motor using LT-1 parts -- heads, cam, intake, etc.
The next step would be to pull the bearings off the carrier. The side yokes go through the carrier in the middle of the bearings. All of the pullers I have are designed to push in the center of whatever they are pulling but in this case, there is nothing there to push against. I need something smaller than the bearing but big enough to lay across the boss to push on. Something else to pick up tomorrow....
So, I have the differential disassembled as far as I can go without a trip to the store so the final thing I did tonight on it was to mic the spacers.
I also spent a fair amount of time cleaning and painting the frame under the car but the pictures didn't turn out too good. I'll try to post a pic of that tomorrow.
Tech Contributor
Joined: Aug 1999
Posts: 15,195
Likes: 4,021
From: Connecticut, USA
Looks like the same bearign splitter I have from HF. It just died trying to remove the pinion bearign last week. It last about 12 diff jobs so you'll be ok. I had to order a OTC splitter to replace it.
I took a 1.5" pipe coupling and turned it on a lathe to get the ID/OD needed for the carrier bearing install. The carrier journal should be slightly higher then the bearing inner race. Be certain the bearing is fully seated on the carrier.
I use a Sears 2 jaw puller to remove the carrier bearings. For this I made a plug to fit into the bore and the OD was just short of the race ID. Works good with an impact wrench.
Keep up the good work.
I took a 1.5" pipe coupling and turned it on a lathe to get the ID/OD needed for the carrier bearing install. The carrier journal should be slightly higher then the bearing inner race. Be certain the bearing is fully seated on the carrier.
I use a Sears 2 jaw puller to remove the carrier bearings. For this I made a plug to fit into the bore and the OD was just short of the race ID. Works good with an impact wrench.
Keep up the good work.

Race Director

Joined: Dec 1999
Posts: 19,610
Likes: 778
From: Forked River NJ
I also honed out the old bearing to use as a setup bearing. I still have it around somewhere. It worked great. I also used the HF bearing splitter. It worked fine for me but as Gary said for multiple jobs a better grade of bearing splitter is needed.

Le Mans Master


Joined: Jun 2002
Posts: 8,339
Likes: 24
From: I can walk to MA
I'm gonna dive into this maybe next year ... too much body and motor work ahead.
Good thing I have an extra diff ... dropping the 3.08s will be the LAST step for me.
Good Luck and keep us posted.

Good thing I have an extra diff ... dropping the 3.08s will be the LAST step for me.
Good Luck and keep us posted.

Thread Starter
Racer
Joined: Aug 2005
Posts: 431
Likes: 0
From: Oita, Japan
I'm having a bit of trouble getting the carrier bearings off. I've got a piece of metal smaller than the bearing ID to push against now but my puller just can't seem to get a grip on the bearing and keeps slipping off.  It's the craftsman puller that can be configured for 2 or 3 jaws. What type of pullers do some of the rest of you use for these bearings?
It's the craftsman puller that can be configured for 2 or 3 jaws. What type of pullers do some of the rest of you use for these bearings?
Tech Contributor
Joined: Aug 1999
Posts: 15,195
Likes: 4,021
From: Connecticut, USA
It's is a very tight fit between the race and the knotch in the carrier. I used a 2" grinder and made a small clearence on the puller legs. Snap-On make a nice thin legged puller but they cost a ton. Look at the post I have going I think I have the tools on it?
The spacer I use with the puller is there on the 1st page with the coupling I machined up.
http://forums.corvetteforum.com/show....php?t=1236684
The spacer I use with the puller is there on the 1st page with the coupling I machined up.
http://forums.corvetteforum.com/show....php?t=1236684
Last edited by gtr1999; Nov 22, 2006 at 08:31 AM.
Thread Starter
Racer
Joined: Aug 2005
Posts: 431
Likes: 0
From: Oita, Japan
I finally got one carrier bearing to pop off. The other one is even harder to get a grip on. I've got a few more things to try and if I can't get it, I'm going to find a better puller.

In the meantime, I'm cleaning up the crossmember. I have new bushings so I removed the old ones. They have metal tabs holding them in. I ground down the tabs a bit to make them easy to bend. I then straightened the tabs and used my press to press the bushings out.

I then spent a few hours with wire bursh, sandpaper, and paint. I still have to paint the other side and put the new bushings in.

In the meantime, I'm cleaning up the crossmember. I have new bushings so I removed the old ones. They have metal tabs holding them in. I ground down the tabs a bit to make them easy to bend. I then straightened the tabs and used my press to press the bushings out.
I then spent a few hours with wire bursh, sandpaper, and paint. I still have to paint the other side and put the new bushings in.
Thread Starter
Racer
Joined: Aug 2005
Posts: 431
Likes: 0
From: Oita, Japan
Happy Thanksgiving everyone! Sorry -- no pics tonight -- but I did get the other carrier bearing off  I think it was the turkey. Actually, I wrapped a small chain around the jaws of my puller so they couldn't slip off and I finally got it.
I also spent some time chasing threads and radiusing the case, carrier, and spider gears. If you've read Gary's thread, you'll know what that means.
I think it was the turkey. Actually, I wrapped a small chain around the jaws of my puller so they couldn't slip off and I finally got it.I also spent some time chasing threads and radiusing the case, carrier, and spider gears. If you've read Gary's thread, you'll know what that means.